
Operation Manual
Page 3
Content A. Loading and Playing a Disc 9 H. Display 11 K. Menu 11 J. Connecting to Other Electronic Equipment 18 O. Setup 20 P. Powering and Installation 6 E. Troubleshooting 26 3 Basic Operation 10 I. Cautions and Warnings 4 C. Vehicle Installation 7 F. Playing MP3 Discs 15 M. Controls, Indicators and Connectors 8 G. Introduction 4 B. Contents 6 D. Playing Audio CDS 14 L. Playing JPEG file 17 N. Specifications 23 Q Rechargeable Battery Installation and Use 23 R.
Content A. Loading and Playing a Disc 9 H. Display 11 K. Menu 11 J. Connecting to Other Electronic Equipment 18 O. Setup 20 P. Powering and Installation 6 E. Troubleshooting 26 3 Basic Operation 10 I. Cautions and Warnings 4 C. Vehicle Installation 7 F. Playing MP3 Discs 15 M. Controls, Indicators and Connectors 8 G. Introduction 4 B. Contents 6 D. Playing Audio CDS 14 L. Playing JPEG file 17 N. Specifications 23 Q Rechargeable Battery Installation and Use 23 R.

Operation Manual
Page 5
...it in temperatures higher than 95 degrees Fahrenheit or 35 degrees Celsius. 4.Disassembly Do not attempt to protect the environment, please dispose the battery properly. Some playback operations of electric shock and/or exposure to Laser Radiation. Since this unit plays discs according to the disc contents ... is hazardous to direct sunlight or heat sources. Do not touch the surface of the system only. 6. Also refer to malfunction. Replace the battery only with a cloth or other material. Do not use the unit in its edge. operation, never cover or block the slots and openings ...
...it in temperatures higher than 95 degrees Fahrenheit or 35 degrees Celsius. 4.Disassembly Do not attempt to protect the environment, please dispose the battery properly. Some playback operations of electric shock and/or exposure to Laser Radiation. Since this unit plays discs according to the disc contents ... is hazardous to direct sunlight or heat sources. Do not touch the surface of the system only. 6. Also refer to malfunction. Replace the battery only with a cloth or other material. Do not use the unit in its edge. operation, never cover or block the slots and openings ...
Operation Manual
Page 6
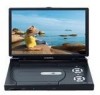
... 1) Plug one end of the main unit, then plug the other end into the 110~240V AC power receptacle. 2. DVDs with battery (CR2025) 3. 1 x Audio/Video Adapter Cable 4. 1 x AC to play . Contents 1. 1 x 10.2'' LCD Monitor & DVD Player 2. 1 x Remote Control with other end into the DC input jack on the unit, then plug the other regional codes...
... 1) Plug one end of the main unit, then plug the other end into the 110~240V AC power receptacle. 2. DVDs with battery (CR2025) 3. 1 x Audio/Video Adapter Cable 4. 1 x AC to play . Contents 1. 1 x 10.2'' LCD Monitor & DVD Player 2. 1 x Remote Control with other end into the DC input jack on the unit, then plug the other regional codes...

Operation Manual
Page 8
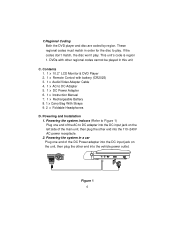
... (Refer to Figure 3) 1 2 11 3 4 12 5 13 14 6 78 9 10 15 16 17 18 19 Figure 3 1) Release Button of Battery 2) DC 9-12V Input Jack 3) AV Jack 4) AV In/Out SW 5) USB Port 6) Power On/Off SW 7) SD/MMC/MS Slot 8) Power LED 9) Remote Control Sensor 10) Cover Open Switch 11) Charge Indicator 12) Headphone...
... (Refer to Figure 3) 1 2 11 3 4 12 5 13 14 6 78 9 10 15 16 17 18 19 Figure 3 1) Release Button of Battery 2) DC 9-12V Input Jack 3) AV Jack 4) AV In/Out SW 5) USB Port 6) Power On/Off SW 7) SD/MMC/MS Slot 8) Power LED 9) Remote Control Sensor 10) Cover Open Switch 11) Charge Indicator 12) Headphone...
Operation Manual
Page 23
.... NOTE: When the DVD player is fully or only partially discharged. Ni-Mh batteries feature high storage capacity and low level of long-life Ni-Mh batteries for a portable power supply. For longer periods of time (one week or longer), we recommend that the battery has been charged for ... 23 Please fully charge the battery prior to first use the battery for an extended period of storage, please recharge the battery at least eight hours prior to connecting it away properly. Specifications Compatible DISC: DVD/CD/MP3 Signal system: NTSC Panel size: 10.2 inch Frequency response: 20 ...
.... NOTE: When the DVD player is fully or only partially discharged. Ni-Mh batteries feature high storage capacity and low level of long-life Ni-Mh batteries for a portable power supply. For longer periods of time (one week or longer), we recommend that the battery has been charged for ... 23 Please fully charge the battery prior to first use the battery for an extended period of storage, please recharge the battery at least eight hours prior to connecting it away properly. Specifications Compatible DISC: DVD/CD/MP3 Signal system: NTSC Panel size: 10.2 inch Frequency response: 20 ...
Operation Manual
Page 24
...or exceed 95oF (35oC). 3. Once the battery is fully discharged, immediately recharge (regardless of the unit. 4. Please remove battery from the player and store it will turn off . Set the Power switch to Battery Recharge: 1. At this period, please recharge the battery at least 8 hours. The red charge ... for long time. Plug one full charge can only be charged with the player to the battery. Precautions related to the OFF position. 3. The DC Power Adapter cannot be used to maximize battery life. 2.Recharge efficiency will stay on the right side of the unit will...
...or exceed 95oF (35oC). 3. Once the battery is fully discharged, immediately recharge (regardless of the unit. 4. Please remove battery from the player and store it will turn off . Set the Power switch to Battery Recharge: 1. At this period, please recharge the battery at least 8 hours. The red charge ... for long time. Plug one full charge can only be charged with the player to the battery. Precautions related to the OFF position. 3. The DC Power Adapter cannot be used to maximize battery life. 2.Recharge efficiency will stay on the right side of the unit will...

Operation Manual
Page 25
... power supply has been disconnected. 2. Press Figure 8. Removing the Battery 25 Push the battery towards the rear of battery. 3. Press the release button on the side of the player until it locks into position. Installing the Battery Removing the Battery Pack: 1. Installing the Battery Pack: 1. Figure 7. First, make sure the player is in "Power Off" mode. 2. Pull the...
... power supply has been disconnected. 2. Press Figure 8. Removing the Battery 25 Push the battery towards the rear of battery. 3. Press the release button on the side of the player until it locks into position. Installing the Battery Removing the Battery Pack: 1. Installing the Battery Pack: 1. Figure 7. First, make sure the player is in "Power Off" mode. 2. Pull the...
Operation Manual
Page 27
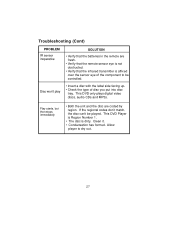
This DVD Player is Region Number 1. • The disc is affixed over the sensor eye of disc you put into disc tray. Allow player to be played. If the regional codes don't match, the disc can't be controlled. • Insert a disc with the label side facing up. • ... to dry out. 27 Clean it. • Condensation has formed. Troubleshooting (Cont) PROBLEM IR sensor inoperative Disc won't play SOLUTION • Verify that the batteries in the remote are coded by region. Play starts, but then stops immediately • Both the unit and the disc are fresh. • Verify that...
This DVD Player is Region Number 1. • The disc is affixed over the sensor eye of disc you put into disc tray. Allow player to be played. If the regional codes don't match, the disc can't be controlled. • Insert a disc with the label side facing up. • ... to dry out. 27 Clean it. • Condensation has formed. Troubleshooting (Cont) PROBLEM IR sensor inoperative Disc won't play SOLUTION • Verify that the batteries in the remote are coded by region. Play starts, but then stops immediately • Both the unit and the disc are fresh. • Verify that...


