User Guide
Page 2
... is intended for television reception, video or DVD play , the LCD panel or video monitor must be installed so that these features will not be visible, directly or indirectly, to the driver if the LCD panel or video monitor is used for home and other rights owners. Use of this copyright protection technology must be installed to the rear of the driver's seat where it will only...
... is intended for television reception, video or DVD play , the LCD panel or video monitor must be installed so that these features will not be visible, directly or indirectly, to the driver if the LCD panel or video monitor is used for home and other rights owners. Use of this copyright protection technology must be installed to the rear of the driver's seat where it will only...
User Guide
Page 3
Cautions and Warnings 4 C. Menu 12 J. Rechargeable Battery Installation and Use 23 Q. Playing MP3 Discs 16 M. Setup 20 O. Troubleshooting 26 Warranty 28 3 Dock for iPod and Playing Files Stored in Your iPOD Player.........10 I. Connecting to a TV or another monitor 18 N. Content A. Controls, Indicators, and Connectors 7 F. Basic Operation 9 H. Display 12 K. Specifications 23 P. Playing Audio CDS 15 L. Introduction 4 B. Contents 6 D. Powering and Installation 6 E. Loading and Playing a Disc 8 G.
Cautions and Warnings 4 C. Menu 12 J. Rechargeable Battery Installation and Use 23 Q. Playing MP3 Discs 16 M. Setup 20 O. Troubleshooting 26 Warranty 28 3 Dock for iPod and Playing Files Stored in Your iPOD Player.........10 I. Connecting to a TV or another monitor 18 N. Content A. Controls, Indicators, and Connectors 7 F. Basic Operation 9 H. Display 12 K. Specifications 23 P. Playing Audio CDS 15 L. Introduction 4 B. Contents 6 D. Powering and Installation 6 E. Loading and Playing a Disc 8 G.
User Guide
Page 4
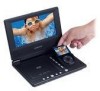
..., direct sunlight, excessive dust. The main features include a 8" Screen (16:9 Aspect Ratio) Liquid Crystal Display (LCD) monitor and a DVD player with a dock for quick and easy installation. The documentation will assist you move it from falling. Do not place anything heavy on until the moisture evaporates. 2. A. Please read the entire instruction manual supplied with SD/MMC, MS memory cards and USB memory devices...
..., direct sunlight, excessive dust. The main features include a 8" Screen (16:9 Aspect Ratio) Liquid Crystal Display (LCD) monitor and a DVD player with a dock for quick and easy installation. The documentation will assist you move it from falling. Do not place anything heavy on until the moisture evaporates. 2. A. Please read the entire instruction manual supplied with SD/MMC, MS memory cards and USB memory devices...
User Guide
Page 5
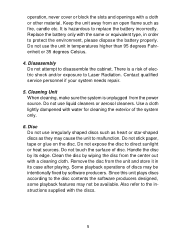
... direct sunlight or heat sources. Cleaning Unit When cleaning, make sure the system is unplugged from an open flame such as they may not be intentionally fixed by software producers. Remove the disc from the center out with a cleaning cloth. Disc Do not use irregularly shaped discs such as heart or star-shaped discs as fire, candle etc. Some playback operations of disc. operation...
... direct sunlight or heat sources. Cleaning Unit When cleaning, make sure the system is unplugged from an open flame such as they may not be intentionally fixed by software producers. Remove the disc from the center out with a cleaning cloth. Disc Do not use irregularly shaped discs such as heart or star-shaped discs as fire, candle etc. Some playback operations of disc. operation...
User Guide
Page 6
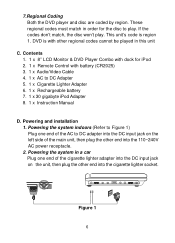
... & DVD Player Combo with dock for the disc to DC Adapter 5. 1 x Cigarette Lighter Adapter 6. 1 x Rechargeable battery 7. 1 x 30 gigabyte iPod Adapter 8. 1 x Instruction Manual D. These regional codes must match in order for iPod 2. 1 x Remote Control with other regional codes cannot be played in a car Plug one end of the main unit, then plug the other end into the 110~240V AC power receptacle. 2. This unit's code is with battery (CR2025) 3. 1 x Audio/Video Cable 4. 1 x AC to play .
... & DVD Player Combo with dock for the disc to DC Adapter 5. 1 x Cigarette Lighter Adapter 6. 1 x Rechargeable battery 7. 1 x 30 gigabyte iPod Adapter 8. 1 x Instruction Manual D. These regional codes must match in order for iPod 2. 1 x Remote Control with other regional codes cannot be played in a car Plug one end of the main unit, then plug the other end into the 110~240V AC power receptacle. 2. This unit's code is with battery (CR2025) 3. 1 x Audio/Video Cable 4. 1 x AC to play .
User Guide
Page 8
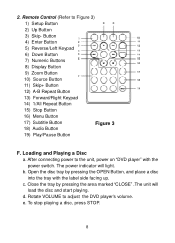
...Remote Control (Refer to adjust the DVD player's volume. c. Rotate VOLUME to Figure 3) 1) Setup Button 2) Up Button 3) Skip- Open the disc tray by pressing the area marked "CLOSE" .The unit will light. e. b. The power indicator will load the disc and start playing. 2. Button 4) Enter Button 5) Reverse/Left Keypad 6) Down Button 7) Numeric Buttons 8) Display Button 9) Zoom Button 10) Source Button 11) Skip+ Button 12) A-B Repeat Button 13) Forward/Right Keypad 14) 1/All Repeat Button 15) Stop Button 16) Menu Button 17) Subtitle Button 18) Audio Button...
...Remote Control (Refer to adjust the DVD player's volume. c. Rotate VOLUME to Figure 3) 1) Setup Button 2) Up Button 3) Skip- Open the disc tray by pressing the area marked "CLOSE" .The unit will light. e. b. The power indicator will load the disc and start playing. 2. Button 4) Enter Button 5) Reverse/Left Keypad 6) Down Button 7) Numeric Buttons 8) Display Button 9) Zoom Button 10) Source Button 11) Skip+ Button 12) A-B Repeat Button 13) Forward/Right Keypad 14) 1/All Repeat Button 15) Stop Button 16) Menu Button 17) Subtitle Button 18) Audio Button...
User Guide
Page 9
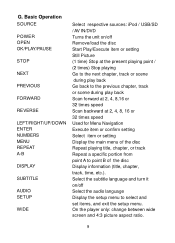
Basic Operation SOURCE POWER OPEN OK/PLAY/PAUSE STOP NEXT PREVIOUS FORWARD REVERSE LEFT/RIGHT/UP/DOWN ENTER NUMBERS MENU REPEAT A-B DISPLAY SUBTITLE AUDIO SETUP WIDE Select respective sources: iPod / USB/SD / AV IN/DVD Turns the unit on /off Remove/load the disc Start Play/Execute item or setting Still Picture (1 time) Stop at the present playing point / (2 times) Stop playing Go to the next chapter, track or scene during play back Go back to the previous chapter, track or...
Basic Operation SOURCE POWER OPEN OK/PLAY/PAUSE STOP NEXT PREVIOUS FORWARD REVERSE LEFT/RIGHT/UP/DOWN ENTER NUMBERS MENU REPEAT A-B DISPLAY SUBTITLE AUDIO SETUP WIDE Select respective sources: iPod / USB/SD / AV IN/DVD Turns the unit on /off Remove/load the disc Start Play/Execute item or setting Still Picture (1 time) Stop at the present playing point / (2 times) Stop playing Go to the next chapter, track or scene during play back Go back to the previous chapter, track or...
User Guide
Page 10
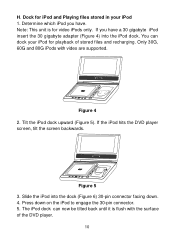
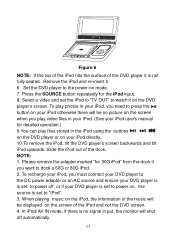
...flush with video are supported. If you have a 30 gigabyte iPod insert the 30 gigabyte adapter (Figure 4) into the dock (Figure 6) 30-pin connector facing down on the iPod to engage the 30-pin connector. 5. Figure 4 2. If the iPod hits the DVD player screen, tilt the screen backwards....video iPods only. Tilt the iPod dock upward (Figure 5). Determine which iPod you have . Only 30G, 60G and 80G iPods with the surface of stored files and recharging. You can now be tilted back until it is for iPod and Playing files stored in your iPod for playback of the DVD player...
...flush with video are supported. If you have a 30 gigabyte iPod insert the 30 gigabyte adapter (Figure 4) into the dock (Figure 6) 30-pin connector facing down on the iPod to engage the 30-pin connector. 5. Figure 4 2. If the iPod hits the DVD player screen, tilt the screen backwards....video iPods only. Tilt the iPod dock upward (Figure 5). Determine which iPod you have . Only 30G, 60G and 80G iPods with the surface of stored files and recharging. You can now be tilted back until it is for iPod and Playing files stored in your iPod for playback of the DVD player...
User Guide
Page 11
... iPod using the buttons on the DVD player or on the screen of the music will be no signal in your iPod. (See your iPod directly. 10.To remove the iPod, tilt the DVD player's screen backwards and tilt iPod upwards. Please remove the adapter marked "for 30G iPod" from the dock if you play video files in put, the monitor will be displayed on your iPod user's manual...
... iPod using the buttons on the DVD player or on the screen of the music will be no signal in your iPod. (See your iPod directly. 10.To remove the iPod, tilt the DVD player's screen backwards and tilt iPod upwards. Please remove the adapter marked "for 30G iPod" from the dock if you play video files in put, the monitor will be displayed on your iPod user's manual...
User Guide
Page 13
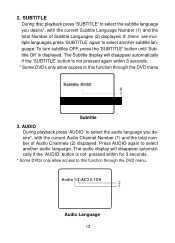
...not pressed within 3 seconds. * Some DVDs only allow access to select the audio language you desire*, with the current Audio Channel Number (1) and the total number of Subtitle Languages (2) displayed. Audio Language 13 The audio display will disappear automatically if the 'SUBTITLE' button is displayed. AUDIO During playback press 'AUDIO' to this function through the DVD menu. 2. SUBTITLE During disc playback press 'SUBTITLE' to this function through the DVD menu Subtitle 3. To turn subtitles OFF, press the 'SUBTITLE' button until 'Subtitle Off' is not pressed again...
...not pressed within 3 seconds. * Some DVDs only allow access to select the audio language you desire*, with the current Audio Channel Number (1) and the total number of Subtitle Languages (2) displayed. Audio Language 13 The audio display will disappear automatically if the 'SUBTITLE' button is displayed. AUDIO During playback press 'AUDIO' to this function through the DVD menu. 2. SUBTITLE During disc playback press 'SUBTITLE' to this function through the DVD menu Subtitle 3. To turn subtitles OFF, press the 'SUBTITLE' button until 'Subtitle Off' is not pressed again...
User Guide
Page 16
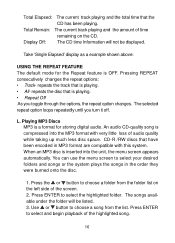
..., the repeat option changes. L. Press the or button to select and begin playback of audio quality while taking up much less disc space. Total Remain: The current track playing and the amount of time remaining on the left side of the screen. 2. Take 'Single Elapsed' display as a example shown above: USING THE REPEAT FEATURE The default mode for the Repeat feature is a format for storing digital audio. repeats the disc that...
..., the repeat option changes. L. Press the or button to select and begin playback of audio quality while taking up much less disc space. Total Remain: The current track playing and the amount of time remaining on the left side of the screen. 2. Take 'Single Elapsed' display as a example shown above: USING THE REPEAT FEATURE The default mode for the Repeat feature is a format for storing digital audio. repeats the disc that...
User Guide
Page 18
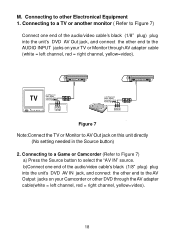
Figure 7 Note:Connect the TV or Monitor to select the "AV IN" source. b)Connect one end of the audio/video cable's black (1/8" plug) plug into the unit's DVD AV Out jack, and connect the other end to the AUDIO INPUT jacks on your Camcorder or other Electronical Equipment 1. Connecting to the AV Output jacks on this unit directly (No setting needed in the Source button) 2. Connecting to a Game or...
Figure 7 Note:Connect the TV or Monitor to select the "AV IN" source. b)Connect one end of the audio/video cable's black (1/8" plug) plug into the unit's DVD AV Out jack, and connect the other end to the AUDIO INPUT jacks on your Camcorder or other Electronical Equipment 1. Connecting to the AV Output jacks on this unit directly (No setting needed in the Source button) 2. Connecting to a Game or...
User Guide
Page 20
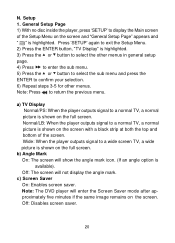
... the Setup Menu. 2) Press the ENTER button, "TV Display" is available). Note: Press to confirm your selection. 6) Repeat steps 3-5 for other menus. Note: The DVD player will enter the Screen Saver mode after approximately five minutes if the same image remains on the full screen. b) Angle Mark On: The screen will not display the angle mark. a) TV Display Normal/PS: When the player outputs signal to a wide screen...
... the Setup Menu. 2) Press the ENTER button, "TV Display" is available). Note: Press to confirm your selection. 6) Repeat steps 3-5 for other menus. Note: The DVD player will enter the Screen Saver mode after approximately five minutes if the same image remains on the full screen. b) Angle Mark On: The screen will not display the angle mark. a) TV Display Normal/PS: When the player outputs signal to a wide screen...
User Guide
Page 22
... submenu. These are recorded in the disc. Note: Press to confirm the pa- This password is the factory default. NOTE: The parental setting is 3308. Some discs can record this manual. e) Default Select 'Default' using the and button, then press RIGHT to enter the submenu. NOTE: The Default Password is not affected by the default reset function. Select the parental level you have selected your selection. 6) Repeat steps 3-5 for discs with lock-out function or multiple rating levels...
... submenu. These are recorded in the disc. Note: Press to confirm the pa- This password is the factory default. NOTE: The parental setting is 3308. Some discs can record this manual. e) Default Select 'Default' using the and button, then press RIGHT to enter the submenu. NOTE: The Default Password is not affected by the default reset function. Select the parental level you have selected your selection. 6) Repeat steps 3-5 for discs with lock-out function or multiple rating levels...
User Guide
Page 23
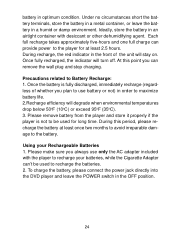
... battery for a portable power supply. If you first fully charge the battery and store it to the DVD player. Li-polymer batteries feature high storage capacity and low level of storage, please recharge the battery at least eight hours prior to connecting it away properly. O. Specifications Compatible DISC: DVD/CD/MP3 Signal system: NTSC Panel size: 8 inch Frequency response: 20 Hz to use . Rechargeable Battery Installation and Use The player utilizes a set...
... battery for a portable power supply. If you first fully charge the battery and store it to the DVD player. Li-polymer batteries feature high storage capacity and low level of storage, please recharge the battery at least eight hours prior to connecting it away properly. O. Specifications Compatible DISC: DVD/CD/MP3 Signal system: NTSC Panel size: 8 inch Frequency response: 20 Hz to use . Rechargeable Battery Installation and Use The player utilizes a set...
User Guide
Page 24
... Battery Recharge: 1. battery in the OFF position. 24 Please remove battery from the player and store it properly if the player is fully discharged, immediately recharge (regardless of the unit will turn off. To charge the battery, please connect the power jack directly into the DVD player and leave the POWER switch in optimum condition. Ideally, store the battery in the front of whether you can 't be used...
... Battery Recharge: 1. battery in the OFF position. 24 Please remove battery from the player and store it properly if the player is fully discharged, immediately recharge (regardless of the unit will turn off. To charge the battery, please connect the power jack directly into the DVD player and leave the POWER switch in optimum condition. Ideally, store the battery in the front of whether you can 't be used...
User Guide
Page 25
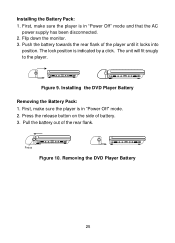
... to the player. Press the release button on the side of the player until it locks into position. The lock position is in "Power Off" mode and that the AC power supply has been disconnected. 2. Press Figure 10. Push the battery towards the rear flank of battery. 3. First, make sure the player is in "Power Off" mode. 2. Installing the Battery Pack: 1. Removing the DVD Player Battery 25 First, make sure the player is...
... to the player. Press the release button on the side of the player until it locks into position. The lock position is in "Power Off" mode and that the AC power supply has been disconnected. 2. Press Figure 10. Push the battery towards the rear flank of battery. 3. First, make sure the player is in "Power Off" mode. 2. Installing the Battery Pack: 1. Removing the DVD Player Battery 25 First, make sure the player is...
User Guide
Page 26
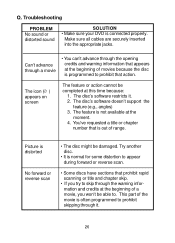
... rapid scanning or title and chapter skip. • If you won't be able to prohibit skipping through the opening credits and warning information that is distorted No forward or reverse scan • The disc might be completed at the moment. 4. Try another disc. • It is often programmed to . Troubleshooting PROBLEM No sound or distorted sound SOLUTION • Make sure your DVD is connected...
... rapid scanning or title and chapter skip. • If you won't be able to prohibit skipping through the opening credits and warning information that is distorted No forward or reverse scan • The disc might be completed at the moment. 4. Try another disc. • It is often programmed to . Troubleshooting PROBLEM No sound or distorted sound SOLUTION • Make sure your DVD is connected...
User Guide
Page 27
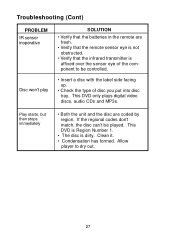
.... • Condensation has formed. If the regional codes don't match, the disc can't be controlled. • Insert a disc with the label side facing up. • Check the type of the component to dry out. 27 Allow player to be played. Troubleshooting (Cont) PROBLEM IR sensor inoperative Disc won't play SOLUTION • Verify that the batteries in the remote are coded by region. This DVD only plays digital video discs, audio CDs and MP3s.
.... • Condensation has formed. If the regional codes don't match, the disc can't be controlled. • Insert a disc with the label side facing up. • Check the type of the component to dry out. 27 Allow player to be played. Troubleshooting (Cont) PROBLEM IR sensor inoperative Disc won't play SOLUTION • Verify that the batteries in the remote are coded by region. This DVD only plays digital video discs, audio CDs and MP3s.
User Guide
Page 28
...'s option) without charge for installation, removal or reinstallation of the product, or to damage to digital memory/media devices, gaming devices, discs, speakers, accessories, or electrical systems. This Warranty does not apply to any liability other than expressed herein in connection with the sale of this Warranty, the product is to be repaired or replaced with proof of warranty coverage (e.g. This Warranty does not...
...'s option) without charge for installation, removal or reinstallation of the product, or to damage to digital memory/media devices, gaming devices, discs, speakers, accessories, or electrical systems. This Warranty does not apply to any liability other than expressed herein in connection with the sale of this Warranty, the product is to be repaired or replaced with proof of warranty coverage (e.g. This Warranty does not...


