
User Manual
Page 2
DVD and Disc Information 7 C. Powering and Installation 8 E. Basic Operation 12 I. Menu ...13 J. Playing Audio CDs 18 L. Connecting to Other Electronic Equipment 20 N. Introduction 7 B. Vehicle Installation 9 F. Rechargeable Built-in Battery Use 29 Q. Contents 8 D. Specifications 29 P. Table of Contents A. Troubleshooting 31 2 Display...13 K. Setup ...21 O. Loading and Playing a Disc 12 H. Playing JPEG Files 19 M. Controls, Indicators, and Connectors 10 G.
DVD and Disc Information 7 C. Powering and Installation 8 E. Basic Operation 12 I. Menu ...13 J. Playing Audio CDs 18 L. Connecting to Other Electronic Equipment 20 N. Introduction 7 B. Vehicle Installation 9 F. Rechargeable Built-in Battery Use 29 Q. Contents 8 D. Specifications 29 P. Table of Contents A. Troubleshooting 31 2 Display...13 K. Setup ...21 O. Loading and Playing a Disc 12 H. Playing JPEG Files 19 M. Controls, Indicators, and Connectors 10 G.

User Manual
Page 3
... into your outlet, consult an electrician for replacement of time. l Only use . l Unplug this DVD Player during handling and use the DVD Player near any heat sources such as with any way, such as power-supply cord or plug is provided for long periods of the obsolete outlet. l Follow all servicing to rain or moisture, does not operate normally, or has been dropped. 3 l Do...
... into your outlet, consult an electrician for replacement of time. l Only use . l Unplug this DVD Player during handling and use the DVD Player near any heat sources such as with any way, such as power-supply cord or plug is provided for long periods of the obsolete outlet. l Follow all servicing to rain or moisture, does not operate normally, or has been dropped. 3 l Do...

User Manual
Page 4
... to qualified service personnel. l Warning: Your DVD player contains a battery and charging system which is incorrectly replaced. Additional Safety Information l An LCD panel or video monitor used for television reception, video or DVD play that operates when the vehicle is in gear or when the parking brake is not applied must be installed to the rear of the driver's seat where it will not be visible, directly or indirectly...
... to qualified service personnel. l Warning: Your DVD player contains a battery and charging system which is incorrectly replaced. Additional Safety Information l An LCD panel or video monitor used for television reception, video or DVD play that operates when the vehicle is in gear or when the parking brake is not applied must be installed to the rear of the driver's seat where it will not be visible, directly or indirectly...

User Manual
Page 5
... for a Class B digital device, pursuant to radio communications. Operation is no guarantee that to operate this equipment does cause harmful interference to radio or television reception, which the receiver is encouraged to try to provide reasonable protection against harmful interference in a residential installation. This equipment generates, uses and can be determined by manufacturer could void the user's authority to...
... for a Class B digital device, pursuant to radio communications. Operation is no guarantee that to operate this equipment does cause harmful interference to radio or television reception, which the receiver is encouraged to try to provide reasonable protection against harmful interference in a residential installation. This equipment generates, uses and can be determined by manufacturer could void the user's authority to...

User Manual
Page 6
..., NY 11788 Service Information This product should be serviced only by those specially trained in this user manual. In the space below, record the date and place of Purchase Serial No. 6 In the event that service should be required, you may need both the model number and the serial number. Date of Purchase Place of purchase, and the serial number: Model No. For instructions on how to...
..., NY 11788 Service Information This product should be serviced only by those specially trained in this user manual. In the space below, record the date and place of Purchase Serial No. 6 In the event that service should be required, you may need both the model number and the serial number. Date of Purchase Place of purchase, and the serial number: Model No. For instructions on how to...

User Manual
Page 7
... Crystal Display (LCD) monitor and a DVD player. Use of 1 or ALL (for use irregularly shaped discs such as heart or starshaped discs as hot air ducts. S. Discs - Do not expose the disc to direct sunlight or heat sources such as they may cause the unit to the instructions supplied with a cleaning cloth. A. Handle the disc by Macrovision Corporation. B. The regional code for home and other rights owners. Remove the disc from...
... Crystal Display (LCD) monitor and a DVD player. Use of 1 or ALL (for use irregularly shaped discs such as heart or starshaped discs as hot air ducts. S. Discs - Do not expose the disc to direct sunlight or heat sources such as they may cause the unit to the instructions supplied with a cleaning cloth. A. Handle the disc by Macrovision Corporation. B. The regional code for home and other rights owners. Remove the disc from...

User Manual
Page 8
.... If the player is powered off, the charge indicator will turn red indicating the battery is off . Contents 1. 1 x 9'' Portable DVD Player with built in a Car (Refer to DC Power Adapter 3. 1 x Automotive Power Adapter 4. 1 x Carrying Bag** 5. 2 x Foldable Headphones** 6. 1 x Instruction Manual 7. 1 x Product Registration Card 8. 1 x eMusic Card * D9104 & D9104PK can operate on the unit, then plug the other end into the 100~240V AC power outlet. D9104/D9104PK needs five hours to DC power adapter wall plug. Once the...
.... If the player is powered off, the charge indicator will turn red indicating the battery is off . Contents 1. 1 x 9'' Portable DVD Player with built in a Car (Refer to DC Power Adapter 3. 1 x Automotive Power Adapter 4. 1 x Carrying Bag** 5. 2 x Foldable Headphones** 6. 1 x Instruction Manual 7. 1 x Product Registration Card 8. 1 x eMusic Card * D9104 & D9104PK can operate on the unit, then plug the other end into the 100~240V AC power outlet. D9104/D9104PK needs five hours to DC power adapter wall plug. Once the...
User Manual
Page 11
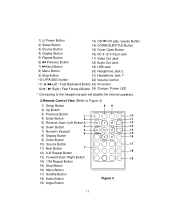
... Button 4) Display Button 5) Repeat Button 14) DOWN/SUBTITLE Button 15) Cover Open Button 16) DC 9-12 V Input Jack 17) Video Out Jack 6) Previous Button 18) Audio Out Jack 7) Next Button 19) USB Jack 8) Menu Button 20) Headphone Jack 2 9) Stop Button 21) Headphone Jack 1* 10) UP/AUDIO button 22) Volume Control 11) / Left / Fast Backward Button 23) IR sensor 12) / Right / Fast Forward Button 24) Charge / Power LED * Connecting to the headphone jack will disable the internal speakers. 2.Remote Control View...
... Button 4) Display Button 5) Repeat Button 14) DOWN/SUBTITLE Button 15) Cover Open Button 16) DC 9-12 V Input Jack 17) Video Out Jack 6) Previous Button 18) Audio Out Jack 7) Next Button 19) USB Jack 8) Menu Button 20) Headphone Jack 2 9) Stop Button 21) Headphone Jack 1* 10) UP/AUDIO button 22) Volume Control 11) / Left / Fast Backward Button 23) IR sensor 12) / Right / Fast Forward Button 24) Charge / Power LED * Connecting to the headphone jack will disable the internal speakers. 2.Remote Control View...

User Manual
Page 12
... subtitle language or turn it on Remove / load the disc Start Play / Execute item or setting Press to pause play and again to restart play Press once to adjust the DVD player's volume. c. To turn green. Basic Operation POWER OPEN PLAY PAUSE STOP NEXT PREVIOUS LEFT/RIGHT/UP/DOWN OK MENU REPEAT DISPLAY SUBTITLE AUDIO ZOOM SETUP Turn the unit on / off the DVD player, press the button. Loading and Playing a Disc a. e. f. b. Close the tray cover. Rotate VOLUME control to stop playing a disc, press the Stop button. Open the disc tray...
... subtitle language or turn it on Remove / load the disc Start Play / Execute item or setting Press to pause play and again to restart play Press once to adjust the DVD player's volume. c. To turn green. Basic Operation POWER OPEN PLAY PAUSE STOP NEXT PREVIOUS LEFT/RIGHT/UP/DOWN OK MENU REPEAT DISPLAY SUBTITLE AUDIO ZOOM SETUP Turn the unit on / off the DVD player, press the button. Loading and Playing a Disc a. e. f. b. Close the tray cover. Rotate VOLUME control to stop playing a disc, press the Stop button. Open the disc tray...
User Manual
Page 16
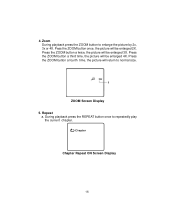
Zoom During playback press the ZOOM button to repeatedly play the current chapter. Pess the ZOOM button once, the picture will be enlarged 2X. During playback press the REPEAT button once to enlarge the picture by 2x, 3x or 4X. 4. ZOOM Screen Display 5. Press the ZOOM button a fourth time, the picture will be enlarged 4X. Chapter Repeat ON Screen Display 16 Repeat a. Press the ZOOM button a twice, the picture will be enlarged 3X. Press the ZOOM button a third time, the picture will return to normal size.
Zoom During playback press the ZOOM button to repeatedly play the current chapter. Pess the ZOOM button once, the picture will be enlarged 2X. During playback press the REPEAT button once to enlarge the picture by 2x, 3x or 4X. 4. ZOOM Screen Display 5. Press the ZOOM button a fourth time, the picture will be enlarged 4X. Chapter Repeat ON Screen Display 16 Repeat a. Press the ZOOM button a twice, the picture will be enlarged 3X. Press the ZOOM button a third time, the picture will return to normal size.

User Manual
Page 20
...) to the Left and Right channel audio input jacks on the right side of the audio cable (not supplied) into either Headphone jack 1 or Headphone jack 2 on your TV or Monitor. (Yellow = video) USB DC 9-1 2V AUDIO OUT VIDEO OUT NOT SUPPLIED Figure 4 2. Connect one end (1/8" stereo plug) of the DVD Player. (Refer to the VIDEO INPUT jack on your TV or monitor. (White = left audio channel, Red = right audio channel) b. Connecting to Figure 4) a. M.
...) to the Left and Right channel audio input jacks on the right side of the audio cable (not supplied) into either Headphone jack 1 or Headphone jack 2 on your TV or Monitor. (Yellow = video) USB DC 9-1 2V AUDIO OUT VIDEO OUT NOT SUPPLIED Figure 4 2. Connect one end (1/8" stereo plug) of the DVD Player. (Refer to the VIDEO INPUT jack on your TV or monitor. (White = left audio channel, Red = right audio channel) b. Connecting to Figure 4) a. M.
User Manual
Page 21
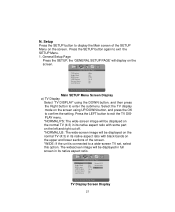
... the setting. TV Display Angle Mark OSD Lang LCD Display Screen Saver Last Memory Wide O ff ENG 16:9 On On G o To G eneral S etup P age Main SETUP Menu Screen Display a) TV Display Select 'TV DISPLAY' using UP/DOWN button, and press the OK to exit the SETUP Menu. 1. N. Press the LEFT button to exit the TV DISPLAY menu. *NORMAL/PS: The wide-screen image will display on the screen. Setup Press the SETUP button to display...
... the setting. TV Display Angle Mark OSD Lang LCD Display Screen Saver Last Memory Wide O ff ENG 16:9 On On G o To G eneral S etup P age Main SETUP Menu Screen Display a) TV Display Select 'TV DISPLAY' using UP/DOWN button, and press the OK to exit the SETUP Menu. 1. N. Press the LEFT button to exit the TV DISPLAY menu. *NORMAL/PS: The wide-screen image will display on the screen. Setup Press the SETUP button to display...

User Manual
Page 23
... using the UP/DOWN buttons and then press the OK button to confirm the setting. Press the LEFT button to return. ..General S etup Page .. TV Display Wide Angle Mark O ff OSD Lang LCD Display ENG 16:9 Screen Saver On Last Memory On On O ff Set Last Memory Last Memory Screen Display *ON:During playback or in the pause mode, if you open the disc tray and then close...
... using the UP/DOWN buttons and then press the OK button to confirm the setting. Press the LEFT button to return. ..General S etup Page .. TV Display Wide Angle Mark O ff OSD Lang LCD Display ENG 16:9 Screen Saver On Last Memory On On O ff Set Last Memory Last Memory Screen Display *ON:During playback or in the pause mode, if you open the disc tray and then close...
User Manual
Page 24
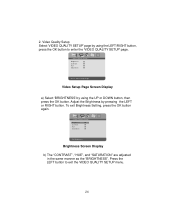
To exit Brightness Setting, press the OK button again. ..Video Quality Setup.. Adjust the Brightness by using the LEFT/RIGHT button, press the OK button to exit the VIDEO QUALITY SETUP menu. 24 Video Quality Setup Select 'VIDEO QUALITY SETUP' page by using the UP or DOWN button, then press the OK button. B r ig h t ne s s 00 C on t ra s t 00 H ue 00 Saturation 00 Set Brightness Brightness Screen Display b) The "CONTRAST", "HUE", and...
To exit Brightness Setting, press the OK button again. ..Video Quality Setup.. Adjust the Brightness by using the LEFT/RIGHT button, press the OK button to exit the VIDEO QUALITY SETUP menu. 24 Video Quality Setup Select 'VIDEO QUALITY SETUP' page by using the UP or DOWN button, then press the OK button. B r ig h t ne s s 00 C on t ra s t 00 H ue 00 Saturation 00 Set Brightness Brightness Screen Display b) The "CONTRAST", "HUE", and...

User Manual
Page 25
... set the parental level and change . Password C ha n g e Change Password Password Setup Page Screen Display Press the OK button twice to confirm the change the password, you have selected your own password and changed it from this default password in another area and delete it . Press the OK button to enter the PASSWORD CHANGE PAGE. 3. Password Setup Select 'PASSWORD SETUP PAGE'( ) using the default password to enter the submenu. ..Password Setup Page .. This password is 3308. Some discs can record this manual. Input the Old Password...
... set the parental level and change . Password C ha n g e Change Password Password Setup Page Screen Display Press the OK button twice to confirm the change the password, you have selected your own password and changed it from this default password in another area and delete it . Press the OK button to enter the PASSWORD CHANGE PAGE. 3. Password Setup Select 'PASSWORD SETUP PAGE'( ) using the default password to enter the submenu. ..Password Setup Page .. This password is 3308. Some discs can record this manual. Input the Old Password...
User Manual
Page 28
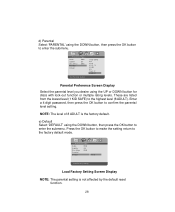
... Factory Setting Screen Display NOTE: The parental setting is the factory default. Audio Subtitle Disc Menu Parental ENG O ff ENG D ef a u lt Set Parental Control 1 KID SAFE 2G 3 PG 4 PG - 13 5 PGR 6R 7 NC -17 8 A DU LT Parental Preference Screen Display Select the parental level you desire using the DOWN button, then press the OK button to enter the submenu. ..Preference Page .. Press the OK button to make the setting return to confirm the parental level setting. Enter a 4 digit password...
... Factory Setting Screen Display NOTE: The parental setting is the factory default. Audio Subtitle Disc Menu Parental ENG O ff ENG D ef a u lt Set Parental Control 1 KID SAFE 2G 3 PG 4 PG - 13 5 PGR 6R 7 NC -17 8 A DU LT Parental Preference Screen Display Select the parental level you desire using the DOWN button, then press the OK button to enter the submenu. ..Preference Page .. Press the OK button to make the setting return to confirm the parental level setting. Enter a 4 digit password...

User Manual
Page 30
... may remove the wall plug and stop charging. Using and Maintaining Your Rechargeable Batteries 1. Please make sure you may result. 30 Do not leave the DVD player in order to Battery Recharge 1. At this point you always use battery or not) in a hot automobile or temperatures exceeding 122oF (50oC). To charge the battery, please connect the power jack directly into the DVD Player and leave it connected until...
... may remove the wall plug and stop charging. Using and Maintaining Your Rechargeable Batteries 1. Please make sure you may result. 30 Do not leave the DVD player in order to Battery Recharge 1. At this point you always use battery or not) in a hot automobile or temperatures exceeding 122oF (50oC). To charge the battery, please connect the power jack directly into the DVD Player and leave it connected until...

User Manual
Page 31
Troubleshooting PROBLEM No sound or distorted sound SOLUTION • Make sure the DVD player is often programmed to appear during forward or reverse scan. No forward or reverse scan • Some discs have sections that is programmed to skip through the opening credits and warning information that action. This part of movies because the disc is out of range. • The disc might be completed at the...
Troubleshooting PROBLEM No sound or distorted sound SOLUTION • Make sure the DVD player is often programmed to appear during forward or reverse scan. No forward or reverse scan • Some discs have sections that is programmed to skip through the opening credits and warning information that action. This part of movies because the disc is out of range. • The disc might be completed at the...

User Manual
Page 32
... 1 (The U.S.,U.S. Troubleshooting (Cont) PROBLEM SOLUTION Disc won't play • Check the type of general reference only and not as the final reference on DVD discs. This DVD player only plays DVDs and audio CDs. Only DVD discs that the remote sensor eye is dirty. Replace disc. • Verify that the batteries in other languages. 32 The descriptions and characteristics in this owner's manual are fresh. • Verify that have regional codes of 1 or...
... 1 (The U.S.,U.S. Troubleshooting (Cont) PROBLEM SOLUTION Disc won't play • Check the type of general reference only and not as the final reference on DVD discs. This DVD player only plays DVDs and audio CDs. Only DVD discs that the remote sensor eye is dirty. Replace disc. • Verify that the batteries in other languages. 32 The descriptions and characteristics in this owner's manual are fresh. • Verify that have regional codes of 1 or...
User Manual
Page 33
...installation, removal or reinstallation of the product, or to damage to digital memory/media devices, gaming devices, discs, speakers, accessories, or electrical systems. This Warranty does not apply to any product or part thereof which vary from the date of original purchase, such defect(s) will be delivered with reconditioned product (at the address...Company, has suffered or been damaged through alteration, improper installation, mishandling, misuse, neglect, accident, or by removal or defacement of the factory serial number/ bar code label(s). IN NO CASE SHALL THE COMPANY BE LIABLE FOR...
...installation, removal or reinstallation of the product, or to damage to digital memory/media devices, gaming devices, discs, speakers, accessories, or electrical systems. This Warranty does not apply to any product or part thereof which vary from the date of original purchase, such defect(s) will be delivered with reconditioned product (at the address...Company, has suffered or been damaged through alteration, improper installation, mishandling, misuse, neglect, accident, or by removal or defacement of the factory serial number/ bar code label(s). IN NO CASE SHALL THE COMPANY BE LIABLE FOR...


