

User Guide
Page 2
Photo Mode Selection 23 2. General Setup - General Setup - Clock Display 26 Technical Data 27 Warranty 28 2 DPF710K Time/Date Setting 24 3. General Setup - Alarm Setting 25 4. Table of Contents Important Safety Instructions 3 Introduction 4 Product Features 5 What's in the Box 6 Installation 7 homebase Refrigerator Installation 7 homebase Countertop Installation 8 homebase Wall Mount Installation Using the Wall Mount Bracket 9 homebase... 12 Accessory Placement 13 Operating the Homebase 14 Preliminary Connections 14 Connecting the Power...
Photo Mode Selection 23 2. General Setup - General Setup - Clock Display 26 Technical Data 27 Warranty 28 2 DPF710K Time/Date Setting 24 3. General Setup - Alarm Setting 25 4. Table of Contents Important Safety Instructions 3 Introduction 4 Product Features 5 What's in the Box 6 Installation 7 homebase Refrigerator Installation 7 homebase Countertop Installation 8 homebase Wall Mount Installation Using the Wall Mount Bracket 9 homebase... 12 Accessory Placement 13 Operating the Homebase 14 Preliminary Connections 14 Connecting the Power...
User Guide
Page 4
Introduction Your homebase allows you to: Display your digital photos from its internal memory, a memory card, or USB memory devices Record and retrieve audio messages Use the calendar to set audio and/or event reminders Display time and date Use a timer, set an alarm Leave a written message on the front of the unit or the Post-it ® pad. 4 DPF710K
Introduction Your homebase allows you to: Display your digital photos from its internal memory, a memory card, or USB memory devices Record and retrieve audio messages Use the calendar to set audio and/or event reminders Display time and date Use a timer, set an alarm Leave a written message on the front of the unit or the Post-it ® pad. 4 DPF710K
User Guide
Page 6
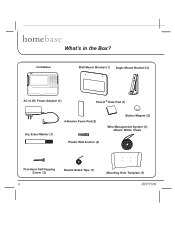
homebase Wall Mount Bracket (1) Angle Mount Bracket (2) AC to DC Power Adapter (1) Post-It ® Note Pad (1) Dry Erase Marker (1) Adhesive Foam Pad (2) Button Magnet (2) Wire Management System (3) (Black, White, Clear) Plastic Wall Anchor (2) Flat-Head Self-Tapping Screw (2) Double-Sided Tape (1) 6 Mounting Hole Template (1) DPF710K What's in the Box?
homebase Wall Mount Bracket (1) Angle Mount Bracket (2) AC to DC Power Adapter (1) Post-It ® Note Pad (1) Dry Erase Marker (1) Adhesive Foam Pad (2) Button Magnet (2) Wire Management System (3) (Black, White, Clear) Plastic Wall Anchor (2) Flat-Head Self-Tapping Screw (2) Double-Sided Tape (1) 6 Mounting Hole Template (1) DPF710K What's in the Box?
User Guide
Page 7
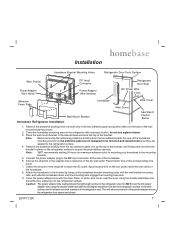
... the power adapter wire as the adhesive pads are applied to be sure of the wall mount bracket as shown. 2. Installation homebase Bracket Mounting Holes Refrigerator Door Front Surface Wire Post(s) Power Adapter Wire Notch DC Input Connector Power Adapter Wire Notches Refrigerator Door ... Below 1. Note: Before removing the remaining protective backing from the two adhesive pads, line up the homebase bracket mounting holes with the clear, black or white wire cover; DPF710K 7 seal the cover using the double-sided tape after the 90 degree transition from one inch rearward ...
... the power adapter wire as the adhesive pads are applied to be sure of the wall mount bracket as shown. 2. Installation homebase Bracket Mounting Holes Refrigerator Door Front Surface Wire Post(s) Power Adapter Wire Notch DC Input Connector Power Adapter Wire Notches Refrigerator Door ... Below 1. Note: Before removing the remaining protective backing from the two adhesive pads, line up the homebase bracket mounting holes with the clear, black or white wire cover; DPF710K 7 seal the cover using the double-sided tape after the 90 degree transition from one inch rearward ...

User Guide
Page 8
...; Push each angle mount bracket to the homebase by lining up the individual angle mount bracket upper mounting tab with the associated homebase mounting hole. 6. Place the DC wire in the desired location. 8 DPF710K Check the amount of the homebase. 3. when the bottom of the angle ...bracket contacts the homebase, the tab on the bottom of the homebase. 5. Find a suitable location on the...
...; Push each angle mount bracket to the homebase by lining up the individual angle mount bracket upper mounting tab with the associated homebase mounting hole. 6. Place the DC wire in the desired location. 8 DPF710K Check the amount of the homebase. 3. when the bottom of the angle ...bracket contacts the homebase, the tab on the bottom of the homebase. 5. Find a suitable location on the...

User Guide
Page 9
... flat-head screws and secure the wall bracket to the bracket by lining up the homebase bracket mounting holes with the wall surface . Check the amount of the two upper holes. 2. Attach the homebase to the wall. 4. DPF710K 9 Align the wall bracket with the clear, black or white wire cover; Connect the power...
... flat-head screws and secure the wall bracket to the bracket by lining up the homebase bracket mounting holes with the wall surface . Check the amount of the two upper holes. 2. Attach the homebase to the wall. 4. DPF710K 9 Align the wall bracket with the clear, black or white wire cover; Connect the power...

User Guide
Page 10
...or wall anchors; Mount the brackets to the AC wall outlet. Align each bracket and secure the bracket to the wall surface. 10 DPF710K Choose the direction of the adapter wire in the corresponding wire notch. 6. Place the DC wire in reference to the wall surface as ... Angle Mount Bracket Mounting Tabs Drill 1/4" Hole (2 Places) Wall Surface Flat-Head Self-Tapping Screw (2) Angle Mount Bracket (2) Mounting Hole Template homebase Wall Mount Installation Using the Angle Mount Brackets Note: Foam adhesive pads are not recommended when mounting the angle mount brackets to the DC input...
...or wall anchors; Mount the brackets to the AC wall outlet. Align each bracket and secure the bracket to the wall surface. 10 DPF710K Choose the direction of the adapter wire in the corresponding wire notch. 6. Place the DC wire in reference to the wall surface as ... Angle Mount Bracket Mounting Tabs Drill 1/4" Hole (2 Places) Wall Surface Flat-Head Self-Tapping Screw (2) Angle Mount Bracket (2) Mounting Hole Template homebase Wall Mount Installation Using the Angle Mount Brackets Note: Foam adhesive pads are not recommended when mounting the angle mount brackets to the DC input...
User Guide
Page 11
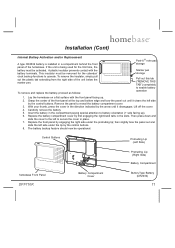
... battery compartment cover. 3. With your thumb, press the cover in the slots. Control Buttons Protruding Lip (Left Side) Protruding Lip (Right Side) Battery Compartment homebase Front Panel DPF710K Battery Compartment Cover Button-Type Battery (CR2032) 11 Carefully remove the battery. 5. Replace the battery compartment cover by first engaging the right-hand tabs...
... battery compartment cover. 3. With your thumb, press the cover in the slots. Control Buttons Protruding Lip (Left Side) Protruding Lip (Right Side) Battery Compartment homebase Front Panel DPF710K Battery Compartment Cover Button-Type Battery (CR2032) 11 Carefully remove the battery. 5. Replace the battery compartment cover by first engaging the right-hand tabs...

User Guide
Page 13
Accessory Placement Note Pad Storage Receptacle Post-It® Note Pad homebase DPF710K Marker Storage Receptacle Dry Erase Marker 13
Accessory Placement Note Pad Storage Receptacle Post-It® Note Pad homebase DPF710K Marker Storage Receptacle Dry Erase Marker 13
User Guide
Page 14
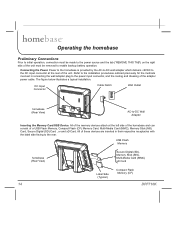
... +9VDC to the DC input connector at the left side of the homebase and can consist of a USB Flash Memory, Compact Flash (CF) Memory Card, Multi-Media Card (MMC), Memory Stick (MS) Card, Secure Digital (SD) Card , or and xD Card. Refer to the installation ... of the unit. USB Flash Memory homebase (Rear View) Secure Digital (SD), Memory Stick (MS), Multi-Media Card (MMC) xD Card Label Side (Typical) Compact Flash Memory (CF) 14 DPF710K The figure below illustrates a typical installation. Connecting the Power. Operating the homebase Preliminary Connections Prior to initial operation,...
... +9VDC to the DC input connector at the left side of the homebase and can consist of a USB Flash Memory, Compact Flash (CF) Memory Card, Multi-Media Card (MMC), Memory Stick (MS) Card, Secure Digital (SD) Card , or and xD Card. Refer to the installation ... of the unit. USB Flash Memory homebase (Rear View) Secure Digital (SD), Memory Stick (MS), Multi-Media Card (MMC) xD Card Label Side (Typical) Compact Flash Memory (CF) 14 DPF710K The figure below illustrates a typical installation. Connecting the Power. Operating the homebase Preliminary Connections Prior to initial operation,...
User Guide
Page 15
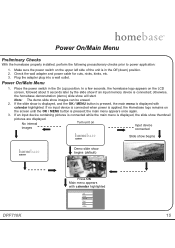
...timer photo setting DPF710K 15 Power On/Main Menu 1. If no input device is connected when power is applied, the Homebase logo...OK Main menu appears with calendar highlighted. In a few seconds, the homebase logo appears on the screen until the OK / MENU button is in... unit is pressed; Power On/Main Menu Preliminary Checks With the homebase properly installed, perform the following precautionary checks prior to power application:..., etc. 3. Note: The demo slide show will start. otherwise, the homebase demonstration (demo) slide show images can be erased. 2. Place the power ...
...timer photo setting DPF710K 15 Power On/Main Menu 1. If no input device is connected when power is applied, the Homebase logo...OK Main menu appears with calendar highlighted. In a few seconds, the homebase logo appears on the screen until the OK / MENU button is in... unit is pressed; Power On/Main Menu Preliminary Checks With the homebase properly installed, perform the following precautionary checks prior to power application:..., etc. 3. Note: The demo slide show will start. otherwise, the homebase demonstration (demo) slide show images can be erased. 2. Place the power ...

User Guide
Page 16
ok button stop highlight record using the up/down buttons ( / ) exit memo calendar timer photo settings Or press the memo button Highlight play /erase/ keep/keep / exit record again cancel Highlight the desired memo and press OK; the memo list ... ( ) to highlight desired function, e.g., review, keep / exit, record again, cancel review keep / exit record again cancel Highlight keep / exit and press OK to homebase screen or slide show DPF710K the memo for: LED now lights exit play / erase erase all recording... Memo Feature Highlight MEMO in memory; exit record play memo 1 (00...
ok button stop highlight record using the up/down buttons ( / ) exit memo calendar timer photo settings Or press the memo button Highlight play /erase/ keep/keep / exit record again cancel Highlight the desired memo and press OK; the memo list ... ( ) to highlight desired function, e.g., review, keep / exit, record again, cancel review keep / exit record again cancel Highlight keep / exit and press OK to homebase screen or slide show DPF710K the memo for: LED now lights exit play / erase erase all recording... Memo Feature Highlight MEMO in memory; exit record play memo 1 (00...
