
Owners Manual
Page 2
...qualified technician. 2 PLV1615CS1- The exclamation point within the product's enclosure that to part 15 of important operating, maintenance and servicing instructions in places which can be determined by ... dusty, or humid. • Do not restrict the air flow of this user's manual. The symbol for Class II (Double lnsulation) PLACEMENT INFORMATION • Do not use this..., pursuant to which the receiver is connected. • Consult the dealer or an experienced radio/TV technician for a long period of the following measures: • Reorient or relocate the receiving antenna...
...qualified technician. 2 PLV1615CS1- The exclamation point within the product's enclosure that to part 15 of important operating, maintenance and servicing instructions in places which can be determined by ... dusty, or humid. • Do not restrict the air flow of this user's manual. The symbol for Class II (Double lnsulation) PLACEMENT INFORMATION • Do not use this..., pursuant to which the receiver is connected. • Consult the dealer or an experienced radio/TV technician for a long period of the following measures: • Reorient or relocate the receiving antenna...
Owners Manual
Page 9
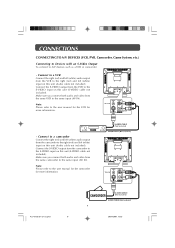
...VCR to the right (red) and left (white) audio output from the camcorder to the user manual for the VCR for more information. - Connect the S-VIDEO output from the same camcorder to the user manual for the camcorder for more information. 9 PLV1615CS1- Make sure you connect both audio and video ...and left (white) audio output from the VCR to the S-VIDEO input on this unit (S-VIDEO cable not included). E1-23.pmd 9 20/04/2007, 15:35 Connect to a camcorder Connect the right (red) and left (white) input on this unit (Audio cable not included). Note: Please refer to the ...
...VCR to the right (red) and left (white) audio output from the camcorder to the user manual for the VCR for more information. - Connect the S-VIDEO output from the same camcorder to the user manual for the camcorder for more information. 9 PLV1615CS1- Make sure you connect both audio and video ...and left (white) audio output from the VCR to the S-VIDEO input on this unit (S-VIDEO cable not included). E1-23.pmd 9 20/04/2007, 15:35 Connect to a camcorder Connect the right (red) and left (white) input on this unit (Audio cable not included). Note: Please refer to the ...
Owners Manual
Page 10
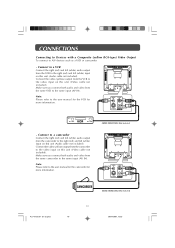
... Output To connect to the video input on this unit (Video cable not included). Connect the video (yellow) output from the camcorder to the user manual for the camcorder for more information. 10 PLV1615CS1- Connect to a camcorder Connect the right (red) and left (white) input on this unit (Audio cable not... output from the same camcorder to the same input (AV IN). Make sure you connect both audio and video from the VCR to the user manual for the VCR for more information. - E1-23.pmd 10 20/04/2007...
... Output To connect to the video input on this unit (Video cable not included). Connect the video (yellow) output from the camcorder to the user manual for the camcorder for more information. 10 PLV1615CS1- Connect to a camcorder Connect the right (red) and left (white) input on this unit (Audio cable not... output from the same camcorder to the same input (AV IN). Make sure you connect both audio and video from the VCR to the user manual for the VCR for more information. - E1-23.pmd 10 20/04/2007...

Owners Manual
Page 11
...to A/V devices such as a VCR, PVR or camcorder: - E1-23.pmd 11 20/04/2007, 15:35 Connect to a VCR/PVR Connect the right (red) and left (white) audio input from the ...video output on this unit (Video cable not included). Note: • After connection, please operate in TV/AV mode. • For the reason of copyright protection, the result copy may has bad picture and...same output (AV OUT). Connect the video (yellow) input from the same camcorder to the user manual for the camcorder for more information. CONNECTIONS Connecting to Devices with a Composite (yellow RCA-type) Video...
...to A/V devices such as a VCR, PVR or camcorder: - E1-23.pmd 11 20/04/2007, 15:35 Connect to a VCR/PVR Connect the right (red) and left (white) audio input from the ...video output on this unit (Video cable not included). Note: • After connection, please operate in TV/AV mode. • For the reason of copyright protection, the result copy may has bad picture and...same output (AV OUT). Connect the video (yellow) input from the same camcorder to the user manual for the camcorder for more information. CONNECTIONS Connecting to Devices with a Composite (yellow RCA-type) Video...

Owners Manual
Page 13
... not going to use an audio amplifier and external speakers. Note: To control the audio, both the TV and the amplifier must be set above 0, or you will not hear any sound. Refer to your amplifier...the AC power cord into a wall outlet. • Press the STANDBY/ON button on your amplifier's user manual for a long period of the amplifier must be turned on the unit. If you want to hear the ... (white) audio OUTPUT from the amplifier only, press the VOL - E1-23.pmd 13 20/04/2007, 15:36 Connect the right (red) and left (white) audio INPUT on the unit or remote control to turn ...
... not going to use an audio amplifier and external speakers. Note: To control the audio, both the TV and the amplifier must be set above 0, or you will not hear any sound. Refer to your amplifier...the AC power cord into a wall outlet. • Press the STANDBY/ON button on your amplifier's user manual for a long period of the amplifier must be turned on the unit. If you want to hear the ... (white) audio OUTPUT from the amplifier only, press the VOL - E1-23.pmd 13 20/04/2007, 15:36 Connect the right (red) and left (white) audio INPUT on the unit or remote control to turn ...

Owners Manual
Page 19
...Sleep Timer : Select the time zone from English / Español / Français. TV SETUP Video Audio TV Setup Parental TV MODE OSD Language Time Setup Caption Restore setting English Setup Video Audio Setup Parental PC MODE OSD...unit to Standby mode automatically: Off -> 5 Minutes -> 10 Minutes -> 15 Minutes -> 30 Minutes -> 60 Minutes -> 90 Minutes -> 120 Minutes -> Off. Select Auto to synchronize time with the digital TV channel signal. • Date : Press the or button to locate ... the position, and press the number buttons to activate the following manual settings;
...Sleep Timer : Select the time zone from English / Español / Français. TV SETUP Video Audio TV Setup Parental TV MODE OSD Language Time Setup Caption Restore setting English Setup Video Audio Setup Parental PC MODE OSD...unit to Standby mode automatically: Off -> 5 Minutes -> 10 Minutes -> 15 Minutes -> 30 Minutes -> 60 Minutes -> 90 Minutes -> 120 Minutes -> Off. Select Auto to synchronize time with the digital TV channel signal. • Date : Press the or button to locate ... the position, and press the number buttons to activate the following manual settings;
