Owners Manual
Page 1
Owner/ Installation Manual MMD10 10" LCD MONITOR & DVD PLAYER
Owner/ Installation Manual MMD10 10" LCD MONITOR & DVD PLAYER

Owners Manual
Page 3
... used for television reception, video or DVD play , the LCD panel or video monitor must be installed to the rear of the motor vehicle. 3 An LCD panel or video monitor used for television reception, video or DVD play that operates when the vehicle is in gear or when the parking brake is not ... it will only function when the vehicle is in a motor vehicle and visible to the driver if the LCD panel or video monitor is applied. Important Notice An LCD panel and/or video monitor may be installed in "park" or when the vehicle's parking brake is used for vehicle information, system control...
... used for television reception, video or DVD play , the LCD panel or video monitor must be installed to the rear of the motor vehicle. 3 An LCD panel or video monitor used for television reception, video or DVD play that operates when the vehicle is in gear or when the parking brake is not ... it will only function when the vehicle is in a motor vehicle and visible to the driver if the LCD panel or video monitor is applied. Important Notice An LCD panel and/or video monitor may be installed in "park" or when the vehicle's parking brake is used for vehicle information, system control...
Owners Manual
Page 4
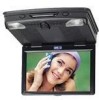
...MMD10. Objects and Liquids Do not push objects of any kind on or in the system (this manual for later use liquid cleaners or aerosol cleaners. do not spill or spray liquid of the system only. 4 The main features include a 10" Wide Screen (16:9 Aspect Ratio) Liquid Crystal Display (LCD) monitor... or electric shock). Cautions and Warnings 1. Please store this may result in need of the art electronics. Introduction Thank you in DVD player. Do not use . To ensure proper ventilation and proper operation, never cover or block the ventilation slots and openings 3.Disassembly Do...
...MMD10. Objects and Liquids Do not push objects of any kind on or in the system (this manual for later use liquid cleaners or aerosol cleaners. do not spill or spray liquid of the system only. 4 The main features include a 10" Wide Screen (16:9 Aspect Ratio) Liquid Crystal Display (LCD) monitor... or electric shock). Cautions and Warnings 1. Please store this may result in need of the art electronics. Introduction Thank you in DVD player. Do not use . To ensure proper ventilation and proper operation, never cover or block the ventilation slots and openings 3.Disassembly Do...

Owners Manual
Page 5
... heat sources such as they may not be intentionally fixed by wiping the disc from the unit and store it in its edge. C. CONTENTS 1. 10" LCD Monitor & DVD Player Combo 2. Mounting Plate 7. Owner/Installation Manual 8.
... heat sources such as they may not be intentionally fixed by wiping the disc from the unit and store it in its edge. C. CONTENTS 1. 10" LCD Monitor & DVD Player Combo 2. Mounting Plate 7. Owner/Installation Manual 8.

Owners Manual
Page 7
... being installed). GENERAL INSTALLATION APPROACH: 1) Decide upon system configuration and options that will be installed (i.e.: what components, VCP, Tuner, RF Modulator/external amp, remote headphones, DVD, etc.). 2) Review all manuals to become familiar with electrical requirements and hook ups. 3) Decide upon mounting locations of all components and method of all system...
... being installed). GENERAL INSTALLATION APPROACH: 1) Decide upon system configuration and options that will be installed (i.e.: what components, VCP, Tuner, RF Modulator/external amp, remote headphones, DVD, etc.). 2) Review all manuals to become familiar with electrical requirements and hook ups. 3) Decide upon mounting locations of all components and method of all system...

Owners Manual
Page 12
... accessory hot line. 4) Verify all functions of the system before final mounting of the finished assembly. A/V Source Definitions : 1 = Built-in DVD 2 = AV1 input ( VCP, DVD, etc ) 3 = AV2 Input ( VCP, Game, DVD, etc ) 12 MMD10 Figure 3 1) Make the connections to the vehicle with the 5 pin wiring harness. 2) Connect the 5 pin harness to the mating connector...
... accessory hot line. 4) Verify all functions of the system before final mounting of the finished assembly. A/V Source Definitions : 1 = Built-in DVD 2 = AV1 input ( VCP, DVD, etc ) 3 = AV2 Input ( VCP, Game, DVD, etc ) 12 MMD10 Figure 3 1) Make the connections to the vehicle with the 5 pin wiring harness. 2) Connect the 5 pin harness to the mating connector...

Owners Manual
Page 16
... Button 2) Display Button 3) Angle Button 4) Subtitle Button 5) A-B Button 6) Slow Button 7) Pause Button 8) Reverse Scan Button 9) Stop Button 10) Picture Button 11) DVD /AV1 /AV2 12) Zoom Button 13) Eject Button 14) Numeric Buttons 15) Audio Button 16) Repeat Button 17) Menu Button 18) Setup Button 19) Up.../ Enter Buttons 20) Forward Scan Button 21) Return Button 22) Play Button 23) Skip- c. Loading and Playing a Disc a. Select DVD using the DVD/AV1/AV2 button on the unit or the remote control. Playback will start automatically. b. Turn the power on by pressing the power button on...
... Button 2) Display Button 3) Angle Button 4) Subtitle Button 5) A-B Button 6) Slow Button 7) Pause Button 8) Reverse Scan Button 9) Stop Button 10) Picture Button 11) DVD /AV1 /AV2 12) Zoom Button 13) Eject Button 14) Numeric Buttons 15) Audio Button 16) Repeat Button 17) Menu Button 18) Setup Button 19) Up.../ Enter Buttons 20) Forward Scan Button 21) Return Button 22) Play Button 23) Skip- c. Loading and Playing a Disc a. Select DVD using the DVD/AV1/AV2 button on the unit or the remote control. Playback will start automatically. b. Turn the power on by pressing the power button on...
Owners Manual
Page 17
... OPERATION POWER PLAY SLOW PAUSE STOP FORWARD REVERSE UP/DOWN/LEFT /RIGHT ENTER NUMBERS RETURN MENU REPEAT A-B DISPLAY ANGLE SUBTITLE AUDIO ZOOM SETUP DVD/AV1/AV2 EJECT PICTURE VOLUMEVOLUME+ SKIPSKIP+ Turn the unit on/off Start Playback Play at 1/2,1/4,1/8, or 1/16 normal speed Still Picture (1 time... 2 ,3, or 4 times the original size Display the setup menu to select and set items, and exit the setup menu. Source selection DVD, AV1, AV2 Eject disc Brightness/Contrast/Tint/Color Reduce volume/Lower picture setting Increase volume/Raise picture setting Previous chapter/track Next chapter/track ...
... OPERATION POWER PLAY SLOW PAUSE STOP FORWARD REVERSE UP/DOWN/LEFT /RIGHT ENTER NUMBERS RETURN MENU REPEAT A-B DISPLAY ANGLE SUBTITLE AUDIO ZOOM SETUP DVD/AV1/AV2 EJECT PICTURE VOLUMEVOLUME+ SKIPSKIP+ Turn the unit on/off Start Playback Play at 1/2,1/4,1/8, or 1/16 normal speed Still Picture (1 time... 2 ,3, or 4 times the original size Display the setup menu to select and set items, and exit the setup menu. Source selection DVD, AV1, AV2 Eject disc Brightness/Contrast/Tint/Color Reduce volume/Lower picture setting Increase volume/Raise picture setting Previous chapter/track Next chapter/track ...
Owners Manual
Page 20
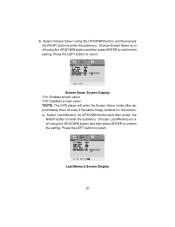
.... d). Last Memory Screen Display 20 Choose Screen Saver on the screen. Screen Saver Screen Display *On: Enables screen saver *Off: Disables screen saver *NOTE: The DVD player will enter the Screen Saver mode after approximately three minutes if the same image remains on or off using the UP/DOWN button, and then...
.... d). Last Memory Screen Display 20 Choose Screen Saver on the screen. Screen Saver Screen Display *On: Enables screen saver *Off: Disables screen saver *NOTE: The DVD player will enter the Screen Saver mode after approximately three minutes if the same image remains on or off using the UP/DOWN button, and then...

Owners Manual
Page 25
... Subtitle Language Note: Language and subtitle selection is not available the player will play and display on the screen the original recorded language contained in the disc. If the selected language is only available for discs that are recorded in the DVD root menu. Select the Disc Menu Language you desire using...
... Subtitle Language Note: Language and subtitle selection is not available the player will play and display on the screen the original recorded language contained in the disc. If the selected language is only available for discs that are recorded in the DVD root menu. Select the Disc Menu Language you desire using...

Owners Manual
Page 27
... the following options will become available. Each time 'DISPLAY' is not pressed. Some DVDs only allow you play a DVD, a root menu of your TV or Monitor. Title, Chapter Number, and Time Screen Display b. When you to display the menu. I. Menu A DVD is divided into sections called titles and chapters. The contents of Chapters (4), and...
... the following options will become available. Each time 'DISPLAY' is not pressed. Some DVDs only allow you play a DVD, a root menu of your TV or Monitor. Title, Chapter Number, and Time Screen Display b. When you to display the menu. I. Menu A DVD is divided into sections called titles and chapters. The contents of Chapters (4), and...

Owners Manual
Page 28
... 'SUBTITLE' button until 'Subtitle Off' is not pressed again within 3 seconds. *NOTE: Not all discs contain this function through the DVD menu 28 ANGLE During playback of a disc, press 'ANGLE' to display the available angles for discs containing multi-angles*, with the current Subtitle... Language Number (1) and the total Number of angles (2) displaying. Subtitle Screen Display * Some DVDs only allow access to select the subtitle language you desire*, with the current angle number (1) and the total number of Subtitle Languages (2) ...
... 'SUBTITLE' button until 'Subtitle Off' is not pressed again within 3 seconds. *NOTE: Not all discs contain this function through the DVD menu 28 ANGLE During playback of a disc, press 'ANGLE' to display the available angles for discs containing multi-angles*, with the current Subtitle... Language Number (1) and the total Number of angles (2) displaying. Subtitle Screen Display * Some DVDs only allow access to select the subtitle language you desire*, with the current angle number (1) and the total number of Subtitle Languages (2) ...

Owners Manual
Page 29
4. Zoom Screen Display 29 Audio Language Screen Display * Some DVDs only allow access to normal size. ZOOM During playback press 'ZOOM' to enlarge the picture by 2x, 3x, or 4X with the current Audio Channel ... ,the picture will disappear automatically if the 'AUDIO' button is not pressed within for 3 seconds. The audio display will return to this function through the DVD menu. 5. AUDIO During playback press 'AUDIO' to select another audio language.
4. Zoom Screen Display 29 Audio Language Screen Display * Some DVDs only allow access to normal size. ZOOM During playback press 'ZOOM' to enlarge the picture by 2x, 3x, or 4X with the current Audio Channel ... ,the picture will disappear automatically if the 'AUDIO' button is not pressed within for 3 seconds. The audio display will return to this function through the DVD menu. 5. AUDIO During playback press 'AUDIO' to select another audio language.
Owners Manual
Page 35
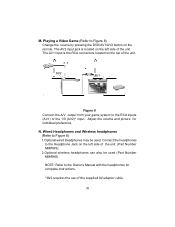
... AV2 input jack is the RCA connectors located on the remote. N. Wired Headphones and Wireless headphones (Refer to Figure 8) Change the source by pressing the DVD/AV1/AV2 button on the top of the unit. Playing a Video Game (Refer to Figure 8) 1.Optional wired Headphones may be used . The AV1 input is...
... AV2 input jack is the RCA connectors located on the remote. N. Wired Headphones and Wireless headphones (Refer to Figure 8) Change the source by pressing the DVD/AV1/AV2 button on the top of the unit. Playing a Video Game (Refer to Figure 8) 1.Optional wired Headphones may be used . The AV1 input is...
Owners Manual
Page 37
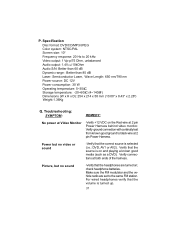
... at both ends of the harness. Verify connections at 2 pin Power Harness behind video monitor. check headphone batteries. P. Picture, but no sound -Verify that the correct source is selected (i.e.: DVD, AV1 or AV2). For wired headphones verify that the source is turned up. 37 ...5~35&C Storage temperature: -20~60&C (4~140&F) Dimensions (W x H x D): 254 x 214 x 58 mm (10.00" x 8.43" x 2.28") Weight:1.36Kg Q. Specification Disc format: DVD/CD/MP3/JPEG Color system: NTSC/PAL Screen size: 10" Frequency response: 20 Hz to black wire at 2 pin Power Harness. Make sure the FM...
... at both ends of the harness. Verify connections at 2 pin Power Harness behind video monitor. check headphone batteries. P. Picture, but no sound -Verify that the correct source is selected (i.e.: DVD, AV1 or AV2). For wired headphones verify that the source is turned up. 37 ...5~35&C Storage temperature: -20~60&C (4~140&F) Dimensions (W x H x D): 254 x 214 x 58 mm (10.00" x 8.43" x 2.28") Weight:1.36Kg Q. Specification Disc format: DVD/CD/MP3/JPEG Color system: NTSC/PAL Screen size: 10" Frequency response: 20 Hz to black wire at 2 pin Power Harness. Make sure the FM...


