
Operation Manual
Page 1
MMD11 11" OVERHEAD LCD MONITOR WITH DVD PLAYER OPERATION MANUAL 128-8290
MMD11 11" OVERHEAD LCD MONITOR WITH DVD PLAYER OPERATION MANUAL 128-8290
Operation Manual
Page 3
...of the Jensen MMD11 DVD Player with Drop-Down Video / Monitor. Please note: Installation options vary, see the individual owner's manuals for each component's operation. FEATURES • 11" TFT (Thin Film Transistor) Active Matrix LCD (Liquid Crystal Display) Monitor • Built-in DVD Player • Multi... with Built-in Three Way Switch • Built-in 16 Channel Frequency Wireless FM Modulator • Last Position Memory for Control of video entertainment in motion, and that you and your Audiovox entertainment system but remember the safety of all passengers remains the...
...of the Jensen MMD11 DVD Player with Drop-Down Video / Monitor. Please note: Installation options vary, see the individual owner's manuals for each component's operation. FEATURES • 11" TFT (Thin Film Transistor) Active Matrix LCD (Liquid Crystal Display) Monitor • Built-in DVD Player • Multi... with Built-in Three Way Switch • Built-in 16 Channel Frequency Wireless FM Modulator • Last Position Memory for Control of video entertainment in motion, and that you and your Audiovox entertainment system but remember the safety of all passengers remains the...

Operation Manual
Page 4
... to enter the picture adjustment mode. 14 6. Picture Select (+) To increase the level of selected picture controls. 7. CONTROLS AND INDICATORS DIAGRAM (FRONT VIEW) 8 7 6 5 43 2 1 9 10 11 12 1. Picture Select (-) To decrease the level of selected picture controls. 13 5. PLAY (u) Button This button is used to stop playback. 3. STOP (n) Button This button...3MHz, CH13 90.5MHz, CH14 90.7MHz, CH15 90.9MHz, CH16 91.1Mhz. 8. EJECT () Button This Button is used to select one of a disc. 16 4 Source Select Use to start playback of the three sources: DVD, AUX,AV1. 4.
... to enter the picture adjustment mode. 14 6. Picture Select (+) To increase the level of selected picture controls. 7. CONTROLS AND INDICATORS DIAGRAM (FRONT VIEW) 8 7 6 5 43 2 1 9 10 11 12 1. Picture Select (-) To decrease the level of selected picture controls. 13 5. PLAY (u) Button This button is used to stop playback. 3. STOP (n) Button This button...3MHz, CH13 90.5MHz, CH14 90.7MHz, CH15 90.9MHz, CH16 91.1Mhz. 8. EJECT () Button This Button is used to select one of a disc. 16 4 Source Select Use to start playback of the three sources: DVD, AUX,AV1. 4.

Operation Manual
Page 5
... lights will not turn the system on state to turn off . 10. LCD Panel 16. Three Position Dome Light Switch ON - Auxiliary Audio Right Input 5 Screen Release Press ...the system. 12. Automatically switches on the dome lights in a powered on /off the LCD panel monitor when in the closed position. 15. DVD Disc insertion Slot For loading and removing discs. CONTROL FUNCTION...control other accessories in this position. Dome Lights Provide additional interior illumination. 11. Also allows the remote control to operate the MMD11 and to turn on the dome lights. Back ...
... lights will not turn the system on state to turn off . 10. LCD Panel 16. Three Position Dome Light Switch ON - Auxiliary Audio Right Input 5 Screen Release Press ...the system. 12. Automatically switches on the dome lights in a powered on /off the LCD panel monitor when in the closed position. 15. DVD Disc insertion Slot For loading and removing discs. CONTROL FUNCTION...control other accessories in this position. Dome Lights Provide additional interior illumination. 11. Also allows the remote control to operate the MMD11 and to turn on the dome lights. Back ...
Operation Manual
Page 6
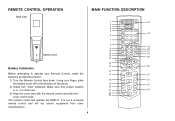
... not a universal remote control and will operate the MMD11. The remote control will not control equipment from other manufacturers. 6 1 2 3 4 5 6 7 8 9 10 11 12 13 POWER MONITOR SELECT EJECT M1 M2 TV DVD SOURCE 1 2 3 AUTO MEMORY 4 5 6 SKIP/ SEARCH 7 8 9 ERASE/ WRITE 0 VOLUME FMM CHANNEL DAY/ ON/OFF SELECT NIGHT... PIX IRT RETURN DISPLAY ON/OFF MUTE 35 34 33 32 31 30 29 14 OK 15 28 MENU SETUP 16 ...
... not a universal remote control and will operate the MMD11. The remote control will not control equipment from other manufacturers. 6 1 2 3 4 5 6 7 8 9 10 11 12 13 POWER MONITOR SELECT EJECT M1 M2 TV DVD SOURCE 1 2 3 AUTO MEMORY 4 5 6 SKIP/ SEARCH 7 8 9 ERASE/ WRITE 0 VOLUME FMM CHANNEL DAY/ ON/OFF SELECT NIGHT... PIX IRT RETURN DISPLAY ON/OFF MUTE 35 34 33 32 31 30 29 14 OK 15 28 MENU SETUP 16 ...

Operation Manual
Page 8
....5MHz, CH9 89.7MHz, CH10 89.9MHz, CH11 90.1MHz, CH12 90.3MHz, CH13 90.5MHz, CH14 90.7MHz, CH15 90.9MHz, CH16 91.1MHz) 11. For Title/Chapter selection use CHq to navigate the menu selections on or off. 10. RETURN Button Press Return Once : Go to access the DVD... menu (DVD MODE). 16. Press Return Twice : Go to repeat a selected title, chapter, or track. 8 REPEAT Button Allows the user to movies playback. 12. DISPLAY Press to select the...
....5MHz, CH9 89.7MHz, CH10 89.9MHz, CH11 90.1MHz, CH12 90.3MHz, CH13 90.5MHz, CH14 90.7MHz, CH15 90.9MHz, CH16 91.1MHz) 11. For Title/Chapter selection use CHq to navigate the menu selections on or off. 10. RETURN Button Press Return Once : Go to access the DVD... menu (DVD MODE). 16. Press Return Twice : Go to repeat a selected title, chapter, or track. 8 REPEAT Button Allows the user to movies playback. 12. DISPLAY Press to select the...

Operation Manual
Page 11
..., TINT or RESET. In the "Day" mode, the LCD backlit intensity is pressed. 33. Once the desired adjustment bar is dimmed to eject the disc. 11 VOLUME DOWN (-) or UP (+)* Press to decrease or increase the level of CD tracks, DVD chapters and password. 35. DAY / NIGHT Mode Button** This control...
..., TINT or RESET. In the "Day" mode, the LCD backlit intensity is pressed. 33. Once the desired adjustment bar is dimmed to eject the disc. 11 VOLUME DOWN (-) or UP (+)* Press to decrease or increase the level of CD tracks, DVD chapters and password. 35. DAY / NIGHT Mode Button** This control...