

Owners Manual
Page 2
Pour des instructions en Francais, référez-vous UMP301 Para obtener instrucciones en Español, diríjase a la página 18.
Pour des instructions en Francais, référez-vous UMP301 Para obtener instrucciones en Español, diríjase a la página 18.
Owners Manual
Page 3
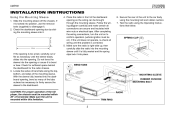
... mounting sleeve off the chassis. CAUTION: For proper operation of the tabs outward as necessary until it . 2. Secure the rear of the unit to confirm operation (vehicle ignition must be mounted within this limitation. Check the dashboard opening so the wiring can be on to the car body using the Operating Instructions that follow. If it is locked into place. 6. UMP301 INSTALLATION INSTRUCTIONS Using the Mounting...
... mounting sleeve off the chassis. CAUTION: For proper operation of the tabs outward as necessary until it . 2. Secure the rear of the unit to confirm operation (vehicle ignition must be mounted within this limitation. Check the dashboard opening so the wiring can be on to the car body using the Operating Instructions that follow. If it is locked into place. 6. UMP301 INSTALLATION INSTRUCTIONS Using the Mounting...

Owners Manual
Page 4
.... 4. UMP301 INSTALLATION INSTRUCTIONS Installation Using a Kit If your local car stereo specialty shop for assistance on this radio, follow the instructions included with the installation kit to attach the radio to the dashboard or center console using the reverse REMOVING THE RADIO 4 Attach the support strap to the vehicle as they lock, then pull the radio out. Remove the existing factory radio from either side. Wire the new radio to the radio...
.... 4. UMP301 INSTALLATION INSTRUCTIONS Installation Using a Kit If your local car stereo specialty shop for assistance on this radio, follow the instructions included with the installation kit to attach the radio to the dashboard or center console using the reverse REMOVING THE RADIO 4 Attach the support strap to the vehicle as they lock, then pull the radio out. Remove the existing factory radio from either side. Wire the new radio to the radio...

Owners Manual
Page 5
Ground Connect to power antenna or amplifier. The red connector is for the right and the white connector is for optional external amplifiers. Blue Gray Power Antenna Connect to ground terminal. If not used, tape bare end of wire. The radio will not work if this wire is always live. UMP301 Antenna Connector 1 5 A Amplifier Wiring Connect line out for the left. Accessory/Ignition Connect to battery or 12 volt power source that is not connected. Memory/Battery Connect to existing radio wire or radio fuse. Black Yellow + Red W l C m 5
Ground Connect to power antenna or amplifier. The red connector is for the right and the white connector is for optional external amplifiers. Blue Gray Power Antenna Connect to ground terminal. If not used, tape bare end of wire. The radio will not work if this wire is always live. UMP301 Antenna Connector 1 5 A Amplifier Wiring Connect line out for the left. Accessory/Ignition Connect to battery or 12 volt power source that is not connected. Memory/Battery Connect to existing radio wire or radio fuse. Black Yellow + Red W l C m 5

Owners Manual
Page 7
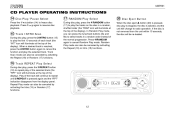
... SEL button (4) to adjust the bass, treble, balance and fader levels. 4 Bass Control To adjust the bass level, first select the Bass mode by pressing the SEL button (4) until "BAS" appears on the display panel. The volume control is a characteristic of time, they may slightly decrease. "MUTE ON" will be shown on . NOTE: It is also used in use before the Mute function was activated. 2 Liquid Crystal Display Panel The Liquid Crystal Display (LCD) panel displays the frequency, time and all activated functions. The volume will...
... SEL button (4) to adjust the bass, treble, balance and fader levels. 4 Bass Control To adjust the bass level, first select the Bass mode by pressing the SEL button (4) until "BAS" appears on the display panel. The volume control is a characteristic of time, they may slightly decrease. "MUTE ON" will be shown on . NOTE: It is also used in use before the Mute function was activated. 2 Liquid Crystal Display Panel The Liquid Crystal Display (LCD) panel displays the frequency, time and all activated functions. The volume will...

Owners Manual
Page 8
... button to the user-set bass and treble levels. Front/Rear Fader Control To adjust the front/rear speaker balance, press the SEL button (4) until "FAD" appears on the display panel. Press the volume +/- Audible Beep Press and hold the SEL button (4) for more than 2 seconds to access the menu. 2. buttons (3) to "FAD 10R" (full rear). 4 UMP301 OPERATING INSTRUCTIONS 4 Treble Control To adjust the treble level, press the SEL button (4) until the "BAL" indication appears on the display panel. buttons (3) to adjust the balance...
... button to the user-set bass and treble levels. Front/Rear Fader Control To adjust the front/rear speaker balance, press the SEL button (4) until "FAD" appears on the display panel. Press the volume +/- Audible Beep Press and hold the SEL button (4) for more than 2 seconds to access the menu. 2. buttons (3) to "FAD 10R" (full rear). 4 UMP301 OPERATING INSTRUCTIONS 4 Treble Control To adjust the treble level, press the SEL button (4) until the "BAL" indication appears on the display panel. buttons (3) to adjust the balance...
Owners Manual
Page 9
... broadcast signal. Press the volume +/- The radio will appear on the display panel according to your selection. 8 Auto-Store/Pre-Set Scan (AS/PS) Press the AS/PS button (8) momentarily to local stations whose signals are weak or intermittent, you can activate the Local mode by pressing the LO/DX button (9) ("LOCAL" appears on volume level using the volume +/- buttons (3) to access the menu. 2. Under normal reception conditions...
... broadcast signal. Press the volume +/- The radio will appear on the display panel according to your selection. 8 Auto-Store/Pre-Set Scan (AS/PS) Press the AS/PS button (8) momentarily to local stations whose signals are weak or intermittent, you can activate the Local mode by pressing the LO/DX button (9) ("LOCAL" appears on volume level using the volume +/- buttons (3) to access the menu. 2. Under normal reception conditions...

Owners Manual
Page 10
... set using the tune/track buttons (6a and 6b). 3. Setting the Clock To set memory buttons , use the following steps: UMP301 CD / MP3 / WMA / RECEIVER 1. Press and hold the DISP button (11) until you hear a confirmation tone. The preset number appears on and select the desired band. 2. Press and hold a preset button until the time display flashes. 3. Press the volume + button (3) to adjust the hour and the AM/PM indication to radio frequency. The station is 11 Display...
... set using the tune/track buttons (6a and 6b). 3. Setting the Clock To set memory buttons , use the following steps: UMP301 CD / MP3 / WMA / RECEIVER 1. Press and hold the DISP button (11) until you hear a confirmation tone. The preset number appears on and select the desired band. 2. Press and hold a preset button until the time display flashes. 3. Press the volume + button (3) to adjust the hour and the AM/PM indication to radio frequency. The station is 11 Display...

Owners Manual
Page 11
... disc play of each track will appear. buttons (3) to change between CD player, radio, and Aux In operation. Each time the tune/track ( ) button (6a) is indicated on the display panel. Do not attempt to use 3" (8 cm.) CD singles in this unit, either function, the elapsed time of standard 5" (12 cm.) compact discs only. Each time the tune/ track ( ) button (6b) is pressed, the next lower track number is selected, as shown on the display panel...
... disc play of each track will appear. buttons (3) to change between CD player, radio, and Aux In operation. Each time the tune/track ( ) button (6a) is indicated on the display panel. Do not attempt to use 3" (8 cm.) CD singles in this unit, either function, the elapsed time of standard 5" (12 cm.) compact discs only. Each time the tune/ track ( ) button (6b) is pressed, the next lower track number is selected, as shown on the display panel...
Owners Manual
Page 12
... Track INTRO Scan During disc play, press the 2/INTRO button (15) to radio operation. Press 1/ again to resume disc playback. 17 RANDOM Play Select During disc play, press the 4/RANDOM button (17) to repeat play the tracks on the disc in a random order instead of the display). UMP301 CD PLAYER OPERATING INSTRUCTIONS 14 Disc Play/Pause Select Press the 1/ button (14) to cancel Random Play mode. If the disc is ejected, and the unit will illuminate at...
... Track INTRO Scan During disc play, press the 2/INTRO button (15) to radio operation. Press 1/ again to resume disc playback. 17 RANDOM Play Select During disc play, press the 4/RANDOM button (17) to repeat play the tracks on the disc in a random order instead of the display). UMP301 CD PLAYER OPERATING INSTRUCTIONS 14 Disc Play/Pause Select Press the 1/ button (14) to cancel Random Play mode. If the disc is ejected, and the unit will illuminate at...
Owners Manual
Page 13
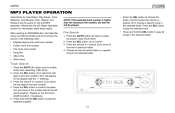
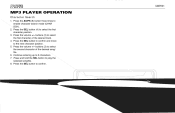
... be played. BANDLOU UMP301 SRC 6a 3 4 8 SRCSEL MUTE DISPST/MO LO/DX AS/PS 123456 MP3 PLAYER OPERATION Instructions for Insert/Eject, Play/Pause, Track Selection, Cue/Review, Scan, Repeat, and Random are the same for CD and MP3 operation. buttons (3) to move to the number field to the next or previous folder. 4. Press the volume +/- Press the AS/PS button (8) twice to choose a specific song...
... be played. BANDLOU UMP301 SRC 6a 3 4 8 SRCSEL MUTE DISPST/MO LO/DX AS/PS 123456 MP3 PLAYER OPERATION Instructions for Insert/Eject, Play/Pause, Track Selection, Cue/Review, Scan, Repeat, and Random are the same for CD and MP3 operation. buttons (3) to move to the number field to the next or previous folder. 4. Press the volume +/- Press the AS/PS button (8) twice to choose a specific song...
Owners Manual
Page 14
... SEL button (4) to the next character position. 5. Press the SEL button to confirm and move to select the first character position. 3. buttons (3) to enable character search mode (CHAR SCH). 2. UMP301 CD / MP3 / WMA / RECEIVER 3 BAND INTRO REPEAT RANDOM 6b 14 Press the volume +/- Press the AS/PS (8) button three times to select the second character of the desired track. 4. UMP301 MP3 PLAYER OPERATION Character...
... SEL button (4) to the next character position. 5. Press the SEL button to confirm and move to select the first character position. 3. buttons (3) to enable character search mode (CHAR SCH). 2. UMP301 CD / MP3 / WMA / RECEIVER 3 BAND INTRO REPEAT RANDOM 6b 14 Press the volume +/- Press the AS/PS (8) button three times to select the second character of the desired track. 4. UMP301 MP3 PLAYER OPERATION Character...
Owners Manual
Page 15
... remove the compact disc. The Reset function should be activated under damp conditions, condensation may appear on the lens of the disc player. Do not attempt to use chemicals such as record sprays or household cleaners to clean CDs, as how to set the clock. Wipe in use and handling will resume when the rough conditions cease. If there is located behind the faceplate...
... remove the compact disc. The Reset function should be activated under damp conditions, condensation may appear on the lens of the disc player. Do not attempt to use chemicals such as record sprays or household cleaners to clean CDs, as how to set the clock. Wipe in use and handling will resume when the rough conditions cease. If there is located behind the faceplate...

Owners Manual
Page 16
... only recognize the CDDA (Compact Disc Digital Audio), .MP3 and .WMA formats "recorded / burned" onto a CDR/RW. We recommend using the latest versions of "recording/burning", some CD-R/RWs may be closed. Review your software's recommended procedures for closing a disc/session. Technical Specifications Marketing Power 160 watts Peak, 40 watts X 4 CEA Power Power Output: 13 watts RMS X 4 channels into 4-ohms @ < 1% THD+N Signal...
... only recognize the CDDA (Compact Disc Digital Audio), .MP3 and .WMA formats "recorded / burned" onto a CDR/RW. We recommend using the latest versions of "recording/burning", some CD-R/RWs may be closed. Review your software's recommended procedures for closing a disc/session. Technical Specifications Marketing Power 160 watts Peak, 40 watts X 4 CEA Power Power Output: 13 watts RMS X 4 channels into 4-ohms @ < 1% THD+N Signal...
Owners Manual
Page 49
... CD Radios/Headunits Who is not transferable or assignable. This Warranty does not cover the following: • Elimination of car static or motor noise • Correction of antenna problems • Costs incurred for installation, removal, or reinstallation of your Installation and Operation Manual for parts and repair labor. Exposure to vehicle electrical systems. Alteration, improper installation, mishandling, misuse, neglect, accident, blown fuse, battery leakage...
... CD Radios/Headunits Who is not transferable or assignable. This Warranty does not cover the following: • Elimination of car static or motor noise • Correction of antenna problems • Costs incurred for installation, removal, or reinstallation of your Installation and Operation Manual for parts and repair labor. Exposure to vehicle electrical systems. Alteration, improper installation, mishandling, misuse, neglect, accident, blown fuse, battery leakage...

Owners Manual
Page 52
Audiovox Electronics Corporation 150 Marcus Boulevard Hauppauge, NY 11788 1-800-323-4815 www.audiovox.com ©2006 Audiovox v.092606
Audiovox Electronics Corporation 150 Marcus Boulevard Hauppauge, NY 11788 1-800-323-4815 www.audiovox.com ©2006 Audiovox v.092606


