
Owners Manual
Page 1
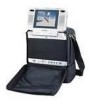
VBP4000 VIDEO IN A BAG SYSTEM WITH DETACHABLE 5.6" LCD MONITOR & DVD PLAYER
VBP4000 VIDEO IN A BAG SYSTEM WITH DETACHABLE 5.6" LCD MONITOR & DVD PLAYER

Owners Manual
Page 2
The "Video in a Bag" System. The connection of reliable, trouble-free service. Keep the unit away from a cold to a warm location, moisture may condense inside Velcro straps of the art electronics and is brought directly from strong magnets, heat sources, direct sunlight, excessive dust. The system's main features include a 5.6" Liquid Crystal Display (LCD) Monitor and a DVD Player. When you move it...
The "Video in a Bag" System. The connection of reliable, trouble-free service. Keep the unit away from a cold to a warm location, moisture may condense inside Velcro straps of the art electronics and is brought directly from strong magnets, heat sources, direct sunlight, excessive dust. The system's main features include a 5.6" Liquid Crystal Display (LCD) Monitor and a DVD Player. When you move it...
Owners Manual
Page 3
... the supplied power cable matching this may result in need of the monitor and the DVD Player. Always disconnect the power source first and then the jack from falling. Disassemble To avoid harm from the power source. Use a cloth lightly dampened with water for rear seat viewing only. Do not use . Do not use the system in the front seat while operating your system...
... the supplied power cable matching this may result in need of the monitor and the DVD Player. Always disconnect the power source first and then the jack from falling. Disassemble To avoid harm from the power source. Use a cloth lightly dampened with water for rear seat viewing only. Do not use . Do not use the system in the front seat while operating your system...
Owners Manual
Page 4
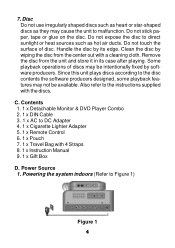
... disc by its case after playing. Remove the disc from the center out with a cleaning cloth. Disc Do not use irregularly shaped discs such as heart or star-shaped discs as hot air ducts. Contents 1. 1 x Detachable Monitor & DVD Player Combo 2. 1 x DIN Cable 3. 1 x AC to direct sunlight or heat sources such as they may be available. Do not expose the disc to DC Adapter 4. 1 x Cigarette Lighter Adapter 5. 1 x Remote Control...
... disc by its case after playing. Remove the disc from the center out with a cleaning cloth. Disc Do not use irregularly shaped discs such as heart or star-shaped discs as hot air ducts. Contents 1. 1 x Detachable Monitor & DVD Player Combo 2. 1 x DIN Cable 3. 1 x AC to direct sunlight or heat sources such as they may be available. Do not expose the disc to DC Adapter 4. 1 x Cigarette Lighter Adapter 5. 1 x Remote Control...
Owners Manual
Page 6
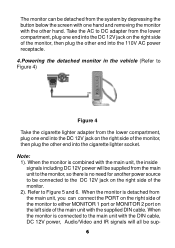
...connected to Figure 5 and 6. When the monitor is combined with the DIN cable, DC 12V power, Audio/Video and IR signals will be supplied from the main unit to the monitor, so there is detached from the main unit, you can be detached from the system by depressing the button below the screen...the vehicle (Refer to Figure 4) Figure 4 Take the cigarette lighter adapter from the lower compartment, plug one hand and removing the monitor with the supplied DIN cable. When the monitor is no need for another power source to be connected to either MONITOR 1 port or MONITOR 2 port on the left side...
...connected to Figure 5 and 6. When the monitor is combined with the DIN cable, DC 12V power, Audio/Video and IR signals will be supplied from the main unit to the monitor, so there is detached from the main unit, you can be detached from the system by depressing the button below the screen...the vehicle (Refer to Figure 4) Figure 4 Take the cigarette lighter adapter from the lower compartment, plug one hand and removing the monitor with the supplied DIN cable. When the monitor is no need for another power source to be connected to either MONITOR 1 port or MONITOR 2 port on the left side...
Owners Manual
Page 13
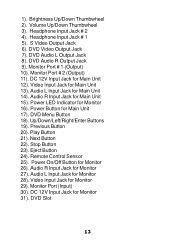
...). Video Input Jack for Monitor 27). Volume Up/Down Thumbwheel 3). Power LED Indicator for Main Unit 13). Up/Down/Left/Right/Enter Buttons 19). Monitor Port (Input) 30). 1). Brightness Up/Down Thumbwheel 2). Headphone Input Jack # 2 4). Headphone Input Jack # 1 5). DVD Video Output Jack 7). Monitor Port # 1 (Output) 10). Monitor Port # 2 (Output) 11). Video Input Jack for Monitor 16). Audio L Input Jack for Monitor 26). DVD Menu Button 18). Previous Button 20). Play Button 21). Stop Button 23). Remote Control...
...). Video Input Jack for Monitor 27). Volume Up/Down Thumbwheel 3). Power LED Indicator for Main Unit 13). Up/Down/Left/Right/Enter Buttons 19). Monitor Port (Input) 30). 1). Brightness Up/Down Thumbwheel 2). Headphone Input Jack # 2 4). Headphone Input Jack # 1 5). DVD Video Output Jack 7). Monitor Port # 1 (Output) 10). Monitor Port # 2 (Output) 11). Video Input Jack for Monitor 16). Audio L Input Jack for Monitor 26). DVD Menu Button 18). Previous Button 20). Play Button 21). Stop Button 23). Remote Control...
Owners Manual
Page 14
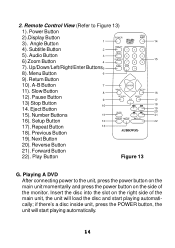
... playing automatically; Previous Button 19). Subtitle Button 5). Slow Button 12). Up/Down/Left/Right/Enter Buttons 8). A-B Button 11). Repeat Button 18). Forward Button 22). Angle Button 4). Setup Button 17). if there's a disc inside unit, press the POWER button, the unit will load the disc and start playing automatically. 14 Return Button 10). Play Button Figure 13 G. Menu Button 9). Eject Button 15). Number Buttons 16). 2. Remote Control View (Refer to the unit, press the power button on the main unit momentarily and press the power button...
... playing automatically; Previous Button 19). Subtitle Button 5). Slow Button 12). Up/Down/Left/Right/Enter Buttons 8). A-B Button 11). Repeat Button 18). Forward Button 22). Angle Button 4). Setup Button 17). if there's a disc inside unit, press the POWER button, the unit will load the disc and start playing automatically. 14 Return Button 10). Play Button Figure 13 G. Menu Button 9). Eject Button 15). Number Buttons 16). 2. Remote Control View (Refer to the unit, press the power button on the main unit momentarily and press the power button...

Owners Manual
Page 15
... 1.5, 2, or 4 times the original Display the setup menu to point B of the disc Repeat playing title or chapter Repeat a specific portion from point to select and set items, and exit the setup menu. 15 1. Basic Operation POWER OPEN/CLOSE PLAY SLOW PAUSE STOP NEXT PREVIOUS FORWARD REVERSE UP/DOWN/LEFT /RIGHT ENTER NUMBERS Return MENU REPEAT A-B DISPLAY ANGLE SUBTITLE AUDIO ZOOM SETUP Turn on /off the unit Eject/load the disc Start Play Play at 1/2, 1/4, or 1/8 times speed Still Picture (1 time) Stop at the present playing point / (2 times) Stop playing Go...
... 1.5, 2, or 4 times the original Display the setup menu to point B of the disc Repeat playing title or chapter Repeat a specific portion from point to select and set items, and exit the setup menu. 15 1. Basic Operation POWER OPEN/CLOSE PLAY SLOW PAUSE STOP NEXT PREVIOUS FORWARD REVERSE UP/DOWN/LEFT /RIGHT ENTER NUMBERS Return MENU REPEAT A-B DISPLAY ANGLE SUBTITLE AUDIO ZOOM SETUP Turn on /off the unit Eject/load the disc Start Play Play at 1/2, 1/4, or 1/8 times speed Still Picture (1 time) Stop at the present playing point / (2 times) Stop playing Go...

Owners Manual
Page 16
... number of the menu vary from disc to select disc play a DVD, a root menu of the disc will disappear automatically in about 3 seconds. 16 Press DISPLAY again to start playing. The heading will appear on the screen of your TV or Monitor. Press MENU during playing to display the menu, and press ENTER or PLAY to display the remaining time for the title (5). Some DVDs allow you play back options using the DVD menu. 3. Playing time...
... number of the menu vary from disc to select disc play a DVD, a root menu of the disc will disappear automatically in about 3 seconds. 16 Press DISPLAY again to start playing. The heading will appear on the screen of your TV or Monitor. Press MENU during playing to display the menu, and press ENTER or PLAY to display the remaining time for the title (5). Some DVDs allow you play back options using the DVD menu. 3. Playing time...

Owners Manual
Page 18
... to select another subtitle language. The subtitle display will disappear automatically if the ANGLE button isn't pressed again in about 3 seconds. (Menu 5) 3). To turn subtitles off, press the subtitle button until SUBTITLE OFF is displayed. 2). Subtitle During playing press SUBTITLE to view angles for 3 seconds. (Menu 6) 18 The angle display will disappear automatically if the SUBTITLE button isn't pressed again for discs containing multi-angles, with the current subtitle language number (1) and the total number of angles (2) displaying.
... to select another subtitle language. The subtitle display will disappear automatically if the ANGLE button isn't pressed again in about 3 seconds. (Menu 5) 3). To turn subtitles off, press the subtitle button until SUBTITLE OFF is displayed. 2). Subtitle During playing press SUBTITLE to view angles for 3 seconds. (Menu 6) 18 The angle display will disappear automatically if the SUBTITLE button isn't pressed again for discs containing multi-angles, with the current subtitle language number (1) and the total number of angles (2) displaying.
Owners Manual
Page 22
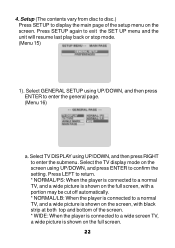
... the setup menu on the screen using UP/DOWN, and then press ENTER to a normal TV, and a wide picture is connected to enter the general page. (Menu 16) a. Press SETUP again to enter the submenu. Select the TV display mode on the screen. 4. Select TV DISPLAY using UP/DOWN, and then press RIGHT to exit the SET UP menu and the unit will resume last play back or stop mode. (Menu...
... the setup menu on the screen using UP/DOWN, and then press ENTER to a normal TV, and a wide picture is connected to enter the general page. (Menu 16) a. Press SETUP again to enter the submenu. Select the TV display mode on the screen. 4. Select TV DISPLAY using UP/DOWN, and then press RIGHT to exit the SET UP menu and the unit will resume last play back or stop mode. (Menu...

Owners Manual
Page 23
... the setting. b. Press LEFT to return. * MULTI: The connected TV is multi system. * NTSC: The connected TV is NTSC system. * PAL: The connected TV is avail able) * OFF: the screen won't show angle mark on the screen using UP/DOWN, and then press RIGHT to return. (Menu 18) * ON: The screen will show angle mark. (If angle option is PAL system. Select TV TYPE using UP...
... the setting. b. Press LEFT to return. * MULTI: The connected TV is multi system. * NTSC: The connected TV is NTSC system. * PAL: The connected TV is avail able) * OFF: the screen won't show angle mark on the screen using UP/DOWN, and then press RIGHT to return. (Menu 18) * ON: The screen will show angle mark. (If angle option is PAL system. Select TV TYPE using UP...

Owners Manual
Page 24
.... (Menu 19) 2). Select the audio language you desired using UP/DOWN, and then press ENTER to confirm the setting. Select SUBTITLE using UP/DOWN, and then press ENTER to enter the preferences page. (Menu 20) a. Select the subtitle language or SUBTITLE OFF you desire using UP/DOWN, and then press RIGHT to confirm the setting. Press LEFT to return. 24 When there's no disc inside the player, select PREFERENCES using...
.... (Menu 19) 2). Select the audio language you desired using UP/DOWN, and then press ENTER to confirm the setting. Select SUBTITLE using UP/DOWN, and then press ENTER to enter the preferences page. (Menu 20) a. Select the subtitle language or SUBTITLE OFF you desire using UP/DOWN, and then press RIGHT to confirm the setting. Press LEFT to return. 24 When there's no disc inside the player, select PREFERENCES using...
Owners Manual
Page 25
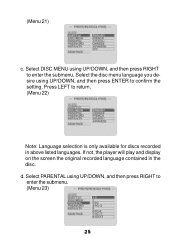
Select DISC MENU using UP/DOWN, and then press RIGHT to enter the submenu. Press LEFT to confirm the setting. d. Select PARENTAL using UP/DOWN, and then press RIGHT to enter the submenu. (Menu 23) 25 Select the disc menu language you desire using UP/DOWN, and then press ENTER to return. (Menu 22) Note: Language selection is only available for discs recorded in the disc. (Menu 21) c. If not, the player will play and display on the screen the original recorded language contained in above listed languages.
Select DISC MENU using UP/DOWN, and then press RIGHT to enter the submenu. Press LEFT to confirm the setting. d. Select PARENTAL using UP/DOWN, and then press RIGHT to enter the submenu. (Menu 23) 25 Select the disc menu language you desire using UP/DOWN, and then press ENTER to return. (Menu 22) Note: Language selection is only available for discs recorded in the disc. (Menu 21) c. If not, the player will play and display on the screen the original recorded language contained in above listed languages.

Owners Manual
Page 26
... the password verify page. (Menu 24) Input the password in 4 digits, and then press ENTER to the highest level (8 Adult). Select PASSWORD using UP/DOWN for 1st time use, the default password 3308. NOTE: for discs with lock-out function or multiple rating levels. e. Press ENTER to confirm the change page. It's listed from the lowest level (1 Child) to confirm the parental level setting. Select the parental level you desired using UP...
... the password verify page. (Menu 24) Input the password in 4 digits, and then press ENTER to the highest level (8 Adult). Select PASSWORD using UP/DOWN for 1st time use, the default password 3308. NOTE: for discs with lock-out function or multiple rating levels. e. Press ENTER to confirm the change page. It's listed from the lowest level (1 Child) to confirm the parental level setting. Select the parental level you desired using UP...
Owners Manual
Page 27
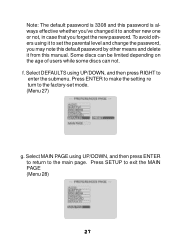
... or not, in case that you may note this default password by other means and delete it to set mode. (Menu 27) g. Press SETUP to the factory-set the parental level and change the password, you forget the new password. Select DEFAULTS using UP/DOWN, and then press ENTER to return to the main page. f. Press ENTER to make the setting re turn to exit the MAIN PAGE...
... or not, in case that you may note this default password by other means and delete it to set mode. (Menu 27) g. Press SETUP to the factory-set the parental level and change the password, you forget the new password. Select DEFAULTS using UP/DOWN, and then press ENTER to return to the main page. f. Press ENTER to make the setting re turn to exit the MAIN PAGE...
Owners Manual
Page 28
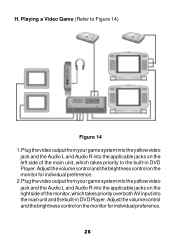
... priority over both AV input into the main unit and the built-in DVD Player. Adjust the volume control and the brightness control on the monitor for individual preference. 2.Plug the video output from your game system into the yellow video jack and the Audio L and Audio R into the applicable jacks on the monitor for individual preference. 28 Playing a Video Game (Refer to the...
... priority over both AV input into the main unit and the built-in DVD Player. Adjust the volume control and the brightness control on the monitor for individual preference. 2.Plug the video output from your game system into the yellow video jack and the Audio L and Audio R into the applicable jacks on the monitor for individual preference. 28 Playing a Video Game (Refer to the...
Owners Manual
Page 29
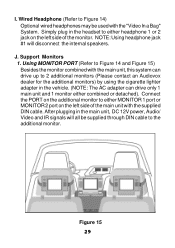
... AC adapter can drive only 1 main unit and 1 monitor either headphone 1 or 2 jack on the left side of the main unit with the "Video In a Bag" System. Simply plug in the main unit, DC 12V power, Audio/ Video and IR signals will disconnect the internal speakers. NOTE: Using headphone jack #1 will all be used with the supplied DIN cable. Support Monitors 1. Using...
... AC adapter can drive only 1 main unit and 1 monitor either headphone 1 or 2 jack on the left side of the main unit with the "Video In a Bag" System. Simply plug in the main unit, DC 12V power, Audio/ Video and IR signals will disconnect the internal speakers. NOTE: Using headphone jack #1 will all be used with the supplied DIN cable. Support Monitors 1. Using...
Owners Manual
Page 30
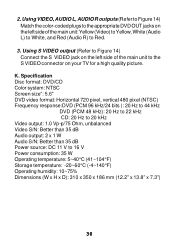
2. Specification Disc format: DVD/CD Color system: NTSC Screen size": 5.6" DVD video format: Horizontal 720 pixel, vertical 480 pixel (NTSC) Frequency response:DVD (PCM 96 kHz/24 bits ): 20 Hz to 44 kHz DVD (PCM 48 kHz): 20 Hz to 22 kHz CD: 20 Hz to 20 kHz Video output: 1.0 Vp-p/75 Ohm, unbalanced Video S/N: Better than 35 dB Audio output: 2 x 1 W Audio S/N: Better than 35 dB Power source: DC 11 V to...
2. Specification Disc format: DVD/CD Color system: NTSC Screen size": 5.6" DVD video format: Horizontal 720 pixel, vertical 480 pixel (NTSC) Frequency response:DVD (PCM 96 kHz/24 bits ): 20 Hz to 44 kHz DVD (PCM 48 kHz): 20 Hz to 22 kHz CD: 20 Hz to 20 kHz Video output: 1.0 Vp-p/75 Ohm, unbalanced Video S/N: Better than 35 dB Audio output: 2 x 1 W Audio S/N: Better than 35 dB Power source: DC 11 V to...
Owners Manual
Page 31
... is in connection with the sale of this product. dated bill of sale), specification of warranty coverage (e.g. This Warranty is authorized to assume for parts and repair labor. Some...part thereof, under normal use and conditions, be proven defective in the opinion of the Company, has suffered or been damaged through alteration, improper installation, mishandling, misuse, neglect, accident, or by removal or defacement of the factory serial number/bar code label(s). This Warranty gives you specific legal rights and you . OPERATING INSTRUCTIONS 90 DAY LIMITED WARRANTY AUDIOVOX...
... is in connection with the sale of this product. dated bill of sale), specification of warranty coverage (e.g. This Warranty is authorized to assume for parts and repair labor. Some...part thereof, under normal use and conditions, be proven defective in the opinion of the Company, has suffered or been damaged through alteration, improper installation, mishandling, misuse, neglect, accident, or by removal or defacement of the factory serial number/bar code label(s). This Warranty gives you specific legal rights and you . OPERATING INSTRUCTIONS 90 DAY LIMITED WARRANTY AUDIOVOX...


