Owners Manual
Page 6
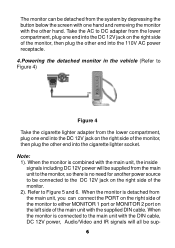
... the other hand. When the monitor is detached from the main unit, you can be detached from the system by depressing the button below the screen with one end into the cigarette lighter socket. Refer to Figure 5 and 6. When the monitor is combined with the supplied DIN cable.
... the other hand. When the monitor is detached from the main unit, you can be detached from the system by depressing the button below the screen with one end into the cigarette lighter socket. Refer to Figure 5 and 6. When the monitor is combined with the supplied DIN cable.

Owners Manual
Page 8
... enough to reach back to the same ring after looping the strap around the headrest of the bag. Swing the monitor upwards and adjust the screen for the right side. Unzip the bag and flip down the front flap. Installation 1. Installing the system onto the seat back in a car (Refer to...
... enough to reach back to the same ring after looping the strap around the headrest of the bag. Swing the monitor upwards and adjust the screen for the right side. Unzip the bag and flip down the front flap. Installation 1. Installing the system onto the seat back in a car (Refer to...

Owners Manual
Page 9
... to reach back to the upper metal ring on the left side of the supplied straps from falling. Swing the monitor upwards and adjust the screen for the right side. Installing the system between the driver/passenger seat (Refer to Figure 8) Figure 8 1).Take one of the bag. Repeat this process for...
... to reach back to the upper metal ring on the left side of the supplied straps from falling. Swing the monitor upwards and adjust the screen for the right side. Installing the system between the driver/passenger seat (Refer to Figure 8) Figure 8 1).Take one of the bag. Repeat this process for...

Owners Manual
Page 10
... the back seat. Installing the detached monitor onto the seat back in this installation. Finally uncover the bag, swing the monitor upward and adjust the screen for a desired viewing angle. Figure 9 Carefully place the system (front facing up) on the back of the bag is not free to Figure 10) Figure...
... the back seat. Installing the detached monitor onto the seat back in this installation. Finally uncover the bag, swing the monitor upward and adjust the screen for a desired viewing angle. Figure 9 Carefully place the system (front facing up) on the back of the bag is not free to Figure 10) Figure...

Owners Manual
Page 11
... pouch around the headrest and pull the end of the main unit. 5. Take the pouch from the bag by depressing the but ton below the screen with or without the unit inside Velcro strap of the monitor and attach the Velcro strap to Figure 11) Figure 11 1). Slide the monitor into... detached monitor, and the other hand. Insert one hand and remove the monitor with the system bottom facing down. Uncover the monitor and adjust the screen for the desired viewing angle. 1).
... pouch around the headrest and pull the end of the main unit. 5. Take the pouch from the bag by depressing the but ton below the screen with or without the unit inside Velcro strap of the monitor and attach the Velcro strap to Figure 11) Figure 11 1). Slide the monitor into... detached monitor, and the other hand. Insert one hand and remove the monitor with the system bottom facing down. Uncover the monitor and adjust the screen for the desired viewing angle. 1).

Owners Manual
Page 12
This can detach the monitor from the main unit by depress ing the button below the screen with one end of the DIN cable into the PORT on the right side of the detached monitor, and the other end into either MONITOR 1 .... You can be placed on the left side of the monitor backward so that it may be done with the other level surface. Adjust the screen for the proper viewing angle. Unit View (Refer to Figure 12) 31 Figure 12 12 2). Controls, Indicators, and Connectors 1. Insert one hand and removing the...
This can detach the monitor from the main unit by depress ing the button below the screen with one end of the DIN cable into the PORT on the right side of the detached monitor, and the other end into either MONITOR 1 .... You can be placed on the left side of the monitor backward so that it may be done with the other level surface. Adjust the screen for the proper viewing angle. Unit View (Refer to Figure 12) 31 Figure 12 12 2). Controls, Indicators, and Connectors 1. Insert one hand and removing the...

Owners Manual
Page 16
...2. The contents of your TV or Monitor. Display (The contents vary from disc to disc. Menu A DVD is divided into sections called title and chapter. The heading will appear on the screen of the menu vary from disc to display the remaining time for the title (5). Press DISPLAY again to... disc.) 1). Some DVDs allow you play a DVD, a root menu of chapters (4), and the playing time for the title...
...2. The contents of your TV or Monitor. Display (The contents vary from disc to disc. Menu A DVD is divided into sections called title and chapter. The heading will appear on the screen of the menu vary from disc to display the remaining time for the title (5). Press DISPLAY again to... disc.) 1). Some DVDs allow you play a DVD, a root menu of chapters (4), and the playing time for the title...
Owners Manual
Page 22
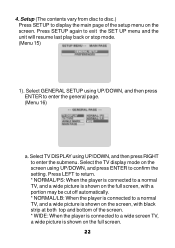
...(Menu 16) a. 4. Press SETUP again to enter the submenu. Select the TV display mode on the full screen. 22 Press LEFT to return. * NORMAL/PS: When the player is connected to a normal TV, and a wide picture is shown on the full screen, with a portion may be cut off automatically. * NORMAL/LB: When the... the setting. Setup (The contents vary from disc to disc.) Press SETUP to display the main page of the screen. * WIDE: When the player is connected to a wide screen TV, a wide picture is shown on the screen using UP/DOWN, and press ENTER to a normal TV, and a wide picture is shown on the...
...(Menu 16) a. 4. Press SETUP again to enter the submenu. Select the TV display mode on the full screen. 22 Press LEFT to return. * NORMAL/PS: When the player is connected to a normal TV, and a wide picture is shown on the full screen, with a portion may be cut off automatically. * NORMAL/LB: When the... the setting. Setup (The contents vary from disc to disc.) Press SETUP to display the main page of the screen. * WIDE: When the player is connected to a wide screen TV, a wide picture is shown on the screen using UP/DOWN, and press ENTER to a normal TV, and a wide picture is shown on the...

Owners Manual
Page 23
... UP/DOWN, and then press RIGHT to enter the submenu. (Menu 17) Select the video system on the screen using UP/DOWN and then press ENTER to confirm the setting. Choose if to show angle mark on the screen using UP/DOWN, and then press RIGHT to return. (Menu 18) * ON: The... screen will show angle mark. 23 Press LEFT to enter the submenu. c. b. Select ANGLE MARK using UP/DOWN, and press...
... UP/DOWN, and then press RIGHT to enter the submenu. (Menu 17) Select the video system on the screen using UP/DOWN and then press ENTER to confirm the setting. Choose if to show angle mark on the screen using UP/DOWN, and then press RIGHT to return. (Menu 18) * ON: The... screen will show angle mark. 23 Press LEFT to enter the submenu. c. b. Select ANGLE MARK using UP/DOWN, and press...
Owners Manual
Page 25
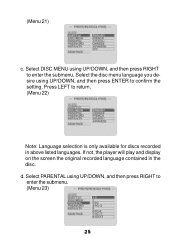
Select the disc menu language you desire using UP/DOWN, and then press RIGHT to confirm the setting. If not, the player will play and display on the screen the original recorded language contained in above listed languages. Press LEFT to enter the submenu. (Menu 23) 25 Select DISC MENU using UP/DOWN, and then press ENTER to enter the submenu. d. (Menu 21) c. Select PARENTAL using UP/DOWN, and then press RIGHT to return. (Menu 22) Note: Language selection is only available for discs recorded in the disc.
Select the disc menu language you desire using UP/DOWN, and then press RIGHT to confirm the setting. If not, the player will play and display on the screen the original recorded language contained in above listed languages. Press LEFT to enter the submenu. (Menu 23) 25 Select DISC MENU using UP/DOWN, and then press ENTER to enter the submenu. d. (Menu 21) c. Select PARENTAL using UP/DOWN, and then press RIGHT to return. (Menu 22) Note: Language selection is only available for discs recorded in the disc.
Owners Manual
Page 30
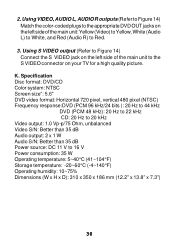
K. Specification Disc format: DVD/CD Color system: NTSC Screen size": 5.6" DVD video format: Horizontal 720 pixel, vertical 480 pixel (NTSC) Frequency response:DVD (PCM 96 kHz/24 bits ): 20 Hz to 44 kHz DVD (PCM 48 kHz): 20 Hz to 22 kHz CD: 20 Hz to 20 kHz Video output: 1.0 Vp-p/75 Ohm, unbalanced Video S/N: ...jack on your TV for a high quality picture. 2. Using VIDEO, AUDIO L, AUDIO R outputs (Refer to Figure 14) Match the color-coded plugs to the appropriate DVD OUT jacks on the left side of the main unit to the S VIDEO connector on the left side of the main unit: Yellow (Video) to...
K. Specification Disc format: DVD/CD Color system: NTSC Screen size": 5.6" DVD video format: Horizontal 720 pixel, vertical 480 pixel (NTSC) Frequency response:DVD (PCM 96 kHz/24 bits ): 20 Hz to 44 kHz DVD (PCM 48 kHz): 20 Hz to 22 kHz CD: 20 Hz to 20 kHz Video output: 1.0 Vp-p/75 Ohm, unbalanced Video S/N: ...jack on your TV for a high quality picture. 2. Using VIDEO, AUDIO L, AUDIO R outputs (Refer to Figure 14) Match the color-coded plugs to the appropriate DVD OUT jacks on the left side of the main unit to the S VIDEO connector on the left side of the main unit: Yellow (Video) to...


