
Operation Manual
Page 2
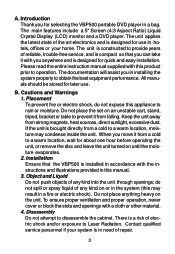
An LCD panel or video monitor used for television reception, video or DVD play , the LCD panel or video monitor must be installed to the rear of the motor vehicle. 2 An LCD panel and/or video monitor may be visible, directly or indirectly, to the operator of the driver's seat where it will only function when the vehicle is in gear or when the parking brake is...
An LCD panel or video monitor used for television reception, video or DVD play , the LCD panel or video monitor must be installed to the rear of the motor vehicle. 2 An LCD panel and/or video monitor may be visible, directly or indirectly, to the operator of the driver's seat where it will only function when the vehicle is in gear or when the parking brake is...
Operation Manual
Page 3
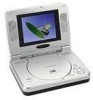
... a 5" Screen (4:3 Aspect Ratio) Liquid Crystal Display (LCD) monitor and a DVD player. The unit applies the latest state of any kind on an unstable cart, stand, tripod, bracket or table to Laser Radiation. Please read the entire instruction manual supplied with the instructions and illustrations provided in this may condense inside the unit. The documentation will assist you for selecting the VBP500 portable DVD player in need...
... a 5" Screen (4:3 Aspect Ratio) Liquid Crystal Display (LCD) monitor and a DVD player. The unit applies the latest state of any kind on an unstable cart, stand, tripod, bracket or table to Laser Radiation. Please read the entire instruction manual supplied with the instructions and illustrations provided in this may condense inside the unit. The documentation will assist you for selecting the VBP500 portable DVD player in need...
Operation Manual
Page 4
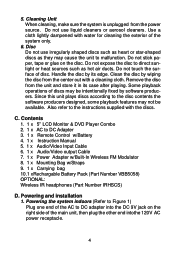
... its edge. Powering the system indoors (Refer to Figure 1) Plug one end of the AC to the disc contents the software producers designed, some playback features may be available. Also refer to DC Adapter 3. 1 x Remote Control w/Battery 4. 1 x Instruction Manual 5. 1 x Audio/Video Input Cable 6. 1 x Audio/Video output Cable 7. 1 x Power Adapter w/Built-In Wireless FM Modulator 8. 1 x Mounting Bag w/Straps 9. 1 x Carrying bag 10.1 xRechargable Battery Pack (Part Number VBB5058) OPTIONAL: Wireless IR headphones (Part Number IRHSCS) D. Powering and installation 1.
... its edge. Powering the system indoors (Refer to Figure 1) Plug one end of the AC to the disc contents the software producers designed, some playback features may be available. Also refer to DC Adapter 3. 1 x Remote Control w/Battery 4. 1 x Instruction Manual 5. 1 x Audio/Video Input Cable 6. 1 x Audio/Video output Cable 7. 1 x Power Adapter w/Built-In Wireless FM Modulator 8. 1 x Mounting Bag w/Straps 9. 1 x Carrying bag 10.1 xRechargable Battery Pack (Part Number VBB5058) OPTIONAL: Wireless IR headphones (Part Number IRHSCS) D. Powering and installation 1.
Operation Manual
Page 10
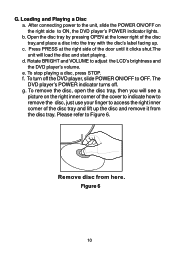
... of the disc tray and lift up . To turn off . To remove the disc, open the disc tray, then you will load the disc and start playing. d. Please refer to adjust the LCD's brightness and the DVD player's volume. Loading and Playing a Disc a. g. b. e. The DVD player's POWER indicator turns off the DVD player, slide POWER ON/OFF to access the right inner corner of the door until it from the disc tray. To stop playing a disc, press STOP. f. Figure 6 10 G. c. After connecting power to...
... of the disc tray and lift up . To turn off . To remove the disc, open the disc tray, then you will load the disc and start playing. d. Please refer to adjust the LCD's brightness and the DVD player's volume. Loading and Playing a Disc a. g. b. e. The DVD player's POWER indicator turns off the DVD player, slide POWER ON/OFF to access the right inner corner of the door until it from the disc tray. To stop playing a disc, press STOP. f. Figure 6 10 G. c. After connecting power to...
Operation Manual
Page 11
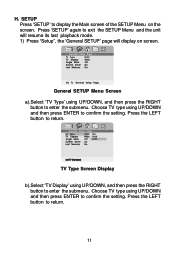
... setting. Press the LEFT button to return. Press the LEFT button to return. 11 General SETUP Menu Screen a).Select 'TV Type' using UP/DOWN and then press ENTER to exit the SETUP Menu and the unit will resume its last playback mode. 1) Press "Setup", the 'General SETUP' page will display on the screen. Choose TV type using UP/DOWN, and then press the RIGHT button to confirm the setting. TV Type Screen Display b).Select 'TV Display' using...
... setting. Press the LEFT button to return. Press the LEFT button to return. 11 General SETUP Menu Screen a).Select 'TV Type' using UP/DOWN and then press ENTER to exit the SETUP Menu and the unit will resume its last playback mode. 1) Press "Setup", the 'General SETUP' page will display on the screen. Choose TV type using UP/DOWN, and then press the RIGHT button to confirm the setting. TV Type Screen Display b).Select 'TV Display' using...

Operation Manual
Page 12
... full screen. Choose TV type using UP/DOWN and then press ENTER to enter the submenu. ANGLE MARK Screen Display * On: The screen will not display the Angle Mark icon. Press the LEFT button to enter the submenu. c).Select 'Angel Mark' using UP/DOWN, and then press the RIGHT button to confirm the setting. NOTE: Not all discs contain above features. d).Select 'Screen Saver' using UP...
... full screen. Choose TV type using UP/DOWN and then press ENTER to enter the submenu. ANGLE MARK Screen Display * On: The screen will not display the Angle Mark icon. Press the LEFT button to enter the submenu. c).Select 'Angel Mark' using UP/DOWN, and then press the RIGHT button to confirm the setting. NOTE: Not all discs contain above features. d).Select 'Screen Saver' using UP...
Operation Manual
Page 13
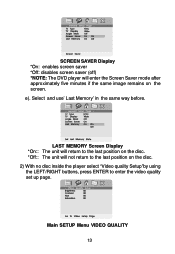
e). Select and use' Last Memory' in the same way before. SCREEN SAVER Display *On: enables screen saver *Off: disables screen saver (off) *NOTE: The DVD player will not return to enter the video quality set up page. Main SETUP Menu VIDEO QUALITY 13 LAST MEMORY Screen Display *On:: The unit will return to the last position on the disc. *Off:: The unit will enter the Screen Saver mode after approximately...
e). Select and use' Last Memory' in the same way before. SCREEN SAVER Display *On: enables screen saver *Off: disables screen saver (off) *NOTE: The DVD player will not return to enter the video quality set up page. Main SETUP Menu VIDEO QUALITY 13 LAST MEMORY Screen Display *On:: The unit will return to the last position on the disc. *Off:: The unit will enter the Screen Saver mode after approximately...

Operation Manual
Page 15
Input the "Old password' or the 'Default Password', the 'New Password', and the 'Confirmed New Password'. Press ENTER to enter the 'Password Change' page. PASSWORD CHANGE Menu Press ENTER to confirm the change. SATURATION (Color)Screen Display 3).With no disc inside the player, select 'password' using the LEFT or RIGHT buttons, press ENTER to enter the password setup page, then press the RIGHT button to enter the submenu . d).Select and use 'Saturation' in the same way before. PASSWORD CHANGE MENU 15
Input the "Old password' or the 'Default Password', the 'New Password', and the 'Confirmed New Password'. Press ENTER to enter the 'Password Change' page. PASSWORD CHANGE Menu Press ENTER to confirm the change. SATURATION (Color)Screen Display 3).With no disc inside the player, select 'password' using the LEFT or RIGHT buttons, press ENTER to enter the password setup page, then press the RIGHT button to enter the submenu . d).Select and use 'Saturation' in the same way before. PASSWORD CHANGE MENU 15
Operation Manual
Page 16
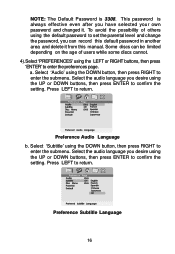
.... Select the audio language you can be limited depending on the age of users while some discs cannot. 4).Select 'PREFERENCES' using the LEFT or RIGHT buttons, then press 'ENTER' to confirm the setting. Press LEFT to return. Preference Subtitle Language 16 This password is 3308. To avoid the possibility of others using the default password to set the parental level and change the password, you desire using the DOWN button, then...
.... Select the audio language you can be limited depending on the age of users while some discs cannot. 4).Select 'PREFERENCES' using the LEFT or RIGHT buttons, then press 'ENTER' to confirm the setting. Press LEFT to return. Preference Subtitle Language 16 This password is 3308. To avoid the possibility of others using the default password to set the parental level and change the password, you desire using the DOWN button, then...

Operation Manual
Page 17
... confirm the parental level setting. Select 'Parental' using the UP or DOWN buttons for discs that are listed from the lowest level (1 Kid Safe) to the highest level (Adult). These are recorded in the above listed languages. d. NOTE: The level of 8 Adult is only available for discs with lock-out function or multiple rating levels. Select and use 'Disc Menu' in the disc. Preference Disc Menu Language Note: Language and subtitle selection is the factory default. 17...
... confirm the parental level setting. Select 'Parental' using the UP or DOWN buttons for discs that are listed from the lowest level (1 Kid Safe) to the highest level (Adult). These are recorded in the above listed languages. d. NOTE: The level of 8 Adult is only available for discs with lock-out function or multiple rating levels. Select and use 'Disc Menu' in the disc. Preference Disc Menu Language Note: Language and subtitle selection is the factory default. 17...

Operation Manual
Page 18
Press ENTER to make the setting return to enter the submenu. Loading Factory Setting NOTE: The parental setting is not affected by the default reset function. 18 Select 'Default' using the DOWN button, then press RIGHT to the factory-set mode. e.
Press ENTER to make the setting return to enter the submenu. Loading Factory Setting NOTE: The parental setting is not affected by the default reset function. 18 Select 'Default' using the DOWN button, then press RIGHT to the factory-set mode. e.
Operation Manual
Page 19
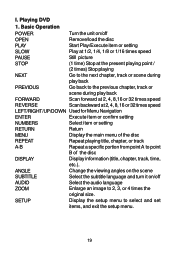
... viewing angles on the scene SUBTITLE AUDIO ZOOM Select the subtitle language and turn it on /off Select the audio language Enlarge an image to 2, 3, or 4 times the original size. SETUP Display the setup menu to point B of the disc DISPLAY Display information (title, chapter, track, time, etc.). Basic Operation POWER Turn the unit on /off OPEN PLAY Remove/load the disc Start Play/Execute item or setting SLOW Play at 1/2, 1/4, 1/8 or 1/16 times speed PAUSE STOP Still picture (1 time) Stop at the present playing point / (2 times) Stop playing...
... viewing angles on the scene SUBTITLE AUDIO ZOOM Select the subtitle language and turn it on /off Select the audio language Enlarge an image to 2, 3, or 4 times the original size. SETUP Display the setup menu to point B of the disc DISPLAY Display information (title, chapter, track, time, etc.). Basic Operation POWER Turn the unit on /off OPEN PLAY Remove/load the disc Start Play/Execute item or setting SLOW Play at 1/2, 1/4, 1/8 or 1/16 times speed PAUSE STOP Still picture (1 time) Stop at the present playing point / (2 times) Stop playing...

Operation Manual
Page 20
... select disc playback options using the DVD root menu. 3. Press 'DISPLAY' again to disc. DISPLAY (Display contents vary from disc to display the Remaining Time of Chapters (4), and the playing elapsed time for the title (5). Title, Chapter Number, and Time Screen Display b. The heading will disappear automatically after 3 seconds if no buttons are pressed. PLAYING TIME AND REMAINING TIME a. Some DVDs only allow you play a DVD, a root menu of the menu vary from disc to display the menu. Title Remaining Time Screen Display 20 MENU A DVD...
... select disc playback options using the DVD root menu. 3. Press 'DISPLAY' again to disc. DISPLAY (Display contents vary from disc to display the Remaining Time of Chapters (4), and the playing elapsed time for the title (5). Title, Chapter Number, and Time Screen Display b. The heading will disappear automatically after 3 seconds if no buttons are pressed. PLAYING TIME AND REMAINING TIME a. Some DVDs only allow you play a DVD, a root menu of the menu vary from disc to display the menu. Title Remaining Time Screen Display 20 MENU A DVD...
Operation Manual
Page 28
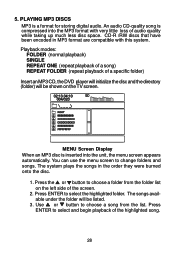
... or button to select and begin playback of the screen. 2. Press ENTER to choose a folder from the list. MENU Screen Display When an MP3 disc is a format for storing digital audio. Use or button to select the highlighted folder. 5. Press ENTER to choose a song from the folder list on the TV screen. CD-R /RW discs that have been encoded in the order they were burned onto the disc. 1. PLAYING MP3 DISCS...
... or button to select and begin playback of the screen. 2. Press ENTER to choose a folder from the list. MENU Screen Display When an MP3 disc is a format for storing digital audio. Use or button to select the highlighted folder. 5. Press ENTER to choose a song from the folder list on the TV screen. CD-R /RW discs that have been encoded in the order they were burned onto the disc. 1. PLAYING MP3 DISCS...
Operation Manual
Page 32
... of the audio/video cable's black (1/8" stereo plug) plug into Headphone jack 1disables external speakers. 32 Figure 7 J. WIRELESS HEADPHONE Optional wired headphones may be used with the unit. Simply plug in the headset to the VIDEO INPUT jack on your TV or Monitor (white = left channel, red = right channel). 2. Wired and Wireless Headphones(Refer to enjoy high quality stereo sound or...
... of the audio/video cable's black (1/8" stereo plug) plug into Headphone jack 1disables external speakers. 32 Figure 7 J. WIRELESS HEADPHONE Optional wired headphones may be used with the unit. Simply plug in the headset to the VIDEO INPUT jack on your TV or Monitor (white = left channel, red = right channel). 2. Wired and Wireless Headphones(Refer to enjoy high quality stereo sound or...
Operation Manual
Page 33
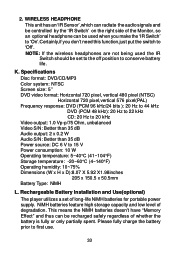
... x 150.5 x 50.5mm Battery Type: NiMH L. K. Specifications Disc format: DVD/CD/MP3 Color system: NTSC Screen size: 5'' DVD video format: Horizontal 720 pixel, vertical 480 pixel (NTSC) Horizontal 720 pixel,vertical 576 pixel(PAL) Frequency response: DVD (PCM 96 kHz/24 bits ): 20 Hz to 44 kHz DVD (PCM 48 kHz): 20 Hz to 22 kHz CD: 20 Hz to 20 kHz Video output: 1.0 Vp-p/75 Ohm, unbalanced...
... x 150.5 x 50.5mm Battery Type: NiMH L. K. Specifications Disc format: DVD/CD/MP3 Color system: NTSC Screen size: 5'' DVD video format: Horizontal 720 pixel, vertical 480 pixel (NTSC) Horizontal 720 pixel,vertical 576 pixel(PAL) Frequency response: DVD (PCM 96 kHz/24 bits ): 20 Hz to 44 kHz DVD (PCM 48 kHz): 20 Hz to 22 kHz CD: 20 Hz to 20 kHz Video output: 1.0 Vp-p/75 Ohm, unbalanced...

Operation Manual
Page 34
... power jack directly into the VBP500 and leave the POWER switch in a humid or damp environment. Ideally, store the battery in its best condition. At this point you plan to not use battery power again soon) in order to connecting it away properly. Using and Maintaining your Rechargeable Batteries 1.Please make sure you always use only the AC transformer included with the player to the DVD player...
... power jack directly into the VBP500 and leave the POWER switch in a humid or damp environment. Ideally, store the battery in its best condition. At this point you plan to not use battery power again soon) in order to connecting it away properly. Using and Maintaining your Rechargeable Batteries 1.Please make sure you always use only the AC transformer included with the player to the DVD player...
Operation Manual
Page 35
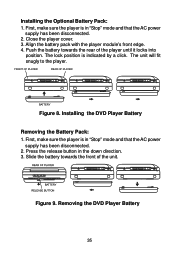
... lock position is in "Stop" mode and that the AC power supply has been disconnected. 2. Figure 8. Installing the DVD Player Battery Removing the Battery Pack: 1. Slide the battery towards the rear of the unit. Installing the Optional Battery Pack: 1. Close the player cover. 3. First, make sure the player is indicated by a click. Align the battery pack with the player module's front edge. 4. Press the release button in the down direction. 3. Removing the DVD Player Battery 35...
... lock position is in "Stop" mode and that the AC power supply has been disconnected. 2. Figure 8. Installing the DVD Player Battery Removing the Battery Pack: 1. Slide the battery towards the rear of the unit. Installing the Optional Battery Pack: 1. Close the player cover. 3. First, make sure the player is indicated by a click. Align the battery pack with the player module's front edge. 4. Press the release button in the down direction. 3. Removing the DVD Player Battery 35...
Operation Manual
Page 36
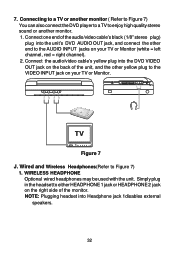
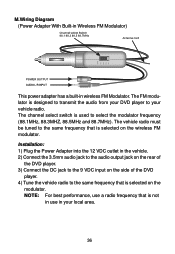
The channel select switch is not in the vehicle. 2) Connect the 3.5mm audio jack to the audio output jack on the rear of the DVD player. 3) Connect the DC jack to the 9 VDC input on the side of the DVD player. 4) Tune the vehicle radio to your local area. 36 Installation: 1) Plug the Power Adapter into the 12 VDC outlet in use a radio frequency that is selected on the wireless...
The channel select switch is not in the vehicle. 2) Connect the 3.5mm audio jack to the audio output jack on the rear of the DVD player. 3) Connect the DC jack to the 9 VDC input on the side of the DVD player. 4) Tune the vehicle radio to your local area. 36 Installation: 1) Plug the Power Adapter into the 12 VDC outlet in use a radio frequency that is selected on the wireless...

Operation Manual
Page 37
... Company's option) without charge for installation, removal or reinstallation of the product, or to damage to tapes, discs, speakers, accessories, or electrical systems. This Warranty does not apply to any product or part thereof which vary from the date of original purchase, such defect(s) will be repaired or replaced with proof of the factory serial number/ bar code label(s). U.S.A. : AUDIOVOX ELECTRONICS CORPORATION, 150...
... Company's option) without charge for installation, removal or reinstallation of the product, or to damage to tapes, discs, speakers, accessories, or electrical systems. This Warranty does not apply to any product or part thereof which vary from the date of original purchase, such defect(s) will be repaired or replaced with proof of the factory serial number/ bar code label(s). U.S.A. : AUDIOVOX ELECTRONICS CORPORATION, 150...


