Owners Guide
Page 1
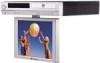
Multi-Function Remote Control - Built-in Speaker Phone Mode - Internal Stereo Speakers - A/V Input -1- 128-6451 DVD Player & 10.4" TFT LCD Monitor - Cable Ready 125 Channel Tuner - Under Cabinet Mounting - LOW PROFILE DVD/TV/SPEAKER PHONE OWNER'S/INSTALLATION GUIDE -
Multi-Function Remote Control - Built-in Speaker Phone Mode - Internal Stereo Speakers - A/V Input -1- 128-6451 DVD Player & 10.4" TFT LCD Monitor - Cable Ready 125 Channel Tuner - Under Cabinet Mounting - LOW PROFILE DVD/TV/SPEAKER PHONE OWNER'S/INSTALLATION GUIDE -

Owners Guide
Page 2
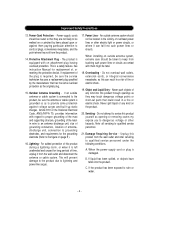
... outlet of important operating and maintenance (servicing) instructions in a particular installation. Connect the equipment to persons. NO USER-SERVICEABLE PARTS INSIDE. Reorient or relocate the receiving antenna. - This symbol is connected. - that interference will not occur in the literature accompanying the VE1040. WARNING To prevent fire or shock hazard, do not expose the unit to radio and television reception. REFER SERVICING TO QUALIFIED SERVICE PERSONNEL. This...
... outlet of important operating and maintenance (servicing) instructions in a particular installation. Connect the equipment to persons. NO USER-SERVICEABLE PARTS INSIDE. Reorient or relocate the receiving antenna. - This symbol is connected. - that interference will not occur in the literature accompanying the VE1040. WARNING To prevent fire or shock hazard, do not expose the unit to radio and television reception. REFER SERVICING TO QUALIFIED SERVICE PERSONNEL. This...
Owners Guide
Page 4
... voltage surges and built-up static charges. When installing on outside antenna system, extreme care should be sure the service technician has uses a replacement plug specified by items placed upon or against them might be located in the vicinity of , or resetting the protective device. Servicing - When the power-supply cord or plug is a safety feature. If liquid has been spilled, or objects have...
... voltage surges and built-up static charges. When installing on outside antenna system, extreme care should be sure the service technician has uses a replacement plug specified by items placed upon or against them might be located in the vicinity of , or resetting the protective device. Servicing - When the power-supply cord or plug is a safety feature. If liquid has been spilled, or objects have...

Owners Guide
Page 5
... the operating instructions, as radiators, heat resistors, or other products (including amplifiers) that the product is in damage and will often require extensive work by following the operating instructions. Upon completion of other hazards. 23. The product should be sure the service technician has used replacement parts specified by the manufacturer. 25. Heat - Adjust only those controls that are required, be mounted to...
... the operating instructions, as radiators, heat resistors, or other products (including amplifiers) that the product is in damage and will often require extensive work by following the operating instructions. Upon completion of other hazards. 23. The product should be sure the service technician has used replacement parts specified by the manufacturer. 25. Heat - Adjust only those controls that are required, be mounted to...
Owners Guide
Page 6
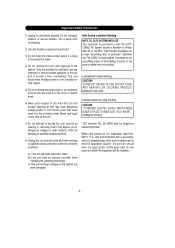
... are provided for cleaning. 2) Use only Audiovox approved accessories. 3) Do not install this video product where it from the outlet and refer servicing to water. b) If the unit does not operate normally when following conditions: a) If the unit has been exposed to qualified service personnel under the following the operating instructions. The cord set should never be installed. - 6 - Cable System Installation Marking bNIpiIbTnnsptp(Ng8ThurehCsOahorra2ppitaOooAalciiTtC0adrtnsuptlTEoBPi-lriTtonecEe4ntrLvrhioTardnorEcg0ieTe'Ofdluiv...
... are provided for cleaning. 2) Use only Audiovox approved accessories. 3) Do not install this video product where it from the outlet and refer servicing to water. b) If the unit does not operate normally when following conditions: a) If the unit has been exposed to qualified service personnel under the following the operating instructions. The cord set should never be installed. - 6 - Cable System Installation Marking bNIpiIbTnnsptp(Ng8ThurehCsOahorra2ppitaOooAalciiTtC0adrtnsuptlTEoBPi-lriTtonecEe4ntrLvrhioTardnorEcg0ieTe'Ofdluiv...
Owners Guide
Page 7
... You Begin Installation Operation Remote Control Functions Modes of Operation Using the Remote Control Functions Using the Setup Menu Definition of Terms Troubleshooting Check List Technical Specifications Table Of Contents Introduction 2 Important Safety Instructions 3 Table of Contents 7 Included in Discs 19 Viewing the Setup Menu 20 Viewing the Playback Time, Title and Chapter Status 20 Using the Setup Menu 21 General Setup 22 Speaker Setup 23 Dolby Digital Setup 23 Preferences 23 Definition of Operation 17 Setting the Cable TV Mode 17 Setting the Presets (For AM...
... You Begin Installation Operation Remote Control Functions Modes of Operation Using the Remote Control Functions Using the Setup Menu Definition of Terms Troubleshooting Check List Technical Specifications Table Of Contents Introduction 2 Important Safety Instructions 3 Table of Contents 7 Included in Discs 19 Viewing the Setup Menu 20 Viewing the Playback Time, Title and Chapter Status 20 Using the Setup Menu 21 General Setup 22 Speaker Setup 23 Dolby Digital Setup 23 Preferences 23 Definition of Operation 17 Setting the Cable TV Mode 17 Setting the Presets (For AM...

Owners Guide
Page 9
... locations marked above a range or oven. Close proximity to effectively lower the VE1040 below or even with the molding. Do not mount the VE1040 above . Do not overtighten. 7) Connect your TV antenna or cable system to the antenna connector on the rear of the VE1040. 8) Plug the AC wire into connector on the rear of the VE1040 and then into the wall. 9) If using the speaker phone feature, plug the VE1040 into a phone...
... locations marked above a range or oven. Close proximity to effectively lower the VE1040 below or even with the molding. Do not mount the VE1040 above . Do not overtighten. 7) Connect your TV antenna or cable system to the antenna connector on the rear of the VE1040. 8) Plug the AC wire into connector on the rear of the VE1040 and then into the wall. 9) If using the speaker phone feature, plug the VE1040 into a phone...
Owners Guide
Page 10
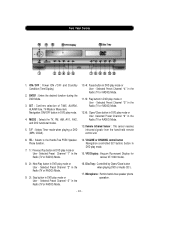
.... Microphone : Permits hands-free speaker phone operation. - 10 - ENTER : Enters the desired function during the DVD Mode. 3. Front Panel Controls 1. T/F : Selects Timer mode when playing a DVD (MP3, CDDA). 10. 4 : Pause button in DVD play mode or User - Selected Preset Channel "1" in the Radio (TV or RADIO) Mode. 16. VOLUME or CHANNEL control button Navigation (controlled SET button) button in DVD play mode. 15. Selected Preset Channel "3" in the Radio (TV or RADIO) Mode. 14. ON/OFF : Power ON /OFF and Standby Condition (Time Display). 2. MODE : Selects the TV, FM, AM...
.... Microphone : Permits hands-free speaker phone operation. - 10 - ENTER : Enters the desired function during the DVD Mode. 3. Front Panel Controls 1. T/F : Selects Timer mode when playing a DVD (MP3, CDDA). 10. 4 : Pause button in DVD play mode or User - Selected Preset Channel "1" in the Radio (TV or RADIO) Mode. 16. VOLUME or CHANNEL control button Navigation (controlled SET button) button in DVD play mode. 15. Selected Preset Channel "3" in the Radio (TV or RADIO) Mode. 14. ON/OFF : Power ON /OFF and Standby Condition (Time Display). 2. MODE : Selects the TV, FM, AM...

Owners Guide
Page 11
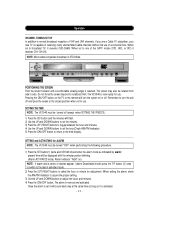
... external coaxial antenna for the reception of FM broadcast signals. 3) AM ANTENNA - Receives the Phone [PSTN] Line Input. - 11 - Provides connection to AC line cord which provides connection to 8 ohm Only). 5) POWER Input Connector - External 8 ohm Speaker (Earphone) Connect stereo output jack. (Adapted to AC input power. 6) Stereo Output Terminal - Provides LEFT and RIGHT external speaker stereo output 7) Audio/Video (A/V) Input Connectors - Support stereo audio and A/V - 1 and 2 video Inputs from an external source. 8) TEL Jack - Rear Panel Controls 1) 75 OHM ANTENNA CONNECTOR -
... external coaxial antenna for the reception of FM broadcast signals. 3) AM ANTENNA - Receives the Phone [PSTN] Line Input. - 11 - Provides connection to AC line cord which provides connection to 8 ohm Only). 5) POWER Input Connector - External 8 ohm Speaker (Earphone) Connect stereo output jack. (Adapted to AC input power. 6) Stereo Output Terminal - Provides LEFT and RIGHT external speaker stereo output 7) Audio/Video (A/V) Input Connectors - Support stereo audio and A/V - 1 and 2 video Inputs from an external source. 8) TEL Jack - Rear Panel Controls 1) 75 OHM ANTENNA CONNECTOR -
Owners Guide
Page 13
... of a converter box. Operation CHANNEL TUNING SET UP In addition to normal broadcast reception of VHF and UHF channels, if you are a Cable TV subscriber, your new TV is capable of receiving many unscrambled Cable channels without the use of dashes appear ( alarm Deactivated mode) press the T/F button (2) once to switch to the alarm activated mode. 2) Press the LEFT/RIGHT buttons to select the hour or minute for use. When set and activated.
... of a converter box. Operation CHANNEL TUNING SET UP In addition to normal broadcast reception of VHF and UHF channels, if you are a Cable TV subscriber, your new TV is capable of receiving many unscrambled Cable channels without the use of dashes appear ( alarm Deactivated mode) press the T/F button (2) once to switch to the alarm activated mode. 2) Press the LEFT/RIGHT buttons to select the hour or minute for use. When set and activated.

Owners Guide
Page 14
... dashes will select a different tone. 4) Press the POWER button to select this tone. 5) When the alarm sounds, press the POWER button to hear tones. 3) Pressing Preset button 1, 2, or 3 will appear ( : - : - The time indication disappears from the Vacuum Flourescent Display(VFD) and a series of the DEACTIVATING THE ALARM procedure. indicating the alarm Deactivated mode. 3) Press the POWER button. SETTING THE ALARM TONES 1) Press the SET button twice (power off . - 14 - Operation...
... dashes will select a different tone. 4) Press the POWER button to select this tone. 5) When the alarm sounds, press the POWER button to hear tones. 3) Pressing Preset button 1, 2, or 3 will appear ( : - : - The time indication disappears from the Vacuum Flourescent Display(VFD) and a series of the DEACTIVATING THE ALARM procedure. indicating the alarm Deactivated mode. 3) Press the POWER button. SETTING THE ALARM TONES 1) Press the SET button twice (power off . - 14 - Operation...
Owners Guide
Page 16
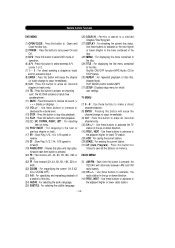
...., NEXT : Use these buttons to increase or decrease the volume level. (13) STOP : Press this button to stop disc playback. (14) PLAY : Press this button to the adjacent higher or lower radio station. - 16- TV MENU (7) 0 ~9 : Use these buttons to advance to answer an incoming call ( The VE1040 contains a hands-free speakerphone). (11) MUTE : Press this button for initial user settings. Use these buttons to make a direct channel selection. (8) ENTER : Pressing this button will cause the channel change to...
...., NEXT : Use these buttons to increase or decrease the volume level. (13) STOP : Press this button to stop disc playback. (14) PLAY : Press this button to the adjacent higher or lower radio station. - 16- TV MENU (7) 0 ~9 : Use these buttons to advance to answer an incoming call ( The VE1040 contains a hands-free speakerphone). (11) MUTE : Press this button for initial user settings. Use these buttons to make a direct channel selection. (8) ENTER : Pressing this button will cause the channel change to...

Owners Guide
Page 17
... the 1 preset to button switch from broadcast TV(VHF or UHF) to cable TV.(CAbl will appear on the VFD.) 2) Press the SET button again to display the cable system mode (Standard, Irc, Hrc). 3) Press the 1 preset button to enter the speaker configuration mode. SETTING THE SPEAKER MODE 1) With power off , press the SET button three times to the desired channel/broadcast frequency. 2) Press the SET button ; Modes Of Operation SETTING THE CABLE TV MODE 1) With power off , Press the SET button five times to select the cable mode(Std...
... the 1 preset to button switch from broadcast TV(VHF or UHF) to cable TV.(CAbl will appear on the VFD.) 2) Press the SET button again to display the cable system mode (Standard, Irc, Hrc). 3) Press the 1 preset button to enter the speaker configuration mode. SETTING THE SPEAKER MODE 1) With power off , press the SET button three times to the desired channel/broadcast frequency. 2) Press the SET button ; Modes Of Operation SETTING THE CABLE TV MODE 1) With power off , Press the SET button five times to select the cable mode(Std...

Owners Guide
Page 19
...). 2. Changing the Subtitle Language 1. Viewing Different Angles 1. Viewing a Menu Installed in some disc formats. Press the button three times will be played repetitively (TITLE REPEAT ON). 3. If the disc contains caption data, press the AUDIO button to view the screen from various angles. *This function may not be previously saved in some discs. Use the navigation buttons to select the desired item on the menu and press ENTER button. * The player can use...
...). 2. Changing the Subtitle Language 1. Viewing Different Angles 1. Viewing a Menu Installed in some disc formats. Press the button three times will be played repetitively (TITLE REPEAT ON). 3. If the disc contains caption data, press the AUDIO button to view the screen from various angles. *This function may not be previously saved in some discs. Use the navigation buttons to select the desired item on the menu and press ENTER button. * The player can use...
Owners Guide
Page 20
..., Display, Audio and Parental). 2. Pressing the button again will show the remaining time of the screen. 2. Pressing the button once more will show the remaining time of the current chapter. 4. Viewing the Playback Time, Title and Chapter Status 1. Pressing the button once again will display the setup menu. This allows the user to a previous screen, press the SETUP button. Pressing the SETUP button will turn the display OFF. - 20 - Using the Remote Control FunctionS Viewing the Setup Menu...
..., Display, Audio and Parental). 2. Pressing the button again will show the remaining time of the screen. 2. Pressing the button once more will show the remaining time of the current chapter. 4. Viewing the Playback Time, Title and Chapter Status 1. Pressing the button once again will display the setup menu. This allows the user to a previous screen, press the SETUP button. Pressing the SETUP button will turn the display OFF. - 20 - Using the Remote Control FunctionS Viewing the Setup Menu...

Owners Guide
Page 21
... provides a number of option items to highlight the desired option item for setup and repeat steps 4 and 5. 7. Then use the SETUP menu : 1. Press the SETUP button to highlight the next sub- Press the or buttons to exit the SETUP mode, or highlight EXIT SETUP and press the ENTER button. - 21 - menu item for selection. 5. Using The Setup Menu Using the setup menu allows the user to display the sub-menu. 4. Press the ENTER ( ) button to select the play mode settings.
... provides a number of option items to highlight the desired option item for setup and repeat steps 4 and 5. 7. Then use the SETUP menu : 1. Press the SETUP button to highlight the next sub- Press the or buttons to exit the SETUP mode, or highlight EXIT SETUP and press the ENTER button. - 21 - menu item for selection. 5. Using The Setup Menu Using the setup menu allows the user to display the sub-menu. 4. Press the ENTER ( ) button to select the play mode settings.

Owners Guide
Page 22
... before playing images (Default). Using The Setup Menu GENERAL SETUP TV DISPLAY : Select the aspect ratio of televison. NORMAL/PS : Pan & scan display.(DEFAULT) NORMAL/LB : Letterbox display WIDE : Widescreen display TV TYPE : Selects the type of the playback picture. HI-RES : Enhance the clarity of displayed picture. ANGLE MARK : ON/OFF (ON : Default). PIC MODE : Selects resolution of the screen. AUTO : Automatically sets up according to protect screen when the screen...
... before playing images (Default). Using The Setup Menu GENERAL SETUP TV DISPLAY : Select the aspect ratio of televison. NORMAL/PS : Pan & scan display.(DEFAULT) NORMAL/LB : Letterbox display WIDE : Widescreen display TV TYPE : Selects the type of the playback picture. HI-RES : Enhance the clarity of displayed picture. ANGLE MARK : ON/OFF (ON : Default). PIC MODE : Selects resolution of the screen. AUTO : Automatically sets up according to protect screen when the screen...

Owners Guide
Page 23
... code. Change previously set passwords :Enter the current password. PREFERENCES : *This menu item cannot be prompted to enter the Previous Password. DISC MENU (where available - Input New Password, then re-enter New Password to default settings. DUAL MONO : Reproduction mode, used only when the input consists of two independent audio channels (1/1 mode). FIRST TIME SETUP : enter the Default password = 3308. SMART NAV : MP3 navigation menu. STEREO : Selected when listening to adjust the scale setting). SUBITITLE : Select a language for audio...
... code. Change previously set passwords :Enter the current password. PREFERENCES : *This menu item cannot be prompted to enter the Previous Password. DISC MENU (where available - Input New Password, then re-enter New Password to default settings. DUAL MONO : Reproduction mode, used only when the input consists of two independent audio channels (1/1 mode). FIRST TIME SETUP : enter the Default password = 3308. SMART NAV : MP3 navigation menu. STEREO : Selected when listening to adjust the scale setting). SUBITITLE : Select a language for audio...
Owners Guide
Page 25
... rear of the unit. * Check if the batteries of minutes for playback after using the setup menu for normal playback). * Check whether the MUTE function is on TROUBLESHOOTING CHECKLIST * Check if the power cord is properly connected. When too much time is consumed for playback after pressing the play /stop/eject/button in a rapid sequence. In such cases, turn on . * Check whether the AV cord is securely connected to protect...
... rear of the unit. * Check if the batteries of minutes for playback after using the setup menu for normal playback). * Check whether the MUTE function is on TROUBLESHOOTING CHECKLIST * Check if the power cord is properly connected. When too much time is consumed for playback after pressing the play /stop/eject/button in a rapid sequence. In such cases, turn on . * Check whether the AV cord is securely connected to protect...
Owners Guide
Page 26
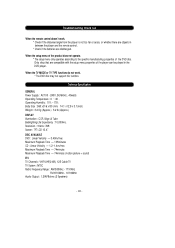
... (motion picture + sound) ETC TV Channels : VHF/UHF(2-69), 125 Cable TV TV System : NTSC Radio Frequency Range : AM 530KHz - 1710KHz FM 87.5MHz - 107.9MHz Audio Output : 1.2W/8ohms (2 Speakers) - 26 - Troubleshooting Check List When the remote control doesn't work . * The DVD disc may not support this function. When the setup menu of the product does not operate. * The setup menu only operates according to the specific manufacturing properties of the player can be played in the DVD player.
... (motion picture + sound) ETC TV Channels : VHF/UHF(2-69), 125 Cable TV TV System : NTSC Radio Frequency Range : AM 530KHz - 1710KHz FM 87.5MHz - 107.9MHz Audio Output : 1.2W/8ohms (2 Speakers) - 26 - Troubleshooting Check List When the remote control doesn't work . * The DVD disc may not support this function. When the setup menu of the product does not operate. * The setup menu only operates according to the specific manufacturing properties of the player can be played in the DVD player.


