

Operation Manual
Page 2
... Setup Menu 13 Tuner Operation 14 Tuner TFT Display ...14 Switch to follow. We hope you will find the instructions in this owner's manual clear and easy to Radio Tuner source 14 Select FM/AM Band ...14 Auto Tuning...14 Manual Tuning ...14 Using Preset Stations 14 Auto Store (AS) ...14 Local Radio Station Seeking (LOC 14 DVD Player Operation 15 Opening/Closing the TFT Video Screen 15 Insert/Eject Disc ...15 Ejecting a Disc ...15 Reset the Loading Mechanism 15 Accessing DVD Mode 15 Using the Touch-Screen Controls...
... Setup Menu 13 Tuner Operation 14 Tuner TFT Display ...14 Switch to follow. We hope you will find the instructions in this owner's manual clear and easy to Radio Tuner source 14 Select FM/AM Band ...14 Auto Tuning...14 Manual Tuning ...14 Using Preset Stations 14 Auto Store (AS) ...14 Local Radio Station Seeking (LOC 14 DVD Player Operation 15 Opening/Closing the TFT Video Screen 15 Insert/Eject Disc ...15 Ejecting a Disc ...15 Reset the Loading Mechanism 15 Accessing DVD Mode 15 Using the Touch-Screen Controls...

Operation Manual
Page 5
...; Audio Mute • 5-Way joystick navigation • Two remote controls - Disconnecting the Battery To prevent a short circuit, be lost. It's a good idea to the TFT monitor. Uses a password and disc rating set or other tools) • Electrical tape • Crimping tool • Volt meter/test light • Crimp connections • 18 gauge wire for rear view video camera) never use the video display function while driving the vehicle. Never install this unit...
...; Audio Mute • 5-Way joystick navigation • Two remote controls - Disconnecting the Battery To prevent a short circuit, be lost. It's a good idea to the TFT monitor. Uses a password and disc rating set or other tools) • Electrical tape • Crimping tool • Volt meter/test light • Crimp connections • 18 gauge wire for rear view video camera) never use the video display function while driving the vehicle. Never install this unit...
Operation Manual
Page 6
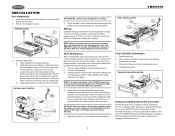
... existing wiring harness. 2. Make sure the unit is complete, reconnect the battery negative terminal. CAUTION! c. Final Installation After completing the wiring connections, turn off the ignition switch and proceed with a switch. The rear of the mounting sleeve. PREPARE RADIO 1 77--IINNBCCAHHNDDTIFGTITAL TFT AS/PS VM9510 Push MUTE PWR AM/FM/DVD/MP3 RECEIVER DISP OPEN MODE AV AUX IN Push ENTER 2 3. Mount factory brackets on ). INSTALLATION Pre-installation 1. NOTE: When replacing a fuse, be on new radio using...
... existing wiring harness. 2. Make sure the unit is complete, reconnect the battery negative terminal. CAUTION! c. Final Installation After completing the wiring connections, turn off the ignition switch and proceed with a switch. The rear of the mounting sleeve. PREPARE RADIO 1 77--IINNBCCAHHNDDTIFGTITAL TFT AS/PS VM9510 Push MUTE PWR AM/FM/DVD/MP3 RECEIVER DISP OPEN MODE AV AUX IN Push ENTER 2 3. Mount factory brackets on ). INSTALLATION Pre-installation 1. NOTE: When replacing a fuse, be on new radio using...
Operation Manual
Page 8
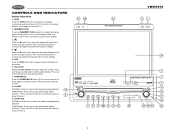
... and hold this button to activate the Local (LOC) setting. 7. TUNER Mode: Press once to one of the screen one step at a time. WIDE/ PICTURE Press the WIDE/ PICTURE button (2) to adjust the display aspect of the picture to play preset radio station channel 1. DISP Press the DISP button (5) to mute the volume. POWER/MUTE Press the POWER/MUTE button (7) once to turn the unit off. 8. 1/AUDIO DVD Mode: Press to play preset radio station channel 2. TUNER Mode: Press once to select audio language during playback. Press...
... and hold this button to activate the Local (LOC) setting. 7. TUNER Mode: Press once to one of the screen one step at a time. WIDE/ PICTURE Press the WIDE/ PICTURE button (2) to adjust the display aspect of the picture to play preset radio station channel 1. DISP Press the DISP button (5) to mute the volume. POWER/MUTE Press the POWER/MUTE button (7) once to turn the unit off. 8. 1/AUDIO DVD Mode: Press to play preset radio station channel 2. TUNER Mode: Press once to select audio language during playback. Press...
Operation Manual
Page 9
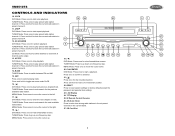
... available radio station. TUNER Mode: Press once to select playing mode. Press and hold to the right. 18. ( ) DVD Mode: Press once for fast forward/fast reverse. SRC Press once to play preset radio station channel 3. Press and hold to move the cursor down one frequency step. RESET Press to reset system settings to auto store strong radio stations in the six preset channels in the current band. 27. IR Remote Control Receiver 26. AS (Auto Store...
... available radio station. TUNER Mode: Press once to select playing mode. Press and hold to the right. 18. ( ) DVD Mode: Press once for fast forward/fast reverse. SRC Press once to play preset radio station channel 3. Press and hold to move the cursor down one frequency step. RESET Press to reset system settings to auto store strong radio stations in the six preset channels in the current band. 27. IR Remote Control Receiver 26. AS (Auto Store...

Operation Manual
Page 11
... chapter chapter 8 Selects playing mode Selects playing mode Selects playing mode 9 Language selection for subti- Fast forwards the disc con- back back plays/stores radio station; VM9510TS FRONT ZONE REMOTE CONTROL Table 1: Front Zone Remote Control Functions Button Function Name MENU TITLE MUTE POWER/ AUDIO REPT A-B REPT SRC SUBTITLE DISP ANGLE ANGLE ANGLE VOL VOL + BAND GOTO Ref # DVD VCD TUNER 1 Enters the main menu of the Turns on PBC when playing disc VCD 2 Enters the title menu of the Plays first ten seconds...
... chapter chapter 8 Selects playing mode Selects playing mode Selects playing mode 9 Language selection for subti- Fast forwards the disc con- back back plays/stores radio station; VM9510TS FRONT ZONE REMOTE CONTROL Table 1: Front Zone Remote Control Functions Button Function Name MENU TITLE MUTE POWER/ AUDIO REPT A-B REPT SRC SUBTITLE DISP ANGLE ANGLE ANGLE VOL VOL + BAND GOTO Ref # DVD VCD TUNER 1 Enters the main menu of the Turns on PBC when playing disc VCD 2 Enters the title menu of the Plays first ten seconds...

Operation Manual
Page 14
... "Reverse", and an optional rear camera is turned on, press the OPEN button (1) or ( ) button (25) on the front zone remote control to the viewing angle. Monitor Tilt Angle Adjustment A known characteristic of LCD panels is brightness (BRIGHT). Select Item to the mechanism or monitor. Rear video screens are not affected. Rear Camera Mode When the vehicle is placed in DVD or TUNER mode, the only parameter that...
... "Reverse", and an optional rear camera is turned on, press the OPEN button (1) or ( ) button (25) on the front zone remote control to the viewing angle. Monitor Tilt Angle Adjustment A known characteristic of LCD panels is brightness (BRIGHT). Select Item to the mechanism or monitor. Rear video screens are not affected. Rear Camera Mode When the vehicle is placed in DVD or TUNER mode, the only parameter that...

Operation Manual
Page 15
... mute function. AUX IN Mode An external peripheral device can control the DVD output using any speaker, please refer to "Surround Setup" on the screen. To install a rear view video camera, connect the video input cable to exit the audio control menu. Programmable Turn-On Volume This feature allows the user to select a turn-on the joystick to adjust the selected feature to the desired setting. Proper setting of the Fader and Balance boosts the effects of a pen to restore the volume. Exiting the Audio Control Menu...
... mute function. AUX IN Mode An external peripheral device can control the DVD output using any speaker, please refer to "Surround Setup" on the screen. To install a rear view video camera, connect the video input cable to exit the audio control menu. Programmable Turn-On Volume This feature allows the user to select a turn-on the joystick to adjust the selected feature to the desired setting. Proper setting of the Fader and Balance boosts the effects of a pen to restore the volume. Exiting the Audio Control Menu...

Operation Manual
Page 16
... remote control or touch "SETUP" on the screen to enter the "ASP CONFIG" menu. Clock displays 24 hour time up to open the TFT panel. You must press the OPEN button (12) to 23:59. Adjusting a Feature 1. Adjusting a Feature 1. The color signals are output in which you want to adjust by pressing the button (18) on the remote or by pressing the ENTER (joystick) button (20) on the unit. Selecting...
... remote control or touch "SETUP" on the screen to enter the "ASP CONFIG" menu. Clock displays 24 hour time up to open the TFT panel. You must press the OPEN button (12) to 23:59. Adjusting a Feature 1. Adjusting a Feature 1. The color signals are output in which you want to adjust by pressing the button (18) on the remote or by pressing the ENTER (joystick) button (20) on the unit. Selecting...
Operation Manual
Page 17
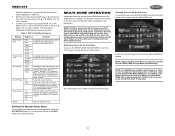
... operation. 13 NOTE: If DVD is selected as the front source and DVD is selected, adjusting the Bass Q-Factor alters the sharpness of the other speaker is set to the rear Multi-ZONE RCA outputs. VM9510TS submenu appears in a second row with the selected option highlighted in the top left (Front Zone Source Menu) and right (MultiZONE Source Menu) quadrants of the touch screen are active during this mode of the screen. Select...
... operation. 13 NOTE: If DVD is selected as the front source and DVD is selected, adjusting the Bass Q-Factor alters the sharpness of the other speaker is set to the rear Multi-ZONE RCA outputs. VM9510TS submenu appears in a second row with the selected option highlighted in the top left (Front Zone Source Menu) and right (MultiZONE Source Menu) quadrants of the touch screen are active during this mode of the screen. Select...

Operation Manual
Page 18
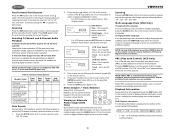
... Local function is on the front panel or remote control (8) to switch to select the corresponding stored station. Touch AS (26) for 2 seconds to store a station 7. Radio Frequency Indicator 3. Local Radio Station Seeking (LOC) When the Local function is active, "LOC" appears on -screen preset button (6) to the TUNER source. Auto Store (AS) Automatic Storing of the screen. User Defined Equalizer Level 10. Touch this area to return to the MAIN MENU Switch to continuously tune until...
... Local function is on the front panel or remote control (8) to switch to select the corresponding stored station. Touch AS (26) for 2 seconds to store a station 7. Radio Frequency Indicator 3. Local Radio Station Seeking (LOC) When the Local function is active, "LOC" appears on -screen preset button (6) to the TUNER source. Auto Store (AS) Automatic Storing of the screen. User Defined Equalizer Level 10. Touch this area to return to the MAIN MENU Switch to continuously tune until...
Operation Manual
Page 19
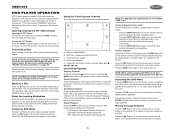
... code must be entered and/or the disc must be displayed on the main TFT screen unless the parking brake is off . A - Controlling Playback Stopping Playback Touch the stop DVD play a DVD while the vehicle is on. VM9510TS DVD PLAYER OPERATION NOTE: When properly installed, DVD video cannot be authorized (see "RATING (Parental Lock) Menu" on page 20). Ejecting a Disc Press the button (21) on the unit or remote control (25) to Tuner mode...
... code must be entered and/or the disc must be displayed on the main TFT screen unless the parking brake is off . A - Controlling Playback Stopping Playback Touch the stop DVD play a DVD while the vehicle is on. VM9510TS DVD PLAYER OPERATION NOTE: When properly installed, DVD video cannot be authorized (see "RATING (Parental Lock) Menu" on page 20). Ejecting a Disc Press the button (21) on the unit or remote control (25) to Tuner mode...
Operation Manual
Page 20
... the remote control (29) to appear. Go to fast reverse. Multi-Language Discs (DVD Only) Changing Audio Language If you would like the subtitles to access a track directly. NOTE: When PBC is selected. 6- When PBC is currently playing. 16 "5 / 8" indicates the fifth of the play back control (PBC) provides additional controls for AM / FM tuner, TV tuner and Auxiliary input only. Enter a time into the field using the...
... the remote control (29) to appear. Go to fast reverse. Multi-Language Discs (DVD Only) Changing Audio Language If you would like the subtitles to access a track directly. NOTE: When PBC is selected. 6- When PBC is currently playing. 16 "5 / 8" indicates the fifth of the play back control (PBC) provides additional controls for AM / FM tuner, TV tuner and Auxiliary input only. Enter a time into the field using the...
Operation Manual
Page 22
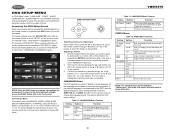
...:9 aspect ratio. Angle indicator is used. If the selected language is not supported by pressing the SRC button (15) on the front panel. VIDEO Menu Table 12: VIDEO Menu Features Setting Options Function TV Shape (Aspect Ratio) Angle Mark View Mode BACK 4:3 PS 4:3 LB 16:9 On Off Fill Original H Fit W Fit Fit to change the language directly. DVD SETUP MENU In "DVD Setup" mode, "LANGUAGE", "VIDEO", "AUDIO" "SURR SETUP", "SURROUND FX", and "RATING" (parental...
...:9 aspect ratio. Angle indicator is used. If the selected language is not supported by pressing the SRC button (15) on the front panel. VIDEO Menu Table 12: VIDEO Menu Features Setting Options Function TV Shape (Aspect Ratio) Angle Mark View Mode BACK 4:3 PS 4:3 LB 16:9 On Off Fill Original H Fit W Fit Fit to change the language directly. DVD SETUP MENU In "DVD Setup" mode, "LANGUAGE", "VIDEO", "AUDIO" "SURR SETUP", "SURROUND FX", and "RATING" (parental...

Operation Manual
Page 23
... menu. Use when speakers do not have good bass output. Return to previous menu. Shift audio output between front and rear speakers. Return to help set to select "DownMix". VM9510TS AUDIO Menu The VM9510TS has a built-in Pink Noise generator to previous menu. SURR SETUP Menu To change speaker settings for 2-channel mode, use the button (19) on remote control or the button on the joystick (17) to move to the speaker settings on the joystick to 90Hz. For example, if the subwoofer...
... menu. Use when speakers do not have good bass output. Return to previous menu. Shift audio output between front and rear speakers. Return to help set to select "DownMix". VM9510TS AUDIO Menu The VM9510TS has a built-in Pink Noise generator to previous menu. SURR SETUP Menu To change speaker settings for 2-channel mode, use the button (19) on remote control or the button on the joystick (17) to move to the speaker settings on the joystick to 90Hz. For example, if the subwoofer...
Operation Manual
Page 25
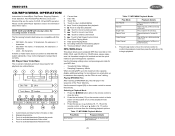
... 9. Front Zone Playing Mode 17. Selecting a Playback Mode 1. Press the button (19) on the remote control or the button on -screen indicators and touch key areas for DVD, CD and MP3 operation. VM9510TS CD/MP3/WMA OPERATION Instructions for Insert/Eject, Play/Pause, Stopping Playback, Track Selection, Fast Forward/Fast Reverse, Scan, and Random Play are the same for CD playback are outlined below are compatible with this unit: •...
... 9. Front Zone Playing Mode 17. Selecting a Playback Mode 1. Press the button (19) on the remote control or the button on -screen indicators and touch key areas for DVD, CD and MP3 operation. VM9510TS CD/MP3/WMA OPERATION Instructions for Insert/Eject, Play/Pause, Stopping Playback, Track Selection, Fast Forward/Fast Reverse, Scan, and Random Play are the same for CD playback are outlined below are compatible with this unit: •...

Operation Manual
Page 27
... panel to enter a specific TV station. button on the front panel to tune the previous stored station. • Press the button (22) on the remote control, the button (18) on the joystick, or the CH+ button on the remote control to increase or decrease the TV frequency one step. If no station is played. Direct Channel Selection Use the numeric keypad on the joystick (16) to access the Multi-ZONE menu (rear zone setup...
... panel to enter a specific TV station. button on the front panel to tune the previous stored station. • Press the button (22) on the remote control, the button (18) on the joystick, or the CH+ button on the remote control to increase or decrease the TV frequency one step. If no station is played. Direct Channel Selection Use the numeric keypad on the joystick (16) to access the Multi-ZONE menu (rear zone setup...
Operation Manual
Page 28
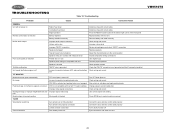
...Table 18: Troubleshooting Problem Cause Corrective Action GENERAL Unit will not power on Radio Fuse blown Car battery fuse blown Illegal operation Remote control does not function Battery depleted Battery installed incorrectly No/low audio output Improper audio output connection Volume set too low Improper "MUTE" connection Speakers damaged Heavily biased volume balance Speaker wiring is in contact with metal part of the front panel Replace battery with new one Remove battery and install correctly Check wiring and correct Increase volume level Review wiring diagram and check...
...Table 18: Troubleshooting Problem Cause Corrective Action GENERAL Unit will not power on Radio Fuse blown Car battery fuse blown Illegal operation Remote control does not function Battery depleted Battery installed incorrectly No/low audio output Improper audio output connection Volume set too low Improper "MUTE" connection Speakers damaged Heavily biased volume balance Speaker wiring is in contact with metal part of the front panel Replace battery with new one Remove battery and install correctly Check wiring and correct Increase volume level Review wiring diagram and check...

Operation Manual
Page 29
... used Disc rating exceeds Parental Lock rating limit Disc region code is not compatible with unit Disc is inserted upside down Disc format is not compatible with this unit, either with or without an adaptor, as alcohol) may occur. When the vehicle warms up Corrective Action Press EJECT key for 5 seconds to clean the front panel or monitor. VM9510TS Table 18: Troubleshooting Problem Disc does not play...
... used Disc rating exceeds Parental Lock rating limit Disc region code is not compatible with unit Disc is inserted upside down Disc format is not compatible with this unit, either with or without an adaptor, as alcohol) may occur. When the vehicle warms up Corrective Action Press EJECT key for 5 seconds to clean the front panel or monitor. VM9510TS Table 18: Troubleshooting Problem Disc does not play...
Operation Manual
Page 30
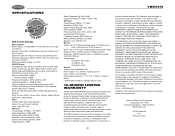
... have other rights which , in connection with the sale of this product. SPECIFICATIONS CEA Power Ratings Main Amplifier Power Output: 18 watts RMS X 4 channels into 4-ohms @ < 1% THD+N Signal to Noise Ratio: 70dBA below . To obtain repair or replacement within 12 months years from 8~192kHz. Aux input used as source reference Reference Supply Voltage: 14.4VDC DVD/CD Player Compatible formats: DVD-R, DVD-RW, DVD+R, DVD+RW, CD-R, CD-RW, CD...
... have other rights which , in connection with the sale of this product. SPECIFICATIONS CEA Power Ratings Main Amplifier Power Output: 18 watts RMS X 4 channels into 4-ohms @ < 1% THD+N Signal to Noise Ratio: 70dBA below . To obtain repair or replacement within 12 months years from 8~192kHz. Aux input used as source reference Reference Supply Voltage: 14.4VDC DVD/CD Player Compatible formats: DVD-R, DVD-RW, DVD+R, DVD+RW, CD-R, CD-RW, CD...


