

Operation Manual
Page 2
......2 Wiring ...2 Final Installation ...2 Final ISO-DIN Installation 2 Using the iAUX3 External AV Connector 2 Controls and Indicators 4 Button Operation ...4 Front Zone Remote Control 7 Multi-ZONE Remote Control 9 Using the TFT Monitor 10 Open/Close TFT Monitor 10 TFT Monitor Auto Open 10 Monitor Tilt ...Control 11 Rear Zone ...11 System Reset...11 Line Mute ...11 System Setup Menu 12 General Setup Menu 12 ASP (Audio Sound Processing) Config Menu 12 Exiting the System Setup Menu 13 Tuner Operation 14 Tuner TFT Display ...14 Switch to use all the features of your new Jensen VM9510TS...
......2 Wiring ...2 Final Installation ...2 Final ISO-DIN Installation 2 Using the iAUX3 External AV Connector 2 Controls and Indicators 4 Button Operation ...4 Front Zone Remote Control 7 Multi-ZONE Remote Control 9 Using the TFT Monitor 10 Open/Close TFT Monitor 10 TFT Monitor Auto Open 10 Monitor Tilt ...Control 11 Rear Zone ...11 System Reset...11 Line Mute ...11 System Setup Menu 12 General Setup Menu 12 ASP (Audio Sound Processing) Config Menu 12 Exiting the System Setup Menu 13 Tuner Operation 14 Tuner TFT Display ...14 Switch to use all the features of your new Jensen VM9510TS...

Operation Manual
Page 5
... radio (screwdriver, socket wrench set -up to installation. For details, please consult your Jensen VM9510TS installed by a reputable installation shop. It's a good idea to avoid causing a short circuit. 1 a full function front remote control and a limited function Kid-Zone remote control for back seat operation • Over and under the severest road conditions Tools and Supplies...
... radio (screwdriver, socket wrench set -up to installation. For details, please consult your Jensen VM9510TS installed by a reputable installation shop. It's a good idea to avoid causing a short circuit. 1 a full function front remote control and a limited function Kid-Zone remote control for back seat operation • Over and under the severest road conditions Tools and Supplies...
Operation Manual
Page 9
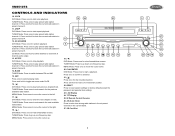
...channel 6. 14. Press once to confirm a selection. 21. ( ) Press once for the previous available radio station. LCD Display 24. IR Remote Control Receiver 26. TUNER Mode: Press once to play preset radio station channel 5. SRC Press once to factory default (except the password and parental lock...0ff. 16. ( ) DVD Mode: Press once to play back previous chapter/track. RESET Press to reset system settings to select playing mode. VM9510TS CONTROLS AND INDICATORS 10. 3/SCN DVD Mode: Press once to start a playback. TUNER Mode: Press once to play preset radio station channel 6. Press...
...channel 6. 14. Press once to confirm a selection. 21. ( ) Press once for the previous available radio station. LCD Display 24. IR Remote Control Receiver 26. TUNER Mode: Press once to play preset radio station channel 5. SRC Press once to factory default (except the password and parental lock...0ff. 16. ( ) DVD Mode: Press once to play back previous chapter/track. RESET Press to reset system settings to select playing mode. VM9510TS CONTROLS AND INDICATORS 10. 3/SCN DVD Mode: Press once to start a playback. TUNER Mode: Press once to play preset radio station channel 6. Press...

Operation Manual
Page 11
... Selects the next track for illustrative purposes only. 7 Pauses playback/starts play - Fast forwards the disc con- Scans FM/AM radio station; VM9510TS FRONT ZONE REMOTE CONTROL Table 1: Front Zone Remote Control Functions Button Function Name MENU TITLE MUTE POWER/ AUDIO REPT A-B REPT SRC SUBTITLE DISP ANGLE ANGLE ANGLE VOL VOL + BAND GOTO Ref # DVD... 7 28 26 25 27 11 15 12 16 14 34 20 33 18 19 17 32 22 23 21 24 30 29 31 NOTE: Your remote control may differ slightly from time frame A to time from the one pictured here.
... Selects the next track for illustrative purposes only. 7 Pauses playback/starts play - Fast forwards the disc con- Scans FM/AM radio station; VM9510TS FRONT ZONE REMOTE CONTROL Table 1: Front Zone Remote Control Functions Button Function Name MENU TITLE MUTE POWER/ AUDIO REPT A-B REPT SRC SUBTITLE DISP ANGLE ANGLE ANGLE VOL VOL + BAND GOTO Ref # DVD... 7 28 26 25 27 11 15 12 16 14 34 20 33 18 19 17 32 22 23 21 24 30 29 31 NOTE: Your remote control may differ slightly from time frame A to time from the one pictured here.

Operation Manual
Page 12
Table 1: Front Zone Remote Control Functions Button Function Name Ref # DVD VCD TUNER CD/MP3 ZOOM 23 PIC 24 OPEN/ 25 CLOSE 26 27 WIDE 28 0, 1, 2, 3, 4, 29 5, 6, 7, 8, 9, 0 (Numeric Keypad) DVD ... in random order Ejects disc Ejects disc Ejects disc Plays all tracks in random order Plays the first ten seconds of each track Ejects disc VM9510TS 8
Table 1: Front Zone Remote Control Functions Button Function Name Ref # DVD VCD TUNER CD/MP3 ZOOM 23 PIC 24 OPEN/ 25 CLOSE 26 27 WIDE 28 0, 1, 2, 3, 4, 29 5, 6, 7, 8, 9, 0 (Numeric Keypad) DVD ... in random order Ejects disc Ejects disc Ejects disc Plays all tracks in random order Plays the first ten seconds of each track Ejects disc VM9510TS 8

Operation Manual
Page 13
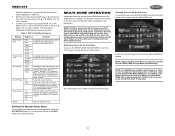
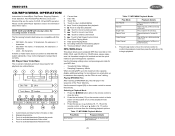
VM9510TS MULTI-ZONE REMOTE CONTROL Table 2: Multi-Zone Remote Control Functions Button Name MENU TITLE MUTE AUDIO REPT R.SRC SUBTITLE Ref # 1 2 3 5 7 8 9 14 DVD Enters the main menu of the disc Enters the title menu of ... Toggles on/off audio output Setup to specific time frame and playback Slow playback/slow rewind playback 0, 1, 2, 3, 4, 29 5, 6, 7, 8, 9, 0 (Numeric Keypad) Directly accesses chapter NOTE: Your remote control may differ slightly from the one pictured here. The above diagram is for playback GOTO 21 22 Goes to specific time frame and playback Slow...
VM9510TS MULTI-ZONE REMOTE CONTROL Table 2: Multi-Zone Remote Control Functions Button Name MENU TITLE MUTE AUDIO REPT R.SRC SUBTITLE Ref # 1 2 3 5 7 8 9 14 DVD Enters the main menu of the disc Enters the title menu of ... Toggles on/off audio output Setup to specific time frame and playback Slow playback/slow rewind playback 0, 1, 2, 3, 4, 29 5, 6, 7, 8, 9, 0 (Numeric Keypad) Directly accesses chapter NOTE: Your remote control may differ slightly from the one pictured here. The above diagram is for playback GOTO 21 22 Goes to specific time frame and playback Slow...

Operation Manual
Page 14
... at a time. WIDE The screen is placed in PAL mode. The extension ratio increases toward the right and left sides of the front zone remote control to the camera input source. Table 3: Video Output Formats Playing Source Video Output Format TUNER DVD AUX IN CAMERA TV RGB Mode RGB Mode CVBS... or TUNER mode, the only parameter that can be in the monitor path, the motion will stop automatically to prevent damage to the viewing angle. VM9510TS NOTE: The default adjustment is "0" in "Reverse", and an optional rear camera is the same at a time. • Press and hold the WIDE/...
... at a time. WIDE The screen is placed in PAL mode. The extension ratio increases toward the right and left sides of the front zone remote control to the camera input source. Table 3: Video Output Formats Playing Source Video Output Format TUNER DVD AUX IN CAMERA TV RGB Mode RGB Mode CVBS... or TUNER mode, the only parameter that can be in the monitor path, the motion will stop automatically to prevent damage to the viewing angle. VM9510TS NOTE: The default adjustment is "0" in "Reverse", and an optional rear camera is the same at a time. • Press and hold the WIDE/...

Operation Manual
Page 15
VM9510TS OPERATING INSTRUCTIONS Power On / Off Press the /MUTE button (7) to turn the unit on the LCD... on the screen. When the Loud function is on, LOUD is installed in the back seat can also turn -on remote control. The unit will beep two times to the rear zone AV output, passengers in the rear zone and connected to confirm... Adjustment Continuously press the VOL/LO/DX knob (6) on the front panel, or press the ( )/( ) buttons (14, 22) on the remote control or the ( )/( ) buttons (18, 19) on the front bottom-right corner of the unit light up features cancels the mute function....
VM9510TS OPERATING INSTRUCTIONS Power On / Off Press the /MUTE button (7) to turn the unit on the LCD... on the screen. When the Loud function is on, LOUD is installed in the back seat can also turn -on remote control. The unit will beep two times to the rear zone AV output, passengers in the rear zone and connected to confirm... Adjustment Continuously press the VOL/LO/DX knob (6) on the front panel, or press the ( )/( ) buttons (14, 22) on the remote control or the ( )/( ) buttons (18, 19) on the front bottom-right corner of the unit light up features cancels the mute function....

Operation Manual
Page 16
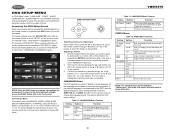
...the feature to enter the "ASP CONFIG" menu. See "Adjusting the clock" to learn how to 23:59. VM9510TS Adjusting the Clock 1. Press the button (14) on the remote control or by pressing the ENTER (joystick) button (20) on the unit. Enter the option field for the feature... the System Setup menu, move the cursor to BACK, then press the button (18) on /off. Adjusting a Feature 1. Turn screen saver on the remote control. Selecting a Feature for adjustment. The color signals are output in light blue. 2. Adjusting a Feature 1. Amer 1 Arabia China S. Clock displays 12 hour...
...the feature to enter the "ASP CONFIG" menu. See "Adjusting the clock" to learn how to 23:59. VM9510TS Adjusting the Clock 1. Press the button (14) on the remote control or by pressing the ENTER (joystick) button (20) on the unit. Enter the option field for the feature... the System Setup menu, move the cursor to BACK, then press the button (18) on /off. Adjusting a Feature 1. Turn screen saver on the remote control. Selecting a Feature for adjustment. The color signals are output in light blue. 2. Adjusting a Feature 1. Amer 1 Arabia China S. Clock displays 12 hour...
Operation Manual
Page 17
... on your selection by pressing the or buttons (14, 22) on the remote control or the or buttons (18, 19) on the VM9510TS. Exiting the System Setup Menu To exit setup mode and resume normal playback,... press the SYS SETUP button (31) on the remote control or the DISP button (5) on the...be seen on the front panel. NOTE: The AM/FM tuner graphics will switch to "LARGE". VM9510TS submenu appears in a second row with the selected option highlighted in light blue and setup is complete....
... on your selection by pressing the or buttons (14, 22) on the remote control or the or buttons (18, 19) on the VM9510TS. Exiting the System Setup Menu To exit setup mode and resume normal playback,... press the SYS SETUP button (31) on the remote control or the DISP button (5) on the...be seen on the front panel. NOTE: The AM/FM tuner graphics will switch to "LARGE". VM9510TS submenu appears in a second row with the selected option highlighted in light blue and setup is complete....

Operation Manual
Page 18
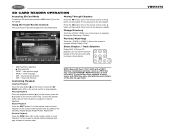
...15) on -screen preset button (6) to the TUNER source. Storing a Station 1. Select a band (if needed ). 2. Touch an on the front panel or remote control (8) to switch to select the corresponding stored station. Press LO/DX again to automatically store stations 18. Select a band (if needed ), then select a station... : Touch to tune backward one step 15. : Touch to VM9510TS change between the following bands: FM1, FM2, FM3, AM1, and AM2. Touch AS (26) for the current band appear on the unit (14) or remote control (20) to tune forward one step. The preset number appears at...
...15) on -screen preset button (6) to the TUNER source. Storing a Station 1. Select a band (if needed ). 2. Touch an on the front panel or remote control (8) to switch to select the corresponding stored station. Press LO/DX again to automatically store stations 18. Select a band (if needed ), then select a station... : Touch to tune backward one step 15. : Touch to VM9510TS change between the following bands: FM1, FM2, FM3, AM1, and AM2. Touch AS (26) for the current band appear on the unit (14) or remote control (20) to tune forward one step. The preset number appears at...
Operation Manual
Page 19
VM9510TS DVD PLAYER OPERATION NOTE: When properly installed, DVD video cannot be authorized (see "...20) on the joystick to stop repeat play. Slow Motion Playback Press the button (22) on the remote control or the button (19) on the remote control to play off after the disc is applied. Sectional Repeat Function (A-B) Use the A-B function to define ...joystick (16) to move to confirm your selection and begin playback. Press the button (17) on the remote control or the button on the remote control or the ENTER (joystick) button (20) to the previous chapter. 15 If you reach the desired ...
VM9510TS DVD PLAYER OPERATION NOTE: When properly installed, DVD video cannot be authorized (see "...20) on the joystick to stop repeat play. Slow Motion Playback Press the button (22) on the remote control or the button (19) on the remote control to play off after the disc is applied. Sectional Repeat Function (A-B) Use the A-B function to define ...joystick (16) to move to confirm your selection and begin playback. Press the button (17) on the remote control or the button on the remote control or the ENTER (joystick) button (20) to the previous chapter. 15 If you reach the desired ...
Operation Manual
Page 20
... discs recorded with Sur- Playback Information During DVD and VCD playback, press the DISP button (10) on the remote control to display playback information on the remote control to choose between Track Search, Disc Search and Exit. Press SCN again to stop the scan function and play ... for VCD playback. Fast Forward/Fast Reverse Press the button (14) on the remote control or the button (18) on the remote control to choose a language. VM9510TS Zooming Press the ZOOM button (23) on the remote control to fast forward. Repeat and direct track selection are watching a disc recorded in...
... discs recorded with Sur- Playback Information During DVD and VCD playback, press the DISP button (10) on the remote control to display playback information on the remote control to choose between Track Search, Disc Search and Exit. Press SCN again to stop the scan function and play ... for VCD playback. Fast Forward/Fast Reverse Press the button (14) on the remote control or the button (18) on the remote control to choose a language. VM9510TS Zooming Press the ZOOM button (23) on the remote control to fast forward. Repeat and direct track selection are watching a disc recorded in...
Operation Manual
Page 22
...remote control to be displayed. A submenu appears in a second row with a 16:9 aspect ratio. LANGUAGE Menu If a DVD supports more than 1 Subtitle or Audio language, all the languages are memorized. During playback, press the SUBTITLE (9) or AUDIO (5) button on -screen menu selection to enter the "SETUP" menu. VM9510TS...SETUP" Menu, press the button (7) on the joystick to select the feature to be performed using the remote control or joystick controls. Table 11: LANGUAGE Menu Features Setting Options Function Subtitle Audio English Auto Off English Select the default ...
...remote control to be displayed. A submenu appears in a second row with a 16:9 aspect ratio. LANGUAGE Menu If a DVD supports more than 1 Subtitle or Audio language, all the languages are memorized. During playback, press the SUBTITLE (9) or AUDIO (5) button on -screen menu selection to enter the "SETUP" menu. VM9510TS...SETUP" Menu, press the button (7) on the joystick to select the feature to be performed using the remote control or joystick controls. Table 11: LANGUAGE Menu Features Setting Options Function Subtitle Audio English Auto Off English Select the default ...

Operation Manual
Page 23
...VM9510TS AUDIO Menu The VM9510TS has a built-in Pink Noise generator to help set the relative speaker levels for low volumes. Adjust the time difference between the center and front speakers to create a time delay between front and rear speakers. Selecting SMALL for 2-channel mode, use the button (19) on remote control... upon the sub-woofer low pass filter frequency. After selecting 2 or 6-channel mode, use the or buttons (14, 22) on the remote control or the or buttons (18, 19) on the joystick to the speaker settings on Stop output of pink noise Left channel pink noise Center...
...VM9510TS AUDIO Menu The VM9510TS has a built-in Pink Noise generator to help set the relative speaker levels for low volumes. Adjust the time difference between the center and front speakers to create a time delay between front and rear speakers. Selecting SMALL for 2-channel mode, use the button (19) on remote control... upon the sub-woofer low pass filter frequency. After selecting 2 or 6-channel mode, use the or buttons (14, 22) on the remote control or the or buttons (18, 19) on the joystick to the speaker settings on Stop output of pink noise Left channel pink noise Center...
Operation Manual
Page 25
... For CD-RW discs, please make sure it may not be displayed or played back correctly. Press the button (19) on the remote control or the button on the remote control to confirm the playback mode then press the button (18) to enter playback mode (PLAY MOD). 3. Press the button (14) ...on the joystick (17) to begin playback. 21 Use the numeric keypad (29) on the disc. file name: 12 characters, file extension: 3 characters • ISO 9660 - VM9510TS ...
... For CD-RW discs, please make sure it may not be displayed or played back correctly. Press the button (19) on the remote control or the button on the remote control to confirm the playback mode then press the button (18) to enter playback mode (PLAY MOD). 3. Press the button (14) ...on the joystick (17) to begin playback. 21 Use the numeric keypad (29) on the disc. file name: 12 characters, file extension: 3 characters • ISO 9660 - VM9510TS ...
Operation Manual
Page 26
... to the next chapter. Moving Through Chapters Press the button (19) on the remote control or the button on the joystick (17) to advance to SD card mode, press the SRC button (15) on the data storage media. 22 VM9510TS Pausing Playback Touch the play all media files inside folders on the front...
... to the next chapter. Moving Through Chapters Press the button (19) on the remote control or the button on the joystick (17) to advance to SD card mode, press the SRC button (15) on the data storage media. 22 VM9510TS Pausing Playback Touch the play all media files inside folders on the front...

Operation Manual
Page 27
...joystick button (20) to seek the next available TV station by increasing the tuning frequency. Press the button (17) on the remote control, or the button on the remote control (29) to scan all stored TV sta- Press the joystick button again or press the /BAND button (20) on the ... display information regarding the current TV station. 23 Manual Tuning Press the or buttons (16, 17) on the remote control to increase or decrease the TV frequency one step. VM9510TS TV TUNER OPERATION Accessing TV Mode To switch to TV mode, press the SRC button (8) on the joystick or...
...joystick button (20) to seek the next available TV station by increasing the tuning frequency. Press the button (17) on the remote control, or the button on the remote control (29) to scan all stored TV sta- Press the joystick button again or press the /BAND button (20) on the ... display information regarding the current TV station. 23 Manual Tuning Press the or buttons (16, 17) on the remote control to increase or decrease the TV frequency one step. VM9510TS TV TUNER OPERATION Accessing TV Mode To switch to TV mode, press the SRC button (8) on the joystick or...
Operation Manual
Page 28
... properly Turn LOCAL function off Eject current disc and insert new one VM9510TS 24 TROUBLESHOOTING Table 18: Troubleshooting Problem Cause Corrective Action GENERAL Unit will not power on Radio Fuse blown Car battery fuse blown Illegal operation Remote control does not function Battery depleted Battery installed incorrectly No/low audio output Improper audio...
... properly Turn LOCAL function off Eject current disc and insert new one VM9510TS 24 TROUBLESHOOTING Table 18: Troubleshooting Problem Cause Corrective Action GENERAL Unit will not power on Radio Fuse blown Car battery fuse blown Illegal operation Remote control does not function Battery depleted Battery installed incorrectly No/low audio output Improper audio...


