Operation Manual
Page 2
...interest of safety, the VOD715 should never be installed...always adjust the volume setting to avoid touching or scratching the screen, as the dome lights, if left on the screen. Important Notice It is unlawful in most jurisdictions for a... person to drive a motor vehicle which is equipped with a screen that is visible, directly or... dampened lint free cloth to wipe the screen if it may scratch the screen. Caution children to the lowest position. Lock the LCD screen in the fully closed position when not ...
...interest of safety, the VOD715 should never be installed...always adjust the volume setting to avoid touching or scratching the screen, as the dome lights, if left on the screen. Important Notice It is unlawful in most jurisdictions for a... person to drive a motor vehicle which is equipped with a screen that is visible, directly or... dampened lint free cloth to wipe the screen if it may scratch the screen. Caution children to the lowest position. Lock the LCD screen in the fully closed position when not ...
Operation Manual
Page 3
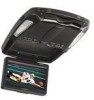
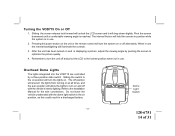
..., while seat-belts remain fastened. Congratulations on your purchase of the Audiovox VOD715 DVD Player with Switch • Backlit Controls for Low Light Operation • Last Position Memory for DVD -3- 128-6751 3 of 31 Enjoy your system to give you and... your equipment. Safety Precaution For safety reasons, when changing video media it is recommended that the vehicle is not in the mobile environment. Features • 7 Inch TFT (Thin Film Transistor)Active Matrix LCD (Liquid Crystal Display) Monitor • OSD (On Screen...
..., while seat-belts remain fastened. Congratulations on your purchase of the Audiovox VOD715 DVD Player with Switch • Backlit Controls for Low Light Operation • Last Position Memory for DVD -3- 128-6751 3 of 31 Enjoy your system to give you and... your equipment. Safety Precaution For safety reasons, when changing video media it is recommended that the vehicle is not in the mobile environment. Features • 7 Inch TFT (Thin Film Transistor)Active Matrix LCD (Liquid Crystal Display) Monitor • OSD (On Screen...

Operation Manual
Page 4
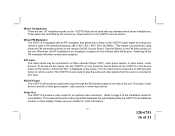
Controls and Indicators Diagram NOTE : Screen Mode Button Located on inside with screen in the closed position. -4- 128-6751 4 of 31
Controls and Indicators Diagram NOTE : Screen Mode Button Located on inside with screen in the closed position. -4- 128-6751 4 of 31
Operation Manual
Page 5
...make picture adjustments in picture select mode. Screen release - It is also used to wireless headphones. Note : Audiovox recommends the use of wired headphones with ...LCD Panel. 19. Moves in a backwards direction at 2x, 4x, 6x and 8x times the normal speed. 13. STOP ( ) Button - Also allows the remote control to operate the VOD715 and to release the drop down screen. 21. VOD715... Ventilation Opening. 8. Used to search in direction of the three sources (AV1, AUX, DVD). 10. For loading ...
...make picture adjustments in picture select mode. Screen release - It is also used to wireless headphones. Note : Audiovox recommends the use of wired headphones with ...LCD Panel. 19. Moves in a backwards direction at 2x, 4x, 6x and 8x times the normal speed. 13. STOP ( ) Button - Also allows the remote control to operate the VOD715 and to release the drop down screen. 21. VOD715... Ventilation Opening. 8. Used to search in direction of the three sources (AV1, AUX, DVD). 10. For loading ...
Operation Manual
Page 8
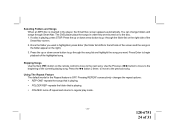
... is pressed, the audio / video source will change the sources: DVD, AV1 and AUX. 3. Press the button again to turn the VOD715 off. 2. SKIP/SEARCH Button** This button selects betweeen SKIP and ...SEARCH mode. ERASE/WRITE Button** While tuned to a channel, pressing this button will tune and stop on the LCD display screen, and...connected to the audio / video inputs can be displayed on the monitor by pressing this button to turn the VOD715 on this model. 1. The stored channel numbers are displayed in ...
... is pressed, the audio / video source will change the sources: DVD, AV1 and AUX. 3. Press the button again to turn the VOD715 off. 2. SKIP/SEARCH Button** This button selects betweeen SKIP and ...SEARCH mode. ERASE/WRITE Button** While tuned to a channel, pressing this button will tune and stop on the LCD display screen, and...connected to the audio / video inputs can be displayed on the monitor by pressing this button to turn the VOD715 on this model. 1. The stored channel numbers are displayed in ...

Operation Manual
Page 12
... 31. SETUP Button Allows the user to the right in the menu options. 28. RIGHT ( ) Button Allows the user to shift to select the DVD player's options (Display, OSD Language, Defaults, Parental Control, Password, Exit Setup). 27. Note: The volume buttons will automatically turn off if no adjustments are... made within 6 seconds, or if any other button is pressed, the on screen picture adjustment display the "adjustment bars" for selection of CD tracks, DVD chapters, and password setting. -12- 128-6751 12 of the headphone jacks. PIX Button (PICTURE SELECT) Each...
... 31. SETUP Button Allows the user to the right in the menu options. 28. RIGHT ( ) Button Allows the user to shift to select the DVD player's options (Display, OSD Language, Defaults, Parental Control, Password, Exit Setup). 27. Note: The volume buttons will automatically turn off if no adjustments are... made within 6 seconds, or if any other button is pressed, the on screen picture adjustment display the "adjustment bars" for selection of CD tracks, DVD chapters, and password setting. -12- 128-6751 12 of the headphone jacks. PIX Button (PICTURE SELECT) Each...
Operation Manual
Page 14
... Remember to turn on or off and pivot the LCD to the Installation Manual for the wire connections. Refer to the locked position when not in use. Overhead Dome Lights The lights integrated into the VOD715 are controlled by pivoting the screen to optimize the picture quality. 4. When in use...in a discharged battery. Do not leave the vehicle unattended with the vehicle's interior lighting. Turning the VOD715 On or Off 1. Sliding the screen release lock forward will unlock the LCD screen and it will allow the lights to the on position will turn the lights on and is reached....
... Remember to turn on or off and pivot the LCD to the Installation Manual for the wire connections. Refer to the locked position when not in use. Overhead Dome Lights The lights integrated into the VOD715 are controlled by pivoting the screen to optimize the picture quality. 4. When in use...in a discharged battery. Do not leave the vehicle unattended with the vehicle's interior lighting. Turning the VOD715 On or Off 1. Sliding the screen release lock forward will unlock the LCD screen and it will allow the lights to the on position will turn the lights on and is reached....
Operation Manual
Page 16
...that can be a video game system, video camera, or other audio / video devices. Video Out The VOD715 provides a video output for an optional video monitor(s). (Refer to a Video cassette Player (VCP), video game system, or other input device. AV1 Input The video inputs may be connected to page... control. Turn the video source component on the side of 31 AUX A/V Input The VOD715 will allow normal radio reception. Wired FM Modulator The VOD715 is on, broadcast reception on the screen. These jacks are two 1/8" headphone jacks on the unit. The audio / video device...
...that can be a video game system, video camera, or other audio / video devices. Video Out The VOD715 provides a video output for an optional video monitor(s). (Refer to a Video cassette Player (VCP), video game system, or other input device. AV1 Input The video inputs may be connected to page... control. Turn the video source component on the side of 31 AUX A/V Input The VOD715 will allow normal radio reception. Wired FM Modulator The VOD715 is on, broadcast reception on the screen. These jacks are two 1/8" headphone jacks on the unit. The audio / video device...

Operation Manual
Page 18
... remote. PressWX and then use the (▼▲) buttons to display the "setup menu" on -screen display. OSD (On-Screen Display) Language Menu The OSD Language Menu allows the user to select the language for On-Screen Display Press the SETUP button and using the (▼▲)buttons select "OSD LANGUAGE". Using the..., and set a language for the OSD language. -18- 128-6751 18 of 31 The user can select either English, French or Spanish for the on-screen display and the setup display and limit playback by children. 1) Press the SETUP button to select the desired language.
... remote. PressWX and then use the (▼▲) buttons to display the "setup menu" on -screen display. OSD (On-Screen Display) Language Menu The OSD Language Menu allows the user to select the language for On-Screen Display Press the SETUP button and using the (▼▲)buttons select "OSD LANGUAGE". Using the..., and set a language for the OSD language. -18- 128-6751 18 of 31 The user can select either English, French or Spanish for the on-screen display and the setup display and limit playback by children. 1) Press the SETUP button to select the desired language.

Operation Manual
Page 19
... your selection. The DISPLAY SETUP allows you to reset ALL options to select the appropriate settings. 4:3 / PS This displays the wide picture on the screen with a portion of the left & right side removed. 4:3 / LB This displays the wide picture with black bands on the upper and lower portions... of the screen. 16:9 This displays a picture with black bands on the upper and lower portion of 31 Defaults Settings Press the SETUP button and select Defaults. Note...
... your selection. The DISPLAY SETUP allows you to reset ALL options to select the appropriate settings. 4:3 / PS This displays the wide picture on the screen with a portion of the left & right side removed. 4:3 / LB This displays the wide picture with black bands on the upper and lower portions... of the screen. 16:9 This displays a picture with black bands on the upper and lower portion of 31 Defaults Settings Press the SETUP button and select Defaults. Note...

Operation Manual
Page 23
... and the time that is playing or you press STOP. .. TIME ELAPSED and the time will remain on-screen until you press DISPLAY again to DISPLAY Banner. The time remains on your DVD player. OFF appears along with the amount of time left in the song that have been encoded in the song... of time the song has played. Press the DISPLAY button on the remote to see the time left in MP3 format can be played on -screen until you press the DISPLAY button. The options below show you what happens when you press DISPLAY again. TIME ELAPSED appears along with very little...
... and the time that is playing or you press STOP. .. TIME ELAPSED and the time will remain on-screen until you press DISPLAY again to DISPLAY Banner. The time remains on your DVD player. OFF appears along with the amount of time left in the song that have been encoded in the song... of time the song has played. Press the DISPLAY button on the remote to see the time left in MP3 format can be played on -screen until you press the DISPLAY button. The options below show you what happens when you press DISPLAY again. TIME ELAPSED appears along with very little...
Operation Manual
Page 24
.... Press Enter to regular play mode. -24- 128-6751 24 of the highlighted song. Pressing REPEAT consecutively changes the repeat options: • REP-ONE- The DVD player plays the songs in order they were burned on the right). 3. If a disc is playing. • FOLDER- Once the folder you want is playing. ... REP- turns off repeat and returns to begin playback of 31 Use the Previous ( ) button to move to the left side of the Smart Nav screen. 2. Press the button 2 times to move to the disc. 1. repeats the songs that is playing, press STOP. Press the up or down arrow ...
.... Press Enter to regular play mode. -24- 128-6751 24 of the highlighted song. Pressing REPEAT consecutively changes the repeat options: • REP-ONE- The DVD player plays the songs in order they were burned on the right). 3. If a disc is playing. • FOLDER- Once the folder you want is playing. ... REP- turns off repeat and returns to begin playback of 31 Use the Previous ( ) button to move to the left side of the Smart Nav screen. 2. Press the button 2 times to move to the disc. 1. repeats the songs that is playing, press STOP. Press the up or down arrow ...

Operation Manual
Page 26
... to the list. 5. Add songs to other play mode. -26- 128-6751 26 of 31 The song you have chosen and the number of the screen. Deleting the Playlist To delete the entire playlist, press STOP while the disc is playing and change to the program list by using the up...
... to the list. 5. Add songs to other play mode. -26- 128-6751 26 of 31 The song you have chosen and the number of the screen. Deleting the Playlist To delete the entire playlist, press STOP while the disc is playing and change to the program list by using the up...
Operation Manual
Page 27
... turned OFF by region. The feature or action cannot be completed at the moment. 4. You've requested a title or chapter number that action. This DVD player only plays DVD's, audio CDs and MP3s. • Both the unit and the disc are securely inserted into the appropriate jacks. • If you put into disc...) 3. The disc's software restricts it . • Condensation has formed. Make sure all cables are coded by using the IR headphones, make sure you turn on screen -27- SOLUTION • Make sure your DVD player is dirty.
... turned OFF by region. The feature or action cannot be completed at the moment. 4. You've requested a title or chapter number that action. This DVD player only plays DVD's, audio CDs and MP3s. • Both the unit and the disc are securely inserted into the appropriate jacks. • If you put into disc...) 3. The disc's software restricts it . • Condensation has formed. Make sure all cables are coded by using the IR headphones, make sure you turn on screen -27- SOLUTION • Make sure your DVD player is dirty.
