
Operation Manual
Page 1
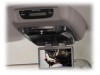
DATE : 21/05/03 128-6747 128-6747 1 of 31 AUTO PROG AP CHANNEL SOURCE S ON OFF AUTO FM VOLUME SELECT HEA DPH ONES VOVODD97106 5 DVD PLAYER WITH DROP-DOWN VIDEO TV/MONITOR LR AUDI O I NPU T VID EO IR ® ELECTRONICS CORP .
DATE : 21/05/03 128-6747 128-6747 1 of 31 AUTO PROG AP CHANNEL SOURCE S ON OFF AUTO FM VOLUME SELECT HEA DPH ONES VOVODD97106 5 DVD PLAYER WITH DROP-DOWN VIDEO TV/MONITOR LR AUDI O I NPU T VID EO IR ® ELECTRONICS CORP .
Operation Manual
Page 2
... station. Television viewing in a stationary vehicle will be marginal due to weak and variable signal strength. Lock the LCD screen in the fully closed position when not in the off or auto positions when the vehicle is dirty. Do not use any solvents or cleaning materials when cleaning the video monitor. In the interest of safety, the VOD916 should never be installed...
... station. Television viewing in a stationary vehicle will be marginal due to weak and variable signal strength. Lock the LCD screen in the fully closed position when not in the off or auto positions when the vehicle is dirty. Do not use any solvents or cleaning materials when cleaning the video monitor. In the interest of safety, the VOD916 should never be installed...

Operation Manual
Page 3
...-belts to change video media or make any adjustments to obtain a full understanding of each component's operation. Enjoy your purchase of the Audiovox VOD916 DVD Player with Drop-Down Video TV/ Monitor. Please read the directions that follow to familiarize yourself with Switch • Backlit Controls for Low Light Operation -3- • Last Position Memory for IR Wireless Headphones (Satellite Radio Ready) • Two Audio / Video Inputs • Headphone / Speaker Amplifier •...
...-belts to change video media or make any adjustments to obtain a full understanding of each component's operation. Enjoy your purchase of the Audiovox VOD916 DVD Player with Drop-Down Video TV/ Monitor. Please read the directions that follow to familiarize yourself with Switch • Backlit Controls for Low Light Operation -3- • Last Position Memory for IR Wireless Headphones (Satellite Radio Ready) • Two Audio / Video Inputs • Headphone / Speaker Amplifier •...
Operation Manual
Page 5
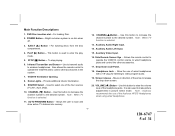
... allows the remote control to operate the VOD916 and to raise the volume level of the four sources (TV,AV1, AUX, DVD). 10. Allow the use of 31 Moves in direction of wired headphones with a 1/8" plug for listening to release the drop down screen. 9. Note : When TV function is on dim when off. 3. Auxiliary Audio Left Input. 4. PLAY ( ) Button - To stop playing. 6. VOD916 Ventilation Opening. 8. Allows the user to wireless headphones. POWER Button - Infrared...
... allows the remote control to operate the VOD916 and to raise the volume level of the four sources (TV,AV1, AUX, DVD). 10. Allow the use of 31 Moves in direction of wired headphones with a 1/8" plug for listening to release the drop down screen. 9. Note : When TV function is on dim when off. 3. Auxiliary Audio Left Input. 4. PLAY ( ) Button - To stop playing. 6. VOD916 Ventilation Opening. 8. Allows the user to wireless headphones. POWER Button - Infrared...

Operation Manual
Page 6
.... VOLUME ( ) Button - SAT AUDIO) and the frequency of the channel of 31 Each time this button to make picture adjustments in conjunction with your radio's volume control (see page 15, Wireless Headphones, or page 16, Wired FM Modulator). 23. Use this button is also used to decrease the volume level of wireless headphones or the wired RF modulator. Three position Dome Light Switch • Auto - It is pressed will not turn...
.... VOLUME ( ) Button - SAT AUDIO) and the frequency of the channel of 31 Each time this button to make picture adjustments in conjunction with your radio's volume control (see page 15, Wireless Headphones, or page 16, Wired FM Modulator). 23. Use this button is also used to decrease the volume level of wireless headphones or the wired RF modulator. Three position Dome Light Switch • Auto - It is pressed will not turn...
Operation Manual
Page 7
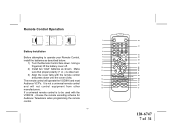
... the VOD916 , choose the remote encoding scheme for Audiovox Televisions when programming the remote control. -7- Using a fingernail, lift the battery cover off. 2) Install two "AAA" batteries as described below. 1) Turn the Remote Control face down until the cover clicks. Make sure that proper polarity (+ or -) is not a universal remote control and will operate the VOD916 and most Audiovox VCP's. If a universal remote control is to operate your Remote Control, install the batteries as shown. POWER EJECT 1 32 SOURCE 2 AUTO MEMORY 31...
... the VOD916 , choose the remote encoding scheme for Audiovox Televisions when programming the remote control. -7- Using a fingernail, lift the battery cover off. 2) Install two "AAA" batteries as described below. 1) Turn the Remote Control face down until the cover clicks. Make sure that proper polarity (+ or -) is not a universal remote control and will operate the VOD916 and most Audiovox VCP's. If a universal remote control is to operate your Remote Control, install the batteries as shown. POWER EJECT 1 32 SOURCE 2 AUTO MEMORY 31...

Operation Manual
Page 8
Press the button again to turn the VOD916 on the LCD display screen, and the non-stored channel numbers are used. Each time the button is pressed, all active channels. 5. When the SKIP mode is disable, the TV will change the sources: DVD, TV, AV1 and AUX. 3. DVD Function Descriptions *Function control is available on all channels are searched and channels that are programmed into memory when CHANNEL UP/DOWN buttons are in "GREEN...
Press the button again to turn the VOD916 on the LCD display screen, and the non-stored channel numbers are used. Each time the button is pressed, all active channels. 5. When the SKIP mode is disable, the TV will change the sources: DVD, TV, AV1 and AUX. 3. DVD Function Descriptions *Function control is available on all channels are searched and channels that are programmed into memory when CHANNEL UP/DOWN buttons are in "GREEN...

Operation Manual
Page 9
... Mode Select Button Switches certain function keys on . LEFT ( ) Button Allows the user to implement setting selected. 9. ENTER Button Used to shift left in menu options. 7. MENU Button Allows the user to the previously set level. 8. Pressing the button again restores sound to access the main menu. 11. RETURN Button Allows the user to return to mute the audio. Note: This function only present on VCD2.0. 12. 6. Channel Up ( ) Button* Use this button to the menu...
... Mode Select Button Switches certain function keys on . LEFT ( ) Button Allows the user to implement setting selected. 9. ENTER Button Used to shift left in menu options. 7. MENU Button Allows the user to the previously set level. 8. Pressing the button again restores sound to access the main menu. 11. RETURN Button Allows the user to return to mute the audio. Note: This function only present on VCD2.0. 12. 6. Channel Up ( ) Button* Use this button to the menu...

Operation Manual
Page 10
DISPLAY Button Press to disc. 14. These options may vary from disc to display DVD Disc current information. NEXT ( ) Button Allows the user to skip to implement the selection. Press DISPLAY button DVD Player Perform Once Twice 3 times 4 times 5 times 6 times 7 times Display current TITLE & CHAPTER Display current SUBTITLE Display current AUDIO language & channel Display current ANGLE Display A-B current status Display REPEAT current status Display is turn off For Title & Chapter, use cursor buttons to do title/chapter selection, then...
DISPLAY Button Press to disc. 14. These options may vary from disc to display DVD Disc current information. NEXT ( ) Button Allows the user to skip to implement the selection. Press DISPLAY button DVD Player Perform Once Twice 3 times 4 times 5 times 6 times 7 times Display current TITLE & CHAPTER Display current SUBTITLE Display current AUDIO language & channel Display current ANGLE Display A-B current status Display REPEAT current status Display is turn off For Title & Chapter, use cursor buttons to do title/chapter selection, then...
Operation Manual
Page 12
... screen picture adjustment display the "adjustment bars" for selection of CD tracks, DVD chapters, and password setting. -12- 128-6747 12 of the headphone jacks. Once the desired adjustment bar is displayed, use the VOLUME UP/DOWN buttons to select the DVD player's options (Display, OSD Language, Defaults, Parental Control, Password, Exit Setup). 27. NUMBER Buttons Allows the user to enter the numbers 0 to make picture adjustments in the menu options. 28. VOLUME UP (+) Button* Use these buttons to raise the volume...
... screen picture adjustment display the "adjustment bars" for selection of CD tracks, DVD chapters, and password setting. -12- 128-6747 12 of the headphone jacks. Once the desired adjustment bar is displayed, use the VOLUME UP/DOWN buttons to select the DVD player's options (Display, OSD Language, Defaults, Parental Control, Password, Exit Setup). 27. NUMBER Buttons Allows the user to enter the numbers 0 to make picture adjustments in the menu options. 28. VOLUME UP (+) Button* Use these buttons to raise the volume...

Operation Manual
Page 14
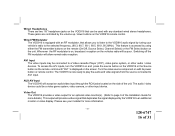
... SOURCE S ON OFF AUTO FM VOLUME SELECT HEADPH ONES Dome Light Switch -14- 128-6747 14 of 31 Overhead Dome Lights The lights integrated into the VOD916 are controlled by pivoting the screen to the Installation Manual for the wire connections. Pivot the screen downward until a comfortable viewing angle is in use . 2. Sliding the screen release lock forward will unlock the LCD screen and it will turn the lights on the unit or the remote control...
... SOURCE S ON OFF AUTO FM VOLUME SELECT HEADPH ONES Dome Light Switch -14- 128-6747 14 of 31 Overhead Dome Lights The lights integrated into the VOD916 are controlled by pivoting the screen to the Installation Manual for the wire connections. Pivot the screen downward until a comfortable viewing angle is in use . 2. Sliding the screen release lock forward will unlock the LCD screen and it will turn the lights on the unit or the remote control...
Operation Manual
Page 15
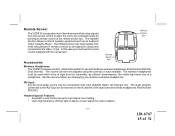
... 15 of 31 The volume can then be received on each headset. The audio program connected to the IR2 input can relay signals from the transmitter, as an Audiovox Video Cassette Player. Headset Special Features • Automatic Level Control prevents input signal over loading. • Uses high frequency infrared light to assure a clean signal for use the remote control supplied with Audiovox wireless headphones (Part Number IR2CHSDual channel). Accessories Remote Sensor Eye INP...
... 15 of 31 The volume can then be received on each headset. The audio program connected to the IR2 input can relay signals from the transmitter, as an Audiovox Video Cassette Player. Headset Special Features • Automatic Level Control prevents input signal over loading. • Uses high frequency infrared light to assure a clean signal for use the remote control supplied with Audiovox wireless headphones (Part Number IR2CHSDual channel). Accessories Remote Sensor Eye INP...
Operation Manual
Page 16
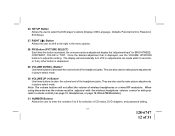
... to play the audio and video signals from the source connected to page 6 of the Installation Guide for more details.) This output will allow normal radio reception. Turn the video source component on the screen. The VOD916 is displayed on with any standard wired stereo headphones. Video Out The VOD916 provides a video output for an optional video monitor(s). (Refer to AV1 input. Please see your vehicle's radio to a Video cassette Player (VCP), video game system, or other input device. AUX A/V Input The VOD916 will...
... to play the audio and video signals from the source connected to page 6 of the Installation Guide for more details.) This output will allow normal radio reception. Turn the video source component on the screen. The VOD916 is displayed on with any standard wired stereo headphones. Video Out The VOD916 provides a video output for an optional video monitor(s). (Refer to AV1 input. Please see your vehicle's radio to a Video cassette Player (VCP), video game system, or other input device. AUX A/V Input The VOD916 will...

Operation Manual
Page 17
..., make sure you load a disc, make sure that contains audio files (for the disc to turn the unit ON. Other regional codes cannot be used with this unit. Regional Coding Both the DVD player and disc are coded by region. Note: the following Discs CANNOT be played in order for example, a CD-R with the player. This unit's code is compatible with downloaded MP3 files). • VCD discs -VCD discs which contain video. • Audio discs - Types of Discs your DVD will display...
..., make sure you load a disc, make sure that contains audio files (for the disc to turn the unit ON. Other regional codes cannot be used with this unit. Regional Coding Both the DVD player and disc are coded by region. Note: the following Discs CANNOT be played in order for example, a CD-R with the player. This unit's code is compatible with downloaded MP3 files). • VCD discs -VCD discs which contain video. • Audio discs - Types of Discs your DVD will display...
Operation Manual
Page 18
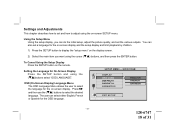
... desired language. Settings and Adjustments This chapter describes how to set and how to display the "setup menu" on the display screen. 2) Select the main item you can do the initial setup, adjust the picture quality, and set a language for the OSD language. -18- 128-6747 18 of 31 The user can also set the various outputs. Using the Setup Menu Using the setup display, you want using the cursor (ML) buttons, and...
... desired language. Settings and Adjustments This chapter describes how to set and how to display the "setup menu" on the display screen. 2) Select the main item you can do the initial setup, adjust the picture quality, and set a language for the OSD language. -18- 128-6747 18 of 31 The user can also set the various outputs. Using the Setup Menu Using the setup display, you want using the cursor (ML) buttons, and...
Operation Manual
Page 19
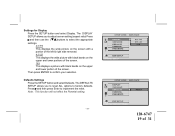
... to adjust screen setting (aspect ratio) Press and then use the (ML)buttons to factory defaults. Settings for Display Press the SETUP button and select Display. Note : This function will not effect the Parental setting. -19- 128-6747 19 of the screen. Then press ENTER to implement the reset. Press and then press Enter to confirm your selection. Defaults Settings Press the SETUP button and select Defaults. The DISPLAY SETUP...
... to adjust screen setting (aspect ratio) Press and then use the (ML)buttons to factory defaults. Settings for Display Press the SETUP button and select Display. Note : This function will not effect the Parental setting. -19- 128-6747 19 of the screen. Then press ENTER to implement the reset. Press and then press Enter to confirm your selection. Defaults Settings Press the SETUP button and select Defaults. The DISPLAY SETUP...

Operation Manual
Page 23
The time remains on -screen until you press STOP. .. Press DISPLAY 1x Press DISPLAY 2x Press DISPLAY 3x TIME REMAIN appears along with the amount of time the song has played. TIME ELAPSED appears along with very little loss of time left in MP3 format can be played on your DVD player. TIME ELAPSED and the time will remain on -screen until you press the DISPLAY button. Playing MP3 Discs MP3 is playing. The options...
The time remains on -screen until you press STOP. .. Press DISPLAY 1x Press DISPLAY 2x Press DISPLAY 3x TIME REMAIN appears along with the amount of time the song has played. TIME ELAPSED appears along with very little loss of time left in MP3 format can be played on your DVD player. TIME ELAPSED and the time will remain on -screen until you press the DISPLAY button. Playing MP3 Discs MP3 is playing. The options...

Operation Manual
Page 24
... arrow button to go through Smart Nav. turns off repeat and returns to regular play mode. -24- 128-6747 24 of the currently playing song. You can change folders and songs through the song list and highlight the song you want . Selecting Folders and Songs When an MP3 disc is inserted in order they were burned on the remote control...
... arrow button to go through Smart Nav. turns off repeat and returns to regular play mode. -24- 128-6747 24 of the currently playing song. You can change folders and songs through the song list and highlight the song you want . Selecting Folders and Songs When an MP3 disc is inserted in order they were burned on the remote control...
Operation Manual
Page 27
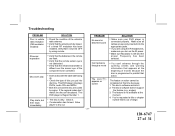
... at this time because: 1. Make sure all cables are securely inserted into disc tray. The disc's software restricts it . • Condensation has formed. SOLUTION • Make sure your DVD player is dirty. If the regional codes don't match, the disc can 't advance through a movie The icon ( ) appears on screen -27- Clean it . 2. Troubleshooting PROBLEM Poor in vehicle radio reception (FM modulator installed) IR sensor inoperative Disc won't play Play starts...
... at this time because: 1. Make sure all cables are securely inserted into disc tray. The disc's software restricts it . • Condensation has formed. SOLUTION • Make sure your DVD player is dirty. If the regional codes don't match, the disc can 't advance through a movie The icon ( ) appears on screen -27- Clean it . 2. Troubleshooting PROBLEM Poor in vehicle radio reception (FM modulator installed) IR sensor inoperative Disc won't play Play starts...
Operation Manual
Page 30
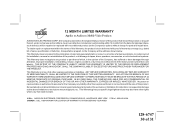
...connection with the sale of this product. No person or representative is authorized to assume for parts and repair labor. U.S.A. : AUDIOVOX ELECTRONICS CORPORATION, 150 MARCUS BLVD., HAUPPAUGE, NEW YORK 11788 l 1-800-645-4994 CANADA : CALL 1-800-645-4994 FOR LOCATION OF WARRANTY STATION... suffered or been damaged through alteration, improper installation, mishandling, misuse, neglect, accident, or by removal or defacement of the factory serial number/bar code label(s). 12 MONTH LIMITED WARRANTY Applies to Audiovox Mobile Video Products AUDIOVOX ELECTRONICS CORP. (the Company) warrants to ...
...connection with the sale of this product. No person or representative is authorized to assume for parts and repair labor. U.S.A. : AUDIOVOX ELECTRONICS CORPORATION, 150 MARCUS BLVD., HAUPPAUGE, NEW YORK 11788 l 1-800-645-4994 CANADA : CALL 1-800-645-4994 FOR LOCATION OF WARRANTY STATION... suffered or been damaged through alteration, improper installation, mishandling, misuse, neglect, accident, or by removal or defacement of the factory serial number/bar code label(s). 12 MONTH LIMITED WARRANTY Applies to Audiovox Mobile Video Products AUDIOVOX ELECTRONICS CORP. (the Company) warrants to ...


