Installation Guide
Page 1
VOH681A Drop Down Video Monitor VOH682A Drop Down TV / Video Monitor ON OFF AUTO OPEN Installation Guide
VOH681A Drop Down Video Monitor VOH682A Drop Down TV / Video Monitor ON OFF AUTO OPEN Installation Guide
Installation Guide
Page 3
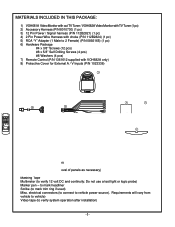
... verify 12 volt DC and continuity: Do not use a test light or logic probe) Marker pen - MATERIALS INCLUDED IN THIS PACKAGE: 1) VOH681A Video Monitor with out TV Tuner / VOH682A Video Monitor with TV Tuner (1 pc) 2) Accessory Harness (P/N 8010730) (1 pc) 3) 12 Pin Power / Signal harness (P/N 112B2821) (1 pc) 4) 2 Pin Power Wire Harness with choke (P/N 112B2824...
... verify 12 volt DC and continuity: Do not use a test light or logic probe) Marker pen - MATERIALS INCLUDED IN THIS PACKAGE: 1) VOH681A Video Monitor with out TV Tuner / VOH682A Video Monitor with TV Tuner (1 pc) 2) Accessory Harness (P/N 8010730) (1 pc) 3) 12 Pin Power / Signal harness (P/N 112B2821) (1 pc) 4) 2 Pin Power Wire Harness with choke (P/N 112B2824...

Installation Guide
Page 4
...Refer to Page 3). 5) Route the wiring harnesses throughout the vehicle as necessary. (Refer to the wiring diagram on p7. -The VOH681A and VOH 682A video systems are mounted, recheck function of each component to allow working room. 6) Remove all A/V system components from sharp edges and is ... all manuals to become familiar with tuner (VOH682A), VCP -Same as system 1 but TV antenna must be purchased. If any access holes need to be located. It is included with the VOH681A and VOH 682A series Drop Down Video Systems: System 1: Video Monitor without tuner (VOH681A), VCP. -All wiring...
...Refer to Page 3). 5) Route the wiring harnesses throughout the vehicle as necessary. (Refer to the wiring diagram on p7. -The VOH681A and VOH 682A video systems are mounted, recheck function of each component to allow working room. 6) Remove all A/V system components from sharp edges and is ... all manuals to become familiar with tuner (VOH682A), VCP -Same as system 1 but TV antenna must be purchased. If any access holes need to be located. It is included with the VOH681A and VOH 682A series Drop Down Video Systems: System 1: Video Monitor without tuner (VOH681A), VCP. -All wiring...

Installation Guide
Page 5
...when key is off). Refer to the "Mini-Console installation" section later in the headliner. You can remove the shelf that the video monitor rests on and trace the opening onto the headliner for selected vehicles. Generally, these vehicles are several additional features, and are particularly useful ... instructions. -3- THIS IS NOT ONLY DANGEROUS, BUT IT IS ALSO ILLEGAL IN MANY STATES 4) Once the mounting location of the monitor has been determined, there may be required are installing this system into already has an OEM overhead console in this manual. NEVER INSTALL THE...
...when key is off). Refer to the "Mini-Console installation" section later in the headliner. You can remove the shelf that the video monitor rests on and trace the opening onto the headliner for selected vehicles. Generally, these vehicles are several additional features, and are particularly useful ... instructions. -3- THIS IS NOT ONLY DANGEROUS, BUT IT IS ALSO ILLEGAL IN MANY STATES 4) Once the mounting location of the monitor has been determined, there may be required are installing this system into already has an OEM overhead console in this manual. NEVER INSTALL THE...

Installation Guide
Page 6
...considerations for the lowest point, then tfraocre tthhe econltoouwr oef thsetropofoint, trace the convteohuicrleosftrutchteurer.oof -4- An alternate method is best to mount the video monitor to the outer surface of the roof. The mini console should be made . 3) Mark the cut . Trace the cut to page 3.... not distort (or bend) when the mounting screws are tightened. The mini console is mounted directly to the crossmember. If the video monitor is as follows: A) First mark the narrowest point of marking is to be installed with a material that matches the headliner before assembling...
...considerations for the lowest point, then tfraocre tthhe econltoouwr oef thsetropofoint, trace the convteohuicrleosftrutchteurer.oof -4- An alternate method is best to mount the video monitor to the outer surface of the roof. The mini console should be made . 3) Mark the cut . Trace the cut to page 3.... not distort (or bend) when the mounting screws are tightened. The mini console is mounted directly to the crossmember. If the video monitor is as follows: A) First mark the narrowest point of marking is to be installed with a material that matches the headliner before assembling...

Installation Guide
Page 8
...by tapping into the second Mini-Din connector on the Face of the VCP. Input RCA-Female Patch Cord RCA-Female To Secondary AV Monitor Wireless FM Modulator Antenna LEFT WHITE RIGHT RED TO OPTIONAL ADDITIONAL MOINTOR 12 VDC Power and Ground Auxillary video display INPUT VIDEO RCA-Female...Green (Right+) Black (Ground) Gray (Left+) IR LED: Clean the IR Receiver Window on the Video Monitor. 6) Connect the wired RF Modulator and / or the remote headphone jacks to the video monitor if those options are being included. 7) Connect power harness to the mating connector on the front of the...
...by tapping into the second Mini-Din connector on the Face of the VCP. Input RCA-Female Patch Cord RCA-Female To Secondary AV Monitor Wireless FM Modulator Antenna LEFT WHITE RIGHT RED TO OPTIONAL ADDITIONAL MOINTOR 12 VDC Power and Ground Auxillary video display INPUT VIDEO RCA-Female...Green (Right+) Black (Ground) Gray (Left+) IR LED: Clean the IR Receiver Window on the Video Monitor. 6) Connect the wired RF Modulator and / or the remote headphone jacks to the video monitor if those options are being included. 7) Connect power harness to the mating connector on the front of the...

Installation Guide
Page 9
... Component can be routed as in steps 2 and 3 above. Note: Installation Guide covers models : VOH682A. -7- Remove Adhesive Backing and Apply IR LED to IR Window on the face of the monitor). This second harness would plug into an accessory hot line. 8) Reinstall PCB cover using a second ...Din connector on PCB Cover. A/V Source Definitions: 1= VCP (right Mini Din on the front of the VCP. VOH682A Note: cables exiting the pod should be connected to the video monitor system using the 2 screws. 9) Connect and mount the Television antenna, or optional diversity antennas. 10) Verify ...
... Component can be routed as in steps 2 and 3 above. Note: Installation Guide covers models : VOH682A. -7- Remove Adhesive Backing and Apply IR LED to IR Window on the face of the monitor). This second harness would plug into an accessory hot line. 8) Reinstall PCB cover using a second ...Din connector on PCB Cover. A/V Source Definitions: 1= VCP (right Mini Din on the front of the VCP. VOH682A Note: cables exiting the pod should be connected to the video monitor system using the 2 screws. 9) Connect and mount the Television antenna, or optional diversity antennas. 10) Verify ...

Installation Guide
Page 10
... door pin switch wire, as the 1999 Dodge Caravan, may require that the purple / brown (Lamp auto) wire be supported by the output of the Monitor's lights may not be connected to ground. CONNECTING THE DOME LIGHTS The dome lights in the video...
... door pin switch wire, as the 1999 Dodge Caravan, may require that the purple / brown (Lamp auto) wire be supported by the output of the Monitor's lights may not be connected to ground. CONNECTING THE DOME LIGHTS The dome lights in the video...

Installation Guide
Page 11
...: Due to the nature of TV signals, vehicle motion, direction the vehicle is facing, distance from known good ground to black wire at Video Monitor Remedy: -Verify +12 VDC on . (Refer to the tuner. Negative Switched Dome lighting To 12 pin connector on p5 and p6. Verify ...connections at 2 pin Power Harness behind video monitor. These conditions may adversely affect TV reception. Verify ground connection with continuity test from the transmitter, nearby surroundings and weather may result in ...
...: Due to the nature of TV signals, vehicle motion, direction the vehicle is facing, distance from known good ground to black wire at Video Monitor Remedy: -Verify +12 VDC on . (Refer to the tuner. Negative Switched Dome lighting To 12 pin connector on p5 and p6. Verify ...connections at 2 pin Power Harness behind video monitor. These conditions may adversely affect TV reception. Verify ground connection with continuity test from the transmitter, nearby surroundings and weather may result in ...

