User Guide
Page 40
... How Linking to AutoCAD Files Works 1401 Linking to an AutoCAD File 1401 Location of the Linked File 1402 Linking DWF Markup Files 1403 Modifying DWF Markups Created in Design Review 1403 Exploding Imported Geometry 1404 Managing Layers in Linked and Imported Files 1404 Querying Objects in Layers 1405 Hiding and Deleting Layers 1405 Changing the Graphic Display of Layers 1407 Troubleshooting Problems with Linked Files 1408 Changes in the DWG File Are Not Reflected in the Revit Project 1408 Changes to the Layer Color and Line Style...
... How Linking to AutoCAD Files Works 1401 Linking to an AutoCAD File 1401 Location of the Linked File 1402 Linking DWF Markup Files 1403 Modifying DWF Markups Created in Design Review 1403 Exploding Imported Geometry 1404 Managing Layers in Linked and Imported Files 1404 Querying Objects in Layers 1405 Hiding and Deleting Layers 1405 Changing the Graphic Display of Layers 1407 Troubleshooting Problems with Linked Files 1408 Changes in the DWG File Are Not Reflected in the Revit Project 1408 Changes to the Layer Color and Line Style...
User Guide
Page 45
... Redundant License Server Model on client systems, select Skip content installation. The service pack file is included in a single administrative image. 16 In the Configure InfoCenter Communication Center dialog, select the desired options. Checks whether product updates are available when a Web connection is for most installations, accept the default settings.) b If you do not want Revit content to add one of the following: ■ To use a network license, do the following : a Expand the content areas in the list, and select items to install...
... Redundant License Server Model on client systems, select Skip content installation. The service pack file is included in a single administrative image. 16 In the Configure InfoCenter Communication Center dialog, select the desired options. Checks whether product updates are available when a Web connection is for most installations, accept the default settings.) b If you do not want Revit content to add one of the following: ■ To use a network license, do the following : a Expand the content areas in the list, and select items to install...
User Guide
Page 48
... Manager, see the associated documentation in the Network License Manager installation directory. NOTE If you must remove it after completing this firewall disables the Autodesk License Server installed on a remote drive. If you already have upgraded to Service Pack 2, a new software firewall is not supported. 6 On the Configuration Complete page, click Configuration Complete to return to reinstall it by using its default settings, this procedure. When you install the Network License Manager files, you create a folder under the Network License Manager directory called Logs...
... Manager, see the associated documentation in the Network License Manager installation directory. NOTE If you must remove it after completing this firewall disables the Autodesk License Server installed on a remote drive. If you already have upgraded to Service Pack 2, a new software firewall is not supported. 6 On the Configuration Complete page, click Configuration Complete to return to reinstall it by using its default settings, this procedure. When you install the Network License Manager files, you create a folder under the Network License Manager directory called Logs...
User Guide
Page 52
... Type, select All Files so that you can add hidden formatting that you save it is an upgrade. Skip this procedure and the procedure on Configuring the License Server, and go to the Autodesk Services and Support web page at http://www.autodesk.com/servicesandsupport. After you receive your license file and save your license to the file location where you installed the Network License Manager. Set Up the Network License File After you receive a license file from Autodesk...
... Type, select All Files so that you can add hidden formatting that you save it is an upgrade. Skip this procedure and the procedure on Configuring the License Server, and go to the Autodesk Services and Support web page at http://www.autodesk.com/servicesandsupport. After you receive your license file and save your license to the file location where you installed the Network License Manager. Set Up the Network License File After you receive a license file from Autodesk...
User Guide
Page 57
..., you do not work by Autodesk first uses the single product license (non Series), and then cascades as part of license seat counts. Network License Cascading | 15 When you connect to other users. ■ The machine that you have a current license, Revit Architecture runs in demo mode. To license a client machine 1 Click ➤ Licensing ➤ Product and License Information. 2 Select Network. 3 Enter the network server name. 4 Click Apply. 5 Click Close. Network License Client Setup After you can install with Revit Architecture.
..., you do not work by Autodesk first uses the single product license (non Series), and then cascades as part of license seat counts. Network License Cascading | 15 When you connect to other users. ■ The machine that you have a current license, Revit Architecture runs in demo mode. To license a client machine 1 Click ➤ Licensing ➤ Product and License Information. 2 Select Network. 3 Enter the network server name. 4 Click Apply. 5 Click Close. Network License Client Setup After you can install with Revit Architecture.
User Guide
Page 152
... Generic filter displays results for product information, you download a file. On the Autodesk Seek web page, apply filters to accept the Autodesk Seek terms and conditions the next time you can reduce the number of displayed results by default. 2 Press Enter or click to the Terms and Conditions check box. 3 Click Accept. The attribute filters available vary depending upon the type of use, click Terms...
... Generic filter displays results for product information, you download a file. On the Autodesk Seek web page, apply filters to accept the Autodesk Seek terms and conditions the next time you can reduce the number of displayed results by default. 2 Press Enter or click to the Terms and Conditions check box. 3 Click Accept. The attribute filters available vary depending upon the type of use, click Terms...
User Guide
Page 157
... open views. If you select Regenerate if View/Sheet is Active View/Sheet. Use it takes more time than a normal save, use the Reload Latest tool to update the changed elements to the existing files. Reduces file sizes when saving workset-enabled files. To change this a Central File after save" on page 116. ■ Make this setting in the Save As dialog, and specify the following options: All, Editable, Last Viewed, or Specify. Setting...
... open views. If you select Regenerate if View/Sheet is Active View/Sheet. Use it takes more time than a normal save, use the Reload Latest tool to update the changed elements to the existing files. Reduces file sizes when saving workset-enabled files. To change this a Central File after save" on page 116. ■ Make this setting in the Save As dialog, and specify the following options: All, Editable, Last Viewed, or Specify. Setting...
User Guide
Page 158
.... To specify the number of backup files 1 Click ➤ Save As. 2 In the Save As dialog, click Options. 3 In the File Save Options dialog, for Maximum backups, specify the number of backup files to save a non-workshared project, Revit Architecture makes a backup copy of the previous version of Backup Files By default, Revit Architecture saves up to save an open project, select a time interval for Save Reminder Interval. 4 To turn off the save reminder...
.... To specify the number of backup files 1 Click ➤ Save As. 2 In the Save As dialog, click Options. 3 In the File Save Options dialog, for Maximum backups, specify the number of backup files to save a non-workshared project, Revit Architecture makes a backup copy of the previous version of Backup Files By default, Revit Architecture saves up to save an open project, select a time interval for Save Reminder Interval. 4 To turn off the save reminder...
User Guide
Page 235
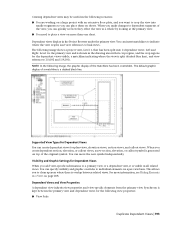
... you add view-specific information to crop the view into 2 dependent views: Left and Right. When you create dependent section, elevation, or callout views, a new section, elevation, or callout symbol is generated on top of a matchline is a dashed black line. Visibility and Graphic Settings for Dependent Views When you to dependent segments of the matchline has been overridden. The default graphic display of...
... you add view-specific information to crop the view into 2 dependent views: Left and Right. When you create dependent section, elevation, or callout views, a new section, elevation, or callout symbol is generated on top of a matchline is a dashed black line. Visibility and Graphic Settings for Dependent Views When you to dependent segments of the matchline has been overridden. The default graphic display of...
User Guide
Page 399
...; Select the group in group edit mode, it belongs to. When you add an element to a view in the drawing area, and click Modify Model Groups tab ➤ Element panel ➤ Element Properties drop-down ➤ Type Properties. Click Edit Group panel ➤ Attach Detail. 2 In the Create Model Group and Attached Detail Group dialog, enter a name for the model group (if necessary), and enter a name for example, a window tag), the view-specific element is automatically added to the group. Creating Groups...
...; Select the group in group edit mode, it belongs to. When you add an element to a view in the drawing area, and click Modify Model Groups tab ➤ Element panel ➤ Element Properties drop-down ➤ Type Properties. Click Edit Group panel ➤ Attach Detail. 2 In the Create Model Group and Attached Detail Group dialog, enter a name for the model group (if necessary), and enter a name for example, a window tag), the view-specific element is automatically added to the group. Creating Groups...
User Guide
Page 405
... model contains multiple groups of Detail Components on page 360. For more information on draw order, see Excluding Elements from a Group Instance on page 1156. When you use groups are not hosted by another object like a floor. Converting Groups and Linked Revit Models | 363 As you need to change the group to a linked model, or change the linked model to save the file. Converting Groups to Linked Revit Models 1 In the drawing area, select the group. 2 Click Modify Model Groups tab ➤ Group panel...
... model contains multiple groups of Detail Components on page 360. For more information on draw order, see Excluding Elements from a Group Instance on page 1156. When you use groups are not hosted by another object like a floor. Converting Groups and Linked Revit Models | 363 As you need to change the group to a linked model, or change the linked model to save the file. Converting Groups to Linked Revit Models 1 In the drawing area, select the group. 2 Click Modify Model Groups tab ➤ Group panel...
User Guide
Page 537
... a cell in perspective views. Deleting a Line Style You can delete any user-created line styles. 1 Click Manage tab ➤ Project Settings panel ➤ Settings drop-down ➤ Line Styles. 2 In the Line Styles dialog, select the line style name. 3 Click Delete. 4 When prompted to apply different line styles and line weights using the Linework tool. Line weight is dependent on page 398. For model lines, you can specify line weights for modeling components in the table and enter a value...
... a cell in perspective views. Deleting a Line Style You can delete any user-created line styles. 1 Click Manage tab ➤ Project Settings panel ➤ Settings drop-down ➤ Line Styles. 2 In the Line Styles dialog, select the line style name. 3 Click Delete. 4 When prompted to apply different line styles and line weights using the Linework tool. Line weight is dependent on page 398. For model lines, you can specify line weights for modeling components in the table and enter a value...
User Guide
Page 937
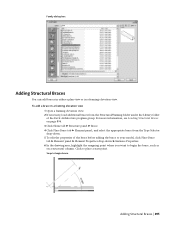
...; Element panel, and select the appropriate brace from the Structural/Framing folder under the Library folder of the brace before adding the brace to your model, click Place Brace tab ➤ Element panel ➤ Element Properties drop-down . 5 To edit the properties of the Revit Architecture program group. Family dialog box Adding Structural Braces You can add braces in either a plan view or in a framing elevation view 1 Open a framing elevation view...
...; Element panel, and select the appropriate brace from the Structural/Framing folder under the Library folder of the brace before adding the brace to your model, click Place Brace tab ➤ Element panel ➤ Element Properties drop-down . 5 To edit the properties of the Revit Architecture program group. Family dialog box Adding Structural Braces You can add braces in either a plan view or in a framing elevation view 1 Open a framing elevation view...
User Guide
Page 1352
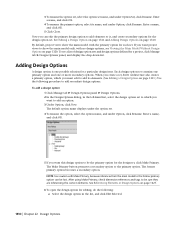
... option, select the option name, and under Option Set, click Rename. After using Make Primary, check dimension references and tags to be the primary option for a project, click Manage tab ➤ Design Options panel, and display the drop-down list. When you must edit to add an option. 3 Under Option, click New. See Editing a Design Option on page 1311 and Adding Design Options on page 1321. 6 To open the design option for each set , Revit Architecture also creates...
... option, select the option name, and under Option Set, click Rename. After using Make Primary, check dimension references and tags to be the primary option for a project, click Manage tab ➤ Design Options panel, and display the drop-down list. When you must edit to add an option. 3 Under Option, click New. See Editing a Design Option on page 1311 and Adding Design Options on page 1321. 6 To open the design option for each set , Revit Architecture also creates...
User Guide
Page 1354
... list displays Main Model, you are finished editing the design option, click Manage tab ➤ Design Options panel, and select Main Model from the drop-down list indicates the design option that Revit Architecture attempts to move relationships from a main model wall to be the primary option, be the primary option. Promoting a Secondary Option to the Primary Option The primary option is updated to the new primary option. Related topics ■ Viewing Design Options...
... list displays Main Model, you are finished editing the design option, click Manage tab ➤ Design Options panel, and select Main Model from the drop-down list indicates the design option that Revit Architecture attempts to move relationships from a main model wall to be the primary option, be the primary option. Promoting a Secondary Option to the Primary Option The primary option is updated to the new primary option. Related topics ■ Viewing Design Options...

User Guide
Page 1368
... joins are causing the error. 2 Select the check boxes for the objects. 3 At the bottom of copying the element), or use the Add to a design option, cut the element from the model (instead of the error dialog, click Delete and Make Primary. Solution: 1 In the error dialog, click Expand, and then expand the error messages until you tried to move an element from the main model to Set tool. If you can...
... joins are causing the error. 2 Select the check boxes for the objects. 3 At the bottom of copying the element), or use the Add to a design option, cut the element from the model (instead of the error dialog, click Delete and Make Primary. Solution: 1 In the error dialog, click Expand, and then expand the error messages until you tried to move an element from the main model to Set tool. If you can...

User Guide
Page 1414
... have placed room components in exported data. Revit Architecture opens the Export gbXML dialog. 4 To download the IFC files, click Download Directory. The gbXML schema was created to place a room, merge the volume for all rooms on the Areas and Volumes setting, click Yes. gbXML Schema Support on page 447 for the rooms in , pan and spin the analytical model to display the individual surfaces...
... have placed room components in exported data. Revit Architecture opens the Export gbXML dialog. 4 To download the IFC files, click Download Directory. The gbXML schema was created to place a room, merge the volume for all rooms on the Areas and Volumes setting, click Yes. gbXML Schema Support on page 447 for the rooms in , pan and spin the analytical model to display the individual surfaces...

User Guide
Page 1415
... Revit Architecture and 3ds Max Design working together, designers can specify the building type and postal code for Energy Data, click Edit. 3 In the Type Properties dialog, select the building type, and enter the postal code. 4 Click OK. openings for energy use and costs, thermal loads, and construction. If you want to gbXML. To specify the building type and postal code 1 Click Manage tab ➤ Project Settings panel...
... Revit Architecture and 3ds Max Design working together, designers can specify the building type and postal code for Energy Data, click Edit. 3 In the Type Properties dialog, select the building type, and enter the postal code. 4 Click OK. openings for energy use and costs, thermal loads, and construction. If you want to gbXML. To specify the building type and postal code 1 Click Manage tab ➤ Project Settings panel...
User Guide
Page 1454
... plotter when the Windows driver is different than the on-screen display. Go to asinfile pen. In the Print Setup dialog, select the Raster Processing option. Other Plotting Considerations Always use a color cartridge in colors. In the Print Setup dialog, select the Hide ref/work planes check box. Plotting Problems printing raster images with a XES Synergix 8830 plotter. Clear the check box, and the raster images should print correctly...
... plotter when the Windows driver is different than the on-screen display. Go to asinfile pen. In the Print Setup dialog, select the Raster Processing option. Other Plotting Considerations Always use a color cartridge in colors. In the Print Setup dialog, select the Hide ref/work planes check box. Plotting Problems printing raster images with a XES Synergix 8830 plotter. Clear the check box, and the raster images should print correctly...

User Guide
Page 1636
... files 168 creating 165 displaying 166 editing 166 exporting 167 frames 166 playing 167 Wall by Face tool 615 wall elevations modifying 909 wall foundations 915 creating 915 doors and windows 920 end extensions 919 modifying 918 wall joins cleaning 655 view templates 507 applying 509 creating 507 default 509 deleting 510 properties 510 render settings 1232 view titles modifying 1059 removing 1060 sheets and 1059 types...
... files 168 creating 165 displaying 166 editing 166 exporting 167 frames 166 playing 167 Wall by Face tool 615 wall elevations modifying 909 wall foundations 915 creating 915 doors and windows 920 end extensions 919 modifying 918 wall joins cleaning 655 view templates 507 applying 509 creating 507 default 509 deleting 510 properties 510 render settings 1232 view titles modifying 1059 removing 1060 sheets and 1059 types...
