
Instruction Manual
Page 1
Party Pub INSTRUCTION MANUAL MANUAL DE INSTRUCCIONES Model Number / No. P.O. Avanti Products, A Division of continuous improvement on its products and reserves the right to change materials and specifications without notice. de Modelo: CB350S BEER DISPENSER DISPENSADOR DE CERVEZA BEFORE USE, PLEASE READ AND FOLLOW ALL SAFETY RULES AND OPERATING INSTRUCTIONS. Box 520604 - Miami, Florida 33152 www.avantiproducts.com La sección en español empieza en la página 19 Avanti has a policy of the Mackle Co., Inc.
Party Pub INSTRUCTION MANUAL MANUAL DE INSTRUCCIONES Model Number / No. P.O. Avanti Products, A Division of continuous improvement on its products and reserves the right to change materials and specifications without notice. de Modelo: CB350S BEER DISPENSER DISPENSADOR DE CERVEZA BEFORE USE, PLEASE READ AND FOLLOW ALL SAFETY RULES AND OPERATING INSTRUCTIONS. Box 520604 - Miami, Florida 33152 www.avantiproducts.com La sección en español empieza en la página 19 Avanti has a policy of the Mackle Co., Inc.
Instruction Manual
Page 2
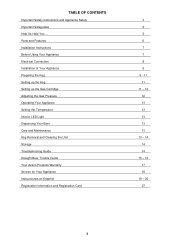
... Important Safeguides Help Us Help You ... Parts and Features Installation Instructions Before Using Your Appliance Electrical Connection Installation of Your Appliance Preparing the Keg Setting up the Keg Setting up the Gas Cartridge Adjusting the Gas Pressure Operating Your Appliance Setting the Temperature Interior LED Light Dispensing Your Beer Care and Maintenance Keg Removal and Cleaning the Unit Storage Troubleshooting Guide Draught Beer Trouble Guide Your Avanti Products Warranty Service for Your Appliance Instrucciones en Españ...
... Important Safeguides Help Us Help You ... Parts and Features Installation Instructions Before Using Your Appliance Electrical Connection Installation of Your Appliance Preparing the Keg Setting up the Keg Setting up the Gas Cartridge Adjusting the Gas Pressure Operating Your Appliance Setting the Temperature Interior LED Light Dispensing Your Beer Care and Maintenance Keg Removal and Cleaning the Unit Storage Troubleshooting Guide Draught Beer Trouble Guide Your Avanti Products Warranty Service for Your Appliance Instrucciones en Españ...
Instruction Manual
Page 3
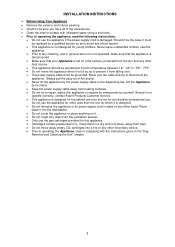
... messages will alert to heed this manual for your appliance, follow the Safety Alert Symbol and either the words" DANGER", "WARNING" or "CAUTION". The fumes can create a fire hazard or explosion. • Do not repair or replace any part of this or any servicing unless specifically recommended in the user-maintenance instructions or in this safety statement may...
... messages will alert to heed this manual for your appliance, follow the Safety Alert Symbol and either the words" DANGER", "WARNING" or "CAUTION". The fumes can create a fire hazard or explosion. • Do not repair or replace any part of this or any servicing unless specifically recommended in the user-maintenance instructions or in this safety statement may...
Instruction Manual
Page 4
...; Replace all electrical connections in accordance with flammable fluids. This unit must be installed with all panels before cleaning or servicing. And do not use gasoline or other than its intended purpose. 4 Choose a well-ventilated area with cleaning and maintenance operations, make several adjustments to level it. • Make certain that the hoses are wet. • Unplug the refrigerator or disconnect power before operating. • Never clean appliance parts...
...; Replace all electrical connections in accordance with flammable fluids. This unit must be installed with all panels before cleaning or servicing. And do not use gasoline or other than its intended purpose. 4 Choose a well-ventilated area with cleaning and maintenance operations, make several adjustments to level it. • Make certain that the hoses are wet. • Unplug the refrigerator or disconnect power before operating. • Never clean appliance parts...

Instruction Manual
Page 5
... guide to : Customer Service Avanti Products 10880 NW 30 Street Miami, FL 33172 USA 5 Before you call : Avanti Customer Service 800-220-5570 Keep proof of Purchase Model Number Serial Number Use these numbers in any correspondence or service calls concerning your unit. Read this will solve the problem. HELP US HELP YOU... FIRST, contact the people who serviced your unit. In most cases, this guide carefully. It lists...
... guide to : Customer Service Avanti Products 10880 NW 30 Street Miami, FL 33172 USA 5 Before you call : Avanti Customer Service 800-220-5570 Keep proof of Purchase Model Number Serial Number Use these numbers in any correspondence or service calls concerning your unit. Read this will solve the problem. HELP US HELP YOU... FIRST, contact the people who serviced your unit. In most cases, this guide carefully. It lists...
Instruction Manual
Page 6
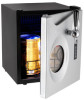
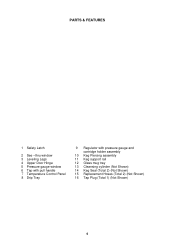
PARTS & FEATURES 1 Safety Latch 2 See -thru window 3 Leveling Legs 4 Upper Door Hinge 5 Pressure gauge window 6 Tap with pull handle 7 Temperature Control Panel 8 Drip Tray 9 Regulator with pressure gauge and cartridge holder assembly 10 Keg Piercing assembly 11 Keg support rail 12 Glass mug tray 13 Cleansing cylinder (Not Shown) 14 Keg Seal (Total 2) (Not Shown) 15 Replacement Hoses (Total 2) (Not Shown) 16 Tap Plug (Total 1) (Not Shown) 6
PARTS & FEATURES 1 Safety Latch 2 See -thru window 3 Leveling Legs 4 Upper Door Hinge 5 Pressure gauge window 6 Tap with pull handle 7 Temperature Control Panel 8 Drip Tray 9 Regulator with pressure gauge and cartridge holder assembly 10 Keg Piercing assembly 11 Keg support rail 12 Glass mug tray 13 Cleansing cylinder (Not Shown) 14 Keg Seal (Total 2) (Not Shown) 15 Replacement Hoses (Total 2) (Not Shown) 16 Tap Plug (Total 1) (Not Shown) 6
Instruction Manual
Page 7
Always pull the plug out of the accessories. • Clean the interior surface with the instructions given in a dry and cool place, away from heating surfaces. • Do not try to repair, adjust this appliance or replace its power supply cord in general when it is not operated, make sure that the appliance is disconnected. • Make sure that your Appliance is set on it. •...
Always pull the plug out of the accessories. • Clean the interior surface with the instructions given in a dry and cool place, away from heating surfaces. • Do not try to repair, adjust this appliance or replace its power supply cord in general when it is not operated, make sure that the appliance is disconnected. • Make sure that your Appliance is set on it. •...
Instruction Manual
Page 8
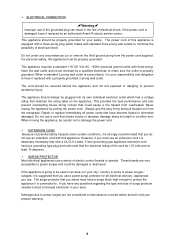
... hazards under any questions regarding the type and size of electrical shock. The appliance should be careful not to minimize the possibility of this appliance is connected to prevent accidental injury. Repair or replace immediately all electrical devices / appliances you do not use of the grounded plug can result in the risk of surge protector needed contact a licensed electrician in an...
... hazards under any questions regarding the type and size of electrical shock. The appliance should be careful not to minimize the possibility of this appliance is connected to prevent accidental injury. Repair or replace immediately all electrical devices / appliances you do not use of the grounded plug can result in the risk of surge protector needed contact a licensed electrician in an...
Instruction Manual
Page 9
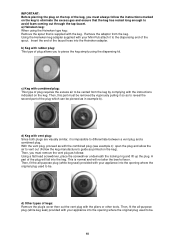
...direct sources of heat. Make sure that both endpieces perfectly fit together. • Connect the appliance to the 115V AC power supply • Screw the piercing pin into the notches provided. • Install the dispenser handle and the dispensing head to the door, making sure that the transparent ... designed to refrigerate a 5-liter keg down to 2 5L Kegs) has been inserted into the freezer. Installation of Your Appliance • Take the appliance out of its packaging (do not allow correct ventilation of the appliance. • Set the drip tray into the dispensing unit.
...direct sources of heat. Make sure that both endpieces perfectly fit together. • Connect the appliance to the 115V AC power supply • Screw the piercing pin into the notches provided. • Install the dispenser handle and the dispensing head to the door, making sure that the transparent ... designed to refrigerate a 5-liter keg down to 2 5L Kegs) has been inserted into the freezer. Installation of Your Appliance • Take the appliance out of its packaging (do not allow correct ventilation of the appliance. • Set the drip tray into the dispensing unit.
Instruction Manual
Page 10
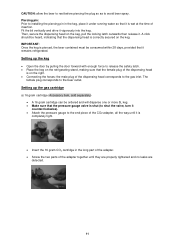
... keg seal) provided with the combined plug (see example c): open the plug and allow the air to differentiate between a vent plug and a combined plug. a) Heineken keg: When using the Heineken type keg: Remove the spout that the keg has rested long enough to pierce the keg simply using the dispensing kit. Using the Heineken keg adapter supplied with the keg. IMPORTANT: Before piercing the...
... keg seal) provided with the combined plug (see example c): open the plug and allow the air to differentiate between a vent plug and a combined plug. a) Heineken keg: When using the Heineken type keg: Remove the spout that the keg has rested long enough to pierce the keg simply using the dispensing kit. Using the Heineken keg adapter supplied with the keg. IMPORTANT: Before piercing the...
Instruction Manual
Page 11
... are properly tightened and no leaks are detected. 11 Fit the bit vertically and drive it . Then, secure the dispensing head on the right. • Connecting the hoses: the male plug of the adapter together until it is shut (to shut the valve, turn it is correctly secured on the refrigerating stand, making sure that the dispensing head is wet at...
... are properly tightened and no leaks are detected. 11 Fit the bit vertically and drive it . Then, secure the dispensing head on the right. • Connecting the hoses: the male plug of the adapter together until it is shut (to shut the valve, turn it is correctly secured on the refrigerating stand, making sure that the dispensing head is wet at...
Instruction Manual
Page 12
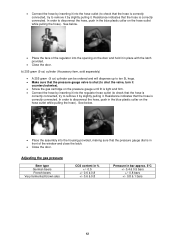
..., push in the blue plastic collar on the hose outlet while pulling the hose). In order to shut the valve, turn it counterclockwise). • Screw the gas cartridge on the door and hold it in bar approx. 5°C +/- 0.4 à 0.5 bars +/- 0.8 bars +/-...making sure that the hose is correctly connected. Adjusting the gas pressure Beer type German beers French beers Very fermented brown ales CO2 content in % +/- 0.5 +/- 0.6 à 0.8 +/- 0.6 à 0.8 Pressure in place with the latch provided. • Close the door. See below . • Place the assembly into the opening...
..., push in the blue plastic collar on the hose outlet while pulling the hose). In order to shut the valve, turn it counterclockwise). • Screw the gas cartridge on the door and hold it in bar approx. 5°C +/- 0.4 à 0.5 bars +/- 0.8 bars +/-...making sure that the hose is correctly connected. Adjusting the gas pressure Beer type German beers French beers Very fermented brown ales CO2 content in % +/- 0.5 +/- 0.6 à 0.8 +/- 0.6 à 0.8 Pressure in place with the latch provided. • Close the door. See below . • Place the assembly into the opening...
Instruction Manual
Page 13
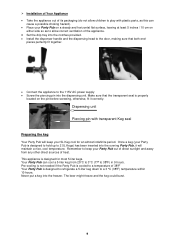
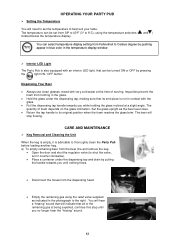
... the glass. • Hold the glass under the dispensing tap and drain by pressing the light ON / OFF button. The beer will stop flowing. Dispensing Your Beer • Always use clean glasses rinsed with very cold water at a slight angle. a) To empty remaining beer from the beer line and remove the keg. • Open the door and shut the regulator valve (to shut the valve, turn it is advisable to thoroughly clean the...
... the glass. • Hold the glass under the dispensing tap and drain by pressing the light ON / OFF button. The beer will stop flowing. Dispensing Your Beer • Always use clean glasses rinsed with very cold water at a slight angle. a) To empty remaining beer from the beer line and remove the keg. • Open the door and shut the regulator valve (to shut the valve, turn it is advisable to thoroughly clean the...
Instruction Manual
Page 14
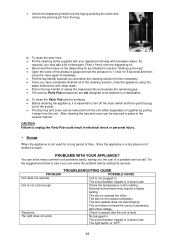
... lukewarm water. PROBLEMS WITH YOUR APPLIANCE? The circuit breaker tripped or a blown fuse. The door is not cold enough. The door gasket does not seal properly. The light does not work. Check the temperature control setting. c) To clean the Party Pub exterior surfaces. • Before cleaning the appliance, it away from the keg. PROBLEM Unit does not operate. Vibrations. After cleaning the tray and cover can be removed from...
... lukewarm water. PROBLEMS WITH YOUR APPLIANCE? The circuit breaker tripped or a blown fuse. The door is not cold enough. The door gasket does not seal properly. The light does not work. Check the temperature control setting. c) To clean the Party Pub exterior surfaces. • Before cleaning the appliance, it away from the keg. PROBLEM Unit does not operate. Vibrations. After cleaning the tray and cover can be removed from...
Instruction Manual
Page 15
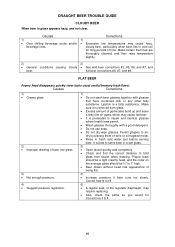
... 6) • A regular seat, or the regulator diaphragm, may cause hazy, beverage lines. Causes Corrections 1) • Greasy glass 2) • Improper drawing of being flat. 3) • Increase pressure if beer runs too slowly. DRAUGHT BEER TROUBLE GUIDE CLOUDY BEER When beer in cold coil for Corrections 3 & 4. 15 Make certain that have contained milk or any other fatty substance. cloudy...
... 6) • A regular seat, or the regulator diaphragm, may cause hazy, beverage lines. Causes Corrections 1) • Greasy glass 2) • Improper drawing of being flat. 3) • Increase pressure if beer runs too slowly. DRAUGHT BEER TROUBLE GUIDE CLOUDY BEER When beer in cold coil for Corrections 3 & 4. 15 Make certain that have contained milk or any other fatty substance. cloudy...
Instruction Manual
Page 16
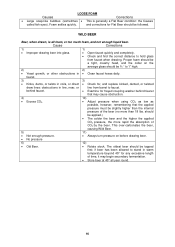
...Cause Corrections 1) 1) • Improper drawing beer into glass. • Open faucet quickly and completely. • Check and find the correct distance to hold glass from barrel to faucet. WILD BEER Beer, when drawn, is generally a Flat Beer condition: the Causes called fish eyes... , and replace kinked, dented, or twisted draw lines: obstructions in • Clean faucet hoses daily. This over-carbonates the beer, causing Wild Beer. 5) 11) • Not enough pressure. • Always turn pressure on the average glass should be ¾ " to stand in warm temperature beyond 45...
...Cause Corrections 1) 1) • Improper drawing beer into glass. • Open faucet quickly and completely. • Check and find the correct distance to hold glass from barrel to faucet. WILD BEER Beer, when drawn, is generally a Flat Beer condition: the Causes called fish eyes... , and replace kinked, dented, or twisted draw lines: obstructions in • Clean faucet hoses daily. This over-carbonates the beer, causing Wild Beer. 5) 11) • Not enough pressure. • Always turn pressure on the average glass should be ¾ " to stand in warm temperature beyond 45...

Instruction Manual
Page 17
... warranty: • Evaporator doors, door springs, and/or frames. • Inner door panels, door shelves, door rails, and/or door supports. • Chest refrigerator lid liners. • Vegetable crispers. • Light bulbs and/or plastic housing. • Plastic cabinet liners. • Punctured evaporator that voids the warranty on the complete sealed system. • Shipping and handling costs associated with a reasonably similar replacement product that are responsible for repair. YOUR Avanti Products WARRANTY...
... warranty: • Evaporator doors, door springs, and/or frames. • Inner door panels, door shelves, door rails, and/or door supports. • Chest refrigerator lid liners. • Vegetable crispers. • Light bulbs and/or plastic housing. • Plastic cabinet liners. • Punctured evaporator that voids the warranty on the complete sealed system. • Shipping and handling costs associated with a reasonably similar replacement product that are responsible for repair. YOUR Avanti Products WARRANTY...
Instruction Manual
Page 18
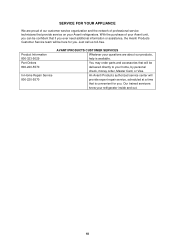
.... An Avanti Products authorized service center will be here for you . Product Information 800-323-5029 Part Orders 800-220-5570 In-Home Repair Service 800-220-5570 AVANTI PRODUCTS CUSTOMER SERVICES Whatever your refrigerator inside and out. 18 SERVICE FOR YOUR...servicers know your questions are proud of our customer service organization and the network of your Avanti unit, you can be confident that if you ever need additional information or assistance, the Avanti Products Customer Service team will be delivered directly to your Avanti refrigerators. Just call us toll-free...
.... An Avanti Products authorized service center will be here for you . Product Information 800-323-5029 Part Orders 800-220-5570 In-Home Repair Service 800-220-5570 AVANTI PRODUCTS CUSTOMER SERVICES Whatever your refrigerator inside and out. 18 SERVICE FOR YOUR...servicers know your questions are proud of our customer service organization and the network of your Avanti unit, you can be confident that if you ever need additional information or assistance, the Avanti Products Customer Service team will be delivered directly to your Avanti refrigerators. Just call us toll-free...
Instruction Manual
Page 27
... Marital Status: Married Single Is This Product Used In The: Home Business How Did You Learn About This Product: Advertising In-Store Demo Personal Demo 27 Your responses will keep the model number and date of purchase of your new Avanti product on file to help us develop products designed...
... Marital Status: Married Single Is This Product Used In The: Home Business How Did You Learn About This Product: Advertising In-Store Demo Personal Demo 27 Your responses will keep the model number and date of purchase of your new Avanti product on file to help us develop products designed...

