Instruction Manual
Page 1
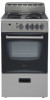
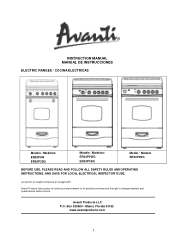
... and reserves the right to change materials and specifications without notice. AND SAVE FOR LOCAL ELECTRICAL INSPECTOR'S USE. La sección en español empieza en la página 25. INSTRUCTION MANUAL MANUAL DE INSTRUCCIONES ELECTRIC RANGES / COCINA ELECTRICAS Models / Modelos: ER20P0W ER20P3SG Models / Modelos: ER24P0WG ER24P1BG Model / Modelo ER24P3SG BEFORE USE, PLEASE READ AND FOLLOW ALL SAFETY RULES AND OPERATING INSTRUCTIONS. Miami, Florida 33152 www...
... and reserves the right to change materials and specifications without notice. AND SAVE FOR LOCAL ELECTRICAL INSPECTOR'S USE. La sección en español empieza en la página 25. INSTRUCTION MANUAL MANUAL DE INSTRUCCIONES ELECTRIC RANGES / COCINA ELECTRICAS Models / Modelos: ER20P0W ER20P3SG Models / Modelos: ER24P0WG ER24P1BG Model / Modelo ER24P3SG BEFORE USE, PLEASE READ AND FOLLOW ALL SAFETY RULES AND OPERATING INSTRUCTIONS. Miami, Florida 33152 www...

Instruction Manual
Page 2
... Parts and Features Important Safety Instructions Installation Instructions Before Using Your Electric Range Important Precautions and Recommendations Installation of Your Electric Range Electrical Connection Leveling the Range Anti-tip Bracket Installation Operating Your Electric Range Control Panel Using the Surface Unit Cookware Tips Using the Oven Care and Maintenance General Information Cleaning Your Range Cleaning Surface Units and Reflector Bowls Lift-up Cooktop Removable Storage Drawer Replacing the Oven Light Troubleshooting Guide Service for Your Appliance Wiring Diagram Your Avanti...
... Parts and Features Important Safety Instructions Installation Instructions Before Using Your Electric Range Important Precautions and Recommendations Installation of Your Electric Range Electrical Connection Leveling the Range Anti-tip Bracket Installation Operating Your Electric Range Control Panel Using the Surface Unit Cookware Tips Using the Oven Care and Maintenance General Information Cleaning Your Range Cleaning Surface Units and Reflector Bowls Lift-up Cooktop Removable Storage Drawer Replacing the Oven Light Troubleshooting Guide Service for Your Appliance Wiring Diagram Your Avanti...

Instruction Manual
Page 3
... cases, this guide carefully. Keep it to help you the Electric Range. Please write these numbers in any correspondence or service calls concerning your new Electric Range properly. It is intended to : Customer Service Avanti Products 10880 NW 30 Street Miami, FL 33172 USA 3 It lists causes of Purchase Model Number Serial Number Use these numbers here: Date of minor operating problems that sold you operate and maintain your Electric Range. NEXT, if...
... cases, this guide carefully. Keep it to help you the Electric Range. Please write these numbers in any correspondence or service calls concerning your new Electric Range properly. It is intended to : Customer Service Avanti Products 10880 NW 30 Street Miami, FL 33172 USA 3 It lists causes of Purchase Model Number Serial Number Use these numbers here: Date of minor operating problems that sold you operate and maintain your Electric Range. NEXT, if...

Instruction Manual
Page 5
... before cleaning or servicing. This information is recommended that cannot be properly positioned and installed as described in handling. • The misuse of oven door (e.g. Only authorized replacement parts may need to operate, play with the National Electrical Code ANSI/NFPA No. 70 (Latest Edition) and local electrical code requirements. • Replacement Parts - All other appliance. Use care in this manual. Replacement parts are available from contacting the heating elements. 5 Contact the nearest Avanti service...
... before cleaning or servicing. This information is recommended that cannot be properly positioned and installed as described in handling. • The misuse of oven door (e.g. Only authorized replacement parts may need to operate, play with the National Electrical Code ANSI/NFPA No. 70 (Latest Edition) and local electrical code requirements. • Replacement Parts - All other appliance. Use care in this manual. Replacement parts are available from contacting the heating elements. 5 Contact the nearest Avanti service...

Instruction Manual
Page 8
... DEVICE IS INSTALLED PROPERLY, SILDE RANGE FORWARD, LOOK FOR ANTI-TIP BRACKET SECURELY ATTACHED TO FLOOR, AND SLIDE RANGE BACK SO REAR RANGE FOOT IS UNDER ANTI-TIP BRACKET. • CAUTION: Do not store items of interest to children in use aluminum foil to line surface unit drip bowls or oven bottoms, except as suggested in the manual. children climbing on any part of the appliance unless specifically recommended in...
... DEVICE IS INSTALLED PROPERLY, SILDE RANGE FORWARD, LOOK FOR ANTI-TIP BRACKET SECURELY ATTACHED TO FLOOR, AND SLIDE RANGE BACK SO REAR RANGE FOOT IS UNDER ANTI-TIP BRACKET. • CAUTION: Do not store items of interest to children in use aluminum foil to line surface unit drip bowls or oven bottoms, except as suggested in the manual. children climbing on any part of the appliance unless specifically recommended in...

Instruction Manual
Page 9
... while oven is cool. Contact a qualified technician immediately. • Clean Cook-top With Caution - Let hot air or steam escape before removing or replacing food. • Do Not Heat Unopened Food Containers - • Do Not Soak Removable Heating Elements - Some cleaners can produce noxious fumes if applied to cause burns. Heating elements should break, cleaning solutions and spillovers may become hot enough to a hot surface. • Use Care When Opening Door -
... while oven is cool. Contact a qualified technician immediately. • Clean Cook-top With Caution - Let hot air or steam escape before removing or replacing food. • Do Not Heat Unopened Food Containers - • Do Not Soak Removable Heating Elements - Some cleaners can produce noxious fumes if applied to cause burns. Heating elements should break, cleaning solutions and spillovers may become hot enough to a hot surface. • Use Care When Opening Door -

Instruction Manual
Page 10
... these instructions with the installation instructions. • Do not attempt to 450°F. It is used in this , set the temperature control knob to repair or replace any non-domestic application and therefore should retain for local inspector's use this , open the oven door and set the burner selector to ensure adequate ventilation during this period. SAVE FOR THE LOCAL ELECTRICAL INSPECTOR'S USE. BEFORE USING YOUR ELECTRIC RANGE • Remove the...
... these instructions with the installation instructions. • Do not attempt to 450°F. It is used in this , set the temperature control knob to repair or replace any non-domestic application and therefore should retain for local inspector's use this , open the oven door and set the burner selector to ensure adequate ventilation during this period. SAVE FOR THE LOCAL ELECTRICAL INSPECTOR'S USE. BEFORE USING YOUR ELECTRIC RANGE • Remove the...
Instruction Manual
Page 11
... operation. • Do not attempt to hands, face, and/or eyes. • Never clean the oven with any appliance, there are specific installation and safety precautions that the knobs are kept out of the range. • To avoid any high-pressure steam cleaning devices, as these may cause serious injuries. Do not place shelves, pans, backing trays, broil tray or other cooking...
... operation. • Do not attempt to hands, face, and/or eyes. • Never clean the oven with any appliance, there are specific installation and safety precautions that the knobs are kept out of the range. • To avoid any high-pressure steam cleaning devices, as these may cause serious injuries. Do not place shelves, pans, backing trays, broil tray or other cooking...
Instruction Manual
Page 12
.... To level your electric range on the rating label. • The range can be avoided. Installation should be connected directly to repair or replace any maintenance. As this may be properly installed and grounded by reaching over heated surface units, cabinet storage space located above the cooking top. • 30 inches is specifically recommended in the risk of the appliance unless it replaced by a qualified technician. Power supply cord is not supplied...
.... To level your electric range on the rating label. • The range can be avoided. Installation should be connected directly to repair or replace any maintenance. As this may be properly installed and grounded by reaching over heated surface units, cabinet storage space located above the cooking top. • 30 inches is specifically recommended in the risk of the appliance unless it replaced by a qualified technician. Power supply cord is not supplied...

Instruction Manual
Page 15
... range by abnormal usage or improper door loading, the range must be secured by properly installing the anti-tip device packed with the appliance. • Place the anti-tip bracket on the corners at the bottom of range should be removed and installed in new location. 15 LEVELING THE RANGE The range must be level to lower the range until the range is relocated, the bracket must be adjusted by turning...
... range by abnormal usage or improper door loading, the range must be secured by properly installing the anti-tip device packed with the appliance. • Place the anti-tip bracket on the corners at the bottom of range should be removed and installed in new location. 15 LEVELING THE RANGE The range must be level to lower the range until the range is relocated, the bracket must be adjusted by turning...

Instruction Manual
Page 16
Kitchen Timer (Digital or Mechanical Knob depending on your specific model.) 2. Oven Light Switch 16 Front Left Burner Control Knob 8. Rear Left Burner Control Knob 6. CONTROL PANEL MODEL: ER24P3SG OPERATING YOUR RANGE 1. Oven Temperature Knob 7. Rear Right Burner Control Knob 4. Front Right Burner Control Knob 3. Indicator Lights 5.
Kitchen Timer (Digital or Mechanical Knob depending on your specific model.) 2. Oven Light Switch 16 Front Left Burner Control Knob 8. Rear Left Burner Control Knob 6. CONTROL PANEL MODEL: ER24P3SG OPERATING YOUR RANGE 1. Oven Temperature Knob 7. Rear Right Burner Control Knob 4. Front Right Burner Control Knob 3. Indicator Lights 5.

Instruction Manual
Page 17
... the surface unit mark shows which has boiled dry, on . OVEN THERMOSTAT CONTROL KNOB Push and turn the knob clockwise to select the desired temperature up to 60 minutes. BURNER CONTROL KNOB The range comes with flat bottoms and tight fitting lids to medium heat selections when using proper cookware. • Use cooking vessels with four burners. KITCHEN TIMER SELECTOR KNOB You can set times less than the element is a waste of using glass cookware. • Pan size...
... the surface unit mark shows which has boiled dry, on . OVEN THERMOSTAT CONTROL KNOB Push and turn the knob clockwise to select the desired temperature up to 60 minutes. BURNER CONTROL KNOB The range comes with flat bottoms and tight fitting lids to medium heat selections when using proper cookware. • Use cooking vessels with four burners. KITCHEN TIMER SELECTOR KNOB You can set times less than the element is a waste of using glass cookware. • Pan size...

Instruction Manual
Page 18
..., the indicator light will turn off to reach the cooking pots/pans. USING THE OVEN You can use the handle. This also makes it more difficult for Bake and Broil. For that is hot, use your range for children to light the oven cavity. WARNING: The door is cooking. Cook Timer: Press the SET button three times and the cook timer indicator will sound 15 times or until the required temperature is pressed. 18 By turning the switch on...
..., the indicator light will turn off to reach the cooking pots/pans. USING THE OVEN You can use the handle. This also makes it more difficult for Bake and Broil. For that is hot, use your range for children to light the oven cavity. WARNING: The door is cooking. Cook Timer: Press the SET button three times and the cook timer indicator will sound 15 times or until the required temperature is pressed. 18 By turning the switch on...

Instruction Manual
Page 19
... it out. 19 When broiling is completed, turn the function selector knob and thermostat control knob to the BROIL temperature. 4. OVEN RACK The rack is hot, outside surfaces of the range get hot. Broil In this setting only the upper element is distributed by radiation. Do not broil without using the broiler pan. 2. IMPORTANT: Always use the following steps: 1. To remove the rack from the top. 3. Turn the thermostat control knob to the position, open door fully and remove the food. Always remember...
... it out. 19 When broiling is completed, turn the function selector knob and thermostat control knob to the BROIL temperature. 4. OVEN RACK The rack is hot, outside surfaces of the range get hot. Broil In this setting only the upper element is distributed by radiation. Do not broil without using the broiler pan. 2. IMPORTANT: Always use the following steps: 1. To remove the rack from the top. 3. Turn the thermostat control knob to the position, open door fully and remove the food. Always remember...

Instruction Manual
Page 20
... cloth when cleaning them. • Replace the burners and reflector bowls as it to ashes. CLEANING YOUR RANGE • Disconnect the A/C from the main power box or designated circuit breaker, turn off the range to make sure all surface units are off and cool before removing burners and reflector bowls. • Removing the burners and reflector bowls as following : • Line up the opening of...
... cloth when cleaning them. • Replace the burners and reflector bowls as it to ashes. CLEANING YOUR RANGE • Disconnect the A/C from the main power box or designated circuit breaker, turn off the range to make sure all surface units are off and cool before removing burners and reflector bowls. • Removing the burners and reflector bowls as following : • Line up the opening of...

Instruction Manual
Page 21
... cleaning purposes by your guarantee. 21 During replacement of the cooktop, be disconnected from the power supply. • Let the oven cavity and broil burner cool down. • Switch off the electric supply. • Remove the protective cover. • Unscrew and replace the bulb with the rails and push inward. Personal injury or damage to do: • Hold the cooktop from the front edge. NOTE: Oven bulb replacement is started...
... cleaning purposes by your guarantee. 21 During replacement of the cooktop, be disconnected from the power supply. • Let the oven cavity and broil burner cool down. • Switch off the electric supply. • Remove the protective cover. • Unscrew and replace the bulb with the rails and push inward. Personal injury or damage to do: • Hold the cooktop from the front edge. NOTE: Oven bulb replacement is started...

Instruction Manual
Page 22
... the servicer. PROBLEMS WITH YOUR ELECTRIC RANGE? Try the suggestions below to see if you can solve many common appliance problems easily, saving you are trying to wrong direction. • Light bulb is loose or defective. • Switch operating oven light is broken. • You have blown a household fuse or tripped a circuit breaker. • You have not set the control knobs correctly. • The oven control knob is not set at Broil...
... the servicer. PROBLEMS WITH YOUR ELECTRIC RANGE? Try the suggestions below to see if you can solve many common appliance problems easily, saving you are trying to wrong direction. • Light bulb is loose or defective. • Switch operating oven light is broken. • You have blown a household fuse or tripped a circuit breaker. • You have not set the control knobs correctly. • The oven control knob is not set at Broil...
Instruction Manual
Page 24
... use , the warranty period is 90 days. RANGES / TOASTER OVENS 24 Avanti Products will , at law or otherwise, to be considered as abuse, misuse, inadequate electrical power, accidents, fire, floods, or any other connecting facilities, for proper foundation/flooring, and for damage to spoilage. • Shipping and handling costs associated with the replacement of breakers or fuses. Products on external surfaces and exposed parts; service...
... use , the warranty period is 90 days. RANGES / TOASTER OVENS 24 Avanti Products will , at law or otherwise, to be considered as abuse, misuse, inadequate electrical power, accidents, fire, floods, or any other connecting facilities, for proper foundation/flooring, and for damage to spoilage. • Shipping and handling costs associated with the replacement of breakers or fuses. Products on external surfaces and exposed parts; service...

Parts and Accessories
Page 2
Description 1 Side plate 3 Anti-tip bracket 4 Weight block 5 Foot 11~15 Drawer assembly 13~15 Drawer front 15 drawer handle 16~28 door assembly 18 Door hinge 22 door outer glass 23 handle 24 door seal 27 door inner glass 29 Knob 30 Control panel 31 indicator light 240V 32 Lamp switch 33 mechamical timer Part code G20C01-071002-01 G20C01-071002-02 G20A01-212500 G20A01-210200 G20C01...030300-01 E20F01-030300 E24F01-031000 G20A01-171000 G20A01-171100 G20A01-170203 G20A01-190100 Qty per unit 2 2 1 1 4 1 1 1 1 1 1 2 1 1 1 1 1 2 5 5 1 1 2 1 1 1 1 ER20P0WG/ ER20P3SG Spare parts list Item No.
Description 1 Side plate 3 Anti-tip bracket 4 Weight block 5 Foot 11~15 Drawer assembly 13~15 Drawer front 15 drawer handle 16~28 door assembly 18 Door hinge 22 door outer glass 23 handle 24 door seal 27 door inner glass 29 Knob 30 Control panel 31 indicator light 240V 32 Lamp switch 33 mechamical timer Part code G20C01-071002-01 G20C01-071002-02 G20A01-212500 G20A01-210200 G20C01...030300-01 E20F01-030300 E24F01-031000 G20A01-171000 G20A01-171100 G20A01-170203 G20A01-190100 Qty per unit 2 2 1 1 4 1 1 1 1 1 1 2 1 1 1 1 1 2 5 5 1 1 2 1 1 1 1 ER20P0WG/ ER20P3SG Spare parts list Item No.

Parts and Accessories
Page 3
34 oven/broil switch E20F01-030900 1 35 cooktop coil switch E20F01-031600 4 37 support rod E24F01-025100 2 38 Glass wool for control panel E20F01-036000 1 39 Cook top E20F01-020100-01 1 E20F01-020100 1 Bowl-small 40 Bowl-big E24F01-022400 3 ...element 240V 2100W E24F01-091000 1 53 Oven lamp-240V G20C01-180100 1 55 Class wool for cavity G24A01-070800 1 58 Glass wool for cavity back G24C01-072900 1 61 Broil grill G20C01-215100 1 62 Broil tray G20C01-215000 1 63 baking rack G20C01-071900 2 64 oven heater element 240V 2100W E20F01-091200 1 69 re-set switch...
34 oven/broil switch E20F01-030900 1 35 cooktop coil switch E20F01-031600 4 37 support rod E24F01-025100 2 38 Glass wool for control panel E20F01-036000 1 39 Cook top E20F01-020100-01 1 E20F01-020100 1 Bowl-small 40 Bowl-big E24F01-022400 3 ...element 240V 2100W E24F01-091000 1 53 Oven lamp-240V G20C01-180100 1 55 Class wool for cavity G24A01-070800 1 58 Glass wool for cavity back G24C01-072900 1 61 Broil grill G20C01-215100 1 62 Broil tray G20C01-215000 1 63 baking rack G20C01-071900 2 64 oven heater element 240V 2100W E20F01-091200 1 69 re-set switch...


