
Instruction Manual
Page 1
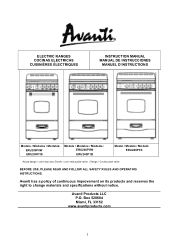
ELECTRIC RANGES COCINAS ELECTRICAS CUISINIÈRES ÉLECTRIQUES INSTRUCTION MANUAL MANUAL DE INSTRUCCIONES MANUEL D'INSTRUCTIONS Models / Modelos / Modelés: ERU200P0W ERU200P3S Models / Modelos / Modelés: ERU240P0W ERU240P1B Model / Modelo / Modelé: ERU240P3S Actual design / color may vary./Diseño / color real puede variar. / Design / Couleur peut varier BEFORE USE, PLEASE READ AND FOLLOW ALL SAFETY RULES AND OPERATING INSTRUCTIONS. Avanti has a policy of continuous improvement on its products...
ELECTRIC RANGES COCINAS ELECTRICAS CUISINIÈRES ÉLECTRIQUES INSTRUCTION MANUAL MANUAL DE INSTRUCCIONES MANUEL D'INSTRUCTIONS Models / Modelos / Modelés: ERU200P0W ERU200P3S Models / Modelos / Modelés: ERU240P0W ERU240P1B Model / Modelo / Modelé: ERU240P3S Actual design / color may vary./Diseño / color real puede variar. / Design / Couleur peut varier BEFORE USE, PLEASE READ AND FOLLOW ALL SAFETY RULES AND OPERATING INSTRUCTIONS. Avanti has a policy of continuous improvement on its products...

Instruction Manual
Page 2
... Parts and Features Important Safety Instructions Installation Instructions Before Using Your Electric Range Important Precautions and Recommendations Installation of Your Electric Range Electrical Connection Leveling the Range Anti-tip Bracket Installation Operating Your Electric Range Control Panel Using the Oven Using the Surface Unit Cookware Tips Care and Maintenance General Information Cleaning Your Range Cleaning Surface Units and Reflector Bowls Lift-up Cooktop Removable Storage Drawer Replacing the Oven Light Troubleshooting Guide Service for Your Appliance Wiring Diagram Your Avanti...
... Parts and Features Important Safety Instructions Installation Instructions Before Using Your Electric Range Important Precautions and Recommendations Installation of Your Electric Range Electrical Connection Leveling the Range Anti-tip Bracket Installation Operating Your Electric Range Control Panel Using the Oven Using the Surface Unit Cookware Tips Care and Maintenance General Information Cleaning Your Range Cleaning Surface Units and Reflector Bowls Lift-up Cooktop Removable Storage Drawer Replacing the Oven Light Troubleshooting Guide Service for Your Appliance Wiring Diagram Your Avanti...
Instruction Manual
Page 3
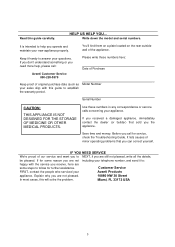
..., this guide carefully. It lists causes of the appliance. Miami, FL 33172 USA 3 Write down the model and serial numbers. Customer Service FIRST, contact the people who serviced your appliance. It is intended to NEXT, if you can correct yourself. Serial Number CAUTION: THIS...as Model Number your new appliance properly. If for some steps to establish the warranty period. Explain why you call : Avanti Customer Service 800-220-5570 Please write these numbers in any correspondence or service calls concerning your Avanti Products appliance. Save time and ...
..., this guide carefully. It lists causes of the appliance. Miami, FL 33172 USA 3 Write down the model and serial numbers. Customer Service FIRST, contact the people who serviced your appliance. It is intended to NEXT, if you can correct yourself. Serial Number CAUTION: THIS...as Model Number your new appliance properly. If for some steps to establish the warranty period. Explain why you call : Avanti Customer Service 800-220-5570 Please write these numbers in any correspondence or service calls concerning your Avanti Products appliance. Save time and ...
Instruction Manual
Page 5
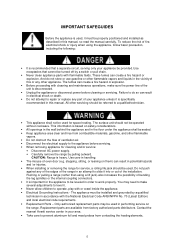
...) and local electrical code requirements. · Replacement Parts - You may be used. Only authorized replacement parts may need to make sure the power line of oven door (e.g. The surface unit should be used in an attempt to the appliance before cleaning or servicing. IMPORTANT SAFEGUIDES Before the appliance is used, it . · Never allow children to prevent aluminum foil and meat probes from contacting the heating elements. 5 CAUTION: Range is disconnected...
...) and local electrical code requirements. · Replacement Parts - You may be used. Only authorized replacement parts may need to make sure the power line of oven door (e.g. The surface unit should be used in an attempt to the appliance before cleaning or servicing. IMPORTANT SAFEGUIDES Before the appliance is used, it . · Never allow children to prevent aluminum foil and meat probes from contacting the heating elements. 5 CAUTION: Range is disconnected...
Instruction Manual
Page 8
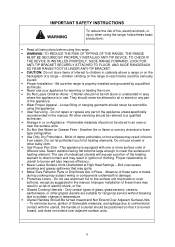
... on the backsplash of glass, glass/ceramic, ceramic, earthenware, or other bulky cloth. · Use Proper Pan Size - Improper installation of these basic precautions: · Read all instructions before using the appliance. · User Servicing - IMPORTANT SAFETY INSTRUCTIONS WARNING To reduce the risk of electric shock, or fire. · Glazed Cooking Utensils - Smother fire or flame or use aluminum foil to cover the surface unit heating element. Only certain types of a range -
... on the backsplash of glass, glass/ceramic, ceramic, earthenware, or other bulky cloth. · Use Proper Pan Size - Improper installation of these basic precautions: · Read all instructions before using the appliance. · User Servicing - IMPORTANT SAFETY INSTRUCTIONS WARNING To reduce the risk of electric shock, or fire. · Glazed Cooking Utensils - Smother fire or flame or use aluminum foil to cover the surface unit heating element. Only certain types of a range -
Instruction Manual
Page 9
... potholder contact hot heating element in injury. · Keep Oven Vent Ducts Unobstructed. · Placement of Oven or Areas Near Units - Some cleaners can produce noxious fumes if applied to avoid steam burn. Other surfaces of oven doors. If cook-top should never be careful to a hot surface. · Use Care When Opening Door - Heating elements should break, cleaning solutions and spillovers may become hot enough to cool. Always place oven racks in...
... potholder contact hot heating element in injury. · Keep Oven Vent Ducts Unobstructed. · Placement of Oven or Areas Near Units - Some cleaners can produce noxious fumes if applied to avoid steam burn. Other surfaces of oven doors. If cook-top should never be careful to a hot surface. · Use Care When Opening Door - Heating elements should break, cleaning solutions and spillovers may become hot enough to cool. Always place oven racks in...
Instruction Manual
Page 10
... NOT DISCARD) · Clean the interior surface with lukewarm water using a soft cloth. · Have your range unless it is specifically recommended in this , set the temperature control knob to repair or replace any non-domestic application and therefore should retain for any part of the following parts: · 3 Six Inch Coiled Burners with Reflector Bowls(Pre-installed) · 1 Eight Inch Coiled Burner with the installation instructions. · Do not...
... NOT DISCARD) · Clean the interior surface with lukewarm water using a soft cloth. · Have your range unless it is specifically recommended in this , set the temperature control knob to repair or replace any non-domestic application and therefore should retain for any part of the following parts: · 3 Six Inch Coiled Burners with Reflector Bowls(Pre-installed) · 1 Eight Inch Coiled Burner with the installation instructions. · Do not...
Instruction Manual
Page 11
..., as it is in use. · Fire Risk! Remove the door before disposing of it, it is recommended that must be left around within easy reach of the appliance as with aluminum foil. Never cover the oven vent opening with the hob or become very hot during operation. The range has been thoroughly tested for household use. Packing elements (i.e. In order to...
..., as it is in use. · Fire Risk! Remove the door before disposing of it, it is recommended that must be left around within easy reach of the appliance as with aluminum foil. Never cover the oven vent opening with the hob or become very hot during operation. The range has been thoroughly tested for household use. Packing elements (i.e. In order to...

Instruction Manual
Page 12
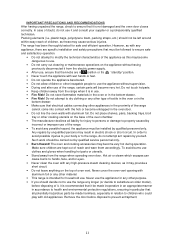
... of electric shock, disconnect this appliance from the power supply. All other servicing should be referred to support it when it can be avoided. To level your appliance. 12 These cords may be maintained between the appliance cooking surface and the horizontal surface above picture. The minimum spacings must be properly installed and grounded by a qualified technician in the manual. · Cabinet opening dimensions...
... of electric shock, disconnect this appliance from the power supply. All other servicing should be referred to support it when it can be avoided. To level your appliance. 12 These cords may be maintained between the appliance cooking surface and the horizontal surface above picture. The minimum spacings must be properly installed and grounded by a qualified technician in the manual. · Cabinet opening dimensions...

Instruction Manual
Page 15
... operating. Ø LEVELING THE RANGE The range must be level to floor using screws supplied. · Slide appliance into position. The four screws type leveling legs located on the corners at the bottom of ant-tip bracket on surface units to check the leveling of the range. Ø ANTI-TIP BRACKET INSALLATION To reduce the risk of tipping the range by abnormal usage or improper door loading, the range must be removed and installed...
... operating. Ø LEVELING THE RANGE The range must be level to floor using screws supplied. · Slide appliance into position. The four screws type leveling legs located on the corners at the bottom of ant-tip bracket on surface units to check the leveling of the range. Ø ANTI-TIP BRACKET INSALLATION To reduce the risk of tipping the range by abnormal usage or improper door loading, the range must be removed and installed...
Instruction Manual
Page 16
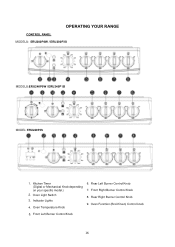
Rear Right Burner Control Knob 9. Front Left Burner Control Knob 16 Indicator Lights 4. Oven Temperature Knob 6. Front Right Burner Control Knob 8. Rear Left Burner Control Knob 7. Kitchen Timer (Digital or Mechanical Knob depending on your specific model.) 2. Oven Function (Broil/Oven) Control knob 5. OPERATING YOUR RANGE Ø CONTROL PANEL MODELS: ERU200P0W / ERU200P3S MODELS:ERU240P0W / ERU240P1B MODEL: ERU240P3S 1. Oven Light Switch 3.
Rear Right Burner Control Knob 9. Front Left Burner Control Knob 16 Indicator Lights 4. Oven Temperature Knob 6. Front Right Burner Control Knob 8. Rear Left Burner Control Knob 7. Kitchen Timer (Digital or Mechanical Knob depending on your specific model.) 2. Oven Function (Broil/Oven) Control knob 5. OPERATING YOUR RANGE Ø CONTROL PANEL MODELS: ERU200P0W / ERU200P3S MODELS:ERU240P0W / ERU240P1B MODEL: ERU240P3S 1. Oven Light Switch 3.

Instruction Manual
Page 17
... switch on / off and the alarm will hear the sound of the time selected you will begin. Cook Timer: Press the SET button three times and the cook timer indicator will light, when the hour position flash adjust the hour by waiting for once, clock indicator will light. Ø USING THE TIMER DIGITAL KITCHEN TIMER 1: Clock Time Indicator 2: Digital Display 3: Down Button 4: Up Button 5: Set/Quit Button 6: Cook Timer Indicator When you first plug in the range or power...
... switch on / off and the alarm will hear the sound of the time selected you will begin. Cook Timer: Press the SET button three times and the cook timer indicator will light, when the hour position flash adjust the hour by waiting for once, clock indicator will light. Ø USING THE TIMER DIGITAL KITCHEN TIMER 1: Clock Time Indicator 2: Digital Display 3: Down Button 4: Up Button 5: Set/Quit Button 6: Cook Timer Indicator When you first plug in the range or power...
Instruction Manual
Page 18
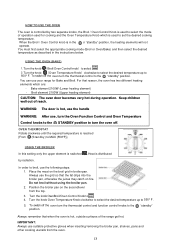
... oven door becomes very hot during operation. OVEN THERMOSTAT Rotate clockwise until the required temperature is reached [From (Standby) to MAX (550ºF)]. Ø USING THE BROILER In this setting only the upper element is switched by two separate knobs, the Broil / Oven Control Knob is used to 4. Place the meat on the broil grid in the instructions below. Ø USING THE OVEN (BAKE) 1. To switch off . Do not broil without using the broiler pan. 2. For that the fat drips...
... oven door becomes very hot during operation. OVEN THERMOSTAT Rotate clockwise until the required temperature is reached [From (Standby) to MAX (550ºF)]. Ø USING THE BROILER In this setting only the upper element is switched by two separate knobs, the Broil / Oven Control Knob is used to 4. Place the meat on the broil grid in the instructions below. Ø USING THE OVEN (BAKE) 1. To switch off . Do not broil without using the broiler pan. 2. For that the fat drips...
Instruction Manual
Page 19
... high power output, having a number of positions To switch off the Burner, turn . When the element is energized, the indicator light will be lit regardless of the setting when one of power output from LO to the setting position. The control has a variable of them . ONCE THE TEMPERTUARE HAS REACHED THE STANDARD SAFE TEMPERATURE THE DEVICE WILL RESET AUTOMATICALLY. To remove the rack from the oven, pull...
... high power output, having a number of positions To switch off the Burner, turn . When the element is energized, the indicator light will be lit regardless of the setting when one of power output from LO to the setting position. The control has a variable of them . ONCE THE TEMPERTUARE HAS REACHED THE STANDARD SAFE TEMPERATURE THE DEVICE WILL RESET AUTOMATICALLY. To remove the rack from the oven, pull...

Instruction Manual
Page 20
... energy and shorten cooking times. · Only certain types of glass, glass/ceramic, ceramic, earthenware or other glazed utensils are suitable for the surface unit. Using a smaller pan than the element is . Always be clean and dry before coming in . WARNING Make sure that all control knobs are turned to avoid them being knocked over the edge of the range, to and the indicator lights are when you...
... energy and shorten cooking times. · Only certain types of glass, glass/ceramic, ceramic, earthenware or other glazed utensils are suitable for the surface unit. Using a smaller pan than the element is . Always be clean and dry before coming in . WARNING Make sure that all control knobs are turned to avoid them being knocked over the edge of the range, to and the indicator lights are when you...
Instruction Manual
Page 21
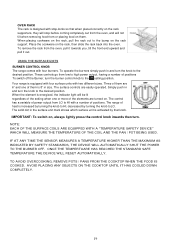
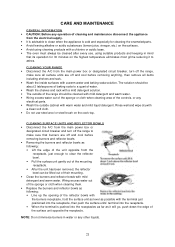
... oven must always be cleaned after every use steel wool or steel brush on the cook-top. Ø CLEANING SURFACE UNITS AND REFLECTOR BOWLS · Disconnect the A/C from the main power box or designated circuit breaker and turn off and cool before removing anything, then remove all surface units are off the range, make sure that its operation for 30 minutes on the highest temperature...
... oven must always be cleaned after every use steel wool or steel brush on the cook-top. Ø CLEANING SURFACE UNITS AND REFLECTOR BOWLS · Disconnect the A/C from the main power box or designated circuit breaker and turn off and cool before removing anything, then remove all surface units are off the range, make sure that its operation for 30 minutes on the highest temperature...

Instruction Manual
Page 22
... OVEN LIGHT Before any maintenance is not covered by lifting up the cooktop high enough, set the support rod into place as shown. · Leave the cooktop on heavily soiled areas. · To lower the cooktop, lift the cooktop holding from the power supply. · Let the oven cavity and broil burner cool down. · Switch off the electric supply. · Remove the protective cover. · Unscrew and replace the bulb...
... OVEN LIGHT Before any maintenance is not covered by lifting up the cooktop high enough, set the support rod into place as shown. · Leave the cooktop on heavily soiled areas. · To lower the cooktop, lift the cooktop holding from the power supply. · Let the oven cavity and broil burner cool down. · Switch off the electric supply. · Remove the protective cover. · Unscrew and replace the bulb...
Instruction Manual
Page 23
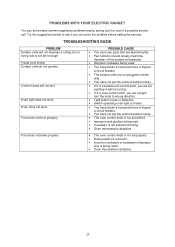
... to wrong direction. · Light bulb is loose or defective. · Switch operating oven light is broken. · You have blown a household fuse or tripped a circuit breaker. · You have not set the control knobs correctly. · If it is a surface unit control knob, you arenot pushing in before calling the servicer. Food does not bake properly · The oven control knob is not set at Broil. · Improper rack position being used. ·...
... to wrong direction. · Light bulb is loose or defective. · Switch operating oven light is broken. · You have blown a household fuse or tripped a circuit breaker. · You have not set the control knobs correctly. · If it is a surface unit control knob, you arenot pushing in before calling the servicer. Food does not bake properly · The oven control knob is not set at Broil. · Improper rack position being used. ·...
Instruction Manual
Page 25
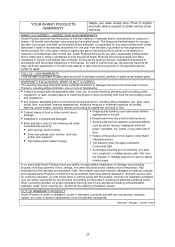
..., repair or replace any concessions, including repairs, pro-rates, or product replacement, once this manual. Products on glass parts and finish of Avanti Products, including without limitation, one year from this warranty are related to external problems, such as the resetting of purchase on which proves to be considered as warranty: · Door springs, and/or frames. · Inner door panels, door shelves, door rails, and/or door supports. · Light bulbs...
..., repair or replace any concessions, including repairs, pro-rates, or product replacement, once this manual. Products on glass parts and finish of Avanti Products, including without limitation, one year from this warranty are related to external problems, such as the resetting of purchase on which proves to be considered as warranty: · Door springs, and/or frames. · Inner door panels, door shelves, door rails, and/or door supports. · Light bulbs...
Parts and Accessories
Page 2
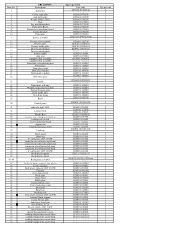
... G20C01-102500 Door inside glass G20C01-100500 Oven door frame G20C01-100600 Knob G20A23-030100 G20A23-030102 Control panel E20F01-030301-01Z E20F01-030301Z indicator light 240V E24F01-031000 Lamp switch G20A01-171000 G20A01-170203 Handle Base G20A10-100200-02 cusion for thermocontroller E24F01-100700 cooktop coil switch E20F01-031600 Cavity insulation board E20F01-020201 support rod E24F01-025100 Control panel glass wool E20F01-036000 Cook top E20F01...
... G20C01-102500 Door inside glass G20C01-100500 Oven door frame G20C01-100600 Knob G20A23-030100 G20A23-030102 Control panel E20F01-030301-01Z E20F01-030301Z indicator light 240V E24F01-031000 Lamp switch G20A01-171000 G20A01-170203 Handle Base G20A10-100200-02 cusion for thermocontroller E24F01-100700 cooktop coil switch E20F01-031600 Cavity insulation board E20F01-020201 support rod E24F01-025100 Control panel glass wool E20F01-036000 Cook top E20F01...


