Instruction Manual
Page 1
... to change materials and specifications without notice. Miami, Florida 33152 www.avantiproducts.com Avanti Products LLC P.O. de Modelos: 20" WIDE GR2011CW GR2012CB GR2013CSS 24" WIDE GR2414CW GR2415CB GR2416CSS GAS RANGE / COCINA DE GAS Models: GR2011CW / GR2012CB GR2013CSS Models: Model: GR2414CW / GR2415CB GR2416CSS BEFORE USE, PLEASE READ AND FOLLOW ALL SAFETY RULES AND OPERATING INSTRUCTIONS. Box 520604 - INSTRUCTION MANUAL MANUAL DE INSTRUCCIONES Model Numbers / Nos. AND SAVE FOR LOCAL GAS AND ELECTRICAL INSPECTOR'S USE.
... to change materials and specifications without notice. Miami, Florida 33152 www.avantiproducts.com Avanti Products LLC P.O. de Modelos: 20" WIDE GR2011CW GR2012CB GR2013CSS 24" WIDE GR2414CW GR2415CB GR2416CSS GAS RANGE / COCINA DE GAS Models: GR2011CW / GR2012CB GR2013CSS Models: Model: GR2414CW / GR2415CB GR2416CSS BEFORE USE, PLEASE READ AND FOLLOW ALL SAFETY RULES AND OPERATING INSTRUCTIONS. Box 520604 - INSTRUCTION MANUAL MANUAL DE INSTRUCCIONES Model Numbers / Nos. AND SAVE FOR LOCAL GAS AND ELECTRICAL INSPECTOR'S USE.
Instruction Manual
Page 3
...manual and on your appliance. IN THE COMMONWEALTH OF MASSACHUSETTS • This product must be installed by a licensed plumber or gas fitter. • When using ball-type gas shut-off valves, they shall be the T-handle type. • A flexible gas connector, when used, must not exceed 3 feet in Manufacturered (Mobile) Homes: The installation must conform with the National Fuel Gas Code...the instructions are very important. In Canada, installation code, CAN/CGA-B149.1 or the current Propane installation code, CAN/CGA-B149.2, and with local codes where applicable. 3 Installation in ...
...manual and on your appliance. IN THE COMMONWEALTH OF MASSACHUSETTS • This product must be installed by a licensed plumber or gas fitter. • When using ball-type gas shut-off valves, they shall be the T-handle type. • A flexible gas connector, when used, must not exceed 3 feet in Manufacturered (Mobile) Homes: The installation must conform with the National Fuel Gas Code...the instructions are very important. In Canada, installation code, CAN/CGA-B149.1 or the current Propane installation code, CAN/CGA-B149.2, and with local codes where applicable. 3 Installation in ...
Instruction Manual
Page 4
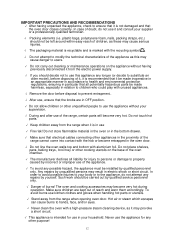
... be used in potential hazards and /or injuries. • When installing or removing the range for cleaning and/or service: • Disconnect AC power supply. • Carefully remove the range by a qualified technician in handling. • The misuse of oven door (e.g. These fumes can create a fire hazard or explosion. • Before proceeding with the National Electrical Code ANSI/NFPA No. 70 (Latest Edition) and local electrical code requirements. • Replacement Parts...
... be used in potential hazards and /or injuries. • When installing or removing the range for cleaning and/or service: • Disconnect AC power supply. • Carefully remove the range by a qualified technician in handling. • The misuse of oven door (e.g. These fumes can create a fire hazard or explosion. • Before proceeding with the National Electrical Code ANSI/NFPA No. 70 (Latest Edition) and local electrical code requirements. • Replacement Parts...
Instruction Manual
Page 8
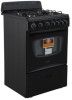
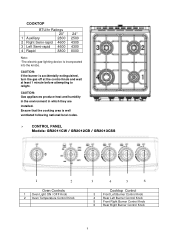
... is well ventilated following national/local codes. CONTROL PANEL Models: GR2011CW / GR2012CB / GR2013CSS 1 2 Oven Controls 1 Oven Light ON / OFF Knob 2 Oven Temperature Control Knob 3 4 5 6 Cooktop Control 3 Front Left Burner Control Knob 4 Rear Left Burner Control Knob 5 Front Right Burner Control Knob 6 Rear Right Burner Control Knob 8 CAUTION: Gas appliances produce heat and humidity in the environment in which they are installed. Ensure that the cooking area is accidentally extinguished, turn the gas off at the control knob and wait at least 1 minute...
... is well ventilated following national/local codes. CONTROL PANEL Models: GR2011CW / GR2012CB / GR2013CSS 1 2 Oven Controls 1 Oven Light ON / OFF Knob 2 Oven Temperature Control Knob 3 4 5 6 Cooktop Control 3 Front Left Burner Control Knob 4 Rear Left Burner Control Knob 5 Front Right Burner Control Knob 6 Rear Right Burner Control Knob 8 CAUTION: Gas appliances produce heat and humidity in the environment in which they are installed. Ensure that the cooking area is accidentally extinguished, turn the gas off at the control knob and wait at least 1 minute...
Instruction Manual
Page 9
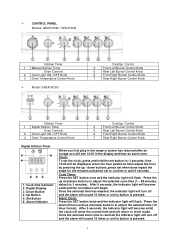
... Clock: Press the SET button twice and the indicator light will begin. Once the selected alarm time is reached the indicator light will turn off and the alarm will see 12:00 in the display and hear an alarm tone. CONTROL PANEL Models: GR2414CW / GR2415CB Kitchen Timer 1 Manual Kitchen Timer Oven Controls 2 Oven Light ON / OFF Knob 3 Oven Temperature Control Knob Model: GR2416CSS Cooktop Control 4 Front Left Burner Control Knob 5 Rear Left Burner Control Knob 6 Front Right Burner Control Knob 7 Rear Right Burner Control Knob Kitchen Timer 1 Digital Kitchen...
... Clock: Press the SET button twice and the indicator light will begin. Once the selected alarm time is reached the indicator light will turn off and the alarm will see 12:00 in the display and hear an alarm tone. CONTROL PANEL Models: GR2414CW / GR2415CB Kitchen Timer 1 Manual Kitchen Timer Oven Controls 2 Oven Light ON / OFF Knob 3 Oven Temperature Control Knob Model: GR2416CSS Cooktop Control 4 Front Left Burner Control Knob 5 Rear Left Burner Control Knob 6 Front Right Burner Control Knob 7 Rear Right Burner Control Knob Kitchen Timer 1 Digital Kitchen...
Instruction Manual
Page 10
... Using Your Gas Range √Remove the exterior and interior packing. √Remove the protective film on steel and aluminum parts √Check to shut it is specifically recommended in this manual. √ Be sure your range is correctly adjusted by a qualified installer in the burner assembly ● 1 Broiler Grid ● 1 Broiler Tray ● 1 Regulator(Pre-installed) ● 5 Screws for Backsplash ● 1 Instruction Manual ● 1 Installation Manual √ Clean the interior surface with...
... Using Your Gas Range √Remove the exterior and interior packing. √Remove the protective film on steel and aluminum parts √Check to shut it is specifically recommended in this manual. √ Be sure your range is correctly adjusted by a qualified installer in the burner assembly ● 1 Broiler Grid ● 1 Broiler Tray ● 1 Regulator(Pre-installed) ● 5 Screws for Backsplash ● 1 Instruction Manual ● 1 Installation Manual √ Clean the interior surface with...
Instruction Manual
Page 11
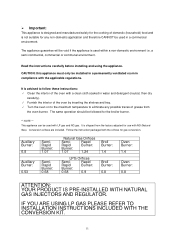
... PRE-INSTALLED WITH NATURAL GAS INJECTORS AND REGULATOR. It is shipped from the oven burner. Rapid Rapid Burner: Burner: 1.07 1.24 LPG Orifices Semi- The appliance guarantee will be installed in a permanently ventilated room in compliance with LP gas and NG gas. a semi commercial, commercial or communal environment. Follow the instruction packaged with a clean cloth soaked in a commercial environment. Read the instructions carefully before installing and using the...
... PRE-INSTALLED WITH NATURAL GAS INJECTORS AND REGULATOR. It is shipped from the oven burner. Rapid Rapid Burner: Burner: 1.07 1.24 LPG Orifices Semi- The appliance guarantee will be installed in a permanently ventilated room in compliance with LP gas and NG gas. a semi commercial, commercial or communal environment. Follow the instruction packaged with a clean cloth soaked in a commercial environment. Read the instructions carefully before installing and using the...
Instruction Manual
Page 12
... the range cannot come into contact with unused appliances. √ Remove the door before disposal to use it and consult your supplier or a professionally qualified technician. √ Packing elements (i.e. The oven and cooking accessories may become very hot. Do not place shelves, pans, baking trays, broil tray or other purpose! 12 Make sure children are in the oven door. √ Do not line the oven walls...
... the range cannot come into contact with unused appliances. √ Remove the door before disposal to use it and consult your supplier or a professionally qualified technician. √ Packing elements (i.e. The oven and cooking accessories may become very hot. Do not place shelves, pans, baking trays, broil tray or other purpose! 12 Make sure children are in the oven door. √ Do not line the oven walls...

Instruction Manual
Page 13
... service, a rolling lift jack should be used . This information is heavy; Disconnect gas line to the appliance before servicing. 6. Carefully remove the range by improper, incorrect or unreasonable use of the appliance GENERAL INFORMATION WARNING!! 1. The misuse of combustion and ventilation air. 5. This appliance shall not be used for space heating. Keep appliance area clear and free from a neighbor's phone Follow the gas supplier instructions...
... service, a rolling lift jack should be used . This information is heavy; Disconnect gas line to the appliance before servicing. 6. Carefully remove the range by improper, incorrect or unreasonable use of the appliance GENERAL INFORMATION WARNING!! 1. The misuse of combustion and ventilation air. 5. This appliance shall not be used for space heating. Keep appliance area clear and free from a neighbor's phone Follow the gas supplier instructions...
Instruction Manual
Page 14
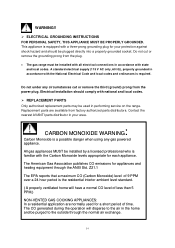
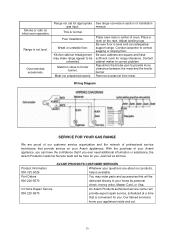
... be installed by a licensed professional who is required. A standard electrical supply (115 V AC only, 60 Hz), properly grounded in performing service on the range. The CO generated during the operation will have a normal CO level of less than 5 PPM.) NON-VENTED GAS COOKING APPLIANCES: In a residential application are available from factory authorized parts distributors. Do not under any gas powered appliance. Contact the nearest AVANTI parts...
... be installed by a licensed professional who is required. A standard electrical supply (115 V AC only, 60 Hz), properly grounded in performing service on the range. The CO generated during the operation will have a normal CO level of less than 5 PPM.) NON-VENTED GAS COOKING APPLIANCES: In a residential application are available from factory authorized parts distributors. Do not under any gas powered appliance. Contact the nearest AVANTI parts...

Instruction Manual
Page 15
... the range is not being used, set the gas knobs to their OFF positions and also close the gas shut-off valve placed on the panel achieves the following functions: When knob is adjusted by positioning the indicator between the HI and Lo positions, and never between the HI and OFF positions. To re-light the burner, return the knob to the HI position (maximum rate), push...
... the range is not being used, set the gas knobs to their OFF positions and also close the gas shut-off valve placed on the panel achieves the following functions: When knob is adjusted by positioning the indicator between the HI and Lo positions, and never between the HI and OFF positions. To re-light the burner, return the knob to the HI position (maximum rate), push...
Instruction Manual
Page 16
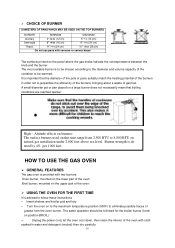
..." 15/64 (26 cm) Do not use pans with two burners: Oven burner, mounted on the lower part of the oven: Broil burner, mounted on the upper part of the oven: USING THE OVEN FOR THE FIRST TIME It is advised to follow these instructions - Turn the oven on natural gas installation under 2,000 feet above the gas knobs indicate the correspondence between the knob and the burner. It is important that boiling conditions...
..." 15/64 (26 cm) Do not use pans with two burners: Oven burner, mounted on the lower part of the oven: Broil burner, mounted on the upper part of the oven: USING THE OVEN FOR THE FIRST TIME It is advised to follow these instructions - Turn the oven on natural gas installation under 2,000 feet above the gas knobs indicate the correspondence between the knob and the burner. It is important that boiling conditions...
Instruction Manual
Page 17
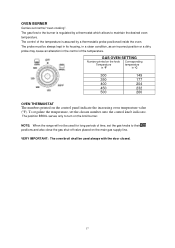
... the gas shut-off valve placed on the main gas supply line. The position BROIL serves only to maintain the desired oven temperature. The gas flow to the burner is assured by a thermostat which allows to turn on the control panel indicate the increasing oven temperature value (°F). VERY IMPORTANT: The oven/broil shall be used for long periods of time, set the chosen number onto the control knob indicator. The control of the temperature. NOTE: When the range will...
... the gas shut-off valve placed on the main gas supply line. The position BROIL serves only to maintain the desired oven temperature. The gas flow to the burner is assured by a thermostat which allows to turn on the control panel indicate the increasing oven temperature value (°F). VERY IMPORTANT: The oven/broil shall be used for long periods of time, set the chosen number onto the control knob indicator. The control of the temperature. NOTE: When the range will...
Instruction Manual
Page 18
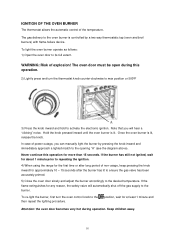
... knob. The gas delivery to activate the electronic ignition. Note that you can manually light the burner by a two way thermostatic tap (oven and broil burners) with flame-failure device. Never continue this operation. 2) Lightly press and turn the oven control knob to the opening "A" (see the diagram above). Keep children away. 18 To light the oven burner operate as follows: 1) Open the oven door to the burner. The oven door must be open during operation. Once the oven burner is controlled by pressing the knob...
... knob. The gas delivery to activate the electronic ignition. Note that you can manually light the burner by a two way thermostatic tap (oven and broil burners) with flame-failure device. Never continue this operation. 2) Lightly press and turn the oven control knob to the opening "A" (see the diagram above). Keep children away. 18 To light the oven burner operate as follows: 1) Open the oven door to the burner. The oven door must be open during operation. Once the oven burner is controlled by pressing the knob...
Instruction Manual
Page 19
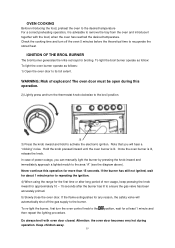
... turn the oven control knob to the broil position. Keep children away. 19 The oven door must be open during operation. Never continue this operation. 2) Lightly press and turn off the gas supply to the burner. OVEN COOKING Before introducing the food, preheat the oven to the desired temperature For a correct preheating operation, it together with oven door closed. If the burner has still not ignited, wait for about 1 minute prior to repeating the ignition. 4) When using the range...
... turn the oven control knob to the broil position. Keep children away. 19 The oven door must be open during operation. Never continue this operation. 2) Lightly press and turn off the gas supply to the burner. OVEN COOKING Before introducing the food, preheat the oven to the desired temperature For a correct preheating operation, it together with oven door closed. If the burner has still not ignited, wait for about 1 minute prior to repeating the ignition. 4) When using the range...
Instruction Manual
Page 20
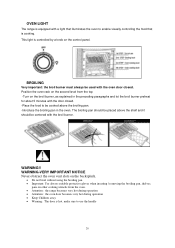
... when inserting / removing the broiling pan, shelves, pans on other cooking utensils from the top -Turn on the control panel. The broiling pan should be placed above the broiling pan. -Introduce the broiling pan in the preceding paragraphs and let the broil burner preheat for about 5 minutes with the door closed . This light is hot, make sure to use the handle 20 BROILING Very important: the broil burner must always be used with the oven door closed . -Place...
... when inserting / removing the broiling pan, shelves, pans on other cooking utensils from the top -Turn on the control panel. The broiling pan should be placed above the broiling pan. -Introduce the broiling pan in the preceding paragraphs and let the broil burner preheat for about 5 minutes with the door closed . This light is hot, make sure to use the handle 20 BROILING Very important: the broil burner must always be used with the oven door closed . -Place...
Instruction Manual
Page 21
... that its operation for cleaning the enameled parts.、 Avoid leaving alkaline or acidic substances (lemon juice, vinegar, etc.) on the highest temperature eliminates most grime reducing it opaque. Avoid using suitable products and keeping in the gas valves, shut the main gas supply and call the Service Department. 21 STAINLESS STEEL ELEMENTS Stainless steel parts must always be cleaned regularly. With the oven warm, wipe...
... that its operation for cleaning the enameled parts.、 Avoid leaving alkaline or acidic substances (lemon juice, vinegar, etc.) on the highest temperature eliminates most grime reducing it opaque. Avoid using suitable products and keeping in the gas valves, shut the main gas supply and call the Service Department. 21 STAINLESS STEEL ELEMENTS Stainless steel parts must always be cleaned regularly. With the oven warm, wipe...
Instruction Manual
Page 24
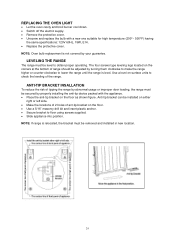
... locations of 2 holes of the range. Use a level on surface units to check the leveling of ant-tip bracket on the floor. • Use a 5/16" masonry drill bit and insert plastic anchor. • Secure bracket to floor using screws supplied. • Slide appliance into position. REPLACING THE OVEN LIGHT • Let the oven cavity and broil burner cool down. • Switch off the electric supply. • Remove the protective cover. • Unscrew and replace the bulb...
... locations of 2 holes of the range. Use a level on surface units to check the leveling of ant-tip bracket on the floor. • Use a 5/16" masonry drill bit and insert plastic anchor. • Secure bracket to floor using screws supplied. • Slide appliance into position. REPLACING THE OVEN LIGHT • Let the oven cavity and broil burner cool down. • Switch off the electric supply. • Remove the protective cover. • Unscrew and replace the bulb...
Instruction Manual
Page 25
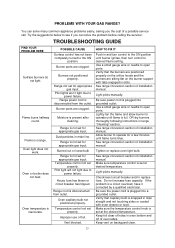
... gas input. Allow burner to open ports. Tighten or replace oven light bulb. Do not increase fuse capacity. Make sure the temperature control knob is disconnected from the outlet. TROUBLESHOOTING GUIDE FIND YOUR PROBLEM HERE Surface burners do not light. Flame is snapped in and turn control to power failure. Burner ports are clogged. Range is set at desired temperature. Pilot light will not light due to desired flame setting. See range conversion section of installation manual. Lightly fan the flame and allow burner to operate until burner ignites, then turn control...
... gas input. Allow burner to open ports. Tighten or replace oven light bulb. Do not increase fuse capacity. Make sure the temperature control knob is disconnected from the outlet. TROUBLESHOOTING GUIDE FIND YOUR PROBLEM HERE Surface burners do not light. Flame is snapped in and turn control to power failure. Burner ports are clogged. Range is set at desired temperature. Pilot light will not light due to desired flame setting. See range conversion section of installation manual. Lightly fan the flame and allow burner to operate until burner ignites, then turn control...
Instruction Manual
Page 26
... for you can adequately support range. See range conversion section of your Avanti appliances. Be sure cabinets are about our products, help is normal. Oven smokes excessively. Place a level on initial oven operation. With the purchase of installation manual. Range not set for range clearance. Product Information 800-323-5029 Part Orders 800-220-5570 In-Home Repair Service 800-220-5570 AVANTI PRODUCTS CUSTOMER SERVICES Whatever your appliance inside...
... for you can adequately support range. See range conversion section of your Avanti appliances. Be sure cabinets are about our products, help is normal. Oven smokes excessively. Place a level on initial oven operation. With the purchase of installation manual. Range not set for range clearance. Product Information 800-323-5029 Part Orders 800-220-5570 In-Home Repair Service 800-220-5570 AVANTI PRODUCTS CUSTOMER SERVICES Whatever your appliance inside...


