
Instruction Manual
Page 1
Avanti has a policy of continuous improvement on its products and reserves the right to change materials and specifications without notice. Miami, Florida 33152 www.avantiproducts.com Box 520604 - Avanti Products LLC P.O. MICROWAVE OVEN HORNO DE MICROONDAS FOUR A MICRO-ONDES INSTRUCTION MANUAL MANUAL DE INSTRUCCIONES MANUEL D'INSTRUCTIONS MODEL / MODELO / MODÈLE: MOTR13D3S BEFORE USE, PLEASE READ AND FOLLOW ALL SAFETY RULES AND OPERATING INSTRUCTIONS.
Avanti has a policy of continuous improvement on its products and reserves the right to change materials and specifications without notice. Miami, Florida 33152 www.avantiproducts.com Box 520604 - Avanti Products LLC P.O. MICROWAVE OVEN HORNO DE MICROONDAS FOUR A MICRO-ONDES INSTRUCTION MANUAL MANUAL DE INSTRUCCIONES MANUEL D'INSTRUCTIONS MODEL / MODELO / MODÈLE: MOTR13D3S BEFORE USE, PLEASE READ AND FOLLOW ALL SAFETY RULES AND OPERATING INSTRUCTIONS.

Instruction Manual
Page 2
Help Us Help You TABLE OF CONTENTS Parts and Features Important Safety Instructions Installation Instructions Before Using Your Microwave Oven Installation of Your Microwave Oven Safety Precautions Electrical Connection Operating Your Microwave Oven Control Panel Operation Procedure Care and Maintenance Problems with Your Microwave Oven? Troubleshooting Guide Service for Your Microwave Oven Avanti Microwave Oven Warranty Instrucciones en Español Instructions en Français Registration Information and Registration Card 3 4 5 6 6 6 6 - 7 8 8 9 9 - 14 15 - 16 17 17 18 19 20 ...
Help Us Help You TABLE OF CONTENTS Parts and Features Important Safety Instructions Installation Instructions Before Using Your Microwave Oven Installation of Your Microwave Oven Safety Precautions Electrical Connection Operating Your Microwave Oven Control Panel Operation Procedure Care and Maintenance Problems with Your Microwave Oven? Troubleshooting Guide Service for Your Microwave Oven Avanti Microwave Oven Warranty Instrucciones en Español Instructions en Français Registration Information and Registration Card 3 4 5 6 6 6 6 - 7 8 8 9 9 - 14 15 - 16 17 17 18 19 20 ...

Instruction Manual
Page 3
... not happy with this guide to be pleased. It lists causes of Purchase Model Number Serial Number Use these numbers here: Date of minor operating problems that sold you are still not pleased, write all the details, including your microwave oven. Read this will solve the problem. It is intended to help you to establish the warranty period. IF YOU NEED SERVICE We're proud of...
... not happy with this guide to be pleased. It lists causes of Purchase Model Number Serial Number Use these numbers here: Date of minor operating problems that sold you are still not pleased, write all the details, including your microwave oven. Read this will solve the problem. It is intended to help you to establish the warranty period. IF YOU NEED SERVICE We're proud of...

Instruction Manual
Page 5
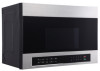
... placed inside the oven to facilitate cooking. • Remove wire twist-ties from bags before using your appliance, follow the specific "PRECAUTIONS TO AVOID POSSIBLE EXPOSURE TO EXCESSIVE MICROWAVE ENERGY" found on page 8. • Install or locate the appliance only in accordance with the provided installation instructions. • When cleaning surfaces of door and oven that comes together on this appliance. • Do not use this microwave oven...
... placed inside the oven to facilitate cooking. • Remove wire twist-ties from bags before using your appliance, follow the specific "PRECAUTIONS TO AVOID POSSIBLE EXPOSURE TO EXCESSIVE MICROWAVE ENERGY" found on page 8. • Install or locate the appliance only in accordance with the provided installation instructions. • When cleaning surfaces of door and oven that comes together on this appliance. • Do not use this microwave oven...
Instruction Manual
Page 6
...; SAFETY PRECAUTIONS PRECAUTIONS TO AVOID POSSIBLE EXPOSURE TO EXCESSIVE MICROWAVE ENERGY (a) Do not attempt to operate this oven with the door-open since open-door operation can result in Cavity If any of the following parts: • Glass Tray • Turntable Roller Assembly (Roller or Roller Ring) • Instruction Manual / Installation Manual • Inspect the oven after unpacking for any circumstances cut or remove the third (ground) prong from the power cord.
...; SAFETY PRECAUTIONS PRECAUTIONS TO AVOID POSSIBLE EXPOSURE TO EXCESSIVE MICROWAVE ENERGY (a) Do not attempt to operate this oven with the door-open since open-door operation can result in Cavity If any of the following parts: • Glass Tray • Turntable Roller Assembly (Roller or Roller Ring) • Instruction Manual / Installation Manual • Inspect the oven after unpacking for any circumstances cut or remove the third (ground) prong from the power cord.

Instruction Manual
Page 7
... before cooking to prevent bursting. • POPCORN must be dangerous to door, control panel or any other materials in the oven, touch the START/STOP pad and LEAVE THE DOOR CLOSED. FOOD • Paper towels and napkins - these absorb excess moisture and prevent splattering. Do not use recycled paper towels, which may shatter. • DO NOT use oven for microwave ovens. Use for short-term heating and covering; Repairs should...
... before cooking to prevent bursting. • POPCORN must be dangerous to door, control panel or any other materials in the oven, touch the START/STOP pad and LEAVE THE DOOR CLOSED. FOOD • Paper towels and napkins - these absorb excess moisture and prevent splattering. Do not use recycled paper towels, which may shatter. • DO NOT use oven for microwave ovens. Use for short-term heating and covering; Repairs should...

Instruction Manual
Page 8
... not place any circumstances cut or remove the third ground prong from the power cord supplied. It is particularly important that the oven closes properly and that is properly installed and grounded. Warning Improper use of the grounded plug can result in the risk of electrical shock by providing an escape wire for example, a child hanging on sealing...
... not place any circumstances cut or remove the third ground prong from the power cord supplied. It is particularly important that the oven closes properly and that is properly installed and grounded. Warning Improper use of the grounded plug can result in the risk of electrical shock by providing an escape wire for example, a child hanging on sealing...

Instruction Manual
Page 9
... will appear in the display. 2. CONTROL PANEL CLOCK Your model features a 12-hour clock. Press STOP/CANCEL to enter the correct time-of- SET TIME OF DAY 1. "12:00 PRESS CLOCK ENTER TIME" will sound. 4. "ENTER TIME" will appear in the display. 2. Press the number pads to enter the Clock Setting mode. Press CLOCK to input the desired cooking time. Press KITCHEN TIMER. Press START to confirm the time. For example, if the time is 99 minutes...
... will appear in the display. 2. CONTROL PANEL CLOCK Your model features a 12-hour clock. Press STOP/CANCEL to enter the correct time-of- SET TIME OF DAY 1. "12:00 PRESS CLOCK ENTER TIME" will sound. 4. "ENTER TIME" will appear in the display. 2. Press the number pads to enter the Clock Setting mode. Press CLOCK to input the desired cooking time. Press KITCHEN TIMER. Press START to confirm the time. For example, if the time is 99 minutes...
Instruction Manual
Page 10
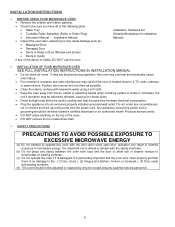
... Status Recall feature allows you to lock the microwave control panel for 3 seconds. FEATURES VENT FAN The Vent Fan feature allows you to exhaust heat and steam from the cooking surface below the microwave oven. TheLock icon indicate the lock has been activated. Press twice Off - CHILD CONTROL PANEL LOCK The Child Lock feature allows you to check the Time and Power settings during microwave cooking. • Press POWER LEVEL to display the set power level. • Press CLOCK to display the time. 10 Press LIGHT...
... Status Recall feature allows you to lock the microwave control panel for 3 seconds. FEATURES VENT FAN The Vent Fan feature allows you to exhaust heat and steam from the cooking surface below the microwave oven. TheLock icon indicate the lock has been activated. Press twice Off - CHILD CONTROL PANEL LOCK The Child Lock feature allows you to check the Time and Power settings during microwave cooking. • Press POWER LEVEL to display the set power level. • Press CLOCK to display the time. 10 Press LIGHT...
Instruction Manual
Page 11
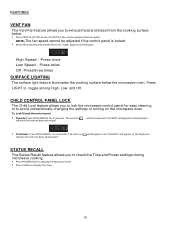
... with gold or silver trim or with metallic glaze • Wood To Test Cookware/Dinnerware: Place dish in the oven cavity; If dish becomes hot and the water stays cool, do not use to leave a cup filled with water inside the oven when it . Program 1 minute of water beside it is unintentionally turned on. IMPORTANT: Never operate the microwave without food in microwave oven...
... with gold or silver trim or with metallic glaze • Wood To Test Cookware/Dinnerware: Place dish in the oven cavity; If dish becomes hot and the water stays cool, do not use to leave a cup filled with water inside the oven when it . Program 1 minute of water beside it is unintentionally turned on. IMPORTANT: Never operate the microwave without food in microwave oven...
Instruction Manual
Page 12
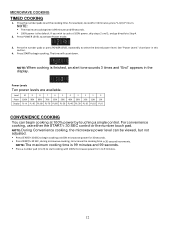
...; Press START/+ 30 SEC to begin cooking. See "Power Levels" chart later in the display. If you wish to increase the cooking time in30-secondincrements. For example, to cook for 30 seconds. • Press START/+ 30 SEC, during microwave cooking, to cook at 100% power by touching a single control. Press the number pads or press POWER LEVEL repeatedly to set the cooking time. NOTE: When cooking is finished, an alert tone sounds 3 times and...
...; Press START/+ 30 SEC to begin cooking. See "Power Levels" chart later in the display. If you wish to increase the cooking time in30-secondincrements. For example, to cook for 30 seconds. • Press START/+ 30 SEC, during microwave cooking, to cook at 100% power by touching a single control. Press the number pads or press POWER LEVEL repeatedly to set the cooking time. NOTE: When cooking is finished, an alert tone sounds 3 times and...
Instruction Manual
Page 13
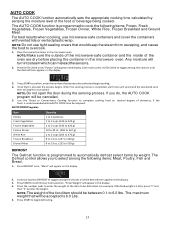
... display. 2. Press START to begin to toggle among the choices until the desired item appearsinthedisplay. 3. AUTO COOK The AUTO COOK function automatically sets the appropriate cooking time calculated by weight. NOTE: Make sure the outside of the microwave-safe container and the inside of doneness, if the food is completed, alert tones will sound and the calculated cook time will be defrosted. Press DEFROST once. For example, if the food weight...
... display. 2. Press START to begin to toggle among the choices until the desired item appearsinthedisplay. 3. AUTO COOK The AUTO COOK function automatically sets the appropriate cooking time calculated by weight. NOTE: Make sure the outside of the microwave-safe container and the inside of doneness, if the food is completed, alert tones will sound and the calculated cook time will be defrosted. Press DEFROST once. For example, if the food weight...
Instruction Manual
Page 14
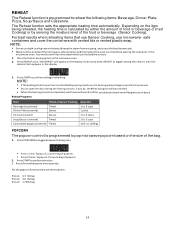
... steam from escaping, and cause the food to pop microwave popcorn based on the display. NOTE: • Do not use tight-sealing covers that use Sensor Cooking, use microwave- The Reheat function sets the appropriate heating time automatically. Depending on the item being reheated, the heating time is completed, alert tones will appear on the size of the microwave-safe containerand theinsideof the oven are three options: Press 1: 3.3 Oz...
... steam from escaping, and cause the food to pop microwave popcorn based on the display. NOTE: • Do not use tight-sealing covers that use Sensor Cooking, use microwave- The Reheat function sets the appropriate heating time automatically. Depending on the item being reheated, the heating time is completed, alert tones will appear on the size of the microwave-safe containerand theinsideof the oven are three options: Press 1: 3.3 Oz...

Instruction Manual
Page 15
... MICROWAVE OVEN CARE CLEANING IMPORTANT: Electrical Shock Hazard Disconnect power before cleaning. Using a warm water and mild soap solution and a soft cloth or sponge, clean the oven cavity, frame and oven exterior. 2. GREASE FILTER(S) Grease filters are located on the underside of the filter into the opening, and then gently push the filter up into place. The grease filters should be used on the microwave. • The glass turntable may be removed and cleaned often; Reinstall the grease filter...
... MICROWAVE OVEN CARE CLEANING IMPORTANT: Electrical Shock Hazard Disconnect power before cleaning. Using a warm water and mild soap solution and a soft cloth or sponge, clean the oven cavity, frame and oven exterior. 2. GREASE FILTER(S) Grease filters are located on the underside of the filter into the opening, and then gently push the filter up into place. The grease filters should be used on the microwave. • The glass turntable may be removed and cleaned often; Reinstall the grease filter...

Instruction Manual
Page 16
... "Back Cover" for your model, contact the Customer Satisfaction Center. Open the microwave door so you are aligned. Unplug or disconnect power. 2. A Charcoal Filter 6. Replacethetwoscrewsremovedearlier,andcompletelytightenthescrews. 16 The charcoal filter cannot be cleaned, so it must be replaced at least every 6 months or more often depending on the back of the grille, and then discard the filter. 5. a b b A Wire Harness (not shown) B Screw Hole Tab(2) 7. Your microwave oven comes...
... "Back Cover" for your model, contact the Customer Satisfaction Center. Open the microwave door so you are aligned. Unplug or disconnect power. 2. A Charcoal Filter 6. Replacethetwoscrewsremovedearlier,andcompletelytightenthescrews. 16 The charcoal filter cannot be cleaned, so it must be replaced at least every 6 months or more often depending on the back of the grille, and then discard the filter. 5. a b b A Wire Harness (not shown) B Screw Hole Tab(2) 7. Your microwave oven comes...
Instruction Manual
Page 17
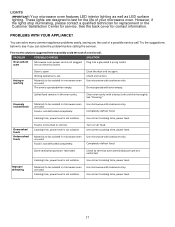
... ovenis operated when empty. See "Cleaning." Use microwave-safe cookware only. Use correct cooking time, power level. Use correct cooking time, power level. Oven ventilationportsare restricted. Use microwave-safe cookware only. Arcing or sparking Door is set. Spilled food remains in microwave oven are designed to see if you can solve many common appliance problems easily, saving you the cost of your microwave oven. See the back cover for service. Use microwave-safe cookware only. However, if the lights stop illuminating...
... ovenis operated when empty. See "Cleaning." Use microwave-safe cookware only. Use correct cooking time, power level. Use correct cooking time, power level. Oven ventilationportsare restricted. Use microwave-safe cookware only. Arcing or sparking Door is set. Spilled food remains in microwave oven are designed to see if you can solve many common appliance problems easily, saving you the cost of your microwave oven. See the back cover for service. Use microwave-safe cookware only. However, if the lights stop illuminating...

Instruction Manual
Page 18
... need additional information or assistance, the Avanti Products Customer Service team will be here for you . Just call us toll-free. AVANTI PRODUCTS CUSTOMER SERVICES Product Information 800-323-5029 Part Orders 800-220-5570 In-Home Repair Service 800...servicers know your Avanti appliances. With the purchase of professional service technicians that provide service on your appliance inside and out. 18 SERVICE FOR YOUR APPLIANCE We are about our products, help is convenient for you . An Avanti Products authorized service center will provide expert repair service, scheduled at a time...
... need additional information or assistance, the Avanti Products Customer Service team will be here for you . Just call us toll-free. AVANTI PRODUCTS CUSTOMER SERVICES Product Information 800-323-5029 Part Orders 800-220-5570 In-Home Repair Service 800...servicers know your Avanti appliances. With the purchase of professional service technicians that provide service on your appliance inside and out. 18 SERVICE FOR YOUR APPLIANCE We are about our products, help is convenient for you . An Avanti Products authorized service center will provide expert repair service, scheduled at a time...
Instruction Manual
Page 19
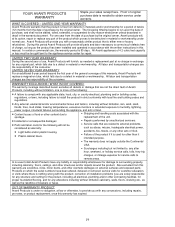
... the consumer. Proof of 4.2 cubic feet capacity or less must be considered as warranty: • Light bulbs and/or plastic housing. • Plastic cabinet liners. • Repairs performed by the original owner, Avanti products will not be brought/sent to external problems, such as the resetting of breakers or fuses. All Avanti appliances of original purchase date is used for repair. service visits for the product...
... the consumer. Proof of 4.2 cubic feet capacity or less must be considered as warranty: • Light bulbs and/or plastic housing. • Plastic cabinet liners. • Repairs performed by the original owner, Avanti products will not be brought/sent to external problems, such as the resetting of breakers or fuses. All Avanti appliances of original purchase date is used for repair. service visits for the product...

Instruction Manual
Page 55
... designed to best meet your input. detach here Avanti Registration Card Name Model # Serial # Address Date Purchased Store / Dealer Name City State Zip E-mail Address Area Code Phone Number Did You Purchase An Additional Warranty Extended None Reason for purchasing this product: Price Product Features Avanti Reputation Product Quality Salesperson Recommendation...
... designed to best meet your input. detach here Avanti Registration Card Name Model # Serial # Address Date Purchased Store / Dealer Name City State Zip E-mail Address Area Code Phone Number Did You Purchase An Additional Warranty Extended None Reason for purchasing this product: Price Product Features Avanti Reputation Product Quality Salesperson Recommendation...

Parts and Accessories
Page 2
... Glass Turntable 37 12170000004285 Fan Guide 38 12170000000209 Fan 39 11002017000167 Brushless DC Motor 40 12270000000150 Wind Guide Cover 41 12170000017785 Vent Grille 42 12270000008282 Vent Motor Cover 43 12270000003545 Mounting Plate 44 12270000008424 Air Duct 45 12270000006217 Capacitor Holder 46 12270000022176 Cover 47 12270000008286 Lamp Cover 48 12270000022316 Mounting Plate 49 12270000008126 Metal Bracket 50 12170000017684 Control Panel 51 17170000018382 Membrane Switch 52 12270000011861 Shielder 53 17170000020067 54 17170000017690 MI Assembly 55 12270000B47432 Door...
... Glass Turntable 37 12170000004285 Fan Guide 38 12170000000209 Fan 39 11002017000167 Brushless DC Motor 40 12270000000150 Wind Guide Cover 41 12170000017785 Vent Grille 42 12270000008282 Vent Motor Cover 43 12270000003545 Mounting Plate 44 12270000008424 Air Duct 45 12270000006217 Capacitor Holder 46 12270000022176 Cover 47 12270000008286 Lamp Cover 48 12270000022316 Mounting Plate 49 12270000008126 Metal Bracket 50 12170000017684 Control Panel 51 17170000018382 Membrane Switch 52 12270000011861 Shielder 53 17170000020067 54 17170000017690 MI Assembly 55 12270000B47432 Door...


