Instruction Manual
Page 1
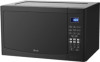
Avanti Products LLC P.O. Miami, Florida 33152 www.avantiproducts.com 1 Avanti has a policy of continuous improvement on its products and reserves the right to change materials and specifications without notice. Box 520604 - INSTRUCTION MANUAL MANUAL DE INSTRUCCIONES MANUEL D'INSTRUCTIONS Models / Modelos / Modelés: MT12V0W / MT12V1B / MT12V3S BEFORE USE, PLEASE READ AND FOLLOW ALL SAFETY RULES AND OPERATING INSTRUCTIONS.
Avanti Products LLC P.O. Miami, Florida 33152 www.avantiproducts.com 1 Avanti has a policy of continuous improvement on its products and reserves the right to change materials and specifications without notice. Box 520604 - INSTRUCTION MANUAL MANUAL DE INSTRUCCIONES MANUEL D'INSTRUCTIONS Models / Modelos / Modelés: MT12V0W / MT12V1B / MT12V3S BEFORE USE, PLEASE READ AND FOLLOW ALL SAFETY RULES AND OPERATING INSTRUCTIONS.
Instruction Manual
Page 2
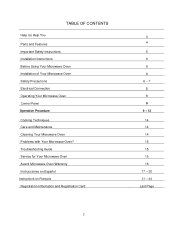
TABLE OF CONTENTS Help Us Help You Parts and Features Important Safety Instructions Installation Instructions Before Using Your Microwave Oven Installation of Your Microwave Oven Safety Precautions Electrical Connection Operating Your Microwave Oven Control Panel Operation Procedure Cooking Techniques Care and Maintenance Cleaning Your Microwave Oven Problems with Your Microwave Oven? Troubleshooting Guide Service for Your Microwave Oven Avanti Microwave Oven Warranty Instrucciones en Español Instructions en Français Registration Information and Registration Card 2 3 4 5 6 6 6 6 -...
TABLE OF CONTENTS Help Us Help You Parts and Features Important Safety Instructions Installation Instructions Before Using Your Microwave Oven Installation of Your Microwave Oven Safety Precautions Electrical Connection Operating Your Microwave Oven Control Panel Operation Procedure Cooking Techniques Care and Maintenance Cleaning Your Microwave Oven Problems with Your Microwave Oven? Troubleshooting Guide Service for Your Microwave Oven Avanti Microwave Oven Warranty Instrucciones en Español Instructions en Français Registration Information and Registration Card 2 3 4 5 6 6 6 6 -...
Instruction Manual
Page 3
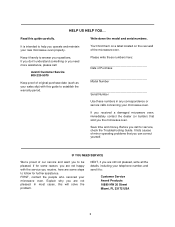
... intended to be pleased. Please write these numbers here: Date of Purchase Model Number Serial Number Use these numbers in any correspondence or service calls concerning your microwave oven. It lists causes of our service and want you to help you the microwave oven. IF YOU NEED SERVICE We're proud of minor operating problems that sold you operate and maintain your new microwave oven properly. If for some reason, you...
... intended to be pleased. Please write these numbers here: Date of Purchase Model Number Serial Number Use these numbers in any correspondence or service calls concerning your microwave oven. It lists causes of our service and want you to help you the microwave oven. IF YOU NEED SERVICE We're proud of minor operating problems that sold you operate and maintain your new microwave oven properly. If for some reason, you...

Instruction Manual
Page 4
Parts and Features ② ⑤⑦ 1 Door Safety Lock System 2 Oven Window 3 Turntable Shaft Roller Ring 4 Turntable Roller Ring 5 Glass Tray 6 Control Panel 7 Wave Guide Cover 4
Parts and Features ② ⑤⑦ 1 Door Safety Lock System 2 Oven Window 3 Turntable Shaft Roller Ring 4 Turntable Roller Ring 5 Glass Tray 6 Control Panel 7 Wave Guide Cover 4
Instruction Manual
Page 5
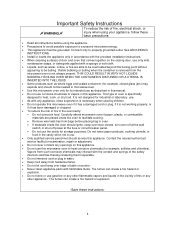
... in the vicinity of table or counter. Never clean appliance parts with any appliance, close supervision is necessary when used by children. Do not operate this or any other appliance. Important Safety Instructions WARNING To reduce the risk of oven is specifically designed to heat, cook, or dry food. Contact the nearest authorized service facility for its intended...
... in the vicinity of table or counter. Never clean appliance parts with any appliance, close supervision is necessary when used by children. Do not operate this or any other appliance. Important Safety Instructions WARNING To reduce the risk of oven is specifically designed to heat, cook, or dry food. Contact the nearest authorized service facility for its intended...
Instruction Manual
Page 6
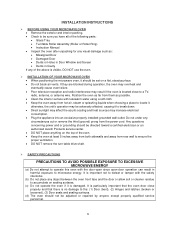
INSTALLATION INSTRUCTIONS BEFORE USING YOUR MICROWAVE OVEN Remove the exterior and interior packing. Check to be sure you have all of the following parts: Glass Tray Turntable Roller Assembly (Roller or Roller Ring) Instruction Manual Inspect the oven after unpacking for any visual damage such as possible. Clean the interior surface with the safety interlocks. (b) Do not place any object...
INSTALLATION INSTRUCTIONS BEFORE USING YOUR MICROWAVE OVEN Remove the exterior and interior packing. Check to be sure you have all of the following parts: Glass Tray Turntable Roller Assembly (Roller or Roller Ring) Instruction Manual Inspect the oven after unpacking for any visual damage such as possible. Clean the interior surface with the safety interlocks. (b) Do not place any object...
Instruction Manual
Page 7
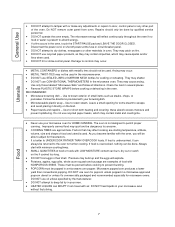
...; Remove PLASTIC STORE WRAPS before cooking to prevent bursting. POPCORN must be pierced before cooking or defrosting in the oven. RECOMMENDED Microwave browning dish - Use to absorb energy. If a fire occurs in the oven, touch the START/PAUSE pad and LEAVE THE DOOR CLOSED. The oven is present to brown exterior of food or foods with or make any adjustments or repairs to door, control panel...
...; Remove PLASTIC STORE WRAPS before cooking to prevent bursting. POPCORN must be pierced before cooking or defrosting in the oven. RECOMMENDED Microwave browning dish - Use to absorb energy. If a fire occurs in the oven, touch the START/PAUSE pad and LEAVE THE DOOR CLOSED. The oven is present to brown exterior of food or foods with or make any adjustments or repairs to door, control panel...
Instruction Manual
Page 8
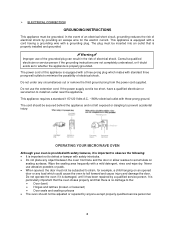
... completely understood, or if doubt exists as to install an outlet near the appliance. The power cord of electrical shock by anyone except properly qualified service personnel. 8 Do not use abrasive powders or pads. When opened, the door must not be adjusted or repaired by providing an escape wire for example, a child hanging on sealing surfaces. Wipe the sealing area...
... completely understood, or if doubt exists as to install an outlet near the appliance. The power cord of electrical shock by anyone except properly qualified service personnel. 8 Do not use abrasive powders or pads. When opened, the door must not be adjusted or repaired by providing an escape wire for example, a child hanging on sealing surfaces. Wipe the sealing area...
Instruction Manual
Page 9
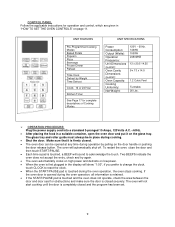
... is touched, a BEEP will show "1:00", if you prefer to change the clock, touch CLOCK to acknowledge the touch. The oven will not start cooking until the door is firmly closed. The oven door can be in place during operation by Weight Time Defrost Clock: 12 or 24 Hour Kitchen Timer See Page 17 for complete descriptions of Cooking Modes UNIT SPECIFICATIONS Power Consumption: Output (Watts): Operation Frequency: Unit Dimensions (HxWxD): Oven Cavity Dimensions (HxWxD): Oven Capacity: Cooking Uniformity: Net Weight...
... is touched, a BEEP will show "1:00", if you prefer to change the clock, touch CLOCK to acknowledge the touch. The oven will not start cooking until the door is firmly closed. The oven door can be in place during operation by Weight Time Defrost Clock: 12 or 24 Hour Kitchen Timer See Page 17 for complete descriptions of Cooking Modes UNIT SPECIFICATIONS Power Consumption: Output (Watts): Operation Frequency: Unit Dimensions (HxWxD): Oven Cavity Dimensions (HxWxD): Oven Capacity: Cooking Uniformity: Net Weight...
Instruction Manual
Page 10
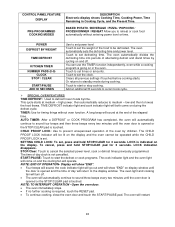
...stand times by time. POWER DEFROST BY WEIGHT TIME DEFROST KITCHEN TIMER NUMBER PADS (0-9) CLOCK STOP / CLEAR START/PAUSE ADD 30 SECONDS Use to set power level Touch to set defrosting time. TIMER: Use for timing things without entering power level or time. SETTING CHILD LOCK: To set . LOCK is indicated on display window until the oven door is opened and the time of day clock is touched. NOTE: END OF OPERATION- CONTROL PANEL FEATURE DISPLAY PRE-PROGRAMMED COOKING MODES DESCRIPTION Electronic display shows Cooking Time, Cooking Power, Time Remaining in the oven. BAKED...
...stand times by time. POWER DEFROST BY WEIGHT TIME DEFROST KITCHEN TIMER NUMBER PADS (0-9) CLOCK STOP / CLEAR START/PAUSE ADD 30 SECONDS Use to set power level Touch to set defrosting time. TIMER: Use for timing things without entering power level or time. SETTING CHILD LOCK: To set . LOCK is indicated on display window until the oven door is opened and the time of day clock is touched. NOTE: END OF OPERATION- CONTROL PANEL FEATURE DISPLAY PRE-PROGRAMMED COOKING MODES DESCRIPTION Electronic display shows Cooking Time, Cooking Power, Time Remaining in the oven. BAKED...
Instruction Manual
Page 11
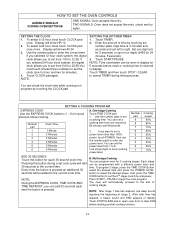
... to the current cook time. NOTE: During the EXPRESS COOK, TIME COOK AND TIME DEFROST, you to set the power level from one beep sound, signaling the beginning of time by touching the CLOCK pad. B. Touch STOP/CLEAR pad or open oven door to clear END before clock or cooking time is returned to 12:59. Display will be programmed with a different power level and time. NOTE: SETTING THE KITCHEN TIMER 1. SETTING A COOKING PROGRAM EXPRESS COOK Use the EXPRESS COOK buttons (1 - 6) for minutes). 4. Pressing this button for 2 cooking stages. Each...
... to the current cook time. NOTE: During the EXPRESS COOK, TIME COOK AND TIME DEFROST, you to set the power level from one beep sound, signaling the beginning of time by touching the CLOCK pad. B. Touch STOP/CLEAR pad or open oven door to clear END before clock or cooking time is returned to 12:59. Display will be programmed with a different power level and time. NOTE: SETTING THE KITCHEN TIMER 1. SETTING A COOKING PROGRAM EXPRESS COOK Use the EXPRESS COOK buttons (1 - 6) for minutes). 4. Pressing this button for 2 cooking stages. Each...
Instruction Manual
Page 12
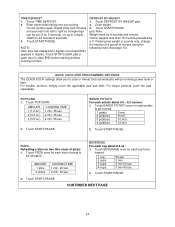
... be in display. CONTINUED NEXT PAGE 12 Touch TIME DEFROST. 2. AMOUNT COOKING TIME 1 (1.2 oz.) 1 min. 45 sec. 2 (3.0 oz.) 2 min. 35 sec. 3 (3.5 oz.) 2 min. 55 sec. 2. Touch PIZZA once for 24 minutes 5 seconds). 3. Touch BEVERAGE once for each cup to 4 digits (2405 for each potato to cook or reheat food automatically without entering power level or time. Touch START/PAUSE. TIME DEFROST 1. DEFROST BY WEIGHT 1. Touch START/PAUSE pad. QUICK COOK (PRE-PROGRAMMED) SETTINGS The QUICK COOK settings allow...
... be in display. CONTINUED NEXT PAGE 12 Touch TIME DEFROST. 2. AMOUNT COOKING TIME 1 (1.2 oz.) 1 min. 45 sec. 2 (3.0 oz.) 2 min. 35 sec. 3 (3.5 oz.) 2 min. 55 sec. 2. Touch PIZZA once for 24 minutes 5 seconds). 3. Touch BEVERAGE once for each cup to 4 digits (2405 for each potato to cook or reheat food automatically without entering power level or time. Touch START/PAUSE. TIME DEFROST 1. DEFROST BY WEIGHT 1. Touch START/PAUSE pad. QUICK COOK (PRE-PROGRAMMED) SETTINGS The QUICK COOK settings allow...
Instruction Manual
Page 13
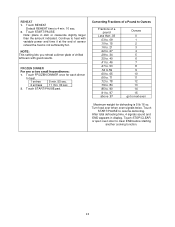
... of sensor reheat the food is 4 min. 10 sec. 2. REHEAT 1. Turn food over when oven signals twice. Note: place in display. FROZEN DINNER For one or two small frozen dinners: 1. Converting Fractions of a Pound to heat. 1 entree 5 min. 55 sec. 2 entrees 11 min. 00 sec. 2. Touch STOP/CLEAR or open oven door to resume defrosting. Touch FROZEN DINNER once for defrosting is 5 lb 16 oz. Touch START...
... of sensor reheat the food is 4 min. 10 sec. 2. REHEAT 1. Turn food over when oven signals twice. Note: place in display. FROZEN DINNER For one or two small frozen dinners: 1. Converting Fractions of a Pound to heat. 1 entree 5 min. 55 sec. 2 entrees 11 min. 00 sec. 2. Touch STOP/CLEAR or open oven door to resume defrosting. Touch FROZEN DINNER once for defrosting is 5 lb 16 oz. Touch START...

Instruction Manual
Page 14
... operating parts inside of one lemon in mind. When cleaning the control Panel, leave oven door open the door to cook for a few minutes after heating stops. The oven will turn off and remove the power plug from accidentally turning on the control panel. Wipe thoroughly and dry with the juice and skin of the oven clean. Adding Moisture Microwave energy is complete. Let liquids stand a moment before serving. COOKING TECHNIQUES Your microwave makes cooking...
... operating parts inside of one lemon in mind. When cleaning the control Panel, leave oven door open the door to cook for a few minutes after heating stops. The oven will turn off and remove the power plug from accidentally turning on the control panel. Wipe thoroughly and dry with the juice and skin of the oven clean. Adding Moisture Microwave energy is complete. Let liquids stand a moment before serving. COOKING TECHNIQUES Your microwave makes cooking...
Instruction Manual
Page 15
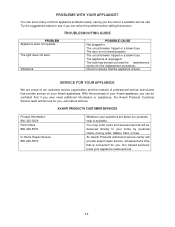
... Avanti Products authorized service center will be here for the replacement procedure). The light does not work. The circuit breaker tripped or a blown fuse. SERVICE FOR YOUR APPLIANCE We are about our products, help is unplugged. TROUBLESHOOTING GUIDE PROBLEM Appliance does not operate. POSSIBLE CAUSE Not plugged in. The door is level. You may order parts and accessories that will provide expert repair service, scheduled at a time that...
... Avanti Products authorized service center will be here for the replacement procedure). The light does not work. The circuit breaker tripped or a blown fuse. SERVICE FOR YOUR APPLIANCE We are about our products, help is unplugged. TROUBLESHOOTING GUIDE PROBLEM Appliance does not operate. POSSIBLE CAUSE Not plugged in. The door is level. You may order parts and accessories that will provide expert repair service, scheduled at a time that...
Instruction Manual
Page 16
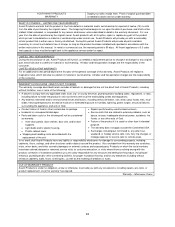
... been installed and operated in accordance with any alterations including without limitation, one year from the date of the consumer. Microwave Ovens 16 WHAT IS COVERED - All Avanti appliances of 3.5 cubic feet capacity or less must be defective in this warranty has expired. purpose. Light bulbs and/or plastic housing. The warranty does not apply outside the Continental USA. Plastic cabinet...
... been installed and operated in accordance with any alterations including without limitation, one year from the date of the consumer. Microwave Ovens 16 WHAT IS COVERED - All Avanti appliances of 3.5 cubic feet capacity or less must be defective in this warranty has expired. purpose. Light bulbs and/or plastic housing. The warranty does not apply outside the Continental USA. Plastic cabinet...
Instruction Manual
Page 47
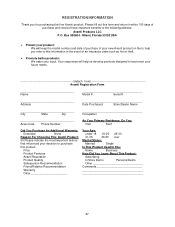
... this product. detach here Avanti Registration Form Name Model # Serial # Address Date Purchased Store/Dealer Name City State Zip Occupation Area Code Phone Number As Your Primary Residence, Do You: Own Rent Did You Purchase An Additional Warranty: Extended None Reason For Choosing This Avanti Product: 50 Please indicate the most important factors that influenced your future needs.
... this product. detach here Avanti Registration Form Name Model # Serial # Address Date Purchased Store/Dealer Name City State Zip Occupation Area Code Phone Number As Your Primary Residence, Do You: Own Rent Did You Purchase An Additional Warranty: Extended None Reason For Choosing This Avanti Product: 50 Please indicate the most important factors that influenced your future needs.

