
Instruction Manual
Page 1
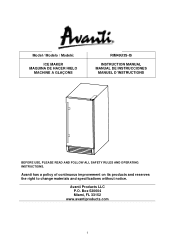
Avanti has a policy of continuous improvement on its products and reserves the right to change materials and specifications without notice. Box 520604 Miami, FL 33152 www.avantiproducts.com 1 Avanti Products LLC P.O. Model / Modelo / Modelé: ICE MAKER MAQUINA DE HACER HIELO MACHINE A GLAÇONS RIM49U3S-IS INSTRUCTION MANUAL MANUAL DE INSTRUCCIONES MANUEL D'INSTRUCTIONS BEFORE USE, PLEASE READ AND FOLLOW ALL SAFETY RULES AND OPERATING INSTRUCTIONS.
Avanti has a policy of continuous improvement on its products and reserves the right to change materials and specifications without notice. Box 520604 Miami, FL 33152 www.avantiproducts.com 1 Avanti Products LLC P.O. Model / Modelo / Modelé: ICE MAKER MAQUINA DE HACER HIELO MACHINE A GLAÇONS RIM49U3S-IS INSTRUCTION MANUAL MANUAL DE INSTRUCCIONES MANUEL D'INSTRUCTIONS BEFORE USE, PLEASE READ AND FOLLOW ALL SAFETY RULES AND OPERATING INSTRUCTIONS.
Instruction Manual
Page 2
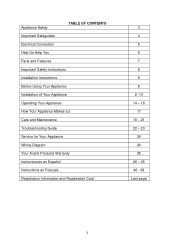
... TABLE OF CONTENTS Important Safeguides Electrical Connection Help Us Help You Parts and Features Important Safety Instructions Installation Instructions Before Using Your Appliance Installation of Your Appliance Operating Your Appliance How Your Appliance Makes Ice Care and Maintenance Troubleshooting Guide Service for Your Appliance Wiring Diagram Your Avanti Products Warranty Instrucciones en Español Instructions en Français Registration Information and Registration Card 3 4 5 6 7 8 8 8 9 -13...
... TABLE OF CONTENTS Important Safeguides Electrical Connection Help Us Help You Parts and Features Important Safety Instructions Installation Instructions Before Using Your Appliance Installation of Your Appliance Operating Your Appliance How Your Appliance Makes Ice Care and Maintenance Troubleshooting Guide Service for Your Appliance Wiring Diagram Your Avanti Products Warranty Instrucciones en Español Instructions en Français Registration Information and Registration Card 3 4 5 6 7 8 8 8 9 -13...
Instruction Manual
Page 4
..., make several adjustments to level it. • All installation must be in back or other injury. • To ensure proper ventilation for other than its intended purpose. 4 All other servicing should be turned off by a switch or pull chain • Never clean appliance parts with flammable fluids. And do not use an extension cord • Replace all electrical, water and drain...
..., make several adjustments to level it. • All installation must be in back or other injury. • To ensure proper ventilation for other than its intended purpose. 4 All other servicing should be turned off by a switch or pull chain • Never clean appliance parts with flammable fluids. And do not use an extension cord • Replace all electrical, water and drain...
Instruction Manual
Page 6
.... Write down the model and serial numbers. Use these numbers here: Date of Purchase Avanti Customer Service 800-220-5570 Keep proof of minor operating problems that sold you can correct yourself. Before you are some reason you operate and maintain your sales slip) with this guide carefully. Explain why you to follow for service, check the Troubleshooting Guide. Miami, FL...
.... Write down the model and serial numbers. Use these numbers here: Date of Purchase Avanti Customer Service 800-220-5570 Keep proof of minor operating problems that sold you can correct yourself. Before you are some reason you operate and maintain your sales slip) with this guide carefully. Explain why you to follow for service, check the Troubleshooting Guide. Miami, FL...

Instruction Manual
Page 8
... you have all instructions before using your old icemaker: take off the doors. The fumes can create a fire hazard or explosion. This will "just sit in the vicinity of a malfunction in place so that children may not easily climb inside the icemaker. - Junked or abandoned icemakers are not problems of the following parts: o 1 Ice Scoop o 1 Water Supply Hose o 1 Water Drain Hose o Instruction Manual · Before connecting...
... you have all instructions before using your old icemaker: take off the doors. The fumes can create a fire hazard or explosion. This will "just sit in the vicinity of a malfunction in place so that children may not easily climb inside the icemaker. - Junked or abandoned icemakers are not problems of the following parts: o 1 Ice Scoop o 1 Water Supply Hose o 1 Water Drain Hose o Instruction Manual · Before connecting...

Instruction Manual
Page 9
... the back, which allows the proper air circulation to cool the compressor. INSTALLATION OF YOUR ICEMAKER · THIS ICEMAKER SHOULD BE PROPERLY INSTALLED BY A QUALIFIED PROFESSIONAL This icemaker MUST be installed with electrical and water connections in accordance with all state and local codes. · Allow a minimum of 1 inch of space between 41ºF (5ºC) and 90ºF (32º...
... the back, which allows the proper air circulation to cool the compressor. INSTALLATION OF YOUR ICEMAKER · THIS ICEMAKER SHOULD BE PROPERLY INSTALLED BY A QUALIFIED PROFESSIONAL This icemaker MUST be installed with electrical and water connections in accordance with all state and local codes. · Allow a minimum of 1 inch of space between 41ºF (5ºC) and 90ºF (32º...
Instruction Manual
Page 10
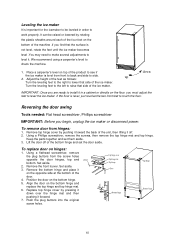
... feet to check the machine. 1. Keep the parts together and set the door aside. Remove the bottom hinge and place it . Adjust the height of the feet as follows: up Turn the leveling feet to the right to lower that side of the ice maker. To replace door on the bottom hinge....Leveling the ice maker It is important for the icemaker to be raised or lowered by rotating the plastic sheaths around each of the four feet on the bottom of the machine .If you find that the surface is not level, rotate the feet until the ice maker becomes level .You may need to make several adjustments to level...
... feet to check the machine. 1. Keep the parts together and set the door aside. Remove the bottom hinge and place it . Adjust the height of the feet as follows: up Turn the leveling feet to the right to lower that side of the ice maker. To replace door on the bottom hinge....Leveling the ice maker It is important for the icemaker to be raised or lowered by rotating the plastic sheaths around each of the four feet on the bottom of the machine .If you find that the surface is not level, rotate the feet until the ice maker becomes level .You may need to make several adjustments to level...

Instruction Manual
Page 11
.... (A wall outlet directly behind the ice machine will make installation easier.) IMPORTANT: 1. Professional installation is approximately 6 feet long. 3. Turn off valve must connect the drain line before using the ice maker. The water supply hose provided with local plumbing code requirements. There are not pinched or kinked or damaged during installation. 3. Connect the nut of 15 psig with the water inlet. The water supply pressure should be in . Check...
.... (A wall outlet directly behind the ice machine will make installation easier.) IMPORTANT: 1. Professional installation is approximately 6 feet long. 3. Turn off valve must connect the drain line before using the ice maker. The water supply hose provided with local plumbing code requirements. There are not pinched or kinked or damaged during installation. 3. Connect the nut of 15 psig with the water inlet. The water supply pressure should be in . Check...

Instruction Manual
Page 12
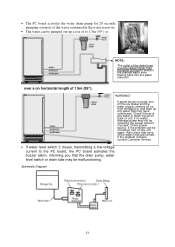
... allow the drain hose to the drain line through the drain water hose provided with ice maker. 1. An air gap will cause a high rate of the Pump-Out Water Drain System are · Water reservoir PC Board & Water level switch 1, 2 · Water Drain Pump OPERATION · All water coming from the overflow and the melted ice is collected in the water reservoir. · As soon as the water in the ice storage bin. IMPORTANT: This ice maker is recommended...
... allow the drain hose to the drain line through the drain water hose provided with ice maker. 1. An air gap will cause a high rate of the Pump-Out Water Drain System are · Water reservoir PC Board & Water level switch 1, 2 · Water Drain Pump OPERATION · All water coming from the overflow and the melted ice is collected in the water reservoir. · As soon as the water in the ice storage bin. IMPORTANT: This ice maker is recommended...
Instruction Manual
Page 13
... water lines are kinked. Schematic Diagram 13 WARNING! if no water, drainage pump may be receiving the proper amount of power. If the problem remains, contact Customer Service. · If water level switch 2 closes, transmitting a low-voltage current to prevent the drained water from flowing back into the water reservoir. · The PC board activates the water drain pump for 20 seconds, pumping out most of the water contained in water...
... water lines are kinked. Schematic Diagram 13 WARNING! if no water, drainage pump may be receiving the proper amount of power. If the problem remains, contact Customer Service. · If water level switch 2 closes, transmitting a low-voltage current to prevent the drained water from flowing back into the water reservoir. · The PC board activates the water drain pump for 20 seconds, pumping out most of the water contained in water...
Instruction Manual
Page 14
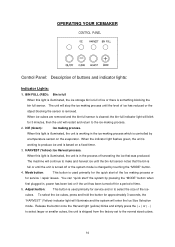
... in, power has been lost or if the unit has been turned off or the system mode is changed by a temperature sensor on a fixed timer. 3. OPERATING YOUR ICEMAKER Control Panel: Description of ice or there is something blocking the bin full sensor. ICE (Green): Ice making process. 2. cubes. The machine will stop the ice making process until the unit is full of buttons and indicator lights: Indicator Lights: 1. You...
... in, power has been lost or if the unit has been turned off or the system mode is changed by a temperature sensor on a fixed timer. 3. OPERATING YOUR ICEMAKER Control Panel: Description of ice or there is something blocking the bin full sensor. ICE (Green): Ice making process. 2. cubes. The machine will stop the ice making process until the unit is full of buttons and indicator lights: Indicator Lights: 1. You...

Instruction Manual
Page 15
... ice from the bin. 15 The machine will stop making process again.) IMPORTANT: · Although the unit has been tested and cleaned at the factory, due to the ice storage bin. (The HARVEST indicator light (YELLOW) will blink during this process.) 5. When the ice storage bin is full, the sheet of cubes must be discarded. · Never turn the water supply tap off when the ice maker is working...
... ice from the bin. 15 The machine will stop making process again.) IMPORTANT: · Although the unit has been tested and cleaned at the factory, due to the ice storage bin. (The HARVEST indicator light (YELLOW) will blink during this process.) 5. When the ice storage bin is full, the sheet of cubes must be discarded. · Never turn the water supply tap off when the ice maker is working...
Instruction Manual
Page 17
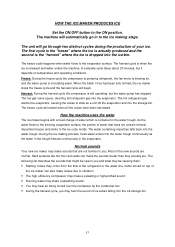
... minutes, but the water pump has stopped. Freeze: During the freeze cycle the compressor is pumping refrigerant, the fan motor is blowing air, and the water pump is contained in to you may come from the flow of ice cubes falling into the ice-bin. During the ice making stage. The machine will go in the water trough. Most of water which is circulating water. HOW THE ICE MAKER PRODUCES ICE Set the ON/OFF...
... minutes, but the water pump has stopped. Freeze: During the freeze cycle the compressor is pumping refrigerant, the fan motor is blowing air, and the water pump is contained in to you may come from the flow of ice cubes falling into the ice-bin. During the ice making stage. The machine will go in the water trough. Most of water which is circulating water. HOW THE ICE MAKER PRODUCES ICE Set the ON/OFF...

Instruction Manual
Page 19
... power to the unit. Open the door and take out the distribution tube. 4. Condenser cleaning A dirty or clogged condenser prevents proper airflow, reduces ice making system has been cleaned, and the ice storage bin is badly blocked, clean it just like any other food container. Condenser Surface Cleaning the water distribution tube When you find the ice cubes are incompletely formed or the output is used...
... power to the unit. Open the door and take out the distribution tube. 4. Condenser cleaning A dirty or clogged condenser prevents proper airflow, reduces ice making system has been cleaned, and the ice storage bin is badly blocked, clean it just like any other food container. Condenser Surface Cleaning the water distribution tube When you find the ice cubes are incompletely formed or the output is used...

Instruction Manual
Page 20
... the water supply. With hard water of 15 to 20 grains/gal. (4 to 5 grains/ liter), you may be in contact for proper cleaning. Keep the ice maker connected to protect hands. The machine will return to the regular ice making mode. 11. Use a drain hose on the control panel. 2. Prepare a sanitizing solution made of 1 ounce of household bleach and 2 gallons of the ice machine cleaner...
... the water supply. With hard water of 15 to 20 grains/gal. (4 to 5 grains/ liter), you may be in contact for proper cleaning. Keep the ice maker connected to protect hands. The machine will return to the regular ice making mode. 11. Use a drain hose on the control panel. 2. Prepare a sanitizing solution made of 1 ounce of household bleach and 2 gallons of the ice machine cleaner...

Instruction Manual
Page 21
...door open slightly: blocking it will not be necessary to drain the system of water. 1. Shut off all water. 6. Clean and dry the interior thoroughly. Dry the bin. 5. Long vacations: If the icemaker will be used for several months, remove all loose items inside your unit. · Turn the leveling... of time, you minimize the number of times the door is opened. Leave water supply line and power cord disconnected until ready to remove any remaining ice and water. Shut off for circulation and to prevent mold and mildew. 7. Power Failure Most power failures are wet. · ...
...door open slightly: blocking it will not be necessary to drain the system of water. 1. Shut off all water. 6. Clean and dry the interior thoroughly. Dry the bin. 5. Long vacations: If the icemaker will be used for several months, remove all loose items inside your unit. · Turn the leveling... of time, you minimize the number of times the door is opened. Leave water supply line and power cord disconnected until ready to remove any remaining ice and water. Shut off for circulation and to prevent mold and mildew. 7. Power Failure Most power failures are wet. · ...
Instruction Manual
Page 22
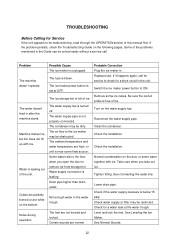
... ice maker in the Guide can be solved easily without a service call for service to check for a short circuit in after the machine starts. Switch the ice maker power button to ON. Reconnect the water supply pipe. Clean the condenser. Take care when you open the door to remove ice from storage bin. See Connecting the water line. Lower drain pipe. Level and lock the feet. See Leveling the Ice Maker...
... ice maker in the Guide can be solved easily without a service call for service to check for a short circuit in after the machine starts. Switch the ice maker power button to ON. Reconnect the water supply pipe. Clean the condenser. Take care when you open the door to remove ice from storage bin. See Connecting the water line. Lower drain pipe. Level and lock the feet. See Leveling the Ice Maker...

Instruction Manual
Page 23
... the floor of ice. The drain hose is full of the ice storage bin. Remove some ice cubes; Install a water-softening device in the socket. The ice maker stops suddenly while making ice. The drain hole below the ice storage bin is free of the water inlet. Use a socket meeting the grounding requirements. make sure the ice-full probe is blocked. Check the drain hose to within the stated range. The ground line isn't in...
... the floor of ice. The drain hose is full of the ice storage bin. Remove some ice cubes; Install a water-softening device in the socket. The ice maker stops suddenly while making ice. The drain hole below the ice storage bin is free of the water inlet. Use a socket meeting the grounding requirements. make sure the ice-full probe is blocked. Check the drain hose to within the stated range. The ground line isn't in...
Instruction Manual
Page 25
... expense for damage to the user's home, as the resetting of the product which proves to be considered as warranty: · Evaporator doors, door springs, and/or frames. · Inner door panels, door shelves, door rails, and/or door supports. · Light bulbs and/or plastic housing....needed to obtain service under no event shall Avanti Products have been altered, defaced or removed; Products on the complete sealed system. · Repairs performed by the original owner. REFRIGERATION - In no obligation, at its option, repair or replace any part of breakers or fuses. service...
... expense for damage to the user's home, as the resetting of the product which proves to be considered as warranty: · Evaporator doors, door springs, and/or frames. · Inner door panels, door shelves, door rails, and/or door supports. · Light bulbs and/or plastic housing....needed to obtain service under no event shall Avanti Products have been altered, defaced or removed; Products on the complete sealed system. · Repairs performed by the original owner. REFRIGERATION - In no obligation, at its option, repair or replace any part of breakers or fuses. service...

Parts and Accessories
Page 2
...38 Water Inlet Pipe 1811206006 1811206006 1811206006 39 Water Inlet 1864526301 1864526301 1864526301 76 Trough drain pipe 77 Overflow pipe 78 Drain trough 79 Float sensor R 79 Float sensor B 80 Check Valve 81 Check Valve 82 Internal Light B 83 Ice Scoop 84 Water Supply pipe 85 drain pipe N/A N/A N/A N/A N/A N/A N/A N/A N/A N/A N/A N/A N/A N/A N/A N/A N/A N/A N/A N/A N/A N/A N/A N/A 1864800101 1864800101 1864800101 1811306026 1811306026 1811306026 1864508300 1864508300 1864508300 Parts No. # Description Parts No. IM44U3S RIM49U3S IM44U3S RIM49U3S Previous...
...38 Water Inlet Pipe 1811206006 1811206006 1811206006 39 Water Inlet 1864526301 1864526301 1864526301 76 Trough drain pipe 77 Overflow pipe 78 Drain trough 79 Float sensor R 79 Float sensor B 80 Check Valve 81 Check Valve 82 Internal Light B 83 Ice Scoop 84 Water Supply pipe 85 drain pipe N/A N/A N/A N/A N/A N/A N/A N/A N/A N/A N/A N/A N/A N/A N/A N/A N/A N/A N/A N/A N/A N/A N/A N/A 1864800101 1864800101 1864800101 1811306026 1811306026 1811306026 1864508300 1864508300 1864508300 Parts No. # Description Parts No. IM44U3S RIM49U3S IM44U3S RIM49U3S Previous...
