Instruction Manual
Page 1
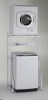
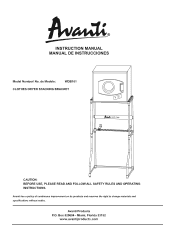
Avanti Products P.O. de Modelo: WDB101 CLOTHES DRYER STACKING BRACKET .&Z. Box 520604 - Miami, Florida 33152 www.avantiproducts.com INSTRUCTION MANUAL MANUAL DE INSTRUCCIONES Model Number/ No. Avantihas a policy ofcontinuous improvement on its products andreserves the right to change materials and specifications without notice. Laundry Center CAUTION: BEFORE USE, PLEASE READ AND FOLLOW ALL SAFETY RULES AND OPERATING INSTRUCTIONS.
Avanti Products P.O. de Modelo: WDB101 CLOTHES DRYER STACKING BRACKET .&Z. Box 520604 - Miami, Florida 33152 www.avantiproducts.com INSTRUCTION MANUAL MANUAL DE INSTRUCCIONES Model Number/ No. Avantihas a policy ofcontinuous improvement on its products andreserves the right to change materials and specifications without notice. Laundry Center CAUTION: BEFORE USE, PLEASE READ AND FOLLOW ALL SAFETY RULES AND OPERATING INSTRUCTIONS.
Instruction Manual
Page 3
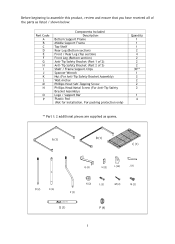
...-Tapping Screw Phillips Head Metal Screw (For Anti-Tip Safety Bracket Assembly) Logo / Support Bar Plastic Pad (Not for installation. For packing protection only) Quantity 1 1 1 2 4 2 2 2 30** 1 2 2 2 2 1 4 ** Part I: 2 additional pieces are supplied as listed / shown below: Part Code: A B C D E F G H I J K L M N O P Components Included Description Bottom Support Frame Middle Support Frame Top Shelf Rear Leg (Bottom section) Front / Rear Leg (Top section) Front...
...-Tapping Screw Phillips Head Metal Screw (For Anti-Tip Safety Bracket Assembly) Logo / Support Bar Plastic Pad (Not for installation. For packing protection only) Quantity 1 1 1 2 4 2 2 2 30** 1 2 2 2 2 1 4 ** Part I: 2 additional pieces are supplied as listed / shown below: Part Code: A B C D E F G H I J K L M N O P Components Included Description Bottom Support Frame Middle Support Frame Top Shelf Rear Leg (Bottom section) Front / Rear Leg (Top section) Front...
Instruction Manual
Page 5
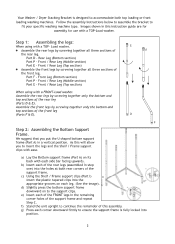
... of this instruction guide are for assembly for use with a TOP-Load washer. d) Slightly press the bottom support frame downward on each leg. (See the image). g) Press each side bar facing upwards. Part F - f) Stand the unit upright to continue the remainder of the rear leg (Parts D & E). Follow the assembly instructions below to assemble the bracket to fit your specific washing machine type. Assemble...
... of this instruction guide are for assembly for use with a TOP-Load washer. d) Slightly press the bottom support frame downward on each leg. (See the image). g) Press each side bar facing upwards. Part F - f) Stand the unit upright to continue the remainder of the rear leg (Parts D & E). Follow the assembly instructions below to assemble the bracket to fit your specific washing machine type. Assemble...

Instruction Manual
Page 6
... each of the rear legs. (See the image). The Middle support frame (Part B) MUST be installed to ensure the support frame is fully locked into the appropriate grooves on each end of the LOGO / Support Bar (Part 0) with each leg. (See the image). a) Using the Shelf / Frame support clips (Part I) insert the plastic tapered clips into position. Press each corner...
... each of the rear legs. (See the image). The Middle support frame (Part B) MUST be installed to ensure the support frame is fully locked into the appropriate grooves on each end of the LOGO / Support Bar (Part 0) with each leg. (See the image). a) Using the Shelf / Frame support clips (Part I) insert the plastic tapered clips into position. Press each corner...

Instruction Manual
Page 7
... Avanti Dryer (Model D110) to the Stacking bracket as shown. I! 4 Laundry Center ■ 5 Step 5: Installing the Anti-Tip Safety Bracket: a) Attach the Anti-Tip Safety Bracket (Parts G and H) to the top shelf. b) Align the assembled Stacking bracket in place and mark where the Anti-Tip Safety Bracket is secure. a) Place the Dryer on the stacking kit you must first remove the four (4) leveling...
... Avanti Dryer (Model D110) to the Stacking bracket as shown. I! 4 Laundry Center ■ 5 Step 5: Installing the Anti-Tip Safety Bracket: a) Attach the Anti-Tip Safety Bracket (Parts G and H) to the top shelf. b) Align the assembled Stacking bracket in place and mark where the Anti-Tip Safety Bracket is secure. a) Place the Dryer on the stacking kit you must first remove the four (4) leveling...

