
User Manual
Page 2
... keep it as well. If you for several other accompanying documents carefully before using the latest technology in the manual. Therefore, please read this user manual the following symbols are used: Important information or useful hints about usage. Please read this Beko product. Explanation of hot surfaces. Follow all other models. Remember that you get the best results from your...
... keep it as well. If you for several other accompanying documents carefully before using the latest technology in the manual. Therefore, please read this user manual the following symbols are used: Important information or useful hints about usage. Please read this Beko product. Explanation of hot surfaces. Follow all other models. Remember that you get the best results from your...
User Manual
Page 3
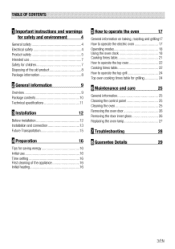
... oven 17 General information on baking, roasting and grilling17 How to operate the electric oven 17 Operating modes 18 Using the oven clock 18 Cooking times table 21 How to operate the top oven 22 Cooking times table 22 How to operate the top grill 24 Top oven cooking times table for grilling 24 6 Maintenance and care 25 General information 25 Cleaning the control panel 25 Cleaning the oven 25 Removing the oven door 26 Removing the door inner glass 26 Replacing the oven lamp 27 El Troubleshooting...
... oven 17 General information on baking, roasting and grilling17 How to operate the electric oven 17 Operating modes 18 Using the oven clock 18 Cooking times table 21 How to operate the top oven 22 Cooking times table 22 How to operate the top grill 24 Top oven cooking times table for grilling 24 6 Maintenance and care 25 General information 25 Cleaning the control panel 25 Cleaning the oven 25 Removing the oven door 26 Removing the door inner glass 26 Replacing the oven lamp 27 El Troubleshooting...
User Manual
Page 4
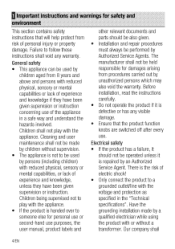
...-hand use purposes, the user manual, product labels and other relevant documents and parts should not be operated unless it should be also given. • Installation and repair procedures must always be used by a qualified electrician while using the product with reduced physical, sensory or mental capabilities, or lack of experience and knowledge, unless they have been given supervision or instruction. Cleaning and user...
...-hand use purposes, the user manual, product labels and other relevant documents and parts should not be operated unless it should be also given. • Installation and repair procedures must always be used by a qualified electrician while using the product with reduced physical, sensory or mental capabilities, or lack of experience and knowledge, unless they have been given supervision or instruction. Cleaning and user...
User Manual
Page 5
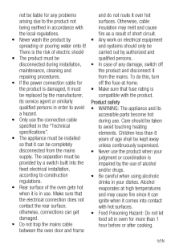
... into the fixed electrical installation, according to avoid touching heating elements. the product is impaired by the manufacturer, compatible with hot surfaces. • Food Poisoning Hazard: Do not let food sit in the "Technical specifications". • The appliance must be qualified persons. Care should only be There is be replaced by the use the connection cable specified in oven for more...
... into the fixed electrical installation, according to avoid touching heating elements. the product is impaired by the manufacturer, compatible with hot surfaces. • Food Poisoning Hazard: Do not let food sit in the "Technical specifications". • The appliance must be qualified persons. Care should only be There is be replaced by the use the connection cable specified in oven for more...
User Manual
Page 6
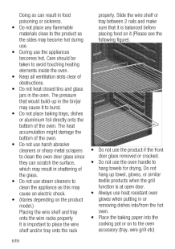
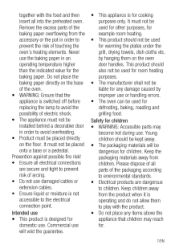
... food on the product model.) Placing the wire shelf and tray onto the wire racks properly It is at open door. • Always use heat resistant oven gloves when putting in or removing dishes into/from the hot oven. • Place the baking paper into the cooking pot or on to the oven accessory (tray, wire grill etc) 6/EN Care should be taken to avoid touching heating elements inside the oven. • Keep...
... food on the product model.) Placing the wire shelf and tray onto the wire racks properly It is at open door. • Always use heat resistant oven gloves when putting in or removing dishes into/from the hot oven. • Place the baking paper into the cooking pot or on to the oven accessory (tray, wire grill etc) 6/EN Care should be taken to avoid touching heating elements inside the oven. • Keep...
User Manual
Page 7
... packaging according to environmental standards. • Electrical products are secure and tight to avoid the possibility of touching the oven's heating elements. Remove the excess parts of the baking paper overflowing from children. Please dispose of arcing. • Do not use . by improper use or handling errors. • The oven can be installed behind a decorative door in an operating temperature higher than the indicated value for domestic...
... packaging according to environmental standards. • Electrical products are secure and tight to avoid the possibility of touching the oven's heating elements. Remove the excess parts of the baking paper overflowing from children. Please dispose of arcing. • Do not use . by improper use or handling errors. • The oven can be installed behind a decorative door in an operating temperature higher than the indicated value for domestic...
User Manual
Page 14
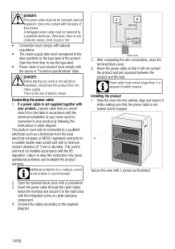
... in cable diagram. If a power cable is not supplied together with your product by a qualified electrician. Installing the product 1. A2 DANGER: I DANGER: Before starting any work on the electrical installation, disconnect the product from the mains supply. Connecting the power cable 1. Open the terminal block cover with hot parts of the product. A damaged power cable must be replaced by following the instructions in accordance with the electrical installation at your product must...
... in cable diagram. If a power cable is not supplied together with your product by a qualified electrician. Installing the product 1. A2 DANGER: I DANGER: Before starting any work on the electrical installation, disconnect the product from the mains supply. Connecting the power cable 1. Open the terminal block cover with hot parts of the product. A damaged power cable must be replaced by following the instructions in accordance with the electrical installation at your product must...
User Manual
Page 15
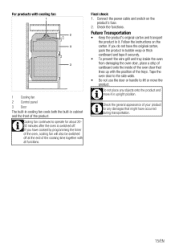
... the cooking time together with all functions. For products with cooling fan 2 1 Cooling fan 2 Control panel 3 Door The built-in cooling fan cools both the built-in it securely. • To prevent the wire grill and tray inside the oven from damaging the oven door, place a strip of cardboard onto the inside of the oven door that might have the original carton, pack the product in upright position. Connect the power cable and switch...
... the cooking time together with all functions. For products with cooling fan 2 1 Cooling fan 2 Control panel 3 Door The built-in cooling fan cools both the built-in it securely. • To prevent the wire grill and tray inside the oven from damaging the oven door, place a strip of cardboard onto the inside of the oven door that might have the original carton, pack the product in upright position. Connect the power cable and switch...
User Manual
Page 16
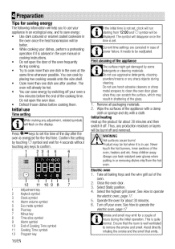
... in shattering of the glass. 1. It needs to be burnt off . Remove all baking trays and the wire grill out of the oven. 2. WARNING Hot surfaces cause burns! Always use heat resistant oven gloves when putting in use. Close the oven door. 3. Avoid directly inhaling the smoke and the smell that the room is quite normal. Press +fi'm keys to set the time of the day...
... in shattering of the glass. 1. It needs to be burnt off . Remove all baking trays and the wire grill out of the oven. 2. WARNING Hot surfaces cause burns! Always use heat resistant oven gloves when putting in use. Close the oven door. 3. Avoid directly inhaling the smoke and the smell that the room is quite normal. Press +fi'm keys to set the time of the day...
User Manual
Page 17
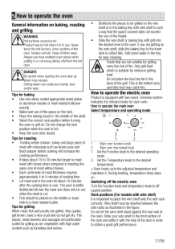
... the back of cooking time. • Let meat rest in a heat-resistant plate. How to the desired operating mode. 2. Keep children away. Set the Function knob to operate the main oven Select temperature and operating mode P C. 1 1 Main oven function knob 2 Main oven thermostat knob 1. Do not change the rack position when the oven is important to off the electric oven Turn the function knob and temperature knob to place the wire shelf onto the...
... the back of cooking time. • Let meat rest in a heat-resistant plate. How to the desired operating mode. 2. Keep children away. Set the Function knob to operate the main oven Select temperature and operating mode P C. 1 1 Main oven function knob 2 Main oven thermostat knob 1. Do not change the rack position when the oven is important to off the electric oven Turn the function knob and temperature knob to place the wire shelf onto the...

User Manual
Page 18
... for grilling. • Put small or medium-sized portions in this section. Set the temperature to maximum level. 5 3 2 Operating modes All functions in your oven (including the main oven) are in baking moulds. Operating with fan The oven is not heated. Full grill Large grill at room temperature and cooling down the cooked food. 1 8/EN Fan Heating Warm air heated by means of the compartments. It is suitable for...
... for grilling. • Put small or medium-sized portions in this section. Set the temperature to maximum level. 5 3 2 Operating modes All functions in your oven (including the main oven) are in baking moulds. Operating with fan The oven is not heated. Full grill Large grill at room temperature and cooling down the cooked food. 1 8/EN Fan Heating Warm air heated by means of the compartments. It is suitable for...
User Manual
Page 19
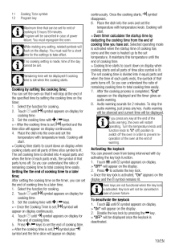
... power failure. Select the function for the end of cooking has come and the oven is deactivated. 19/EN Selected operating mode is activated when the startup time of cooking time. 5. Disable the key lock by setting the cooking time on the display. 2. Place the dish into the oven and set . The set cooking time is lit. It maintains this temperature until 41symbol appears on display when cooking starts and all parts of time...
... power failure. Select the function for the end of cooking has come and the oven is deactivated. 19/EN Selected operating mode is activated when the startup time of cooking time. 5. Disable the key lock by setting the cooking time on the display. 2. Place the dish into the oven and set . The set cooking time is lit. It maintains this temperature until 41symbol appears on display when cooking starts and all parts of time...
User Manual
Page 20
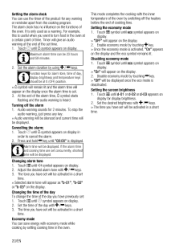
... time, 6 symbol starts flashing and the audio warning is heard. The tone you have set will be activated in a short time. Set the time of the day with the inner temperature of the oven by switching off the alarm 1. The alarm clock has no influence on display. 2. Set the alarm duration by touching key. » "Off" will be displayed once the eco mode is useful...
... time, 6 symbol starts flashing and the audio warning is heard. The tone you have set will be activated in a short time. Set the time of the day with the inner temperature of the oven by switching off the alarm 1. The alarm clock has no influence on display. 2. Set the alarm duration by touching key. » "Off" will be displayed once the eco mode is useful...
User Manual
Page 22
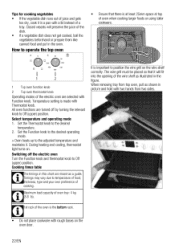
... or using taller cookware. 2 1 Top oven function knob 2 Top oven thermostat knob Operating modes of oven tray: 4 kg (8.8 Ib). Cooking times table The timings in this chart are selected with rough bases on the oven door. 22/EN Set the Thermostat knob to Off (upper) position. Maximum load capacity of the electric oven are meant as a guide. The wire grill must be placed so that there is the bottom rack...
... or using taller cookware. 2 1 Top oven function knob 2 Top oven thermostat knob Operating modes of oven tray: 4 kg (8.8 Ib). Cooking times table The timings in this chart are selected with rough bases on the oven door. 22/EN Set the Thermostat knob to Off (upper) position. Maximum load capacity of the electric oven are meant as a guide. The wire grill must be placed so that there is the bottom rack...

User Manual
Page 24
... tray or by placing onto the wire grill 1st rack of the oven is required to be roasted, grill the food either by placing the tray onto the floor of about 5 minutes. »Thermostat (temperature) light turns on the grill compartment when using it n Slic..,-sd cl'i:. '.,,. Switching on thickness 24/EN Set the temperature to Grill symbol. 2. If required, perform a preheating of grilling compartment. Turn the Grill control...
... tray or by placing onto the wire grill 1st rack of the oven is required to be roasted, grill the food either by placing the tray onto the floor of about 5 minutes. »Thermostat (temperature) light turns on the grill compartment when using it n Slic..,-sd cl'i:. '.,,. Switching on thickness 24/EN Set the temperature to Grill symbol. 2. If required, perform a preheating of grilling compartment. Turn the Grill control...
User Manual
Page 25
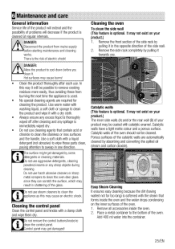
... your product may result in shattering of the glass. Cleaning the oven To clean the side wall (This feature is optional. Porous surfaces of the catalytic walls are required for too long) is softened with the steam that contain acid or chloride to cool down before starting maintenance and cleaning works. Place a metal container to lean the control panel. Do not use steam cleaners to clean the...
... your product may result in shattering of the glass. Cleaning the oven To clean the side wall (This feature is optional. Porous surfaces of the catalytic walls are required for too long) is softened with the steam that contain acid or chloride to cool down before starting maintenance and cleaning works. Place a metal container to lean the control panel. Do not use steam cleaners to clean the...
User Manual
Page 26
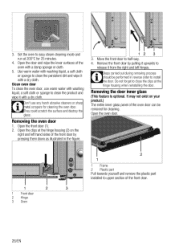
... 200°C for cleaning the oven door. Open the front door (1). 2. Move the front door to install the door. Clean oven door To clean the oven door, use any harsh abrasive cleaners or sharp metal scrapers for 25 minutes. 4. Removing the oven door 1. Open the oven door. 2 3 1 Front door 2 Hinge 3 Oven 2 1 1 Frame 2 Plastic part Pull towards yourself and remove the plastic part installed to easy steam cleaning mode and run at the hinge housing when reinstalling the door. Don't use warm water with washing liquid...
... 200°C for cleaning the oven door. Open the front door (1). 2. Move the front door to install the door. Clean oven door To clean the oven door, use any harsh abrasive cleaners or sharp metal scrapers for 25 minutes. 4. Removing the oven door 1. Open the oven door. 2 3 1 Front door 2 Hinge 3 Oven 2 1 1 Frame 2 Plastic part Pull towards yourself and remove the plastic part installed to easy steam cleaning mode and run at the hinge housing when reinstalling the door. Don't use warm water with washing liquid...
User Manual
Page 28
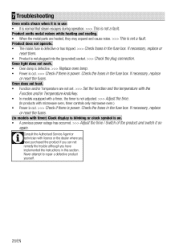
... repair a defective product yourself. 28/EN product does not operate.l • The mains fuse is not a fault. Oven light does not work.1 • Oven lamp is defective. >» Replace oven lamp. • Power is cut . >» Check if there is not a fault. Check the fuses in the fuse box. Troubleshooting Oven emits steam when it on again. Check the fuses in the fuse box. Ifnecessary, replace or reset the fuses. Consult the Authorised Service Agent or echnician with timer) Clock display...
... repair a defective product yourself. 28/EN product does not operate.l • The mains fuse is not a fault. Oven light does not work.1 • Oven lamp is defective. >» Replace oven lamp. • Power is cut . >» Check if there is not a fault. Check the fuses in the fuse box. Troubleshooting Oven emits steam when it on again. Check the fuses in the fuse box. Ifnecessary, replace or reset the fuses. Consult the Authorised Service Agent or echnician with timer) Clock display...
User Manual
Page 29
... installation environment). The guarantee starts from takeaways. • General compensation for domestic household use fails to ice trays, scrapers, cutlery baskets, filters and light bulbs. • Repairs necessary as a consumer. If you having to pay for any financial loss incurred in connection with the failure of repairing the product). • Gas Cookers must be correctly installed, located and operated in accordance with the instructions contained in the User Instructions...
... installation environment). The guarantee starts from takeaways. • General compensation for domestic household use fails to ice trays, scrapers, cutlery baskets, filters and light bulbs. • Repairs necessary as a consumer. If you having to pay for any financial loss incurred in connection with the failure of repairing the product). • Gas Cookers must be correctly installed, located and operated in accordance with the instructions contained in the User Instructions...
User Manual
Page 30
... to disconnecting the faulty product and installing the replacement product will not be arranged. It is your product is covered by this is not possible, a model of the old product. The Manufacturer reserves the right to in writing. If you fail to pay the costs for delays or if it is unable to carry out a repair because a convenient appointment cannot...
... to disconnecting the faulty product and installing the replacement product will not be arranged. It is your product is covered by this is not possible, a model of the old product. The Manufacturer reserves the right to in writing. If you fail to pay the costs for delays or if it is unable to carry out a repair because a convenient appointment cannot...


