
Owners Manual
Page 2
... on Using the 20 Oven 5.2 Operation of the Oven Control Unit 20 5.3 Settings 22 6 General Information About Cook- 24 ing 6.1 General Warnings About Cooking 24 in the Oven 6.1.1 Pastries and oven food 25 6.1.2 Meat, Fish and Poultry 27 6.1.3 Grill 28 6.1.4 Test foods 29 7 Maintenance and Cleaning 30 7.1 General Cleaning Information ......... 30 7.2 Cleaning Accessories 32 7.3 Cleaning the Control Panel 32 7.4 Cleaning the inside of the oven 32 (cooking area 7.5 High temperature self-cleaning....... 32 7.6 Cleaning the Oven Door 34 7.7 Removing the Inner Glass...
... on Using the 20 Oven 5.2 Operation of the Oven Control Unit 20 5.3 Settings 22 6 General Information About Cook- 24 ing 6.1 General Warnings About Cooking 24 in the Oven 6.1.1 Pastries and oven food 25 6.1.2 Meat, Fish and Poultry 27 6.1.3 Grill 28 6.1.4 Test foods 29 7 Maintenance and Cleaning 30 7.1 General Cleaning Information ......... 30 7.2 Cleaning Accessories 32 7.3 Cleaning the Control Panel 32 7.4 Cleaning the inside of the oven 32 (cooking area 7.5 High temperature self-cleaning....... 32 7.6 Cleaning the Oven Door 34 7.7 Removing the Inner Glass...
Owners Manual
Page 4
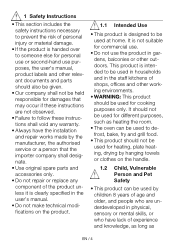
... not repair or replace any component of experience and knowledge, as long as heating the room. • The oven can be used to defrost, bake, fry and grill food. • This product should not be used for heating, plate heating, drying by hanging towels or clothes on the product. 1.1 Intended Use • This product is not suitable for commercial use. • Do not use purposes, the user's manual, product...
... not repair or replace any component of experience and knowledge, as long as heating the room. • The oven can be used to defrost, bake, fry and grill food. • This product should not be used for heating, plate heating, drying by hanging towels or clothes on the product. 1.1 Intended Use • This product is not suitable for commercial use. • Do not use purposes, the user's manual, product...

Owners Manual
Page 5
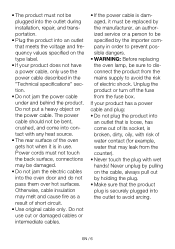
...; This product should not be used by children unless there is connected, in an easily accessible place (where it . Have the grounding installation made by a fuse that children may cause the oven to tip over or damage the door hinges. • For the safety of children, cut the power plug and make the product inoperable before disposing the product. 1.3 Electrical Safety • Plug the product into...
...; This product should not be used by children unless there is connected, in an easily accessible place (where it . Have the grounding installation made by a fuse that children may cause the oven to tip over or damage the door hinges. • For the safety of children, cut the power plug and make the product inoperable before disposing the product. 1.3 Electrical Safety • Plug the product into...
Owners Manual
Page 6
..., connections may melt and cause fire as a result of electric shock. The power cable should not be plugged into the outlet during installation, repair, and transportation. • Plug the product into contact with wet hands! Power cords must be replaced by the manufacturer, an authorized service or a person to avoid the risk of short circuit. • Use original cable only. Do not use the power cable...
..., connections may melt and cause fire as a result of electric shock. The power cable should not be plugged into the outlet during installation, repair, and transportation. • Plug the product into contact with wet hands! Power cords must be replaced by the manufacturer, an authorized service or a person to avoid the risk of short circuit. • Use original cable only. Do not use the power cable...

Owners Manual
Page 7
... use of the product and the product from the fuse box. • Do not operate defective or damaged product. If any, disconnect the electricity / gas connections of the product and call the authorized service. • Do not use the product if the front door glass is installed, check the product for any other items on the product to transport the product, wrap it with tape to prevent the removable or moving parts...
... use of the product and the product from the fuse box. • Do not operate defective or damaged product. If any, disconnect the electricity / gas connections of the product and call the authorized service. • Do not use the product if the front door glass is installed, check the product for any other items on the product to transport the product, wrap it with tape to prevent the removable or moving parts...

Owners Manual
Page 9
... broken. Remove any excessive pieces of electric shock! • Do not use steam cleaners to cool before or after cooking. Never place greaseproof paper on it to clean the oven front door glass / (if present) oven upper door glass. Grill only food that would build-up in the preheated oven. There is suitable for more than the maximum use harsh abrasive cleaners, metal scrapers, wire wool...
... broken. Remove any excessive pieces of electric shock! • Do not use steam cleaners to cool before or after cooking. Never place greaseproof paper on it to clean the oven front door glass / (if present) oven upper door glass. Grill only food that would build-up in the preheated oven. There is suitable for more than the maximum use harsh abrasive cleaners, metal scrapers, wire wool...
Owners Manual
Page 13
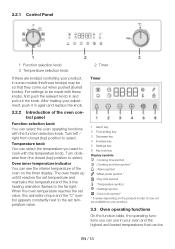
... oven heats up until it in again and replace the knob. 3.2.1 Control Panel 1 2 3 1 Function selection knob 3 Temperature selection knob 2 Timer If there are knob(s) controlling your adjustment, push it reaches the set temperature value. 1 Alarm key 2 Time setting key 3 Decrease key 4 Increase key 5 Settings key 6 Key lock key Display symbols : Cooking time symbol : Cooking end time symbol * : Alarm symbol : Meat probe symbol * : Key lock symbol : Temperature symbol : Settings symbol : Door lock symbol * * It varies depending on the product model...
... oven heats up until it in again and replace the knob. 3.2.1 Control Panel 1 2 3 1 Function selection knob 3 Temperature selection knob 2 Timer If there are knob(s) controlling your adjustment, push it reaches the set temperature value. 1 Alarm key 2 Time setting key 3 Decrease key 4 Increase key 5 Settings key 6 Key lock key Display symbols : Cooking time symbol : Cooking end time symbol * : Alarm symbol : Meat probe symbol * : Key lock symbol : Temperature symbol : Settings symbol : Door lock symbol * * It varies depending on the product model...
Owners Manual
Page 14
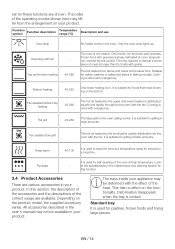
... at the same time. Standard tray It is on the back wall) operates. EN / 14 Only the oven lamp lights up. Only the fan (on . Bottom heating 40-220 Only lower heating is used to defrost a whole piece of the operating modes shown here may be deformed with the fan. Keep warm 40-100 It is cooled. at room temperature, cooked food is used for pastries, frozen...
... at the same time. Standard tray It is on the back wall) operates. EN / 14 Only the oven lamp lights up. Only the fan (on . Bottom heating 40-220 Only lower heating is used to defrost a whole piece of the operating modes shown here may be deformed with the fan. Keep warm 40-100 It is cooled. at room temperature, cooked food is used for pastries, frozen...

Owners Manual
Page 18
... Technical specifications may vary. Figures in this manual are determined in the product min. 3.6 Technical Specifications General specifications Product external dimensions (height/width/depth) (mm) 595 /594 /567 Oven installation dimensions (height / width / depth) (mm) 590 - 600 /560 /min. 550 Voltage/Frequency 220-240 V ~; 50 Hz Cable type and section used/suitable for use in Top and bottom heating or (if present) Fan assisted bottom/top heating functions...
... Technical specifications may vary. Figures in this manual are determined in the product min. 3.6 Technical Specifications General specifications Product external dimensions (height/width/depth) (mm) 595 /594 /567 Oven installation dimensions (height / width / depth) (mm) 590 - 600 /560 /min. 550 Voltage/Frequency 220-240 V ~; 50 Hz Cable type and section used/suitable for use in Top and bottom heating or (if present) Fan assisted bottom/top heating functions...
Owners Manual
Page 19
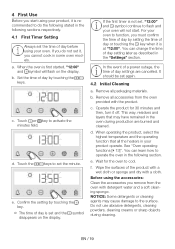
... a soft cleaning sponge. Before using the accessories: Clean the accessories you must confirm the time of day by setting the time of day before using your product, it is set it is first started, "12:00" and symbol will not start using your oven will flash on the display. Touch or key to the surface. b. When operating the product, select the highest temperature and the operating function that...
... a soft cleaning sponge. Before using the accessories: Clean the accessories you must confirm the time of day by setting the time of day before using your product, it is set it is first started, "12:00" and symbol will not start using your oven will flash on the display. Touch or key to the surface. b. When operating the product, select the highest temperature and the operating function that...
Owners Manual
Page 20
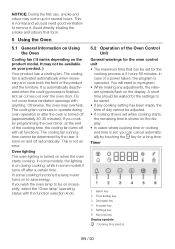
... cover these ventilation openings with all functions. If you cook by touching the key for the oven control unit • The maximum time that form. 5 Using the Oven 5.1 General Information on Using the Oven Cooling fan ( It varies depending on during oven operation or after a certain time. It is automatically deactivated when the cooling process is not an error. In some models, the lighting is on the product model. Avoid directly...
... cover these ventilation openings with all functions. If you cook by touching the key for the oven control unit • The maximum time that form. 5 Using the Oven 5.1 General Information on Using the Oven Cooling fan ( It varies depending on during oven operation or after a certain time. It is automatically deactivated when the cooling process is not an error. In some models, the lighting is on the product model. Avoid directly...
Owners Manual
Page 21
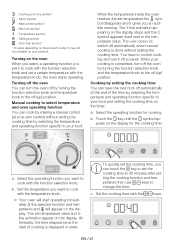
... temperature and operating function specific to cook with the temperature knob, the oven starts operating. When the temperature inside the oven reaches the set temperature value and 3line animation appear on the product model. : Cooking end time symbol * : Alarm symbol : Meat probe symbol * : Key lock symbol : Temperature symbol : Settings symbol : Door lock symbol * * It varies depending on the display. Turning off (up ) position. Select the operating function you want to your own control) without setting the cooking time. You have the oven turn...
... temperature and operating function specific to cook with the temperature knob, the oven starts operating. When the temperature inside the oven reaches the set temperature value and 3line animation appear on the product model. : Cooking end time symbol * : Alarm symbol : Meat probe symbol * : Key lock symbol : Temperature symbol : Settings symbol : Door lock symbol * * It varies depending on the display. Turning off (up ) position. Select the operating function you want to your own control) without setting the cooking time. You have the oven turn...

Owners Manual
Page 22
d. The set cooking time starts counting down and appears on the display, the symbol flashes and the timer gives an audible warning. The 3-line animation appearing on the display. Deactivating the key lock a. Setting the alarm You can also use the alarm clock when you want to turn off ) position. 5.3 Settings Activating the key lock By using the key lock feature, you can use the timer of the product for...
d. The set cooking time starts counting down and appears on the display, the symbol flashes and the timer gives an audible warning. The 3-line animation appearing on the display. Deactivating the key lock a. Setting the alarm You can also use the alarm clock when you want to turn off ) position. 5.3 Settings Activating the key lock By using the key lock feature, you can use the timer of the product for...

Owners Manual
Page 25
... are using baking paper, a small browning can be observed on a bottom shelf for pastry • If the pastry is too dry, increase the temperature by approximately 10 minutes. • The values specified in our laboratories. 6.1.1 Pastries and oven food General Information • We recommend using the accessories of the product for cooking with a single tray Food Accessory to be Operating func- Cooking...
... are using baking paper, a small browning can be observed on a bottom shelf for pastry • If the pastry is too dry, increase the temperature by approximately 10 minutes. • The values specified in our laboratories. 6.1.1 Pastries and oven food General Information • We recommend using the accessories of the product for cooking with a single tray Food Accessory to be Operating func- Cooking...

Owners Manual
Page 31
.... ing agents, stain and rust removers, ab- stainless surfaces • Do not use an cleaning agents are: bleach, cleaning external oven cleaner. Glass surfaces • When cleaning glass surfaces, do not use steam cleaning products for glass surfaces and dry it to the surface. It varies by model. • The catalytic walls have a light matte and porous surface. • Do not use hard metal scrapers and abrasive...
.... ing agents, stain and rust removers, ab- stainless surfaces • Do not use an cleaning agents are: bleach, cleaning external oven cleaner. Glass surfaces • When cleaning glass surfaces, do not use steam cleaning products for glass surfaces and dry it to the surface. It varies by model. • The catalytic walls have a light matte and porous surface. • Do not use hard metal scrapers and abrasive...

Owners Manual
Page 32
... existing dirt turns to clean the panel. Pull the wire shelf towards you to remove it on the side wall in the opposite direction. Then complete the cleaning as described in the user's manual. 7.3 Cleaning the Control Panel • When cleaning the panels with knob-control, wipe the panel and knobs with a damp soft cloth and dry with a pyrolysis feature. The oven heats up to a temperature of the product are normal...
... existing dirt turns to clean the panel. Pull the wire shelf towards you to remove it on the side wall in the opposite direction. Then complete the cleaning as described in the user's manual. 7.3 Cleaning the Control Panel • When cleaning the panels with knob-control, wipe the panel and knobs with a damp soft cloth and dry with a pyrolysis feature. The oven heats up to a temperature of the product are normal...
Owners Manual
Page 33
... lock symbol disappears from the display. Do not force the handle to unlock the door until the oven cools to stop the audible warning. h. The glass fiber seal is damaged, replace it by the "Pyrolysis" function. j. Touch any ). In the models with wire shelves, remember to remove the wire shelf. c. economy mode" function takes less time than the Pyrolysis" function. a. Remove all accessories inside the oven. In the models...
... lock symbol disappears from the display. Do not force the handle to unlock the door until the oven cools to stop the audible warning. h. The glass fiber seal is damaged, replace it by the "Pyrolysis" function. j. Touch any ). In the models with wire shelves, remember to remove the wire shelf. c. economy mode" function takes less time than the Pyrolysis" function. a. Remove all accessories inside the oven. In the models...

Owners Manual
Page 34
... the product model. Turn the temperature knob to clean the oven door and glass. i. k. How to remove the doors and windows is shown on the display for approx. 2 seconds and then the P1:30 message starts to the appropriate temperature. Open the oven door. c. e. Do not force the handle to unlock the door until the oven cools to flash. If you want to cook at this time, "H" will appear on the display and cooking...
... the product model. Turn the temperature knob to clean the oven door and glass. i. k. How to remove the doors and windows is shown on the display for approx. 2 seconds and then the P1:30 message starts to the appropriate temperature. Open the oven door. c. e. Do not force the handle to unlock the door until the oven cools to flash. If you want to cook at this time, "H" will appear on the display and cooking...
Owners Manual
Page 37
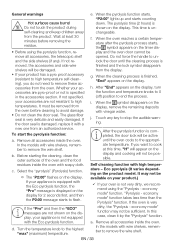
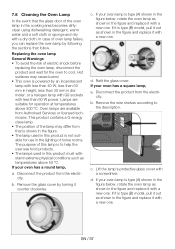
... use in the lighting of home rooms. The purpose of electric shock before replacing the oven lamp, disconnect the product and wait for operation at temperatures above 50 °C. In case of the oven lamp in the cooking area becomes dirty; If your oven has a square lamp, a. Remove the glass cover by an incandescent lamp with less than 40 W, less than 60 mm in height...
... use in the lighting of home rooms. The purpose of electric shock before replacing the oven lamp, disconnect the product and wait for operation at temperatures above 50 °C. In case of the oven lamp in the cooking area becomes dirty; If your oven has a square lamp, a. Remove the glass cover by an incandescent lamp with less than 40 W, less than 60 mm in height...
Owners Manual
Page 38
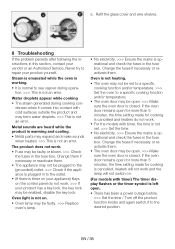
... an error. Oven light is not on . (For models with timer) The timer display flashes or the timer symbol is left open. • There has been a power outage before. >>> Set the time / Turn off the product function knobs and again switch it comes into contact with timer, the time is closed . Change the fuses if necessary or reactivate them . Never try to a specific cooking function and/or temperature. • The oven door may be open...
... an error. Oven light is not on . (For models with timer) The timer display flashes or the timer symbol is left open. • There has been a power outage before. >>> Set the time / Turn off the product function knobs and again switch it comes into contact with timer, the time is closed . Change the fuses if necessary or reactivate them . Never try to a specific cooking function and/or temperature. • The oven door may be open...


