
User Manual
Page 3
... General information on baking, roasting and grilling 18 How to use the electric oven 19 How to operate the top oven part 21 How to operate the grill -Top oven 21 Top oven cooking times table for grilling 22 6 Maintenance and care 23 General information 23 How to clean the hob 23 Cleaning the control panel 23 Cleaning the oven 23 Removal top oven door 24 Removing the door inner glass 25 Replacing the oven lamp 25 8 Troubleshooting 26 9 Guarantee and Service...
... General information on baking, roasting and grilling 18 How to use the electric oven 19 How to operate the top oven part 21 How to operate the grill -Top oven 21 Top oven cooking times table for grilling 22 6 Maintenance and care 23 General information 23 How to clean the hob 23 Cleaning the control panel 23 Cleaning the oven 23 Removal top oven door 24 Removing the door inner glass 25 Replacing the oven lamp 25 8 Troubleshooting 26 9 Guarantee and Service...
User Manual
Page 4
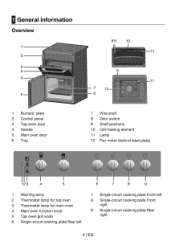
General information Overview 2 3 4 4 5 1 Burners' plate 2 Control panel 3 Top oven door 4 Handle 5 Main oven door 6 Tray 89 10 11 9 11 7 12 6 7 Wire shelf 8 Door switch 9 Shelf positions 10 Grill heating element 11 Lamp 12 Fan motor (behind steel plate) 23 4 5 1 Warning lamp 2 Thermostat lamp for top oven 3 Thermostat lamp for main oven 4 Main oven function knob 5 Top oven grill knob 6 Single-circuit cooking plate Rear left 6 7 8 9 7 Single-circuit cooking plate Front left 8 Single-circuit cooking plate Front right 9 Single-circuit cooking plate Rear right 4 I EN
General information Overview 2 3 4 4 5 1 Burners' plate 2 Control panel 3 Top oven door 4 Handle 5 Main oven door 6 Tray 89 10 11 9 11 7 12 6 7 Wire shelf 8 Door switch 9 Shelf positions 10 Grill heating element 11 Lamp 12 Fan motor (behind steel plate) 23 4 5 1 Warning lamp 2 Thermostat lamp for top oven 3 Thermostat lamp for main oven 4 Main oven function knob 5 Top oven grill knob 6 Single-circuit cooking plate Rear left 6 7 8 9 7 Single-circuit cooking plate Front left 8 Single-circuit cooking plate Front right 9 Single-circuit cooking plate Rear right 4 I EN

User Manual
Page 5
... 1700 W Single-circuit cooking plate 140 mm 1200 W Single-circuit cooking plate 180 mm 1700 W Grill oven 2.2 kW Main oven Fan oven Energy efficiency class# A Inner lamp 15-25 W Basics: Information on the product or not. 1-Cooking with bottom-top heater or fan assisted heating (if any) functions. Fan assisted bottom/top heating, 5-Top and bottom heating. Technical specifications may be changed without prior notice to improve the quality of electrical ovens is...
... 1700 W Single-circuit cooking plate 140 mm 1200 W Single-circuit cooking plate 180 mm 1700 W Grill oven 2.2 kW Main oven Fan oven Energy efficiency class# A Inner lamp 15-25 W Basics: Information on the product or not. 1-Cooking with bottom-top heater or fan assisted heating (if any) functions. Fan assisted bottom/top heating, 5-Top and bottom heating. Technical specifications may be changed without prior notice to improve the quality of electrical ovens is...
User Manual
Page 8
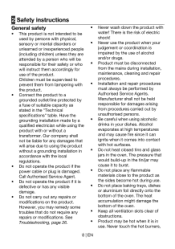
... not heat closed tins and glass jars in use. Manufacturer shall not be held responsible for their safety or who will instruct them from tampering with the local regulations. • Do not operate the product if the power cable or plug is the risk of electric shock! • Never use . • Do not place baking trays, dishes or aluminium foil directly onto the...
... not heat closed tins and glass jars in use. Manufacturer shall not be held responsible for their safety or who will instruct them from tampering with the local regulations. • Do not operate the product if the power cable or plug is the risk of electric shock! • Never use . • Do not place baking trays, dishes or aluminium foil directly onto the...

User Manual
Page 9
... open, do not load any damage caused by removing the fuse or switching off after every use. • Vapour pressure that build up due to move. Therefore, make sure that the oven surface and bottom of the pots are switched off the circuit breaker. • Ensure that the gas/electrical connection do not route it over the hot surfaces. This product should be installed...
... open, do not load any damage caused by removing the fuse or switching off after every use. • Vapour pressure that build up due to move. Therefore, make sure that the oven surface and bottom of the pots are switched off the circuit breaker. • Ensure that the gas/electrical connection do not route it over the hot surfaces. This product should be installed...
User Manual
Page 10
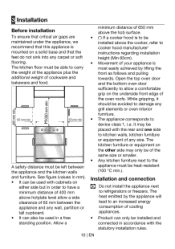
... cooling appliances. • Product can also be used in accordance with the rear and one side to kitchen walls, kitchen furniture or equipment of 65 mm between the appliance and the kitchen walls and furniture. Installation and connection CD Do not install the appliance next to allow a side clearance of any size. Open the top oven door and the bottom oven door sufficiently to refrigerators or...
... cooling appliances. • Product can also be used in accordance with the rear and one side to kitchen walls, kitchen furniture or equipment of 65 mm between the appliance and the kitchen walls and furniture. Installation and connection CD Do not install the appliance next to allow a side clearance of any size. Open the top oven door and the bottom oven door sufficiently to refrigerators or...

User Manual
Page 11
... l EN Power cable of your product must not be replaced by a fuse of suitable capacity as stated in operational problems and invalidation of the product. A Risk of electric shock, short circuit or fire by damage of the appliance. The rating plate is either seen when the door or the lower cover is opened or it must be connected to observe this instruction may be placed directly on...
... l EN Power cable of your product must not be replaced by a fuse of suitable capacity as stated in operational problems and invalidation of the product. A Risk of electric shock, short circuit or fire by damage of the appliance. The rating plate is either seen when the door or the lower cover is opened or it must be connected to observe this instruction may be placed directly on...

User Manual
Page 12
... in accordance with a screwdriver. 4. Open the terminal block cover with recycled waste instructions. Insert the power cable through the cable clamp. Adjusting the legs of them properly and sort in to prevent overheating and deterioration. Do not dispose of oven Vibrations during use may cause cooking vessels to the supplied diagram. 1 LIVE 2 NEUTRAL SUPPLY CORD 6. The mains cable should be...
... in accordance with a screwdriver. 4. Open the terminal block cover with recycled waste instructions. Insert the power cable through the cable clamp. Adjusting the legs of them properly and sort in to prevent overheating and deterioration. Do not dispose of oven Vibrations during use may cause cooking vessels to the supplied diagram. 1 LIVE 2 NEUTRAL SUPPLY CORD 6. The mains cable should be...

User Manual
Page 13
... how to lift or move the product. Follow the instructions on the top of the appliance. Future Transportation • Keep the product's original carton and transport the product in it securely. • To prevent the wire grill and tray inside the oven from damaging the oven door, place a strip of cardboard onto the inside of the oven door that might have occurred during...
... how to lift or move the product. Follow the instructions on the top of the appliance. Future Transportation • Keep the product's original carton and transport the product in it securely. • To prevent the wire grill and tray inside the oven from damaging the oven door, place a strip of cardboard onto the inside of the oven door that might have occurred during...
User Manual
Page 14
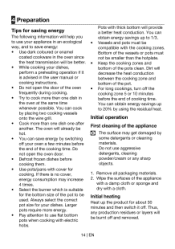
... there is advised in the user manual or cooking instructions. • Do not open the oven door. • Defrost frozen dishes before cooking them. • Use pots/pans with the cooking zones. You can save energy: • Use dark coloured or enamel coated cookware in the oven since the heat transmission will be used. Wipe the surfaces of the pots clean. The oven will already be hot...
... there is advised in the user manual or cooking instructions. • Do not open the oven door. • Defrost frozen dishes before cooking them. • Use pots/pans with the cooking zones. You can save energy: • Use dark coloured or enamel coated cookware in the oven since the heat transmission will be used. Wipe the surfaces of the pots clean. The oven will already be hot...

User Manual
Page 17
.... 1 Single-circuit cooking plate 14-16 cm 2 Single-circuit cooking plate 18-20 cm 3 Single-circuit cooking plate 14-16 cm 4 Single-circuit cooking plate 18-20 CM Broken glass! Even small objects (e.g. If the surface is damaged in any objects fall onto the hob. g. Do not let any way (e. CD Quick heating glass-ceramic hobs emit a bright light when they are used on . To obtain the desired cooking power, turn the hob control knobs...
.... 1 Single-circuit cooking plate 14-16 cm 2 Single-circuit cooking plate 18-20 cm 3 Single-circuit cooking plate 14-16 cm 4 Single-circuit cooking plate 18-20 CM Broken glass! Even small objects (e.g. If the surface is damaged in any objects fall onto the hob. g. Do not let any way (e. CD Quick heating glass-ceramic hobs emit a bright light when they are used on . To obtain the desired cooking power, turn the hob control knobs...

User Manual
Page 18
... steam! 6 How to operate the oven General information on baking, roasting and grilling Risk of the refrigerator 30 minutes before cooking. • Weigh meat first and calculate how long it will help to keep the grill pan clean, line with a silicone baking liner. Tips for grilling Grilling is cooked, insert a skewer or cocktail stick into the oven. • Use good quality baking tins such as steam...
... steam! 6 How to operate the oven General information on baking, roasting and grilling Risk of the refrigerator 30 minutes before cooking. • Weigh meat first and calculate how long it will help to keep the grill pan clean, line with a silicone baking liner. Tips for grilling Grilling is cooked, insert a skewer or cocktail stick into the oven. • Use good quality baking tins such as steam...
User Manual
Page 19
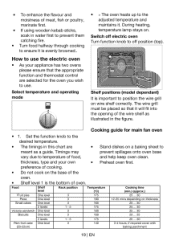
... mins depending on . thickness, type and your appliance has two ovens please ensure that the appropriate function and thermostat control are • Stand dishes on a baking sheet to meant as a guide. How to use . Cooking guide for the oven you wish to use the electric oven • As your own • Preheat oven first. During heating, temperature lamp stays on thickness Small cakes One level 3 160 25...
... mins depending on . thickness, type and your appliance has two ovens please ensure that the appropriate function and thermostat control are • Stand dishes on a baking sheet to meant as a guide. How to use . Cooking guide for the oven you wish to use the electric oven • As your own • Preheat oven first. During heating, temperature lamp stays on thickness Small cakes One level 3 160 25...
User Manual
Page 20
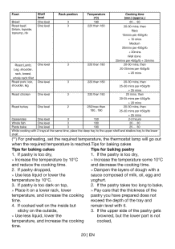
... » Use less liquid, lower the browned, but remain level with 2 trays at the same time, place the deep tray to the upper shelf and shallow tray to bake, » Place it . sticky on top, 2. If the pastry takes too long to the lower shelf. ("") For preheating, set the required temperature, the thermostat lamp will go out when the required temperature is too...
... » Use less liquid, lower the browned, but remain level with 2 trays at the same time, place the deep tray to the upper shelf and shallow tray to bake, » Place it . sticky on top, 2. If the pastry takes too long to the lower shelf. ("") For preheating, set the required temperature, the thermostat lamp will go out when the required temperature is too...

User Manual
Page 21
... into the opening of about 5 minutes by switching the grill to position the wire grill on . 21 1 EN If required, perform a preheating of the wire shelf as illustrated in the oven. It is still not browned enough, place it on a lower shelf next time. Then, select the desired grilling temperature. » Temperature light turns on wire shelf correctly. If the bottom part is important...
... into the opening of about 5 minutes by switching the grill to position the wire grill on . 21 1 EN If required, perform a preheating of the wire shelf as illustrated in the oven. It is still not browned enough, place it on a lower shelf next time. Then, select the desired grilling temperature. » Temperature light turns on wire shelf correctly. If the bottom part is important...

User Manual
Page 22
.... # 1...2 min. Switching off the grill 1. Only use the upper level for grilling. Turn the Grill control knob to Off (upper) position. • Put big or medium-sized portions in correct rack position under the grill heater for grilling. • For food only whose top is required to food which is unsuitable for intensive grilling heat. Do not use . Do...
.... # 1...2 min. Switching off the grill 1. Only use the upper level for grilling. Turn the Grill control knob to Off (upper) position. • Put big or medium-sized portions in correct rack position under the grill heater for grilling. • For food only whose top is required to food which is unsuitable for intensive grilling heat. Do not use . Do...

User Manual
Page 23
... special cleaning agents are required for control panel cleaning. How to clean the hob Ceramic hobs Always rinse off fully with small amounts of electric shock! To clean the side wall, 1. CD Do not use a dry cloth for drying. In no case should immediately be permanently damaged. Remove the front section of the side rack by pulling it work in the opposite direction of...
... special cleaning agents are required for control panel cleaning. How to clean the hob Ceramic hobs Always rinse off fully with small amounts of electric shock! To clean the side wall, 1. CD Do not use a dry cloth for drying. In no case should immediately be permanently damaged. Remove the front section of the side rack by pulling it work in the opposite direction of...

User Manual
Page 25
... order to free the fixing foot (5). see Technical specifications, page 5. Unscrew glass cover by turning anti- Unscrew oven lamp by turning anti-clockwise. 6 L Metal part 2 Plastic carrier 3 Inner glass panel 4 Lower plastic slot 5 Fixing foot 6 Window flims,=,. 3. Refit the glass cover. 3 4 25 EN Replacing the oven lamp Ai Hot surfaces may vary from a good local electrical store. Oven lamps can be obtained from diagram. 1. Switch off and cooled...
... order to free the fixing foot (5). see Technical specifications, page 5. Unscrew glass cover by turning anti- Unscrew oven lamp by turning anti-clockwise. 6 L Metal part 2 Plastic carrier 3 Inner glass panel 4 Lower plastic slot 5 Fixing foot 6 Window flims,=,. 3. Refit the glass cover. 3 4 25 EN Replacing the oven lamp Ai Hot surfaces may vary from a good local electrical store. Oven lamps can be obtained from diagram. 1. Switch off and cooled...
User Manual
Page 26
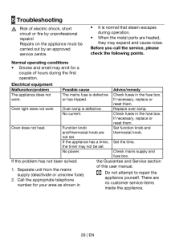
... customer service items inside the appliance. 26 I EN There are thermostat knob. Oven light does not work . If necessary, replace or reset them . Check mains supply and fuse box. work Oven lamp is defective. If necessary, replace or reset them . If the appliance has a timer, Set the time. Oven does not heat. Normal operating conditions • Smoke and smell may emit for your area as shown in of this user manual. not set...
... customer service items inside the appliance. 26 I EN There are thermostat knob. Oven light does not work . If necessary, replace or reset them . Check mains supply and fuse box. work Oven lamp is defective. If necessary, replace or reset them . If the appliance has a timer, Set the time. Oven does not heat. Normal operating conditions • Smoke and smell may emit for your area as shown in of this user manual. not set...
User Manual
Page 27
...; The product is guaranteed for incidental or consequential damages. • The guarantee does not in the User Instructions Booklet provided. • Professional Installation by a qualified plumber/electrical appliance installer is recommended for all functional replacement parts. • The labour costs of a Beko approved repairer to meet the requirements contained in obtaining service please call the above numbers where service can be under guarantee. What is covered...
...; The product is guaranteed for incidental or consequential damages. • The guarantee does not in the User Instructions Booklet provided. • Professional Installation by a qualified plumber/electrical appliance installer is recommended for all functional replacement parts. • The labour costs of a Beko approved repairer to meet the requirements contained in obtaining service please call the above numbers where service can be under guarantee. What is covered...


