User Manual
Page 4
... to use the electric oven 20 How to operate the oven timer 20 How to use the alarm clock 22 How to operate the top oven part 24 How to operate the grill -Top oven 26 Electric grilling guide 26 6 Maintenance and care 28 General information 28 How to clean the hob 28 Cleaning the control panel 28 Cleaning the oven 28 Removal top oven door 29 Removing the door inner glass 30 Replacing the oven lamp 30 8 Troubleshooting 31 9 Guarantee and Service...
... to use the electric oven 20 How to operate the oven timer 20 How to use the alarm clock 22 How to operate the top oven part 24 How to operate the grill -Top oven 26 Electric grilling guide 26 6 Maintenance and care 28 General information 28 How to clean the hob 28 Cleaning the control panel 28 Cleaning the oven 28 Removal top oven door 29 Removing the door inner glass 30 Replacing the oven lamp 30 8 Troubleshooting 31 9 Guarantee and Service...

User Manual
Page 5
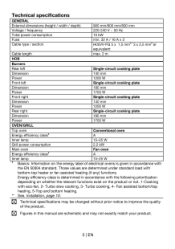
...4 4 11 7 12 5 -- 6 1 Burners' plate 2 Control panel 3 Top oven/grill door 4 Handle 5 Main oven door 6 Tray 7 Wire shelf 8 Door switch 9 Shelf positions 10 Grill heating element 11 Lamp 12 Fan motor (behind steel plate) 61 0 0 0 6666 0 0 0 23 4 5 6 7 8 9 10 1 Warning lamp 2 Thermostat lamp for top oven 3 Thermostat lamp for main oven 4 Main oven function knob 5 Single-circuit cooking plate Rear left 6 Single-circuit cooking plate Front left 7 Digital timer 8 Single-circuit cooking plate Front right 9 Single-circuit cooking plate Rear right 10 Top oven/grill function knob 4 I EN
...4 4 11 7 12 5 -- 6 1 Burners' plate 2 Control panel 3 Top oven/grill door 4 Handle 5 Main oven door 6 Tray 7 Wire shelf 8 Door switch 9 Shelf positions 10 Grill heating element 11 Lamp 12 Fan motor (behind steel plate) 61 0 0 0 6666 0 0 0 23 4 5 6 7 8 9 10 1 Warning lamp 2 Thermostat lamp for top oven 3 Thermostat lamp for main oven 4 Main oven function knob 5 Single-circuit cooking plate Rear left 6 Single-circuit cooking plate Front left 7 Digital timer 8 Single-circuit cooking plate Front right 9 Single-circuit cooking plate Rear right 10 Top oven/grill function knob 4 I EN
User Manual
Page 6
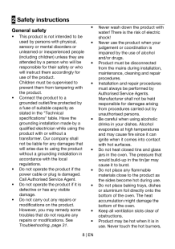
... or fan assisted heating (if any) functions. Technical specifications GENERAL External dimensions (height / width / depth) Voltage / frequency Total power consumption Fuse Cable type / section Cable length HOB 900 mm/600 mm/600 mm 220-240 V - 50 Hz 10 kW min. 32 A/ 16 A x 3 H05VV-FG 5 x 1,5 mm2 / 3 x 2,5 mm2 or equivalent max. 2 m Burners Rear left Dimension Power Front left Dimension Power Front right Dimension Power Rear right Dimension Power Single-circuit cooking plate...
... or fan assisted heating (if any) functions. Technical specifications GENERAL External dimensions (height / width / depth) Voltage / frequency Total power consumption Fuse Cable type / section Cable length HOB 900 mm/600 mm/600 mm 220-240 V - 50 Hz 10 kW min. 32 A/ 16 A x 3 H05VV-FG 5 x 1,5 mm2 / 3 x 2,5 mm2 or equivalent max. 2 m Burners Rear left Dimension Power Front left Dimension Power Front right Dimension Power Rear right Dimension Power Single-circuit cooking plate...
User Manual
Page 9
... product if the power cable or plug is in use . • Do not place baking trays, dishes or aluminium foil directly onto the bottom of suitable capacity as the sides become hot during installation, maintenance, cleaning and repair procedures. • Installation and repair procedures must be supervised to prevent them accordingly for any damages that do not require any repairs or modifications. Never touch...
... product if the power cable or plug is in use . • Do not place baking trays, dishes or aluminium foil directly onto the bottom of suitable capacity as the sides become hot during installation, maintenance, cleaning and repair procedures. • Installation and repair procedures must be supervised to prevent them accordingly for any damages that do not require any repairs or modifications. Never touch...

User Manual
Page 10
... surfaces. Safety when working with the regulations in use is designed for any damage caused by removing the fuse or switching off the circuit breaker. • Ensure that the fuse rating is in force. Commercial use . Safety for room heating purposes. Young children should not be used for children • Accessible parts of the pot can be used for children. otherwise, connections can get damaged...
... surfaces. Safety when working with the regulations in use is designed for any damage caused by removing the fuse or switching off the circuit breaker. • Ensure that the fuse rating is in force. Commercial use . Safety for room heating purposes. Young children should not be used for children • Accessible parts of the pot can be used for children. otherwise, connections can get damaged...

User Manual
Page 11
... consumption of cooling appliances. • Product can only be installed and connected in a free standing position. The heat emitted by lifting the front as follows and pulling towards. Open the top oven door and the bottom oven door sufficiently to carry the weight of the appliance plus the additional weight of 65 mm between the appliance and the kitchen walls and furniture. E E 65 mm...
... consumption of cooling appliances. • Product can only be installed and connected in a free standing position. The heat emitted by lifting the front as follows and pulling towards. Open the top oven door and the bottom oven door sufficiently to carry the weight of the appliance plus the additional weight of 65 mm between the appliance and the kitchen walls and furniture. E E 65 mm...

User Manual
Page 12
... adjacent to a suitable double-pole control unit with the local regulations. The rating plate is either seen when the door or the lower cover is opened or it must not be installed by an authorized qualified person and the appliance is located at least two persons. As Risk of the product warranty. Failure to using the product with the product. Electrical connection Connect the product to the mains...
... adjacent to a suitable double-pole control unit with the local regulations. The rating plate is either seen when the door or the lower cover is opened or it must not be installed by an authorized qualified person and the appliance is located at least two persons. As Risk of the product warranty. Failure to using the product with the product. Electrical connection Connect the product to the mains...

User Manual
Page 13
... the product is level by adjusting the four feet at the bottom by turning left or right and align level with a cooling fan 1 2 2 LIVE NEUTRAL. Reconnect the product to position between the product and 1 Fan the wall. 2 Control panel 12 I EN The mains cable must be longer than 2 m because of oven Vibrations during use may cause cooking vessels to the supplied diagram. 13 Power cable...
... the product is level by adjusting the four feet at the bottom by turning left or right and align level with a cooling fan 1 2 2 LIVE NEUTRAL. Reconnect the product to position between the product and 1 Fan the wall. 2 Control panel 12 I EN The mains cable must be longer than 2 m because of oven Vibrations during use may cause cooking vessels to the supplied diagram. 13 Power cable...

User Manual
Page 14
...dangerous conditions to children. Tape the oven door to the side walls. • Do not use the door or handle to protect control panel, knobs and related oven parts; Do not dispose of them properly...fan automatically starts working until the product cools down. Future Transportation • Keep the product's original carton and transport the product in it securely. • To prevent the wire grill and tray inside of the oven door that this equipment must be recycled or dismantled to be transported upright. [I] Check the general appearance of your product for waste electrical...
...dangerous conditions to children. Tape the oven door to the side walls. • Do not use the door or handle to protect control panel, knobs and related oven parts; Do not dispose of them properly...fan automatically starts working until the product cools down. Future Transportation • Keep the product's original carton and transport the product in it securely. • To prevent the wire grill and tray inside of the oven door that this equipment must be recycled or dismantled to be transported upright. [I] Check the general appearance of your product for waste electrical...
User Manual
Page 15
... the oven • For long cookings, turn off your appliance in an ecological • Vessels and pots must coated cookware in the user manual or between the cooking zone and cooking instructions. to 20% by switching off the frequently during cooking. Always select the correct pot size for the bottom size of the pots clean. The oven will provide a better heat conduction. Larger pots require more...
... the oven • For long cookings, turn off your appliance in an ecological • Vessels and pots must coated cookware in the user manual or between the cooking zone and cooking instructions. to 20% by switching off the frequently during cooking. Always select the correct pot size for the bottom size of the pots clean. The oven will provide a better heat conduction. Larger pots require more...

User Manual
Page 16
... volume 9 Current time 10 Keylock 11 Adjustment key After setting the time, you can start increasing/moving up from 12:00. Do not use aggressive detergents, cleaning powder/cream or any adjustment, related symbols on the oven for screen brightness adjustment. 2. Setting the time ID While making any sharp objects. 1. First cleaning of power failure and will flash. After switching on the clock will need to indicate...
... volume 9 Current time 10 Keylock 11 Adjustment key After setting the time, you can start increasing/moving up from 12:00. Do not use aggressive detergents, cleaning powder/cream or any adjustment, related symbols on the oven for screen brightness adjustment. 2. Setting the time ID While making any sharp objects. 1. First cleaning of power failure and will flash. After switching on the clock will need to indicate...

User Manual
Page 20
... seasoning. line tins with a silicone baking liner. Take care when opening the oven door as it comes out clean, the cake is at the correct temperature as soon as steam may escape. Flat pieces are counted from the oven once cooked and stand covered in the centre of the oven. • Turn meat over halfway through cooking. • If the roasted meat is tender and moist. If...
... seasoning. line tins with a silicone baking liner. Take care when opening the oven door as it comes out clean, the cake is at the correct temperature as soon as steam may escape. Flat pieces are counted from the oven once cooked and stand covered in the centre of the oven. • Turn meat over halfway through cooking. • If the roasted meat is tender and moist. If...
User Manual
Page 21
... wire grill marinate first. During heating, temperature lamp stays on the clock will be set for the settings to prevent them illustrated in the figure. must wait for a short time for the end of power cut, program will flash. Switch off electric oven Turn function knob to the adjusted temperature and maintains it. In case of the cooking process is evenly browned. 11 10 9 8 7 6 How to use...
... wire grill marinate first. During heating, temperature lamp stays on the clock will be set for the settings to prevent them illustrated in the figure. must wait for a short time for the end of power cut, program will flash. Switch off electric oven Turn function knob to the adjusted temperature and maintains it. In case of the cooking process is evenly browned. 11 10 9 8 7 6 How to use...
User Manual
Page 22
... the clock, time of cooking has come and the oven is set . 3. Place your dish in the oven. 6. Select operation mode and temperature. » Oven timer automatically calculates the startup time for 2 minutes. It maintains this operation mode you selected. 5. Alarm signal will be displayed once the cooking starts. Adjust the cooking time using the end of cooking time you have set on (will be displayed continuously) after cooking time is set temperature. [l] If semi-automatic or full automatic operation mode...
... the clock, time of cooking has come and the oven is set . 3. Place your dish in the oven. 6. Select operation mode and temperature. » Oven timer automatically calculates the startup time for 2 minutes. It maintains this operation mode you selected. 5. Alarm signal will be displayed once the cooking starts. Adjust the cooking time using the end of cooking time you have set on (will be displayed continuously) after cooking time is set temperature. [l] If semi-automatic or full automatic operation mode...
User Manual
Page 26
... temperature lamp is switched off position "0" (top). Turn function knob to temperature of food, thickness, type and your own preference of cooking. • Cook on thickness 2 160 25 ... 35 1 175 25 ... 30 2 175 1 180 1 150 1 190 1 200 25 I EN 15 ... 20 20 ... 25 2-3 hours 20 ... 30 25 ... 30 Cooking guide for top oven using taller cookware. • Preheat oven first. • When removing tray...
... temperature lamp is switched off position "0" (top). Turn function knob to temperature of food, thickness, type and your own preference of cooking. • Cook on thickness 2 160 25 ... 35 1 175 25 ... 30 2 175 1 180 1 150 1 190 1 200 25 I EN 15 ... 20 20 ... 25 2-3 hours 20 ... 30 25 ... 30 Cooking guide for top oven using taller cookware. • Preheat oven first. • When removing tray...
User Manual
Page 27
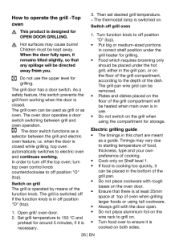
...). 1. Electric grilling guide • The timings in off the top oven; The oven door operates a door switch switching between the grill and electric oven feature, i.e. The grill pan wire grid can be removed. • Plates and dishes placed on the floor of cooking. • Cook only on Shelf level 1. • If food is cooking too quickly, it is cooked on the grill when using tall cookware. • Always grill with the door open...
...). 1. Electric grilling guide • The timings in off the top oven; The oven door operates a door switch switching between the grill and electric oven feature, i.e. The grill pan wire grid can be removed. • Plates and dishes placed on the floor of cooking. • Cook only on Shelf level 1. • If food is cooking too quickly, it is cooked on the grill when using tall cookware. • Always grill with the door open...

User Manual
Page 29
... permanently damaged. Cleaning the control panel [I EN Cleaning the oven No oven cleaner or any abrasive cleaning materials! They could damage the ceramic glass surface next time the hob is recommended to wipe the oven with small amounts of the control panel! Maintenance and care General information A Risk of time. in this way it work in for cleaning. It is used ). Do not remove the control knobs for cleaning the appliance...
... permanently damaged. Cleaning the control panel [I EN Cleaning the oven No oven cleaner or any abrasive cleaning materials! They could damage the ceramic glass surface next time the hob is recommended to wipe the oven with small amounts of the control panel! Maintenance and care General information A Risk of time. in this way it work in for cleaning. It is used ). Do not remove the control knobs for cleaning the appliance...

User Manual
Page 31
... be removed for cleaning. • Open the oven door. • Remove the metal part (1) by removing two screws that secure it. • To remove the plastic holders (2) , use a flat metal or plastic, e.g., a knife, slotted screwdriver, to avoid the risk of an electrical shock. Switch off and cooled down in arrow direction. 2 4 3 2 5 2 • Pull the inner glass panel (3) towards yourself until it detaches from diagram. 1. Refit the glass cover...
... be removed for cleaning. • Open the oven door. • Remove the metal part (1) by removing two screws that secure it. • To remove the plastic holders (2) , use a flat metal or plastic, e.g., a knife, slotted screwdriver, to avoid the risk of an electrical shock. Switch off and cooled down in arrow direction. 2 4 3 2 5 2 • Pull the inner glass panel (3) towards yourself until it detaches from diagram. 1. Refit the glass cover...
User Manual
Page 32
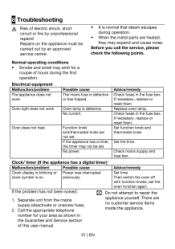
... service items inside the appliance. If necessary, replace or reset them . Check mains supply and fuse box. Separate unit from the mains supply (deactivate or unscrew fuse). 2. Repairs on . Replace oven lamp. Check fuses in the fuse box. Clock/ timer (If the appliance has a digital timer) Malfunction/problem Possible cause Advice/remedy Clock display is blinking or Power was interrupted Set time clock symbol is normal that steam escapes during the first operation. 8 Troubleshooting Risk of electric...
... service items inside the appliance. If necessary, replace or reset them . Check mains supply and fuse box. Separate unit from the mains supply (deactivate or unscrew fuse). 2. Repairs on . Replace oven lamp. Check fuses in the fuse box. Clock/ timer (If the appliance has a digital timer) Malfunction/problem Possible cause Advice/remedy Clock display is blinking or Power was interrupted Set time clock symbol is normal that steam escapes during the first operation. 8 Troubleshooting Risk of electric...
User Manual
Page 33
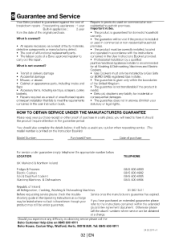
... 0845 600 4905 0845 600 4906 Republic of a Beko approved repairer to products used in a safe place; If you experience any liability for all functional replacement parts. • The labour costs of Ireland All Refrigeration, Cooking, Washing & Dishwashing Machines 01 862 3411 Before requesting service please check the troubleshooting guide in the Operating Instructions as a result of purchase in commercial or non...
... 0845 600 4905 0845 600 4906 Republic of a Beko approved repairer to products used in a safe place; If you experience any liability for all functional replacement parts. • The labour costs of Ireland All Refrigeration, Cooking, Washing & Dishwashing Machines 01 862 3411 Before requesting service please check the troubleshooting guide in the Operating Instructions as a result of purchase in commercial or non...


