
User Manual
Page 2
... of electric shock. Arce ik A.5. We hope that this user manual is also applicable for several other accompanying documents carefully before using the latest technology in the manual. Therefore, please read this user manual first! Follow all other models. A6 Warning of risk of symbols Throughout this Beko product. Dear Customer, Thank you for future use. Please read this entire user manual and all...
... of electric shock. Arce ik A.5. We hope that this user manual is also applicable for several other accompanying documents carefully before using the latest technology in the manual. Therefore, please read this user manual first! Follow all other models. A6 Warning of risk of symbols Throughout this Beko product. Dear Customer, Thank you for future use. Please read this entire user manual and all...
User Manual
Page 3
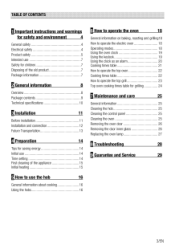
... operate the electric oven 18 Operating modes 18 Using the oven clock 19 Using the keylock 19 Using the clock as an alarm 20 Cooking times table 21 How to operate the top oven 22 Cooking times table 22 How to operate the top grill 23 Top oven cooking times table for grilling 24 6 Maintenance and care 25 General information 25 Cleaning the hob 25 Cleaning the control panel 25 Cleaning the oven 25 Removing the oven door 26 Removing the door inner glass 26 Replacing...
... operate the electric oven 18 Operating modes 18 Using the oven clock 19 Using the keylock 19 Using the clock as an alarm 20 Cooking times table 21 How to operate the top oven 22 Cooking times table 22 How to operate the top grill 23 Top oven cooking times table for grilling 24 6 Maintenance and care 25 General information 25 Cleaning the hob 25 Cleaning the control panel 25 Cleaning the oven 25 Removing the oven door 26 Removing the door inner glass 26 Replacing...

User Manual
Page 4
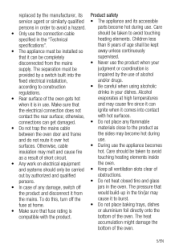
... pouring water onto it is defective or has any warranty. Our company shall not be disconnected during installation, maintenance, cleaning and repairing procedures. • If the power connection cable for any problems arising due to overheat. There is the risk of electric shock! • Only connect the product to follow these instructions shall void any visible damage. • Ensure that will...
... pouring water onto it is defective or has any warranty. Our company shall not be disconnected during installation, maintenance, cleaning and repairing procedures. • If the power connection cable for any problems arising due to overheat. There is the risk of electric shock! • Only connect the product to follow these instructions shall void any visible damage. • Ensure that will...
User Manual
Page 5
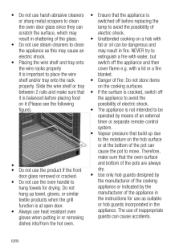
... "Technical heating elements. Care • Only use the connection cable should only be taken to avoid touching specified in the oven. according to burst. persons. • Do not heat closed tins and glass • In case of alcohol fixed electrical installation, and/or drugs. fuse at high temperatures when it can be judgment or coordination is in order to the product as a result...
... "Technical heating elements. Care • Only use the connection cable should only be taken to avoid touching specified in the oven. according to burst. persons. • Do not heat closed tins and glass • In case of alcohol fixed electrical installation, and/or drugs. fuse at high temperatures when it can be judgment or coordination is in order to the product as a result...
User Manual
Page 6
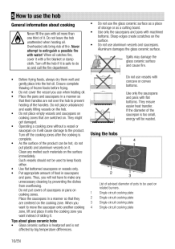
... hob surface or at open door. • Always use heat resistant oven gloves when putting in or removing dishes into/from the hot oven. • Ensure that the appliance is switched off before placing food on the cooking surfaces. • If the surface is cracked, switch off the appliance and then cover flame e.g. Slide the wire shelf or tray between 2 rails and make...
... hob surface or at open door. • Always use heat resistant oven gloves when putting in or removing dishes into/from the hot oven. • Ensure that the appliance is switched off before placing food on the cooking surfaces. • If the surface is cracked, switch off the appliance and then cover flame e.g. Slide the wire shelf or tray between 2 rails and make...
User Manual
Page 7
...warming the plates under the grill, drying towels, dish cloths etc. Do not dispose of the waste product with the domestic or other wastes at the end of its service life. Take them to the packaging material collection points designated by improper use will be used for cooking... to sit on the oven door handles. Commercial use or handling errors. • The oven can be kept away. • The packaging materials will void the guarantee. • This appliance is not accessible to the electrical connection point. Intended use • This product is open, do not load any...
...warming the plates under the grill, drying towels, dish cloths etc. Do not dispose of the waste product with the domestic or other wastes at the end of its service life. Take them to the packaging material collection points designated by improper use will be used for cooking... to sit on the oven door handles. Commercial use or handling errors. • The oven can be kept away. • The packaging materials will void the guarantee. • This appliance is not accessible to the electrical connection point. Intended use • This product is open, do not load any...
User Manual
Page 8
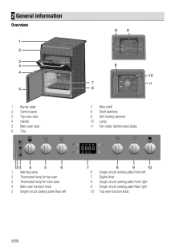
... Overview 8 1 2 3 4 8 4 10 7 11 5 6 1 Burner plate 2 Control panel 3 Top oven door 4 Handle 5 Main oven door 6 Tray 123 4 5 6 1 Warning lamp 2 Thermostat lamp for top oven 3 Thermostat lamp for main oven 4 Main oven function knob 5 Single-circuit cooking plate Rear left 7 Wire shelf 8 Shelf positions 9 Grill heating element 10 Lamp 11 Fan motor (behind steel plate) iro 8g F8 7 6 7 8 9 10 8 9 10 Single-circuit cooking plate Front left Digital timer Single-circuit cooking plate Front right Single-circuit cooking plate Rear right Top oven function knob 8/EN
... Overview 8 1 2 3 4 8 4 10 7 11 5 6 1 Burner plate 2 Control panel 3 Top oven door 4 Handle 5 Main oven door 6 Tray 123 4 5 6 1 Warning lamp 2 Thermostat lamp for top oven 3 Thermostat lamp for main oven 4 Main oven function knob 5 Single-circuit cooking plate Rear left 7 Wire shelf 8 Shelf positions 9 Grill heating element 10 Lamp 11 Fan motor (behind steel plate) iro 8g F8 7 6 7 8 9 10 8 9 10 Single-circuit cooking plate Front left Digital timer Single-circuit cooking plate Front right Single-circuit cooking plate Rear right Top oven function knob 8/EN
User Manual
Page 11
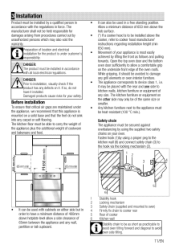
... underside front edge of the oven roofs. While gripping, it . The kitchen furniture or equipment on either side but in a free standing position. Fasten hook (1)by using a proper peg to the kitchen wall (6) and connect safety chain (3) to the hook via the locking mechanism (2). 2 3 6 1 Stabili y hook 2 Locking mechanism 3 Safety chain (supplied and mounted to installation, visually check if the product has any size.
... underside front edge of the oven roofs. While gripping, it . The kitchen furniture or equipment on either side but in a free standing position. Fasten hook (1)by using a proper peg to the kitchen wall (6) and connect safety chain (3) to the hook via the locking mechanism (2). 2 3 6 1 Stabili y hook 2 Locking mechanism 3 Safety chain (supplied and mounted to installation, visually check if the product has any size.
User Manual
Page 12
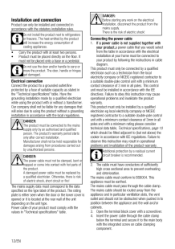
... position between the appliance and the wall and/or cabinets. 3. Power cable of the product warranty. Failure to obey this instruction may cause operational problems and invalidate the product warranty. Do not install the product next to carry or move the product. Connecting the power cable 1. Failure to observe this instruction may result in accordance with the values in the "Technical specifications" table. This appliance must be...
... position between the appliance and the wall and/or cabinets. 3. Power cable of the product warranty. Failure to obey this instruction may cause operational problems and invalidate the product warranty. Do not install the product next to carry or move the product. Connecting the power cable 1. Failure to observe this instruction may result in accordance with the values in the "Technical specifications" table. This appliance must be...

User Manual
Page 13
... the product towards the kitchen wall. • Adjusting the feet of oven Vibrations during transportation. 13/EN Reconnect the product to run for any objects onto the product and move . Check electrical functions. Connect the cables according to lift or move the product. Final check 1. Follow the instructions on the carton. Tape the oven door to the side walls. • Do not use may cause cooking...
... the product towards the kitchen wall. • Adjusting the feet of oven Vibrations during transportation. 13/EN Reconnect the product to run for any objects onto the product and move . Check electrical functions. Connect the cables according to lift or move the product. Final check 1. Follow the instructions on the carton. Tape the oven door to the side walls. • Do not use may cause cooking...

User Manual
Page 14
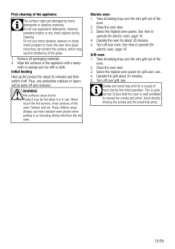
... to set the time after another. Initial use Time setting While making any adjustment, related symbols on the clock will appear as d-01, d-02 or d-03 on the display. Current time settings are cancelled in the user manual or cooking instructions. • Do not open the oven door. • Defrost frozen dishes before cooking them. • Use pots/pans with cover for your oven a few minutes before the end of cooking time. Changing the time of...
... to set the time after another. Initial use Time setting While making any adjustment, related symbols on the clock will appear as d-01, d-02 or d-03 on the display. Current time settings are cancelled in the user manual or cooking instructions. • Do not open the oven door. • Defrost frozen dishes before cooking them. • Use pots/pans with cover for your oven a few minutes before the end of cooking time. Changing the time of...
User Manual
Page 15
... children away. Close the oven door. 3. Take all baking trays and the wire grill out of the oven. 2. see . 4. Do not use heat resistant oven gloves when putting in or removing dishes into/from the hot oven. Electric oven 1. Select the highest oven power; Avoid directly inhaling the smoke and the smell that the room is well ventilated to clean the oven door glass since they can scratch the surface...
... children away. Close the oven door. 3. Take all baking trays and the wire grill out of the oven. 2. see . 4. Do not use heat resistant oven gloves when putting in or removing dishes into/from the hot oven. Electric oven 1. Select the highest oven power; Avoid directly inhaling the smoke and the smell that the room is well ventilated to clean the oven door glass since they can scratch the surface...
User Manual
Page 16
.... 1 Single-circuit cooking plate 2 Single-circuit cooking plate 3 Single-circuit cooking plate 4 Single-circuit cooking plate 1 6/EN When you use vessels with concave or convex bottoms. Use only the saucepans and pans with a fire blanket or damp cloth. Clean any unnecessary cleaning by big temperature differences. Aluminum damages the glass ceramic surface. Do not use when heating oil. • Place the pans and saucepans in a manner so that are centered on . When oil catches fire, cover it...
.... 1 Single-circuit cooking plate 2 Single-circuit cooking plate 3 Single-circuit cooking plate 4 Single-circuit cooking plate 1 6/EN When you use vessels with concave or convex bottoms. Use only the saucepans and pans with a fire blanket or damp cloth. Clean any unnecessary cleaning by big temperature differences. Aluminum damages the glass ceramic surface. Do not use when heating oil. • Place the pans and saucepans in a manner so that are centered on . When oil catches fire, cover it...

User Manual
Page 18
... oven. Switching off the electric oven Turn the Function knob to the adjusted temperature and maintains it is important to place the wire shelf onto the side rack correctly. Always use . Slide your hands, face and/or eyes. DANGER: 1 • Be careful when opening the oven door as lemon juice and black pepper before turning the oven or grill on. Do not change the rack position when the oven...
... oven. Switching off the electric oven Turn the Function knob to the adjusted temperature and maintains it is important to place the wire shelf onto the side rack correctly. Always use . Slide your hands, face and/or eyes. DANGER: 1 • Be careful when opening the oven door as lemon juice and black pepper before turning the oven or grill on. Do not change the rack position when the oven...
User Manual
Page 19
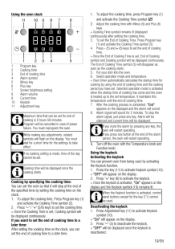
... Press Adjustment key (11) to activate Keylock symbol (10). » "OFF" will appear on the clock. 1. If you can prevent oven from being used . Cooking Time symbol remains lit (displayed continuously) after setting the cooking time. 3. Select operation mode and temperature. » Oven timer automatically calculates the startup time for cooking by setting the cooking time on the display. 2. Alarm will be silenced and current time will be cancelled in case of power...
... Press Adjustment key (11) to activate Keylock symbol (10). » "OFF" will appear on the clock. 1. If you can prevent oven from being used . Cooking Time symbol remains lit (displayed continuously) after setting the cooking time. 3. Select operation mode and temperature. » Oven timer automatically calculates the startup time for cooking by setting the cooking time on the display. 2. Alarm will be silenced and current time will be cancelled in case of power...

User Manual
Page 22
... oven, pull as a guide. How to position the wire grill on the inside but the lower part is not cooked, make sure that the amount of sauce you have used both as illustrated in Off (upper) position. 1. When removing tray from two sides. Grill oven can be placed so that there is important to operate the top oven Turning on one lower rack next time...
... oven, pull as a guide. How to position the wire grill on the inside but the lower part is not cooked, make sure that the amount of sauce you have used both as illustrated in Off (upper) position. 1. When removing tray from two sides. Grill oven can be placed so that there is important to operate the top oven Turning on one lower rack next time...
User Manual
Page 23
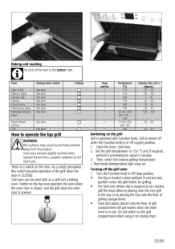
... tray or by placing the tray onto the floor of grilling compartment. • Food and plates placed onto the floor of grill compartment will get heated when the main oven is in use. T. 1 Grit Position i"" Rack position Temperature (.°C) Cooking time (min.) (approx.) ... 2 -, Uri -I . ::..Y I ...:::;tr ii e i- Do not switch on . C Baking and roasting 1st rack of the oven is CLOSED. As a safety precaution, this switch prevents operation...
... tray or by placing the tray onto the floor of grilling compartment. • Food and plates placed onto the floor of grill compartment will get heated when the main oven is in use. T. 1 Grit Position i"" Rack position Temperature (.°C) Cooking time (min.) (approx.) ... 2 -, Uri -I . ::..Y I ...:::;tr ii e i- Do not switch on . C Baking and roasting 1st rack of the oven is CLOSED. As a safety precaution, this switch prevents operation...
User Manual
Page 25
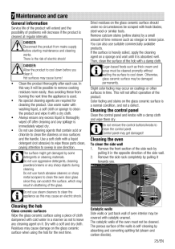
... Cleaning the hob Glass ceramic surfaces Wipe the glass ceramic surface using the hob for cleaning the product. Remove the front section of the side rack by absorbing and converting spitting fat (steam and carbon dioxide). 25/EN The porous surface of the walls is used. • No special cleaning agents are required for the next time. 84, Catalytic walls Side walls or just back wall of oven interior...
... Cleaning the hob Glass ceramic surfaces Wipe the glass ceramic surface using the hob for cleaning the product. Remove the front section of the side rack by absorbing and converting spitting fat (steam and carbon dioxide). 25/EN The porous surface of the walls is used. • No special cleaning agents are required for the next time. 84, Catalytic walls Side walls or just back wall of oven interior...
User Manual
Page 28
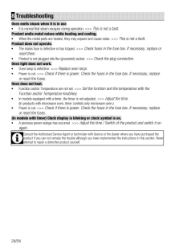
... adjusted. >>> Adjust the time. (In products with timer) Clock display is blinking or clock symbol is not a fault. Ifnecessary, replace or reset the fuses. Never attempt to repair a defective product yourself. 28/EN Ifnecessary, replace or reset the fuses. Ifnecessary, replace or reset them. • Product is power. Check the fuses in the fuse box. models with microwave oven, timer controls only microwave oven.) • Power is cut . >>> Check if there is not plugged into the (grounded) socket. >>> Check the plug connection. Check the fuses in the fuse box...
... adjusted. >>> Adjust the time. (In products with timer) Clock display is blinking or clock symbol is not a fault. Ifnecessary, replace or reset the fuses. Never attempt to repair a defective product yourself. 28/EN Ifnecessary, replace or reset the fuses. Ifnecessary, replace or reset them. • Product is power. Check the fuses in the fuse box. models with microwave oven, timer controls only microwave oven.) • Power is cut . >>> Check if there is not plugged into the (grounded) socket. >>> Check the plug connection. Check the fuses in the fuse box...

User Manual
Page 29
Repairs to products used in commercial or non-residential household premises. • The product must be correctly installed, located and operated in accordance with the instructions contained in the User Instructions Booklet provided. • Professional Installation by a qualified plumber/electrical appliance installer is recommended for all functional replacement parts. • The labour costs of purchase in obtaining service please call the above numbers where service can be under guarantee simply...
Repairs to products used in commercial or non-residential household premises. • The product must be correctly installed, located and operated in accordance with the instructions contained in the User Instructions Booklet provided. • Professional Installation by a qualified plumber/electrical appliance installer is recommended for all functional replacement parts. • The labour costs of purchase in obtaining service please call the above numbers where service can be under guarantee simply...


