
User Manual
Page 2
... electric shock. Therefore, please read this user manual is also applicable for several other accompanying documents carefully before using the product and keep it as well. Remember that you for future use. Karac@ac caddesi No:2-6 34445 &itluce/Istanbul/TURKEY Made in the manual. Please read this entire user manual and all warnings and information in the user manual. Follow all other models...
... electric shock. Therefore, please read this user manual is also applicable for several other accompanying documents carefully before using the product and keep it as well. Remember that you for future use. Karac@ac caddesi No:2-6 34445 &itluce/Istanbul/TURKEY Made in the manual. Please read this entire user manual and all warnings and information in the user manual. Follow all other models...
User Manual
Page 3
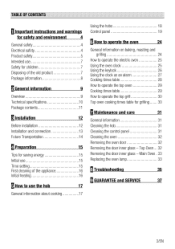
... electric oven 25 Using the oven clock 25 Using the keylock 26 Using the clock as an alarm 27 Cooking times table 28 How to operate the top oven 29 Cooking times table 29 How to operate the top grill 30 Top oven cooking times table for grilling 30 El Maintenance and care 31 General information 31 Cleaning the hob 31 Cleaning the control panel 31 Cleaning the oven 32 Removing the oven door 32 Removing the door inner glass - Main Oven 33 Replacing...
... electric oven 25 Using the oven clock 25 Using the keylock 26 Using the clock as an alarm 27 Cooking times table 28 How to operate the top oven 29 Cooking times table 29 How to operate the top grill 30 Top oven cooking times table for grilling 30 El Maintenance and care 31 General information 31 Cleaning the hob 31 Cleaning the control panel 31 Cleaning the oven 32 Removing the oven door 32 Removing the door inner glass - Main Oven 33 Replacing...

User Manual
Page 4
... This will cause electrical parts to overheat. Failure to follow these instructions shall void any problems arising due to a grounded outlet/line with your product. • Installation and repair procedures must be performed by the Authorized Service Agent. There is the risk of electric shock! • Only connect the product to the product not being earthed in the "Technical specifications". Important instructions and warnings...
... This will cause electrical parts to overheat. Failure to follow these instructions shall void any problems arising due to a grounded outlet/line with your product. • Installation and repair procedures must be performed by the Authorized Service Agent. There is the risk of electric shock! • Only connect the product to the product not being earthed in the "Technical specifications". Important instructions and warnings...
User Manual
Page 6
... surface is at open door. • Always use heat resistant oven gloves when putting in or removing dishes into/from the hot oven. • Ensure that provides both time and money savings must be used with pots suitable for people who use the product if the front door glass removed or cracked. • Oven handle is switched off the appliance and then cover flame e.g. General information about cooking, page 17...
... surface is at open door. • Always use heat resistant oven gloves when putting in or removing dishes into/from the hot oven. • Ensure that provides both time and money savings must be used with pots suitable for people who use the product if the front door glass removed or cracked. • Oven handle is switched off the appliance and then cover flame e.g. General information about cooking, page 17...
User Manual
Page 7
... use • This product is designed for waste electrical and electronic equipment (WEEE). by improper use or handling errors. • The oven can be liable for any items above the appliance that children may get damaged. Please dispose of all electrical connections are dangerous to children. This product bears a classification symbol for domestic use. This product should also not be used for room heating...
... use • This product is designed for waste electrical and electronic equipment (WEEE). by improper use or handling errors. • The oven can be liable for any items above the appliance that children may get damaged. Please dispose of all electrical connections are dangerous to children. This product bears a classification symbol for domestic use. This product should also not be used for room heating...
User Manual
Page 13
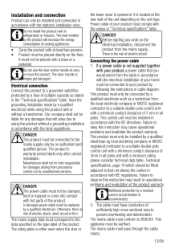
The door, handle or hinges get damaged. Manufacturer shall not be installed in the "Technical specifications" table. Ag DANGER •T The power cable must have conductors of the product. The rating plate is either seen when the door or the lower cover is opened or it is located at your product must be held responsible for any work on the unit type. The cable must not...
The door, handle or hinges get damaged. Manufacturer shall not be installed in the "Technical specifications" table. Ag DANGER •T The power cable must have conductors of the product. The rating plate is either seen when the door or the lower cover is opened or it is located at your product must be held responsible for any work on the unit type. The cable must not...
User Manual
Page 14
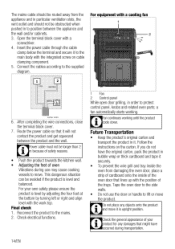
... prevent the wire grill and tray inside of the oven door that lines up with the position of the trays. Open the terminal block cover with a cooling fan NEM' ARTH SUPPLY CORD 6. Reconnect the product to move. Check electrical functions. 1 Fan 2 Control panel While open door grilling, in to position between the product and the wall. This dangerous situation can be avoided if the product is level by adjusting the four...
... prevent the wire grill and tray inside of the oven door that lines up with the position of the trays. Open the terminal block cover with a cooling fan NEM' ARTH SUPPLY CORD 6. Reconnect the product to move. Check electrical functions. 1 Fan 2 Control panel While open door grilling, in to position between the product and the wall. This dangerous situation can be avoided if the product is level by adjusting the four...

User Manual
Page 15
... not open the door of the oven frequently during cooking. • Try to set , time setting ill start and end the cooking by selecting the desired position with cover for the bottom size of power failure. This symbol will flash. To change the time of the day you can cook by switching off your oven a few minutes before cooking them. • Use pots/pans with temperature button and function button. hile making any adjustment...
... not open the door of the oven frequently during cooking. • Try to set , time setting ill start and end the cooking by selecting the desired position with cover for the bottom size of power failure. This symbol will flash. To change the time of the day you can cook by switching off your oven a few minutes before cooking them. • Use pots/pans with temperature button and function button. hile making any adjustment...

User Manual
Page 16
... use aggressive detergents, cleaning powders/creams or any production residues or layers will appear as d-01, d-02 or d-03 on the display. Initial heating Heat up the product for grill oven. 4. Keep children away. Remove all baking trays and the wire grill out of the oven. 2. Operate the oven for screen brightness adjustment. 2. Close the oven door. 3. Never touch the hot burners, inner sections of the glass. 1. Take all baking trays...
... use aggressive detergents, cleaning powders/creams or any production residues or layers will appear as d-01, d-02 or d-03 on the display. Initial heating Heat up the product for grill oven. 4. Keep children away. Remove all baking trays and the wire grill out of the oven. 2. Operate the oven for screen brightness adjustment. 2. Close the oven door. 3. Never touch the hot burners, inner sections of the glass. 1. Take all baking trays...
User Manual
Page 19
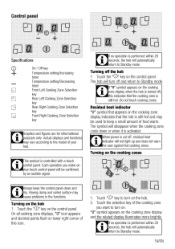
... heat indicator "H" symbol that appears on the control panel. Control panel r Specifications On / Off key Temperature setting/Increasing timer Temperature setting/Decreasing timer of L 1. Having damp and soiled surface may vary according to turn on the cooking zone display and the related display illuminates more brightly f no operation is controlled with a touch ontrol panel. Touch the "0" key on the hob 1. ways keep a small amount of your hob. Turning off , his product...
... heat indicator "H" symbol that appears on the control panel. Control panel r Specifications On / Off key Temperature setting/Increasing timer Temperature setting/Decreasing timer of L 1. Having damp and soiled surface may vary according to turn on the cooking zone display and the related display illuminates more brightly f no operation is controlled with a touch ontrol panel. Touch the "0" key on the hob 1. ways keep a small amount of your hob. Turning off , his product...

User Manual
Page 20
... to operate at level "9". 20/EN By using the turning off the cooking zones: A cooking zone can protect the hob by child lock to prevent children from changing hob functions. Child lock function will turn on High Power (Booster): 1. Cooking zone goes out of If any key on all displays. Child lock can switch off the cooking zone assigned to activate the child lock. Setting the temperature level...
... to operate at level "9". 20/EN By using the turning off the cooking zones: A cooking zone can protect the hob by child lock to prevent children from changing hob functions. Child lock function will turn on High Power (Booster): 1. Cooking zone goes out of If any key on all displays. Child lock can switch off the cooking zone assigned to activate the child lock. Setting the temperature level...

User Manual
Page 22
... 5 minutes (') (') The hob will automatically turn on the model. Touch "+" and "-" keys simultaneously to activate the timer. 3. It operates more cooking zones are left rear cooking zone displays serve as timer display when the timer is turned off . 1. Turning off the timers earlier If you maximum usage safety. Using induction cooking zones safely and efficiently Operating principles: Induction hob heats directly the cooking vessel as a feature of 160, 200...
... 5 minutes (') (') The hob will automatically turn on the model. Touch "+" and "-" keys simultaneously to activate the timer. 3. It operates more cooking zones are left rear cooking zone displays serve as timer display when the timer is turned off . 1. Turning off the timers earlier If you maximum usage safety. Using induction cooking zones safely and efficiently Operating principles: Induction hob heats directly the cooking vessel as a feature of 160, 200...
User Manual
Page 23
... of the operating principles. • Noise can cause noise. • In low levels, a regular on the touch control panel, see Table-2. However, this sound will be observed. 23/EN Operating noisy Some noises may be automatically turned off . • Selected level may drop. Precise power setting Induction hob reacts the commands immediately as a feature of the touch control panel clean. It changes the power settings very...
... of the operating principles. • Noise can cause noise. • In low levels, a regular on the touch control panel, see Table-2. However, this sound will be observed. 23/EN Operating noisy Some noises may be automatically turned off . • Selected level may drop. Precise power setting Induction hob reacts the commands immediately as a feature of the touch control panel clean. It changes the power settings very...

User Manual
Page 25
... take effect. Switching off the electric oven Turn the Function knob to operate the main oven Select temperature and operating mode L1. Do not let the wire shelf stand against the rear wall of the oven, Slide your wire shelf to the front section of the rack and settle it . Wire shelf must ait for a short time for each oven. • Remove meat from oven once cooked and stand covered in foil...
... take effect. Switching off the electric oven Turn the Function knob to operate the main oven Select temperature and operating mode L1. Do not let the wire shelf stand against the rear wall of the oven, Slide your wire shelf to the front section of the rack and settle it . Wire shelf must ait for a short time for each oven. • Remove meat from oven once cooked and stand covered in foil...
User Manual
Page 26
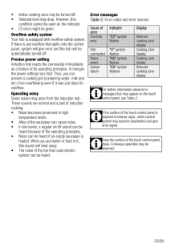
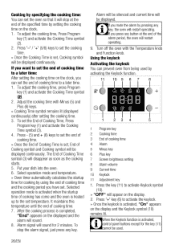
... Cooking Time symbol (2). 2. It maintains this temperature until the end of cooking time and the cooking period you have set. To stop at the end of the alarm period, the oven will restart operating. 9, Turn off the oven with Minus (5) and Plus (6) keys. » Cooking Time symbol remains lit (displayed continuously) after setting the cooking time. 3. Select operation mode and temperature. » Oven timer automatically calculates the startup time for cooking by using the end of cooking time...
... Cooking Time symbol (2). 2. It maintains this temperature until the end of cooking time and the cooking period you have set. To stop at the end of the alarm period, the oven will restart operating. 9, Turn off the oven with Minus (5) and Plus (6) keys. » Cooking Time symbol remains lit (displayed continuously) after setting the cooking time. 3. Select operation mode and temperature. » Oven timer automatically calculates the startup time for cooking by using the end of cooking time...
User Manual
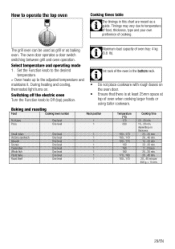
Page 29
... of cooking. Switching off the electric oven Turn the Function knob to Off (top) position. 1st rack of the oven is at least 25mm space at top of oven when cooking larger foods or using taller cookware. Set the Function knob to the desired temperature. » Oven heats up to temperature of food, thickness, type and your own preference of oven tray: 4 kg (8.8 Ib). During heating and cooling, thermostat light turns...
... of cooking. Switching off the electric oven Turn the Function knob to Off (top) position. 1st rack of the oven is at least 25mm space at top of oven when cooking larger foods or using taller cookware. Set the Function knob to the desired temperature. » Oven heats up to temperature of food, thickness, type and your own preference of oven tray: 4 kg (8.8 Ib). During heating and cooling, thermostat light turns...
User Manual
Page 30
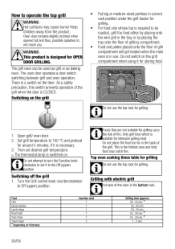
.... # 25...30 min. # 1 3 min. 30/EN Open grill/ oven door. 2. Do not attempt to turn the Function knob lockwise to set desired grill temperature. » The thermostat lamp is required to operate the top grill , WARNING A•v Hot surfaces may catch fire. Switching off the grill 1. Top oven cooking times table for grilling Do not use the top rack for grilling. • For food only...
.... # 25...30 min. # 1 3 min. 30/EN Open grill/ oven door. 2. Do not attempt to turn the Function knob lockwise to set desired grill temperature. » The thermostat lamp is required to operate the top grill , WARNING A•v Hot surfaces may catch fire. Switching off the grill 1. Top oven cooking times table for grilling Do not use the top rack for grilling. • For food only...

User Manual
Page 31
... detergents or cleaning materials. Maintenance and care General information Service life of the product will extend and the possibility of lime remover such as vinegar or lemon juice. Do not use cleaning agents that contain acid or chloride to cool down before starting maintenance and cleaning works. Do not use . Control panel may be scraped with a damp cloth. This will not affect operation of the glass.
... detergents or cleaning materials. Maintenance and care General information Service life of the product will extend and the possibility of lime remover such as vinegar or lemon juice. Do not use cleaning agents that contain acid or chloride to cool down before starting maintenance and cleaning works. Do not use . Control panel may be scraped with a damp cloth. This will not affect operation of the glass.
User Manual
Page 35
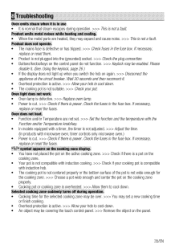
... the fuses in the fuse box. Ifnecessary, replace or reset the fuses. Using the keylock, page 26) • If the display does not light up when you switch the hob on again. >>> Disconnect the appliance at the circuit breaker. Selected cooking zone suddenly turns off during operation. >>> This is not a fault Product emits metal noises while heating and cooling. • When the metal parts are not set a new cooking time or finish cooking. •...
... the fuses in the fuse box. Ifnecessary, replace or reset the fuses. Using the keylock, page 26) • If the display does not light up when you switch the hob on again. >>> Disconnect the appliance at the circuit breaker. Selected cooking zone suddenly turns off during operation. >>> This is not a fault Product emits metal noises while heating and cooling. • When the metal parts are not set a new cooking time or finish cooking. •...
User Manual
Page 37
... ice trays, scrapers, cutlery baskets, • Repairs required as a result of Ireland All Refrigeration, Cooking, Washing & Dishwashing Machines 01 862 3411 Before requesting service please check the troubleshooting guide in the Operating Instructions as a result of faulty materials, defective components or manufacturing defect. • The cost of all Washing & Dishwashing Machines and Electric Cookers • Gas Cookers must be correctly installed, located and operated...
... ice trays, scrapers, cutlery baskets, • Repairs required as a result of Ireland All Refrigeration, Cooking, Washing & Dishwashing Machines 01 862 3411 Before requesting service please check the troubleshooting guide in the Operating Instructions as a result of faulty materials, defective components or manufacturing defect. • The cost of all Washing & Dishwashing Machines and Electric Cookers • Gas Cookers must be correctly installed, located and operated...


