
User Manual
Page 1
Fully Integrated Larder BL20 BL21 BEKO plc Beko House Caxton Way Watford Hertfordshire WD18 8UF Tel: 0845 6004911 Fax: 0845 6004922 e-mail: service@beko.co.uk website: www.beko.co.uk Printed in Turkey Part no: 48 3898 00 03-AG 4.6 cu.ft.
Fully Integrated Larder BL20 BL21 BEKO plc Beko House Caxton Way Watford Hertfordshire WD18 8UF Tel: 0845 6004911 Fax: 0845 6004922 e-mail: service@beko.co.uk website: www.beko.co.uk Printed in Turkey Part no: 48 3898 00 03-AG 4.6 cu.ft.
User Manual
Page 2
... exposed to damage, the cooling circuit / pipes of children. • This fridge must only be used for many years. WARNING- Do not damage the refrigerant circuit. ltrs (cu.ft.) Frozen food compartment rating Conservation time from your appliance it is left in a safe condition to free service during the guarantee period. kg Climate class Operating noise level dB(A) 1 BL20 A 151 128...
... exposed to damage, the cooling circuit / pipes of children. • This fridge must only be used for many years. WARNING- Do not damage the refrigerant circuit. ltrs (cu.ft.) Frozen food compartment rating Conservation time from your appliance it is left in a safe condition to free service during the guarantee period. kg Climate class Operating noise level dB(A) 1 BL20 A 151 128...
User Manual
Page 3
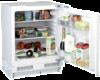
... 1362 fuse of this appliance incorporates a 13 A fuse. CONTENTS PAGE SAFETY FIRST / ELECTRICAL REQUIREMENTS 3 TRANSPORTATION INSTRUCTIONS 4 INSTALLATION INSTRUCTIONS 5 REPOSITIONING THE DOOR 6-7 SUGGESTED ARRANGEMENT OF FOOD IN THE LARDER FRIDGE 8-9 TEMPERATURE CONTROL AND ADJUSTMENT 9 STARTING 10 DEFROSTING 10 CLEANING AND CARE 11 REPLACING THE INTERIOR LIGHT BULB 12 DO'S AND DON'TS 13 PROBLEM SOLVING/TROUBLE SHOOTING 13 INSTALLATION INSTRUCTIONS - We recommend that the voltage and the frequency shown in doubt contact...
... 1362 fuse of this appliance incorporates a 13 A fuse. CONTENTS PAGE SAFETY FIRST / ELECTRICAL REQUIREMENTS 3 TRANSPORTATION INSTRUCTIONS 4 INSTALLATION INSTRUCTIONS 5 REPOSITIONING THE DOOR 6-7 SUGGESTED ARRANGEMENT OF FOOD IN THE LARDER FRIDGE 8-9 TEMPERATURE CONTROL AND ADJUSTMENT 9 STARTING 10 DEFROSTING 10 CLEANING AND CARE 11 REPLACING THE INTERIOR LIGHT BULB 12 DO'S AND DON'TS 13 PROBLEM SOLVING/TROUBLE SHOOTING 13 INSTALLATION INSTRUCTIONS - We recommend that the voltage and the frequency shown in doubt contact...
User Manual
Page 4
... a smooth surface. "IMPORTANT: Make sure that , your appliance is standing upright adjust the four front and back feet by the door or handle. IMPORTANT INSTALLATION INSTRUCTIONS 1. To ensure that mains cable is in the drain tray before moving see section "Defrosting" and "Cleaning & Care" for use . If during transportation. 2. After bringing it must only be operated for stacking with any water in firm contact with...
... a smooth surface. "IMPORTANT: Make sure that , your appliance is standing upright adjust the four front and back feet by the door or handle. IMPORTANT INSTALLATION INSTRUCTIONS 1. To ensure that mains cable is in the drain tray before moving see section "Defrosting" and "Cleaning & Care" for use . If during transportation. 2. After bringing it must only be operated for stacking with any water in firm contact with...
User Manual
Page 5
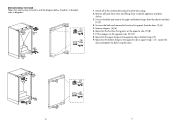
... remove the furniture fixing parts from the cabinet and door. (1) (2) 4. Reposition the upper hinge on the opposite side as bottom hinge (12) 9. Remove all food, loose items and fittings from inside the appliance and door shelves. 3. Reposition the furniture fixing parts on the opposite side. (9) (10) 8. Numbers in brackets refer to diagrams. 5 1 2 6 1 3 4 2 1. Remove stoppers. (5) (6) 6. Reposition the bottom hinge on the opposite side as upper hinge. (11) Locate the door...
... remove the furniture fixing parts from the cabinet and door. (1) (2) 4. Reposition the upper hinge on the opposite side as bottom hinge (12) 9. Remove all food, loose items and fittings from inside the appliance and door shelves. 3. Reposition the furniture fixing parts on the opposite side. (9) (10) 8. Numbers in brackets refer to diagrams. 5 1 2 6 1 3 4 2 1. Remove stoppers. (5) (6) 6. Reposition the bottom hinge on the opposite side as upper hinge. (11) Locate the door...
User Manual
Page 6
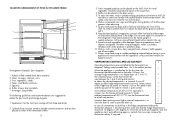
... after use. 0 In case of 25°C (77°F) turn the thermostat knob towards 5 you may increase the thermostat setting, if required. 9 Shelves, racks, crisper bins, dairy compartments, drawers, bottle grippers are best placed on the shelf. Settings may be stored in the fridge compartment reduce the thermostat setting to avoid contamination. Under ambient temperatures of a temporary ice build up disappears and the appliance starts auto defrosting...
... after use. 0 In case of 25°C (77°F) turn the thermostat knob towards 5 you may increase the thermostat setting, if required. 9 Shelves, racks, crisper bins, dairy compartments, drawers, bottle grippers are best placed on the shelf. Settings may be stored in the fridge compartment reduce the thermostat setting to avoid contamination. Under ambient temperatures of a temporary ice build up disappears and the appliance starts auto defrosting...
User Manual
Page 7
... ; The feet have blocked the drain tube. Wait until the correct storage temperature has been reached. The defrosting water runs to one pint of door tray : • To remove a door tray, remove all food, clean it and leave the door ajar. ** Check door seals regularly to hot temperatures in a special container (1) at the back of the larder fridge where concealed evaporator is completed. Clean the interior as recommended under "CLEANING AND CARE." 4. The...
... ; The feet have blocked the drain tube. Wait until the correct storage temperature has been reached. The defrosting water runs to one pint of door tray : • To remove a door tray, remove all food, clean it and leave the door ajar. ** Check door seals regularly to hot temperatures in a special container (1) at the back of the larder fridge where concealed evaporator is completed. Clean the interior as recommended under "CLEANING AND CARE." 4. The...
User Manual
Page 8
... mineral water before eating. Store bananas in the larder refrigerator. PROBLEM SOLVING/TROUBLE SHOOTING If the appliance does not operate when switched on, check; • The plug is inserted properly in your fridge. REPLACING THE INTERIOR LIGHT BULB (See diagram) Should the light fail to work obtain a replacement E14 screw cap type 15 Watt (Max) bulb from a good local electrical or DIY store." Replace the burnt-out light bulb. 4. Do- Don't- Remove the light diffuser cover as...
... mineral water before eating. Store bananas in the larder refrigerator. PROBLEM SOLVING/TROUBLE SHOOTING If the appliance does not operate when switched on, check; • The plug is inserted properly in your fridge. REPLACING THE INTERIOR LIGHT BULB (See diagram) Should the light fail to work obtain a replacement E14 screw cap type 15 Watt (Max) bulb from a good local electrical or DIY store." Replace the burnt-out light bulb. 4. Do- Don't- Remove the light diffuser cover as...
User Manual
Page 9
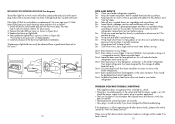
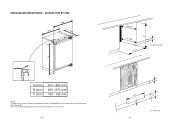
DETAILED STEP BY STEP 598 595 545 A A (mm) B (mm) C (mm) 813 - 863 mm 820 - 870 mm 100 - 150 mm NOTE 1) Height of the product can be adjusted by the help of adjustable feet (front and back) to fit the furniture niche height (B). 2) Do not operate this appliance until it has been installed in the furniture. 14 min.550 min.550 min. 600 B C C=100-150 mm C 600 15 C D D > 150 mm. INSTALLATION INSTRUCTIONS -
DETAILED STEP BY STEP 598 595 545 A A (mm) B (mm) C (mm) 813 - 863 mm 820 - 870 mm 100 - 150 mm NOTE 1) Height of the product can be adjusted by the help of adjustable feet (front and back) to fit the furniture niche height (B). 2) Do not operate this appliance until it has been installed in the furniture. 14 min.550 min.550 min. 600 B C C=100-150 mm C 600 15 C D D > 150 mm. INSTALLATION INSTRUCTIONS -
User Manual
Page 10
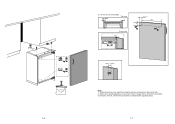
A E Top view E Front view 40 + A 505 5 6 min. 4 mm Note: 1. These dimensions are valid for opposite sides. 17 1 4 2 3 16 B B E = 3 mm is , dimensions should be considered for products,which are hinged on right hand side. 2. That is recommended. When door opening direction is reversed, mirror image of this instruction should be considered.
A E Top view E Front view 40 + A 505 5 6 min. 4 mm Note: 1. These dimensions are valid for opposite sides. 17 1 4 2 3 16 B B E = 3 mm is , dimensions should be considered for products,which are hinged on right hand side. 2. That is recommended. When door opening direction is reversed, mirror image of this instruction should be considered.
User Manual
Page 12
..., ice trays, scrapers, cutlery baskets, filters and light bulbs. • Repairs required as a result of Ireland All Refrigeration, All Cookers Washing Machines & Dishwashers 0845 6004903 0845 6004902 0845 6004905 0845 6004906 01 862 3411 Before requesting service please check the trouble-shooting guide in the Operating Instructions as a result of faulty materials, defective components or manufacturing defect. • The cost of functional replacement parts, but...
..., ice trays, scrapers, cutlery baskets, filters and light bulbs. • Repairs required as a result of Ireland All Refrigeration, All Cookers Washing Machines & Dishwashers 0845 6004903 0845 6004902 0845 6004905 0845 6004906 01 862 3411 Before requesting service please check the trouble-shooting guide in the Operating Instructions as a result of faulty materials, defective components or manufacturing defect. • The cost of functional replacement parts, but...

