User Manual
Page 5
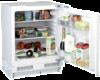
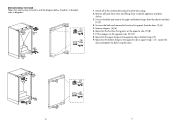
... the cabinet and door. (1) (2) 4. Unscrew the bolts and remove the upper and bottom hinges from inside the appliance and door shelves. 3. Fit the stoppers on the opposite side as bottom hinge (12) 9. Unscrew the bolts and remove the furniture fixing parts from the door. (3) ... 6 1 3 4 2 1. Reposition the furniture fixing parts on the opposite side as upper hinge. (11) Locate the door and tighten the bolts fixing the door. 9 11 11 7 8 10 12 12 6 7 Reposition the upper hinge on the opposite side. (7) (8) 7. REPOSITIONING THE DOOR Follow the step by step instructions and...
... the cabinet and door. (1) (2) 4. Unscrew the bolts and remove the upper and bottom hinges from inside the appliance and door shelves. 3. Fit the stoppers on the opposite side as bottom hinge (12) 9. Unscrew the bolts and remove the furniture fixing parts from the door. (3) ... 6 1 3 4 2 1. Reposition the furniture fixing parts on the opposite side as upper hinge. (11) Locate the door and tighten the bolts fixing the door. 9 11 11 7 8 10 12 12 6 7 Reposition the upper hinge on the opposite side. (7) (8) 7. REPOSITIONING THE DOOR Follow the step by step instructions and...
User Manual
Page 10
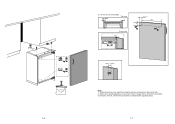
These dimensions are hinged on right hand side. 2. 1 4 2 3 16 B B E = 3 mm is reversed, mirror image of this instruction should be considered. That is, dimensions should be considered for products,which are valid for opposite sides. 17 When door opening direction is recommended. A E Top view E Front view 40 + A 505 5 6 min. 4 mm Note: 1.
These dimensions are hinged on right hand side. 2. 1 4 2 3 16 B B E = 3 mm is reversed, mirror image of this instruction should be considered. That is, dimensions should be considered for products,which are valid for opposite sides. 17 When door opening direction is recommended. A E Top view E Front view 40 + A 505 5 6 min. 4 mm Note: 1.