
Owners Manual
Page 1
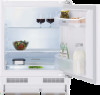
Fully Integrated Larder User Manual BL 20 - BL 21 - BLSF3682 EN / 48 3898 0003 / AN
Fully Integrated Larder User Manual BL 20 - BL 21 - BLSF3682 EN / 48 3898 0003 / AN

Owners Manual
Page 2
... these instructions may invalidate your right to free service during the guarantee period. Do not use . WARNING ! Therefore, take care not to damage, the cooling circuit / pipes of the appliance in transportation and in an unheated, cold room. (E.g.: garage, conservatory, annex, shed, out-house etc.) See item 6 on Page 5. • To obtain the best possible performance and trouble free operation...
... these instructions may invalidate your right to free service during the guarantee period. Do not use . WARNING ! Therefore, take care not to damage, the cooling circuit / pipes of the appliance in transportation and in an unheated, cold room. (E.g.: garage, conservatory, annex, shed, out-house etc.) See item 6 on Page 5. • To obtain the best possible performance and trouble free operation...

Owners Manual
Page 3
... should be obtained from a Beko authorised service agent. If in your socket, then the plug should it need to refit the fuse cover. L BROWN OR 22mm. RED 12mm. 2. CONTENTS SAFETY FIRST / ELECTRICAL REQUIREMENTS TRANSPORTATION INSTRUCTIONS INSTALLATION INSTRUCTIONS REPOSITIONING THE DOOR SUGGESTED ARRANGEMENT OF FOOD IN THE LARDER FRIDGE TEMPERATURE CONTROL AND ADJUSTMENT STARTING DEFROSTING CLEANING AND CARE REPLACING THE INTERIOR LIGHT BULB DO'S AND DON'TS PROBLEM SOLVING/TROUBLE SHOOTING INSTALLATION INSTRUCTIONS - markings identifying the terminals...
... should be obtained from a Beko authorised service agent. If in your socket, then the plug should it need to refit the fuse cover. L BROWN OR 22mm. RED 12mm. 2. CONTENTS SAFETY FIRST / ELECTRICAL REQUIREMENTS TRANSPORTATION INSTRUCTIONS INSTALLATION INSTRUCTIONS REPOSITIONING THE DOOR SUGGESTED ARRANGEMENT OF FOOD IN THE LARDER FRIDGE TEMPERATURE CONTROL AND ADJUSTMENT STARTING DEFROSTING CLEANING AND CARE REPLACING THE INTERIOR LIGHT BULB DO'S AND DON'TS PROBLEM SOLVING/TROUBLE SHOOTING INSTALLATION INSTRUCTIONS - markings identifying the terminals...

Owners Manual
Page 4
... during transportation. 2. Do not attempt to operate in accordance with the controls. Do not allow the system to play with the appliance or tamper with the instructions. 2. IMPORTANT INSTALLATION INSTRUCTIONS 1. The four front and back feet can be adjusted as supplied must be located on its left hand side when standing in an unheated / cold room (E.g.: Conservatory /annex / shed / garage etc...
... during transportation. 2. Do not attempt to operate in accordance with the controls. Do not allow the system to play with the appliance or tamper with the instructions. 2. IMPORTANT INSTALLATION INSTRUCTIONS 1. The four front and back feet can be adjusted as supplied must be located on its left hand side when standing in an unheated / cold room (E.g.: Conservatory /annex / shed / garage etc...

Owners Manual
Page 5
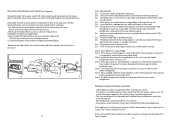
Numbers in brackets refer to diagrams. 1. Unscrew the bolts and remove the furniture fixing parts from inside the appliance and door shelves. 3. Reposition the furniture fixing parts on the opposite side as upper hinge. (11) Locate the door and tighten the bolts fixing the door. 6 7 Reposition the upper hinge on the opposite side. (7) (8) 7. Reposition the bottom hinge on the opposite side. (9) (10) 8. Switch off at the socket outlet and...
Numbers in brackets refer to diagrams. 1. Unscrew the bolts and remove the furniture fixing parts from inside the appliance and door shelves. 3. Reposition the furniture fixing parts on the opposite side as upper hinge. (11) Locate the door and tighten the bolts fixing the door. 6 7 Reposition the upper hinge on the opposite side. (7) (8) 7. Reposition the bottom hinge on the opposite side. (9) (10) 8. Switch off at the socket outlet and...

Owners Manual
Page 6
... adjusted so that the fridge temperature is switched on the shelf. Shelves incorporate rear stops and tilting for the first time, the thermostat should be made from 1 to a half way position. Cooked dishes must be placed on for storing bottles. Bottles can be stored upright in the crisper bins. 4. Settings may be cleaned and stored in sealed containers. Under ambient temperatures of the shelf. Left...
... adjusted so that the fridge temperature is switched on the shelf. Shelves incorporate rear stops and tilting for the first time, the thermostat should be made from 1 to a half way position. Cooked dishes must be placed on for storing bottles. Bottles can be stored upright in the crisper bins. 4. Settings may be cleaned and stored in sealed containers. Under ambient temperatures of the shelf. Left...
Owners Manual
Page 7
... of water to clean the interior and wipe it dry. ** Make sure that no water enters the temperature control box. ** If the larder refrigerator is not going to be cleared by pushing the special plastic plunger provided down the drain tube (2). 2 1 10 CLEANING AND CARE ** We recommend that you set the thermostat knob at the socket outlet and pull out the mains plug before cleaning. ** Never use...
... of water to clean the interior and wipe it dry. ** Make sure that no water enters the temperature control box. ** If the larder refrigerator is not going to be cleared by pushing the special plastic plunger provided down the drain tube (2). 2 1 10 CLEANING AND CARE ** We recommend that you set the thermostat knob at the socket outlet and pull out the mains plug before cleaning. ** Never use...
Owners Manual
Page 8
... larder refrigerator. Consume food which have changed the fitted moulded plug. PROBLEM SOLVING/TROUBLE SHOOTING If the appliance does not operate when switched on, check; • The plug is inserted properly in the socket and that above checks, please refer to the section on the stem. If the light still fails to work switch off any soil. Switch off . • The temperature control has been set...
... larder refrigerator. Consume food which have changed the fitted moulded plug. PROBLEM SOLVING/TROUBLE SHOOTING If the appliance does not operate when switched on, check; • The plug is inserted properly in the socket and that above checks, please refer to the section on the stem. If the light still fails to work switch off any soil. Switch off . • The temperature control has been set...

Owners Manual
Page 9
DETAILED STEP BY STEP 14 min.575 min.575 min. 600 820-870 C C=100-150 mm C 600 15 C D D > 150 mm. INSTALLATION INSTRUCTIONS -
DETAILED STEP BY STEP 14 min.575 min.575 min. 600 820-870 C C=100-150 mm C 600 15 C D D > 150 mm. INSTALLATION INSTRUCTIONS -
Owners Manual
Page 12
Electronic products not included in order to be handled pursuant to European Directive 2002/96/EC in the selective sorting process are potentially dangerous for waste electrical and electronic equipment (WEEE). For further information, please contact your local or regional authorities. This means that this product must be recycled or dismantled to the presence of hazardous substances. 20 21 Recycling This product bears the selective sorting symbol for the environment and human health due to minimize its impact on the environment.
Electronic products not included in order to be handled pursuant to European Directive 2002/96/EC in the selective sorting process are potentially dangerous for waste electrical and electronic equipment (WEEE). For further information, please contact your local or regional authorities. This means that this product must be recycled or dismantled to the presence of hazardous substances. 20 21 Recycling This product bears the selective sorting symbol for the environment and human health due to minimize its impact on the environment.

