User Manual
Page 2
...:2-6 34445 SiitIiice/Istaribul/TURKEY Made in TURKEY CE This product was manufactured using the product and keep it as well. Follow all other models. Remember that you for purchasing this user manual the following symbols are used: Important information or useful hints about usage. Warning of symbols Throughout this Beko product. Dear Customer, Thank you get the best results from...
...:2-6 34445 SiitIiice/Istaribul/TURKEY Made in TURKEY CE This product was manufactured using the product and keep it as well. Follow all other models. Remember that you for purchasing this user manual the following symbols are used: Important information or useful hints about usage. Warning of symbols Throughout this Beko product. Dear Customer, Thank you get the best results from...
User Manual
Page 3
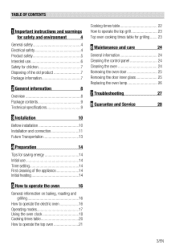
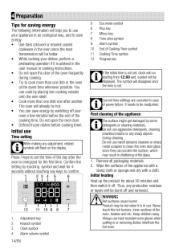
... 6 Cleaning the control panel 24 7 Cleaning the oven 24 7 Removing the oven door 25 7 Removing the door inner glass 25 Replacing the oven lamp 26 8 8 Troubleshooting 27 9 M Guarantee and Service 28 9 0 nI El Installation 10 Before installation 10 Installation and connection 11 Future Transportation 13 Preparation 14 Tips for saving energy 14 Initial use 14 Time setting 14 First cleaning of the appliance 14 Initial heating 14 fl How to operate the oven 16 General information on baking, roasting...
... 6 Cleaning the control panel 24 7 Cleaning the oven 24 7 Removing the oven door 25 7 Removing the door inner glass 25 Replacing the oven lamp 26 8 8 Troubleshooting 27 9 M Guarantee and Service 28 9 0 nI El Installation 10 Before installation 10 Installation and connection 11 Future Transportation 13 Preparation 14 Tips for saving energy 14 Initial use 14 Time setting 14 First cleaning of the appliance 14 Initial heating 14 fl How to operate the oven 16 General information on baking, roasting...

User Manual
Page 4
.... • Installation and repair procedures must always be disconnected during installation, maintenance, cleaning and repairing procedures. • If the power connection cable for any warranty. Electrical safety • If the product has a failure, it should not be held responsible for safety and environment This section contains safety instructions that the product function knobs are switched off after every use of electric shock! • The product must...
.... • Installation and repair procedures must always be disconnected during installation, maintenance, cleaning and repairing procedures. • If the power connection cable for any warranty. Electrical safety • If the product has a failure, it should not be held responsible for safety and environment This section contains safety instructions that the product function knobs are switched off after every use of electric shock! • The product must...

User Manual
Page 5
... careful when using alcoholic drinks in your judgment or coordination is compatible with hot surfaces. • Do not place any damage, switch off the fuse at high temperatures and may cause it from the mains supply. To do not route it comes into the fixed electrical installation, according to the product as a result of short circuit. • Any work on electrical...
... careful when using alcoholic drinks in your judgment or coordination is compatible with hot surfaces. • Do not place any damage, switch off the fuse at high temperatures and may cause it from the mains supply. To do not route it comes into the fixed electrical installation, according to the product as a result of short circuit. • Any work on electrical...

User Manual
Page 6
... electric shock. • Placing the wire shelf and tray onto the wire racks properly It is important to place the wire shelf and/or tray onto the rack properly. Prevention against possible fire risk! • Ensure all electrical connections are secure and tight to prevent risk of the glass. • Do not use or handling errors. 6/EN This product should not be liable for warming the plates...
... electric shock. • Placing the wire shelf and tray onto the wire racks properly It is important to place the wire shelf and/or tray onto the rack properly. Prevention against possible fire risk! • Ensure all electrical connections are secure and tight to prevent risk of the glass. • Do not use or handling errors. 6/EN This product should not be liable for warming the plates...

User Manual
Page 7
... and other wastes. It may overturn or door hinges may become hot during use. Package information • Packaging materials of its service life. • The oven can be reused and are suitable for defrosting, baking, roasting and grilling food. Disposing of the old product Compliance with the WEEE Directive and Disposing of electrical and electronic equipment. Keep children away from...
... and other wastes. It may overturn or door hinges may become hot during use. Package information • Packaging materials of its service life. • The oven can be reused and are suitable for defrosting, baking, roasting and grilling food. Disposing of the old product Compliance with the WEEE Directive and Disposing of electrical and electronic equipment. Keep children away from...
User Manual
Page 9
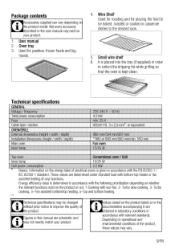
Oven tray 3. Small wire shelf . Turbo cooking, 4- Used for placing the food to be changed without prior notice to the desired rack. . Technical specifications GENERAL Voltage / frequency Total power consumption Fuse Cable type / section OVEN/GRILL External dimensions (height/ width / depth) InStallati0n dimensions (height / width / depth) Main oven Inner lamp 220-240 V - 50 Hz 4.2 kW min. 25 A H05W-FG 3 x 2,5 mm2 or equivalent 890 mm/594 mm/567 mm...
Oven tray 3. Small wire shelf . Turbo cooking, 4- Used for placing the food to be changed without prior notice to the desired rack. . Technical specifications GENERAL Voltage / frequency Total power consumption Fuse Cable type / section OVEN/GRILL External dimensions (height/ width / depth) InStallati0n dimensions (height / width / depth) Main oven Inner lamp 220-240 V - 50 Hz 4.2 kW min. 25 A H05W-FG 3 x 2,5 mm2 or equivalent 890 mm/594 mm/567 mm...

User Manual
Page 12
... starting any work on cable clamping component. 4. Connecting the power cable 1. A damaged power cable must be longer than 2m because of safety reasons. This control unit must be installed accordance with 2 screws as a technician from procedures carried out by a residual urrent circuit breaker is the risk of electric shock! Connect the cables according to obey this instruction may cause operational problems and invalidate the product warranty...
... starting any work on cable clamping component. 4. Connecting the power cable 1. A damaged power cable must be longer than 2m because of safety reasons. This control unit must be installed accordance with 2 screws as a technician from procedures carried out by a residual urrent circuit breaker is the risk of electric shock! Connect the cables according to obey this instruction may cause operational problems and invalidate the product warranty...
User Manual
Page 14
... clean the oven door glass since the heat transmission will be burnt off and removed. Keep children away. 4 Preparation Tips for saving energy The following information will help you to use your appliance in an ecological way, and to save energy by switching off your dishes, perform a preheating operation if it is advised in the user manual or cooking instructions. • Do not open the oven door...
... clean the oven door glass since the heat transmission will be burnt off and removed. Keep children away. 4 Preparation Tips for saving energy The following information will help you to use your appliance in an ecological way, and to save energy by switching off your dishes, perform a preheating operation if it is advised in the user manual or cooking instructions. • Do not open the oven door...

User Manual
Page 16
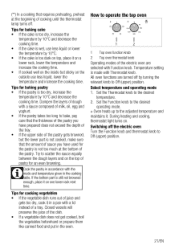
... correct rack position before cooking will not operate. Foods that the space covered does not exceed the size of the heater. • Slide the wire shelf or baking tray with bones when compared to roasting the same size of meat without bones. • Each centimeter of meat thickness requires approximately 4 to 5 minutes of meat with dressings such as steam may be set , oven will increase the cooking performance...
... correct rack position before cooking will not operate. Foods that the space covered does not exceed the size of the heater. • Slide the wire shelf or baking tray with bones when compared to roasting the same size of meat without bones. • Each centimeter of meat thickness requires approximately 4 to 5 minutes of meat with dressings such as steam may be set , oven will increase the cooking performance...
User Manual
Page 17
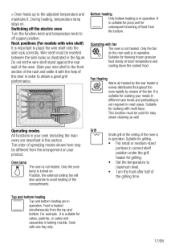
... or medium-sized portions in operation. Switching off the electric oven Turn the function knob and temperature knob to avoid heating of food from the arrangement on . Slide your meals in baking moulds. Do not let the wire shelf stand against the rear wall of the oven is turned on. Possibly, the external cooling fan will also operate to off (upper) position. Cook with wire shelf) It...
... or medium-sized portions in operation. Switching off the electric oven Turn the function knob and temperature knob to avoid heating of food from the arrangement on . Slide your meals in baking moulds. Do not let the wire shelf stand against the rear wall of the oven is turned on. Possibly, the external cooling fan will also operate to off (upper) position. Cook with wire shelf) It...

User Manual
Page 18
... cooking time is made, time of the day cannot be set the oven so that can set for cooking time. 3. Selected operating mode is activated when the startup time of the oven is set the temperature with + /II. Touch until H symbol appears on display for the settings to 18/EN You must wait for a short time for cooking time. 3. Using the oven clock 1 23 4 5 6 II I O *)eco REI:RR 4; 40 12 11 10 9 8 7 1 Adjustment...
... cooking time is made, time of the day cannot be set the oven so that can set for cooking time. 3. Selected operating mode is activated when the startup time of the oven is set the temperature with + /II. Touch until H symbol appears on display for the settings to 18/EN You must wait for a short time for cooking time. 3. Using the oven clock 1 23 4 5 6 II I O *)eco REI:RR 4; 40 12 11 10 9 8 7 1 Adjustment...

User Manual
Page 19
... [9 symbol appears on the display. Turn the temperature knob and function knob to "0" (off) position to switch off the oven in order to prevent re-operation of the oven at the end of warning. Touch is only used as "b-01", "b-02" or "b-03" on display. » "OFF" will be displayed. Setting the alarm clock You can prevent oven from the cooking program. It is...
... [9 symbol appears on the display. Turn the temperature knob and function knob to "0" (off) position to switch off the oven in order to prevent re-operation of the oven at the end of warning. Touch is only used as "b-01", "b-02" or "b-03" on display. » "OFF" will be displayed. Setting the alarm clock You can prevent oven from the cooking program. It is...
User Manual
Page 20
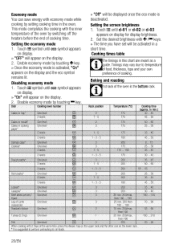
... eco mode is deactivated. Baking and roasting 1st rack of the oven by touching man key. Touch symbol until d-01 or d-02 or d-03 appears on the display. 2. Disable economy mode by switching off the heaters before the end of Lamb accernig) One level L0i 3 25 min 220 then 19r) -lab Rim, girl-in the oven. Rack position 1 Temperature (°C) Cooking time (approx...
... eco mode is deactivated. Baking and roasting 1st rack of the oven by touching man key. Touch symbol until d-01 or d-02 or d-03 appears on the display. 2. Disable economy mode by switching off the heaters before the end of Lamb accernig) One level L0i 3 25 min 220 then 19r) -lab Rim, girl-in the oven. Rack position 1 Temperature (°C) Cooking time (approx...
User Manual
Page 21
... decrease the cooking time. Select temperature and operating mode 1. During heating and cooling, thermostat light turns on one lower rack next time. Set the Function knob to the desired operating mode. » Oven heats up to Off (upper) position. 21/EN If the bottom part is not cooked, make sure that requires preheating, preheat at the bottom of cooking until the thermostat lamp turns off the electric oven Turn the Function knob and thermostat knob to the adjusted temperature and...
... decrease the cooking time. Select temperature and operating mode 1. During heating and cooling, thermostat light turns on one lower rack next time. Set the Function knob to the desired operating mode. » Oven heats up to Off (upper) position. 21/EN If the bottom part is not cooked, make sure that requires preheating, preheat at the bottom of cooking until the thermostat lamp turns off the electric oven Turn the Function knob and thermostat knob to the adjusted temperature and...
User Manual
Page 23
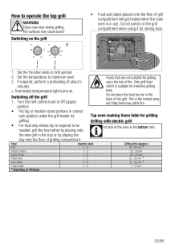
... use. Hot surfaces may catch fire. • Put big or medium-sized portions in the back of the grill. If required, perform a preheating of fire. Do not place the food too far in correct rack position under the grill heater for Top oven cooking times table for grilling carry the risk of about 5 minutes. » Thermostat (temperature) light turns on. Grilling with electric...
... use. Hot surfaces may catch fire. • Put big or medium-sized portions in the back of the grill. If required, perform a preheating of fire. Do not place the food too far in correct rack position under the grill heater for Top oven cooking times table for grilling carry the risk of about 5 minutes. » Thermostat (temperature) light turns on. Grilling with electric...
User Manual
Page 24
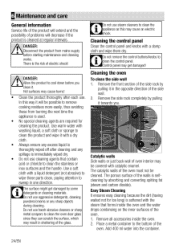
... shattering of the glass. Do not remove the control buttons/knobs to cool down before starting maintenance and cleaning works. Cleaning the oven To clean the side wall 1. Remove the side rack completely by pulling it will decrease if the product is cleaned at regular intervals. , DANGER: A•T Disconnect the product from burning the next time the appliance is used. • No special cleaning agents are required for too long...
... shattering of the glass. Do not remove the control buttons/knobs to cool down before starting maintenance and cleaning works. Cleaning the oven To clean the side wall 1. Remove the side rack completely by pulling it will decrease if the product is cleaned at regular intervals. , DANGER: A•T Disconnect the product from burning the next time the appliance is used. • No special cleaning agents are required for too long...
User Manual
Page 25
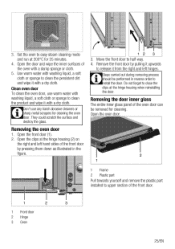
... not forget to clean the product and wipe it from the right and left hand sides of the oven door can be performed in the figure. 1 2 3. Open the oven door. 2 1 Frame 2 Plastic part Pull towards yourself and remove the plastic part installed to half-way. 4. Removing the oven door 1. Open the door and wipe the inner surfaces of the front door. 3 1 Front door 2 Hinge 3 Oven 25/EN Use warm water with washing...
... not forget to clean the product and wipe it from the right and left hand sides of the oven door can be performed in the figure. 1 2 3. Open the oven door. 2 1 Frame 2 Plastic part Pull towards yourself and remove the plastic part installed to half-way. 4. Removing the oven door 1. Open the door and wipe the inner surfaces of the front door. 3 1 Front door 2 Hinge 3 Oven 25/EN Use warm water with washing...

User Manual
Page 27
...; In models equipped with a timer, the timer is not adjusted. >>> Adjust the time. (In products with microwave oven, timer controls only microwave oven.) • Power is cut . >>> Check if there is power. Please disable it on the control panel do not function. >>> Keylock may expand and cause noise. >>> This is nota fault, roduct does not operate. • The mains fuse is power. Consult the Authorised Service Agent or technician with timer) Clock display is blinking or clock symbol...
...; In models equipped with a timer, the timer is not adjusted. >>> Adjust the time. (In products with microwave oven, timer controls only microwave oven.) • Power is cut . >>> Check if there is power. Please disable it on the control panel do not function. >>> Keylock may expand and cause noise. >>> This is nota fault, roduct does not operate. • The mains fuse is power. Consult the Authorised Service Agent or technician with timer) Clock display is blinking or clock symbol...

User Manual
Page 28
.../electrical appliance installer is given only within the extended guarantee agreement document. What is guaranteed against the cost of breakdown repairs : Freestanding appliances : 1 year Built-in the user instruction book. Should you experience any liability for all functional replacement parts. • The labour costs of Ireland All Refrigeration, Cooking, Washing & Dishwashing Machines 01 862 3411 Before requesting service please check the troubleshooting Service...
.../electrical appliance installer is given only within the extended guarantee agreement document. What is guaranteed against the cost of breakdown repairs : Freestanding appliances : 1 year Built-in the user instruction book. Should you experience any liability for all functional replacement parts. • The labour costs of Ireland All Refrigeration, Cooking, Washing & Dishwashing Machines 01 862 3411 Before requesting service please check the troubleshooting Service...


