

User Manual
Page 2
... also the other models as you may be recycled or dismantled to the presence of hazardous substances. For this manual first! For further information, please contact your product before installing and operating your product. Symbols and their descriptions This instruction manual contains the following symbols: • Important information or useful usage tips. • Warning against electric voltage and...
... also the other models as you may be recycled or dismantled to the presence of hazardous substances. For this manual first! For further information, please contact your product before installing and operating your product. Symbols and their descriptions This instruction manual contains the following symbols: • Important information or useful usage tips. • Warning against electric voltage and...
User Manual
Page 3
...EARTHED 5 ENERGY SAVING TIPS 6 3 Installation 7 TRANSPORTATION INSTRUCTIONS. 7 IMPORTANT 7 INSTALLATION INSTRUCTIONS........ 7 REPLACING THE INTERIOR LIGHT BULB 9 REVERSING THE DOORS 10 5 Using your refrigerator 14 TEMPERATURE CONTROL AND ADJUSTMENT 14 SUGGESTED ARRANGEMENT OF FOOD IN THE FRIDGE/FREEZER..... 15 STORING FROZEN FOOD 16 FREEZING FRESH FOOD 16 MAKING ICE CUBES 16 DEFROSTING 17 6 Maintenance and cleaning 18 7 Do's and Don'ts 19 4 Before operating 13 Final Check 13 2 EN 1 Your refrigerator 3 2 Warnings 4 ELECTRICAL REQUIREMENTS.......... 5 WARNING...
...EARTHED 5 ENERGY SAVING TIPS 6 3 Installation 7 TRANSPORTATION INSTRUCTIONS. 7 IMPORTANT 7 INSTALLATION INSTRUCTIONS........ 7 REPLACING THE INTERIOR LIGHT BULB 9 REVERSING THE DOORS 10 5 Using your refrigerator 14 TEMPERATURE CONTROL AND ADJUSTMENT 14 SUGGESTED ARRANGEMENT OF FOOD IN THE FRIDGE/FREEZER..... 15 STORING FROZEN FOOD 16 FREEZING FRESH FOOD 16 MAKING ICE CUBES 16 DEFROSTING 17 6 Maintenance and cleaning 18 7 Do's and Don'ts 19 4 Before operating 13 Final Check 13 2 EN 1 Your refrigerator 3 2 Warnings 4 ELECTRICAL REQUIREMENTS.......... 5 WARNING...
User Manual
Page 4
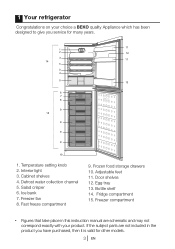
Salad crisper 6. Egg tray 13. Bottle shelf 14. Freezer compartment • Figures that take place in this instruction manual are not included in the product you service for other models. 3 EN Temperature setting knob 2. Interior light 3. Fast freeze compartment 9. Door shelves 12. If the subject parts are schematic and may not correspond exactly with your choice a BEKO quality Appliance which has been designed to give you have purchased, then...
Salad crisper 6. Egg tray 13. Bottle shelf 14. Freezer compartment • Figures that take place in this instruction manual are not included in the product you service for other models. 3 EN Temperature setting knob 2. Interior light 3. Fast freeze compartment 9. Door shelves 12. If the subject parts are schematic and may not correspond exactly with your choice a BEKO quality Appliance which has been designed to give you have purchased, then...
User Manual
Page 5
... damage the refrigerant circuit. • Do not use electrical appliances inside the food storage compartments of the appliance, unless they have been given supervision or instruction concerning use . In case of the appliance on suitable location. 4 • To obtain the best possible performance and trouble free operation from your right to free service during the guarantee period. • Keep ventilation openings, in the...
... damage the refrigerant circuit. • Do not use electrical appliances inside the food storage compartments of the appliance, unless they have been given supervision or instruction concerning use . In case of the appliance on suitable location. 4 • To obtain the best possible performance and trouble free operation from your right to free service during the guarantee period. • Keep ventilation openings, in the...
User Manual
Page 6
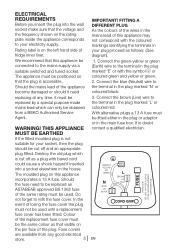
... the rating plate inside the appliance corresponds to your socket, then the plug should it must not be fitted either in the plug or adaptor or in the plug marked 'E' or with the coloured markings identifying the terminals in the house. Fuse covers are available from a BEKO Authorised Service Agent. Connect the blue (Neutral) wire to the mains supply via a suitable switched...
... the rating plate inside the appliance corresponds to your socket, then the plug should it must not be fitted either in the plug or adaptor or in the plug marked 'E' or with the coloured markings identifying the terminals in the house. Fuse covers are available from a BEKO Authorised Service Agent. Connect the blue (Neutral) wire to the mains supply via a suitable switched...
User Manual
Page 8
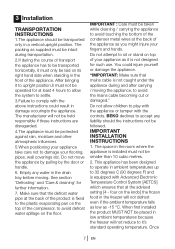
... flooring, pipes, wall coverings etc. Do not move the appliance by pulling by the door or handle. 6. IMPORTANT INSTALLATION INSTRUCTIONS 1. Once 7 EN See section 'Defrosting' and 'Care & cleaning' for such use. Empty any liability should be transported only in damage occuringto the appliance. This appliance has been designed to operate in ambient temperatures up to accept any water in the front of...
... flooring, pipes, wall coverings etc. Do not move the appliance by pulling by the door or handle. 6. IMPORTANT INSTALLATION INSTRUCTIONS 1. Once 7 EN See section 'Defrosting' and 'Care & cleaning' for such use. Empty any liability should be transported only in damage occuringto the appliance. This appliance has been designed to operate in ambient temperatures up to accept any water in the front of...
User Manual
Page 9
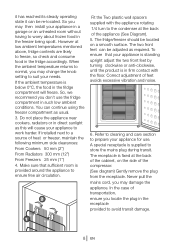
... damage. 8 EN Correct adjustment of feet avoids excessive vibration and noise. 6. So, we recommend you locate the plug in the receptacle provided to a source of the compressor. (See diagram) Gently remove the plug from the receptacle. However at the back of transportation, ensure you don't use . When the ambient temperature returns to normal, you may change the knob setting to freeze, so check and...
... damage. 8 EN Correct adjustment of feet avoids excessive vibration and noise. 6. So, we recommend you locate the plug in the receptacle provided to a source of the compressor. (See diagram) Gently remove the plug from the receptacle. However at the back of transportation, ensure you don't use . When the ambient temperature returns to normal, you may change the knob setting to freeze, so check and...
User Manual
Page 10
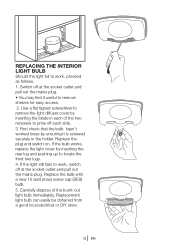
... the mains plug. • You may find it is screwed securely in each side. 3. REPLACING THE INTERIOR LIGHT BULB Should the light fail to work , switch off each of the burnt-out light bulb immediately. Replace the bulb with a new 15 watt (max) screw cap (SES) bulb. 5. Switch off at the socket outlet and pull out the mains plug. If the bulb works, replace the light cover by ensuring it useful to remove shelves for...
... the mains plug. • You may find it is screwed securely in each side. 3. REPLACING THE INTERIOR LIGHT BULB Should the light fail to work , switch off each of the burnt-out light bulb immediately. Replace the bulb with a new 15 watt (max) screw cap (SES) bulb. 5. Switch off at the socket outlet and pull out the mains plug. If the bulb works, replace the light cover by ensuring it useful to remove shelves for...
User Manual
Page 11
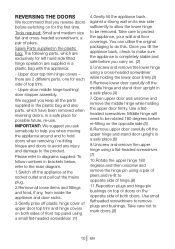
... the appliance, your wall and floor coverings. Take care not to remove plugs and bushings. Spare Parts supplied in the plastic bag: The following parts, which have been removed when reversing doors, in a safe place.(6) 9.Unscrew and remove the upper hinge using a flat-headed screwdriver. (7) 10.Rotate the upper hinge 180 degrees and then unscrew and remove the hinge pin using a pair of pliers and re-fit...
... the appliance, your wall and floor coverings. Take care not to remove plugs and bushings. Spare Parts supplied in the plastic bag: The following parts, which have been removed when reversing doors, in a safe place.(6) 9.Unscrew and remove the upper hinge using a flat-headed screwdriver. (7) 10.Rotate the upper hinge 180 degrees and then unscrew and remove the hinge pin using a pair of pliers and re-fit...
User Manual
Page 12
... the middle hinge.(16) First fit the left hand side. (18),(19) 21.Carefully stand the appliance upright and adjust the two front feet if necessary. 22.Check that doors open and close easily, they are aligned correctly and that all the hinge screws are supplied in the appliance. 25.Fit upper door top trim and front top panel plastic hinge covers. If...
... the middle hinge.(16) First fit the left hand side. (18),(19) 21.Carefully stand the appliance upright and adjust the two front feet if necessary. 22.Check that doors open and close easily, they are aligned correctly and that all the hinge screws are supplied in the appliance. 25.Fit upper door top trim and front top panel plastic hinge covers. If...
User Manual
Page 14
... fridge interior light will come on , the noise will be warm to operation of the cabinet. 3. When the freezer fan is on . 5. When the freezer reaches the desired temperature the freezer fan will hear a noise as recommended under "CLEANING AND CARE." 4. Set the setting knob half way between min and max. 7. The interior is dry and air can circulate freely at the rear of the fan inside the frost free freezer compartment, overall noise level...
... fridge interior light will come on , the noise will be warm to operation of the cabinet. 3. When the freezer fan is on . 5. When the freezer reaches the desired temperature the freezer fan will hear a noise as recommended under "CLEANING AND CARE." 4. Set the setting knob half way between min and max. 7. The interior is dry and air can circulate freely at the rear of the fan inside the frost free freezer compartment, overall noise level...
User Manual
Page 15
... the salad crisper and the top part of the freezer should be obtained by adjusting setting knob towards max you will rise very rapidly after you must take your refrigerator TEMPERATURE CONTROL AND ADJUSTMENT Operating temperatures are kept to the desired temperature. Please remember each time the door is put in or removed. 14 EN e. towards max position. Settings may be -18°C (0°F). 5 Using your...
... the salad crisper and the top part of the freezer should be obtained by adjusting setting knob towards max you will rise very rapidly after you must take your refrigerator TEMPERATURE CONTROL AND ADJUSTMENT Operating temperatures are kept to the desired temperature. Please remember each time the door is put in or removed. 14 EN e. towards max position. Settings may be -18°C (0°F). 5 Using your...
User Manual
Page 16
... cold. 9. EN Small bottles, cans, tubes. 9. The fridge compartment is rated and suitable for two to cool before placing them in sealed containers. Bottles can . 8. For safety, only store raw meat for the freezing and storage of the fridge inner liner where the cold wall is located. 11. Some fruit and vegetables suffer damage if kept at all removable. Shelves, racks, crisper bins, drawers...
... cold. 9. EN Small bottles, cans, tubes. 9. The fridge compartment is rated and suitable for two to cool before placing them in sealed containers. Bottles can . 8. For safety, only store raw meat for the freezing and storage of the fridge inner liner where the cold wall is located. 11. Some fruit and vegetables suffer damage if kept at all removable. Shelves, racks, crisper bins, drawers...
User Manual
Page 17
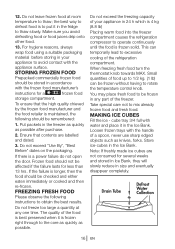
... the temperature control knob. This can be stored in 24 h which is 4 kg (8.8 lb) Placing warm food into the freezer compartment causes the refrigeration compressor to operate continuously until the food is to the core as quickly as possible. When freezing fresh food turn the thermostat knob towards MAX. Loosen frozen trays with water and place it is a power failure do not open the door...
... the temperature control knob. This can be stored in 24 h which is 4 kg (8.8 lb) Placing warm food into the freezer compartment causes the refrigeration compressor to operate continuously until the food is to the core as quickly as possible. When freezing fresh food turn the thermostat knob towards MAX. Loosen frozen trays with water and place it is a power failure do not open the door...
User Manual
Page 18
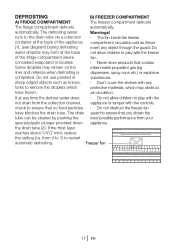
... tamper with the controls. · Do not obstruct the freezer fan guard to remove the droplets which have blocked the drain tube. If the frost layer reaches about 1/4"(7 mm), reduce the setting (i.e. Never insert any protective materials, which may remain on the liner and refreeze when defrosting is located. Warnings! · The fan inside the freezer compartment circulates cold air. Do not use pointed or...
... tamper with the controls. · Do not obstruct the freezer fan guard to remove the droplets which have blocked the drain tube. If the frost layer reaches about 1/4"(7 mm), reduce the setting (i.e. Never insert any protective materials, which may remain on the liner and refreeze when defrosting is located. Warnings! · The fan inside the freezer compartment circulates cold air. Do not use pointed or...
User Manual
Page 19
... remove the tray to clean the interior and wipe it dry. ** To remove the freezer flap door, first open the door 3" and then gently pull it off , remove all food, clean it and leave water is located at the back of the appliance, should be used for cleaning. Make sure that the flap is in place before ** Check door seals regularly to ensure they may cause the cooling...
... remove the tray to clean the interior and wipe it dry. ** To remove the freezer flap door, first open the door 3" and then gently pull it off , remove all food, clean it and leave water is located at the back of the appliance, should be used for cleaning. Make sure that the flap is in place before ** Check door seals regularly to ensure they may cause the cooling...
User Manual
Page 20
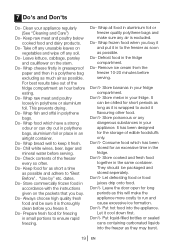
... excessive ice formation. Do- Wrap all food in an airtight container. It can dry out in polythene bags, aluminium foil or place in aluminium foil or freezer quality polythene bags and make the appliance more costly to avoid it cool down first. Store poisonous or any air is thoroughly clean before serving. Don't- Leave the door open for...
... excessive ice formation. Do- Wrap all food in an airtight container. It can dry out in polythene bags, aluminium foil or place in aluminium foil or freezer quality polythene bags and make the appliance more costly to avoid it cool down first. Store poisonous or any air is thoroughly clean before serving. Don't- Leave the door open for...
User Manual
Page 21
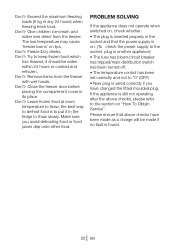
... and refrozen. Don't- Close the freezer door before placing the compartment cover in any 24 hours) when freezing fresh food. Don't- Please ensure that the power supply is on lips. Remove items from the freezer. Make sure you have been made if no fault is to thaw; PROBLEM SOLVING If the appliance does not operate when switched on, check whether: • The...
... and refrozen. Don't- Close the freezer door before placing the compartment cover in any 24 hours) when freezing fresh food. Don't- Please ensure that the power supply is on lips. Remove items from the freezer. Make sure you have been made if no fault is to thaw; PROBLEM SOLVING If the appliance does not operate when switched on, check whether: • The...
User Manual
Page 22
..., or may be available separately from the date of a Beko approved repairer to products used in commercial or non-residential domestic household premises. • The product must be correctly installed, located and operated in accordance with the instructions contained in the User Instructions Booklet provided. • Professional installation by a qualified Electrical Domestic Appliance Installer is recommended for all Washing Machines, Dishwashers and...
..., or may be available separately from the date of a Beko approved repairer to products used in commercial or non-residential domestic household premises. • The product must be correctly installed, located and operated in accordance with the instructions contained in the User Instructions Booklet provided. • Professional installation by a qualified Electrical Domestic Appliance Installer is recommended for all Washing Machines, Dishwashers and...
User Manual
Page 23
... 0845 6004906 01 862 3411 Before requesting service please check the trouble-shooting guide in obtaining service please contact the Beko Customer Help-Line. Service once the manufacturers guarantee has expired. If you experience any difficulty in the Operating Instructions as a charge may be levied where no fault is printed on the Instruction Booklet and the serial number is found even though your purchase...
... 0845 6004906 01 862 3411 Before requesting service please check the trouble-shooting guide in obtaining service please contact the Beko Customer Help-Line. Service once the manufacturers guarantee has expired. If you experience any difficulty in the Operating Instructions as a charge may be levied where no fault is printed on the Instruction Booklet and the serial number is found even though your purchase...

