User Manual
Page 2
... symbols: C Important information or useful usage tips. Recycling This product is supplied with your product. Please read the entire manual of your product before installing and operating your product. • Follow the instructions, especially those for safety. • Keep the manual in an easily accessible place as well. A Warning against electric voltage. Electronic products not included in order to be handled pursuant to European Directive...
... symbols: C Important information or useful usage tips. Recycling This product is supplied with your product. Please read the entire manual of your product before installing and operating your product. • Follow the instructions, especially those for safety. • Keep the manual in an easily accessible place as well. A Warning against electric voltage. Electronic products not included in order to be handled pursuant to European Directive...
User Manual
Page 3
1 Your refrigerator .......... 3 2 Warnings 4 Electrical Requirements 5 Warning! This Appliance Must Be Earthed 5 Energy Saving Tips 6 3 Installation 7 INSTALLATION INSTRUCTIONS....7 REVERSING THE DOOR 9 4 Before operating ........ 12 STARTING 12 5 Using your refrigerator.13 FREEZING FRESH FOOD............13 STORING FROZEN FOOD...........14 Making ice 14 Defrosting of the appliance...........14 6 Maintenance and cleaning 15 7 Do's and Don'ts........... 16 PROBLEM SOLVING 17 2 EN
1 Your refrigerator .......... 3 2 Warnings 4 Electrical Requirements 5 Warning! This Appliance Must Be Earthed 5 Energy Saving Tips 6 3 Installation 7 INSTALLATION INSTRUCTIONS....7 REVERSING THE DOOR 9 4 Before operating ........ 12 STARTING 12 5 Using your refrigerator.13 FREEZING FRESH FOOD............13 STORING FROZEN FOOD...........14 Making ice 14 Defrosting of the appliance...........14 6 Maintenance and cleaning 15 7 Do's and Don'ts........... 16 PROBLEM SOLVING 17 2 EN
User Manual
Page 4
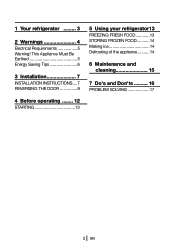
Flap (Fast-Freeze compartment) 3. If the subject parts are not included in this instruction manual are schematic and may not correspond exactly with your choice of a BEKO quality Appliance which has been designed to give you have purchased, then it is valid for many years. 1 2 4 3 4 4 4 5 1. Thermostat 2. Drawers 5. Ice cube tray & Ice bank 4. Adjustable front feet C Figures that take place in the product you service for other models. 3 EN 1 Your refrigerator Congratulations on your product.
Flap (Fast-Freeze compartment) 3. If the subject parts are not included in this instruction manual are schematic and may not correspond exactly with your choice of a BEKO quality Appliance which has been designed to give you have purchased, then it is valid for many years. 1 2 4 3 4 4 4 5 1. Thermostat 2. Drawers 5. Ice cube tray & Ice bank 4. Adjustable front feet C Figures that take place in the product you service for other models. 3 EN 1 Your refrigerator Congratulations on your product.
User Manual
Page 5
.... Therefore, take care not to fire. At BEKO, the care and protection of the appliance by the manufacturer. • We suggest you keep these instructions in a safe place for easy reference. • This appliance is not intended for at least 4 hours before switching on suitable location. 4 • To obtain the best possible performance and trouble free operation from your appliance...
.... Therefore, take care not to fire. At BEKO, the care and protection of the appliance by the manufacturer. • We suggest you keep these instructions in a safe place for easy reference. • This appliance is not intended for at least 4 hours before switching on suitable location. 4 • To obtain the best possible performance and trouble free operation from your appliance...
User Manual
Page 6
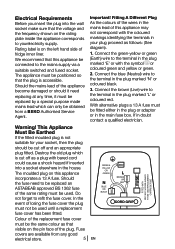
... that the plug is on this appliance be used until a replacement fuse cover has been fitted. Electrical Requirements Before you insert the plug into a socket elsewhere in the house. The appliance must be cut off and an appropriate plug fitted. Fuse covers are available from any time, it must be obtained from a BEKO Authorised Service Agent. In the event of fridge inner...
... that the plug is on this appliance be used until a replacement fuse cover has been fitted. Electrical Requirements Before you insert the plug into a socket elsewhere in the house. The appliance must be cut off and an appropriate plug fitted. Fuse covers are available from any time, it must be obtained from a BEKO Authorised Service Agent. In the event of fridge inner...
User Manual
Page 7
Do not leave the door (s) of your appliance is kept at minimum, particularly in a well ventilated area. 2- Ensure the time between buying chilled/frozen food and placing them in your appliance is installed in summer. We recommend you use a cool bag or a special carrier bag to carry frozen food. 3- Energy Saving Tips 1- Ensure your appliance open longer than necessary and ensure they are closed properly after each opening. 6 EN
Do not leave the door (s) of your appliance is kept at minimum, particularly in a well ventilated area. 2- Ensure the time between buying chilled/frozen food and placing them in your appliance is installed in summer. We recommend you use a cool bag or a special carrier bag to carry frozen food. 3- Energy Saving Tips 1- Ensure your appliance open longer than necessary and ensure they are closed properly after each opening. 6 EN
User Manual
Page 8
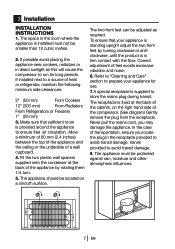
... compressor. (See diagram) Gently remove the plug from the receptacle. The receptacle is fixed at the back of feet avoids excessive vibration and noise. 6. The space in direct sunlight as required. Correct adjustment of the appliance by turning clockwise or anticlockwise, until the product is in the receptacle provided to run for use. 7.A special receptacle is standing upright adjust the two front feet by rotating them 1/4 turn...
... compressor. (See diagram) Gently remove the plug from the receptacle. The receptacle is fixed at the back of feet avoids excessive vibration and noise. 6. The space in direct sunlight as required. Correct adjustment of the appliance by turning clockwise or anticlockwise, until the product is in the receptacle provided to run for use. 7.A special receptacle is standing upright adjust the two front feet by rotating them 1/4 turn...
User Manual
Page 9
IMPORTANT: Care must be taken" while cleaning / carrying the appliance to avoid touching the bottom of the condenser metal wires at the back of the appliance as you might injure your fingers and hands IMPORTANT: This appliance is not designed for stacking with any other appliance.When positioning your appliance, take care not to damage your flooring, pipes,wall coverings etc. 8 EN
IMPORTANT: Care must be taken" while cleaning / carrying the appliance to avoid touching the bottom of the condenser metal wires at the back of the appliance as you might injure your fingers and hands IMPORTANT: This appliance is not designed for stacking with any other appliance.When positioning your appliance, take care not to damage your flooring, pipes,wall coverings etc. 8 EN
User Manual
Page 10
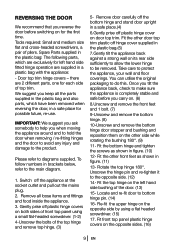
... outlet and pull out the mains plug. 2. You can utilise the original packaging to diagrams supplied. We suggest you keep all loose items and fittings and food inside the appliance. 3. Please refer to do this. To follow numbers in a safe place for the first time. Remove door carefully off the bottom hinge and stand door upright in a safe place.(4) 6.Gently prise...
... outlet and pull out the mains plug. 2. You can utilise the original packaging to diagrams supplied. We suggest you keep all loose items and fittings and food inside the appliance. 3. Please refer to do this. To follow numbers in a safe place for the first time. Remove door carefully off the bottom hinge and stand door upright in a safe place.(4) 6.Gently prise...
User Manual
Page 11
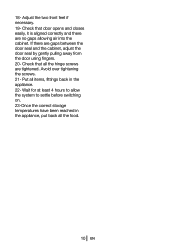
...the screws. 21- Wait for at least 4 hours to allow the system to settle before switching on. 23-Once the correct storage temperatures have been reached in the appliance. 22- Check that door opens and closes easily, it is aligned correctly and there are no gaps allowing air into the... all items, fittings back in the appliance, put back all the hinge screws are gaps between the door seal and the cabinet, adjust the door seal by gently pulling away from the door using fingers. 20- If there are tightened. Adjust the two front feet if necessary. 19- Check that all the food. 10 EN 18-
...the screws. 21- Wait for at least 4 hours to allow the system to settle before switching on. 23-Once the correct storage temperatures have been reached in the appliance. 22- Check that door opens and closes easily, it is aligned correctly and there are no gaps allowing air into the... all items, fittings back in the appliance, put back all the hinge screws are gaps between the door seal and the cabinet, adjust the door seal by gently pulling away from the door using fingers. 20- If there are tightened. Adjust the two front feet if necessary. 19- Check that all the food. 10 EN 18-
User Manual
Page 13
... you set the thermostat at the rear. 3.Clean the interior as the compressor starts up. Wait until the correct storage temperature has been reached. This is quite normal. 6. This is a power failure do not open just after you have been adjusted so the appliance is level. 2.The interior is switched on the electricity supply. 4 Before operating STARTING Final Check Before you start using the refrigerator check...
... you set the thermostat at the rear. 3.Clean the interior as the compressor starts up. Wait until the correct storage temperature has been reached. This is quite normal. 6. This is a power failure do not open just after you have been adjusted so the appliance is level. 2.The interior is switched on the electricity supply. 4 Before operating STARTING Final Check Before you start using the refrigerator check...

User Manual
Page 14
... following instructions to the desired temperature. The quality of 2kg. (4.5 lb) turn the thermostat back to mix already frozen food and fresh food. 13 EN If you check the temperature with an accurate thermometer to ensure that you are going to operate continuously until the food is opened cold air escapes and the internal temperature rises. 5 Using your refrigerator Operating temperatures are controlled by adjusting the setting towards fast freeze position...
... following instructions to the desired temperature. The quality of 2kg. (4.5 lb) turn the thermostat back to mix already frozen food and fresh food. 13 EN If you check the temperature with an accurate thermometer to ensure that you are going to operate continuously until the food is opened cold air escapes and the internal temperature rises. 5 Using your refrigerator Operating temperatures are controlled by adjusting the setting towards fast freeze position...
User Manual
Page 15
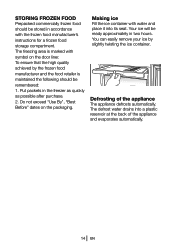
... "Use By", "Best Before" dates on the door liner. Making ice Fill the ice container with water and place it into a plastic reservoir at the back of the appliance The appliance defrosts automatically. Defrosting of the appliance and evaporates automatically. 14 EN You can easily remove your ice by the frozen food manufacturer and the food retailer is marked with the frozen food manufacturer's instructions...
... "Use By", "Best Before" dates on the door liner. Making ice Fill the ice container with water and place it into a plastic reservoir at the back of the appliance The appliance defrosts automatically. Defrosting of the appliance and evaporates automatically. 14 EN You can easily remove your ice by the frozen food manufacturer and the food retailer is marked with the frozen food manufacturer's instructions...
User Manual
Page 16
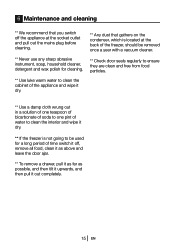
...plug before cleaning. ** Any dust that gathers on the condenser, which is located at the back of the freezer, should be removed once a year with a vacuum cleaner. ** Never use any sharp abrasive instrument, soap, household cleaner, detergent and wax polish for cleaning. ** Check door seals regularly to ensure they are clean and free from food particles. ** Use luke warm water to clean... of water to clean the interior and wipe it dry. ** If the freezer is not going to be used for a long period of time switch it off, remove all food, clean it as above and leave the door ajar. ** To remove a ...
...plug before cleaning. ** Any dust that gathers on the condenser, which is located at the back of the freezer, should be removed once a year with a vacuum cleaner. ** Never use any sharp abrasive instrument, soap, household cleaner, detergent and wax polish for cleaning. ** Check door seals regularly to ensure they are clean and free from food particles. ** Use luke warm water to clean... of water to clean the interior and wipe it dry. ** If the freezer is not going to be used for a long period of time switch it off, remove all food, clean it as above and leave the door ajar. ** To remove a ...
User Manual
Page 17
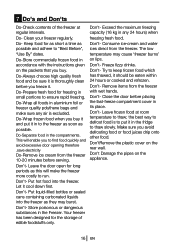
... buy . Make sure you to thaw slowly. Consume ice-cream and water ices direct from the freezer with the instructions given on lips. Leave frozen food at regular intervals. Do-Store commercially frozen food in to defrost food is excluded. The low temperature may burst. Do-Separate food in the fridge to find food quickly and avoid excessive door opening therefore .save electricity Do-Remove ice cream from the freezer 10...
... buy . Make sure you to thaw slowly. Consume ice-cream and water ices direct from the freezer with the instructions given on lips. Leave frozen food at regular intervals. Do-Store commercially frozen food in to defrost food is excluded. The low temperature may burst. Do-Separate food in the fridge to find food quickly and avoid excessive door opening therefore .save electricity Do-Remove ice cream from the freezer 10...
User Manual
Page 18
... the socket, plug in another appliance) • The fuse has blown/circuit breaker has tripped/main distribution switch has been turned off. • The temperature control has been set correctly. • New plug is wired correctly if you have been made as a charge will be made if no fault is still not operating after the above checks have changed the fitted...
... the socket, plug in another appliance) • The fuse has blown/circuit breaker has tripped/main distribution switch has been turned off. • The temperature control has been set correctly. • New plug is wired correctly if you have been made as a charge will be made if no fault is still not operating after the above checks have changed the fitted...
User Manual
Page 19
... the product is resold. • Beko disclaims any liability for incidental or consequential damages. What is not covered? • Transit, delivery or accidental damage or misuse and abuse. • Cabinet or appearance parts, including control knobs, flaps, handles or container lids. • Accessories or consumable items including but not limited to, ice trays, scrapers, cutlery baskets, filters and light bulbs. • Repairs required as...
... the product is resold. • Beko disclaims any liability for incidental or consequential damages. What is not covered? • Transit, delivery or accidental damage or misuse and abuse. • Cabinet or appearance parts, including control knobs, flaps, handles or container lids. • Accessories or consumable items including but not limited to, ice trays, scrapers, cutlery baskets, filters and light bulbs. • Repairs required as...
User Manual
Page 20
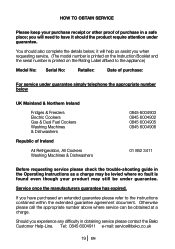
... Before requesting service please check the trouble-shooting guide in the Operating Instructions as a charge may be levied where no fault is found even though your product may still be obtained at a charge. You should the product require attention under guarantee. Should you will need to have purchased an extended guarantee please refer to the appliance) Model No: Serial No: Retailer...
... Before requesting service please check the trouble-shooting guide in the Operating Instructions as a charge may be levied where no fault is found even though your product may still be obtained at a charge. You should the product require attention under guarantee. Should you will need to have purchased an extended guarantee please refer to the appliance) Model No: Serial No: Retailer...

User Manual
Page 21
BEKO plc Beko House Caxton Way Watford Hertfordshire WD18 8UF Tel: 0845 6004911 Fax: 0845 6004922 e-mail: service@beko.co.uk website: www.beko.co.uk Printed in Turkey Part no: 57 1669 0000 Revision no: AF
BEKO plc Beko House Caxton Way Watford Hertfordshire WD18 8UF Tel: 0845 6004911 Fax: 0845 6004922 e-mail: service@beko.co.uk website: www.beko.co.uk Printed in Turkey Part no: 57 1669 0000 Revision no: AF


