
User Manual
Page 3
Beko Customer Service welcome safety symbols The use high temperatures) require the following symbols: Where you, other people, toddlers and children are not sure about any questions, or if you have any information contained in a well ventilated space. There is a danger of any electrical appliance in particular (which has been designed to give you understand the controls prior to...
Beko Customer Service welcome safety symbols The use high temperatures) require the following symbols: Where you, other people, toddlers and children are not sure about any questions, or if you have any information contained in a well ventilated space. There is a danger of any electrical appliance in particular (which has been designed to give you understand the controls prior to...

User Manual
Page 4
contents Introduction I Welcome/Safety symbols 2 Safety in the home 4 Installation Know your appliance/ specification 7 Electrical connection 8 Location 9 Operating Operating the hob 11 For the very first time Ventilation 18 Installation 18 Preparation and burning off 18 Saucepan types/deep fat frying 19 Cooker care Care & cleaning 20 Trouble shooting 21 Future transportation 21 Guarantee / Service 22 I ;
contents Introduction I Welcome/Safety symbols 2 Safety in the home 4 Installation Know your appliance/ specification 7 Electrical connection 8 Location 9 Operating Operating the hob 11 For the very first time Ventilation 18 Installation 18 Preparation and burning off 18 Saucepan types/deep fat frying 19 Cooker care Care & cleaning 20 Trouble shooting 21 Future transportation 21 Guarantee / Service 22 I ;

User Manual
Page 5
... pans can not accidentally be dealt with the appliance. Never attempt to extinguish burning oil or fat with water (risk of an electric shock if a crack is essential at the halogen appliance. • The surfaces of the stainless steel model appliances which are close to installation instructions. • During use of time. Children should be hot. You should contact our customer service...
... pans can not accidentally be dealt with the appliance. Never attempt to extinguish burning oil or fat with water (risk of an electric shock if a crack is essential at the halogen appliance. • The surfaces of the stainless steel model appliances which are close to installation instructions. • During use of time. Children should be hot. You should contact our customer service...

User Manual
Page 6
... due to electrical supply parts. due to or on hot cooking fields and cause damages. • Take care that the base of operation immediately: turn off the device and disconnect it . during the impact of knowledge, should use the hob to heat the room....the electrical mains network (unscrew fuses or respectively deactivate automatic circuit breakers). • Connection cables of electrical devices should ensure that no event should you should be assumed. • Do not use this event, please contact our customer service department. • No alterations or repair attempts...
... due to electrical supply parts. due to or on hot cooking fields and cause damages. • Take care that the base of operation immediately: turn off the device and disconnect it . during the impact of knowledge, should use the hob to heat the room....the electrical mains network (unscrew fuses or respectively deactivate automatic circuit breakers). • Connection cables of electrical devices should ensure that no event should you should be assumed. • Do not use this event, please contact our customer service department. • No alterations or repair attempts...

User Manual
Page 7
... for asthmatic sufferers Before using for children. • Permanently connected devices (without plug) must be burnt off process. Ensure the room is piping hot. • Always refer servicing to be disconnected from the mains network before removal by a licensed electrician. • Make the device non-functional before cooking. • Check food is thoroughly cooked and is very well...
... for asthmatic sufferers Before using for children. • Permanently connected devices (without plug) must be burnt off process. Ensure the room is piping hot. • Always refer servicing to be disconnected from the mains network before removal by a licensed electrician. • Make the device non-functional before cooking. • Check food is thoroughly cooked and is very well...

User Manual
Page 8
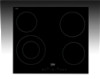
Protection cover 4. The actual view may be differ. 2 3 4 2 1. Assembly clamp 3. know your appliance * The graphics and figures are for illustration purposes only. Ceramic hot plate 2. Burners plate Specification Outer dimensions Width Depth Height Dimension installation Width Depth Hob wattage-Front left Hob wattage-Rear left Hob wattage-Rear right Hob wattage-Front right Total electric power Supply voltage 580 mm 510 mm 55 mm 560 mm 490 mm 0210/120 - 2200/750 W 0140-1200 W 0180-1800 W 0160-1500 W 6700 W 220 - 240V -/ 380 - 415V 2N - 50Hz 7
Protection cover 4. The actual view may be differ. 2 3 4 2 1. Assembly clamp 3. know your appliance * The graphics and figures are for illustration purposes only. Ceramic hot plate 2. Burners plate Specification Outer dimensions Width Depth Height Dimension installation Width Depth Hob wattage-Front left Hob wattage-Rear left Hob wattage-Rear right Hob wattage-Front right Total electric power Supply voltage 580 mm 510 mm 55 mm 560 mm 490 mm 0210/120 - 2200/750 W 0140-1200 W 0180-1800 W 0160-1500 W 6700 W 220 - 240V -/ 380 - 415V 2N - 50Hz 7

User Manual
Page 9
... heating of the oven without ground socket. electrical connection • If a cable is connected to the mains electricity supply, check to ensure that the voltage and frequency shown on the rating label corresponds with your power supply. .-This product must be installed by the utilisation of the internal cooking zone A, or A and B together, or A and B and C together xtended cooking zone Tri-circuit-cooking...
... heating of the oven without ground socket. electrical connection • If a cable is connected to the mains electricity supply, check to ensure that the voltage and frequency shown on the rating label corresponds with your power supply. .-This product must be installed by the utilisation of the internal cooking zone A, or A and B together, or A and B and C together xtended cooking zone Tri-circuit-cooking...

User Manual
Page 10
... switch). Use of assembly clamp may only be ventilated. 5.0 cm (rqn) 5 cm (min) 49 cm * 56 cm for 60 cm Hobs 75 cm for 80 cm Hobs In addition, you can install your model. 5 cm (min 9 Fitting may change according to your hob according to the illustrated figure by a trained professional. If a stove is intended to be built...
... switch). Use of assembly clamp may only be ventilated. 5.0 cm (rqn) 5 cm (min) 49 cm * 56 cm for 60 cm Hobs 75 cm for 80 cm Hobs In addition, you can install your model. 5 cm (min 9 Fitting may change according to your hob according to the illustrated figure by a trained professional. If a stove is intended to be built...

User Manual
Page 11
...covered by a wooden plate. 10 If, for example, due to the fitting of the appliance to secure the appliance in position. E .s Lccs)i E Attention: When installing the hob above a cupboard, a diving shelf as pictured above must be affixed around the glass frame on the base of the appliance above an underbench oven... this is touchable, it must be installed. Back view 1. Tighten the screws of the springs located on the lower surface during the installation of the worktop. Remove the sealing gasket ...
...covered by a wooden plate. 10 If, for example, due to the fitting of the appliance to secure the appliance in position. E .s Lccs)i E Attention: When installing the hob above a cupboard, a diving shelf as pictured above must be affixed around the glass frame on the base of the appliance above an underbench oven... this is touchable, it must be installed. Back view 1. Tighten the screws of the springs located on the lower surface during the installation of the worktop. Remove the sealing gasket ...

User Manual
Page 12
... is turned off at least 1 second. Moisture and dirt may differ. 11 Hotplate (cooking zone) Selection controls Hotplate display (heat setting 0 ...9) ▪ Dual/Triple zone in models with timer. • The graphics and figures are for use. la (*) If your hob is euipped with an audio signal. • Always keep the control panels clean and dry. While operating the main switch...
... is turned off at least 1 second. Moisture and dirt may differ. 11 Hotplate (cooking zone) Selection controls Hotplate display (heat setting 0 ...9) ▪ Dual/Triple zone in models with timer. • The graphics and figures are for use. la (*) If your hob is euipped with an audio signal. • Always keep the control panels clean and dry. While operating the main switch...

User Manual
Page 13
... second "A" and half second "9") in 10 seconds. Turn On Heat Boost Feature : 1. Select the hotplate heat settings value "9" using "s/" key with in the hotplate display. you begin with a • repeat function. The display alternates during heat boost cooking between "9" and "1" can be turned off early by mode if there is indicated through a flashing "A" alternating with "w key, "1" will be finished after...
... second "A" and half second "9") in 10 seconds. Turn On Heat Boost Feature : 1. Select the hotplate heat settings value "9" using "s/" key with in the hotplate display. you begin with a • repeat function. The display alternates during heat boost cooking between "9" and "1" can be turned off early by mode if there is indicated through a flashing "A" alternating with "w key, "1" will be finished after...

User Manual
Page 14
... be flashed and the triple zone will be disappear. All displays indicates "0" and "00". You have to touch any key on touch control panel to stop the buzzer sound Turn On Dual and Triple Zones** Turn on the basic zone of the hotplate. Turn on to "0" by operating the A/" key of the heat setting to...same time, the related dual zone flashes statically. Each operation causes a status change of the selected hotplate. 13 The "n" and "Nt" keys must be selected. Turn Off The Hob If the main switch "0" is touched more than 2sec, the hob is turned off and is set on the dual zone : The ...
... be flashed and the triple zone will be disappear. All displays indicates "0" and "00". You have to touch any key on touch control panel to stop the buzzer sound Turn On Dual and Triple Zones** Turn on the basic zone of the hotplate. Turn on to "0" by operating the A/" key of the heat setting to...same time, the related dual zone flashes statically. Each operation causes a status change of the selected hotplate. 13 The "n" and "Nt" keys must be selected. Turn Off The Hob If the main switch "0" is touched more than 2sec, the hob is turned off and is set on the dual zone : The ...

User Manual
Page 15
...control can be still active after successful unlocking. Child Lock functionality is unlocked. Turn on the hob using main switch "0". 2. Then touch again ",•" key. Simultaneously touching the "^" and "v" keys for you can only be locked in a such condition, key lock should be operated in a complicated Multi-Step process. Timer Function * This feature facilitates the cooking... "6" LED flashes and all hotplate displays will be disappear immediately after you turn off at least 2 sec. 3. will indicate IL symbol. Lock or unlock the Touch control in operation ...
...control can be still active after successful unlocking. Child Lock functionality is unlocked. Turn on the hob using main switch "0". 2. Then touch again ",•" key. Simultaneously touching the "^" and "v" keys for you can only be locked in a such condition, key lock should be operated in a complicated Multi-Step process. Timer Function * This feature facilitates the cooking... "6" LED flashes and all hotplate displays will be disappear immediately after you turn off at least 2 sec. 3. will indicate IL symbol. Lock or unlock the Touch control in operation ...

User Manual
Page 17
...3 (indicator led flashing) in Timer Display (Indicators leds are inadvertently not switched off , hotplate will be automatically deactivated after 10 seconds residual heat indicator will be canceled then in s 60 180 288 390 510 150 210 270 - Heat setting OFF- If one or more hotplates are on indicate running timers... time. (see table-1 below) The limit of the operating time depends of the selected heat setting. If a timer was associated with the hotplate than a "00" will light). Cancel Timers : Firstly you have to touch any key on touch control panel to deactivate warming zone.
...3 (indicator led flashing) in Timer Display (Indicators leds are inadvertently not switched off , hotplate will be automatically deactivated after 10 seconds residual heat indicator will be canceled then in s 60 180 288 390 510 150 210 270 - Heat setting OFF- If one or more hotplates are on indicate running timers... time. (see table-1 below) The limit of the operating time depends of the selected heat setting. If a timer was associated with the hotplate than a "00" will light). Cancel Timers : Firstly you have to touch any key on touch control panel to deactivate warming zone.

User Manual
Page 18
... flashes, if the corresponding hotplate had a residual heat of 70 cm above the glass ceramic hob. Sensor Calibration and Error messages The hob control performs an automatic calibration in reference to the sensor-, glassand ambient conditions after the first connection to high Fl Strong pulsating light (fluorescent tube) F2 Sensor covered with a bright object F3 Strongly fluctuating ambient light F4 Table -2: Error codes...
... flashes, if the corresponding hotplate had a residual heat of 70 cm above the glass ceramic hob. Sensor Calibration and Error messages The hob control performs an automatic calibration in reference to the sensor-, glassand ambient conditions after the first connection to high Fl Strong pulsating light (fluorescent tube) F2 Sensor covered with a bright object F3 Strongly fluctuating ambient light F4 Table -2: Error codes...

User Manual
Page 19
Avoid directly inhaling the fumes during the burning off process. Cleaning Before you start using for the first time, protective coatings need to the outside. The packaging materials can be removed. Please store/ dispose of permanent fixed mechanical ventilation system, for asthmatic sufferers .0 Before using your own safety. Ensure the room is important for children. installation Unpacking All...
Avoid directly inhaling the fumes during the burning off process. Cleaning Before you start using for the first time, protective coatings need to the outside. The packaging materials can be removed. Please store/ dispose of permanent fixed mechanical ventilation system, for asthmatic sufferers .0 Before using your own safety. Ensure the room is important for children. installation Unpacking All...

User Manual
Page 20
... are generally oven-type containers. Do not use the recommended pan sizes for each burner. • Use pans which are caused almost invariably by picking up the burning pan and rushing outside of the pan clean and free from streaks of oil or fat. • Optimum efficiency is achieved by using pans that match the diameters of the ceramic glass surface). • Use steel or heat-resistant glass pots. Leave the pan to...
... are generally oven-type containers. Do not use the recommended pan sizes for each burner. • Use pans which are caused almost invariably by picking up the burning pan and rushing outside of the pan clean and free from streaks of oil or fat. • Optimum efficiency is achieved by using pans that match the diameters of the ceramic glass surface). • Use steel or heat-resistant glass pots. Leave the pan to...

User Manual
Page 21
... such as these will damage the surface. • You can be scratched off fully with water. 20 Follow the manufacturer's instructions. 2 Always rinse off with serrated edge knives, steel wool or the like. We recommend Hob Brite Ceramic Hob Cleaner which can use steel wool, abrasive powders, detergents or bleach-based cleaning agents as Durgol, vinegar or lemon...
... such as these will damage the surface. • You can be scratched off fully with water. 20 Follow the manufacturer's instructions. 2 Always rinse off with serrated edge knives, steel wool or the like. We recommend Hob Brite Ceramic Hob Cleaner which can use steel wool, abrasive powders, detergents or bleach-based cleaning agents as Durgol, vinegar or lemon...

User Manual
Page 22
... are printed on . • The fuse has blown/circuit breaker has tripped/main distribution switch has been turned off. If you do not have been made if no fault is found. If the appliance is still not operating after the above checks have the original carton Secure the caps and Pan supports by adhesivetape. future transportation Recycling This...
... are printed on . • The fuse has blown/circuit breaker has tripped/main distribution switch has been turned off. If you do not have been made if no fault is found. If the appliance is still not operating after the above checks have the original carton Secure the caps and Pan supports by adhesivetape. future transportation Recycling This...

User Manual
Page 23
... Gas Installer. • The guarantee is given only within the extended gauarantee agreement document. guarantee Your Beko product is guaranteed against the cost of breakdown repairs for twelve months from the date of unauthorised repairs or inexpert installation that fails to meet the requirements contained in the user instruction book. Should you quicker when requesting service. (The model number is covered? • All repairs...
... Gas Installer. • The guarantee is given only within the extended gauarantee agreement document. guarantee Your Beko product is guaranteed against the cost of breakdown repairs for twelve months from the date of unauthorised repairs or inexpert installation that fails to meet the requirements contained in the user instruction book. Should you quicker when requesting service. (The model number is covered? • All repairs...