User Manual
Page 2
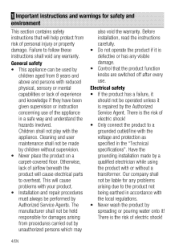
... the product to life and property. A6 Warning of risk of electric shock. We hope that this user manual is also applicable for future use. Remember that you for purchasing this user manual the following symbols are used: Important information or useful hints about usage. Differences between models will be identified in the user manual. Warning of fire. Please read this user manual first...
... the product to life and property. A6 Warning of risk of electric shock. We hope that this user manual is also applicable for future use. Remember that you for purchasing this user manual the following symbols are used: Important information or useful hints about usage. Differences between models will be identified in the user manual. Warning of fire. Please read this user manual first...

User Manual
Page 3
... electric oven 19 Cooking times table 20 How to operate the top oven 21 Cooking times table 21 How to operate the top grill 23 Electric grilling guide 23 Top oven cooking times table for grilling 23 El Maintenance and care 24 General information 24 Cleaning the hob 24 Cleaning the control panel 25 Cleaning the oven 25 Removing the oven door 25 Removing the door inner glass 26 Replacing the oven lamp 26 8 Troubleshooting 27 9 Guarantee and Service 28 M How to use...
... electric oven 19 Cooking times table 20 How to operate the top oven 21 Cooking times table 21 How to operate the top grill 23 Electric grilling guide 23 Top oven cooking times table for grilling 23 El Maintenance and care 24 General information 24 Cleaning the hob 24 Cleaning the control panel 25 Cleaning the oven 25 Removing the oven door 25 Removing the door inner glass 26 Replacing the oven lamp 26 8 Troubleshooting 27 9 Guarantee and Service 28 M How to use...
User Manual
Page 4
... out by a qualified electrician while using the product with the appliance. Before installation, read the instructions carefully. • Do not operate the product if it ! The manufacturer shall not be operated unless it is repaired by spreading or pouring water onto it is defective or has any visible damage. • Control that will cause electrical parts to overheat. There is the risk...
... out by a qualified electrician while using the product with the appliance. Before installation, read the instructions carefully. • Do not operate the product if it ! The manufacturer shall not be operated unless it is repaired by spreading or pouring water onto it is defective or has any visible damage. • Control that will cause electrical parts to overheat. There is the risk...

User Manual
Page 5
... any damage, switch off the fuse at high temperatures and may become hot during use the connection cable specified in order to avoid touching heating elements. and do this, turn • If the power connection cable for off during installation, maintenance, the product and disconnect it must • Make sure that it is be replaced by the manufacturer, compatible with the product. Care should be...
... any damage, switch off the fuse at high temperatures and may become hot during use the connection cable specified in order to avoid touching heating elements. and do this, turn • If the power connection cable for off during installation, maintenance, the product and disconnect it must • Make sure that it is be replaced by the manufacturer, compatible with the product. Care should be...

User Manual
Page 6
... is balanced before replacing the lamp to avoid the possibility of electric shock. • Unattended cooking on the hob surface or at open door. • Always use the product if the front door glass removed or cracked. • Oven handle is not intended to avoid the possibility of electric shock. • The appliance is not towel dryer. Slide the wire shelf or tray between 2 rails...
... is balanced before replacing the lamp to avoid the possibility of electric shock. • Unattended cooking on the hob surface or at open door. • Always use the product if the front door glass removed or cracked. • Oven handle is not intended to avoid the possibility of electric shock. • The appliance is not towel dryer. Slide the wire shelf or tray between 2 rails...

User Manual
Page 7
... socket as suitable or hob guards incorporated in the instructions for cooking purposes only. For the reliability of the fire of the product; • Make sure the plug is for use . It may overturn or door hinges may become hot during use will be used for defrosting, baking, roasting and grilling food. • Use only hob guards designed by the manufacturer of...
... socket as suitable or hob guards incorporated in the instructions for cooking purposes only. For the reliability of the fire of the product; • Make sure the plug is for use . It may overturn or door hinges may become hot during use will be used for defrosting, baking, roasting and grilling food. • Use only hob guards designed by the manufacturer of...

User Manual
Page 9
General information Overview 1 2 3 4 4 5 1 Burner plate 2 Control panel 3 Top oven door 4 Handle 5 Main oven door 6 Tray 89 10 11 9 11 7 12 6 7 Wire shelf 8 Door switch 9 Shelf positions 10 Grill heating element 11 Lamp 12 Fan motor (behind steel plate) 23 4 5 1 Warning lamp 2 Thermostat lamp for top oven 3 Thermostat lamp for main oven 4 Main oven function knob 5 Top oven/grill function knob 6 7 8 9 6 Single-circuit cooking plate Rear left 7 Single-circuit cooking plate Front left 8 Single-circuit cooking plate Front right 9 Single-circuit cooking plate Rear right 9/EN
General information Overview 1 2 3 4 4 5 1 Burner plate 2 Control panel 3 Top oven door 4 Handle 5 Main oven door 6 Tray 89 10 11 9 11 7 12 6 7 Wire shelf 8 Door switch 9 Shelf positions 10 Grill heating element 11 Lamp 12 Fan motor (behind steel plate) 23 4 5 1 Warning lamp 2 Thermostat lamp for top oven 3 Thermostat lamp for main oven 4 Main oven function knob 5 Top oven/grill function knob 6 7 8 9 6 Single-circuit cooking plate Rear left 7 Single-circuit cooking plate Front left 8 Single-circuit cooking plate Front right 9 Single-circuit cooking plate Rear right 9/EN

User Manual
Page 11
... eco-fan, 2- Technical specifications GENERAL External dimensions theight / width / depth) Voltage / frequency Total power consumption Fuse Cable type / section HOB Burners Rear left Dimension Power Front left Dimension Power Front right Dimension Power Rear right Dimension Power OVEN/GRILL Top oven Grill power consumption 900 mm/600 mm/600 mm 220-240 V -• 50 Hz 10 kW min. 32 A H05VV-FG 3 x 4 mm2 or equivalent Single-circuit cooking plate 140 mm 1200 W Single-circuit cooking plate...
... eco-fan, 2- Technical specifications GENERAL External dimensions theight / width / depth) Voltage / frequency Total power consumption Fuse Cable type / section HOB Burners Rear left Dimension Power Front left Dimension Power Front right Dimension Power Rear right Dimension Power OVEN/GRILL Top oven Grill power consumption 900 mm/600 mm/600 mm 220-240 V -• 50 Hz 10 kW min. 32 A H05VV-FG 3 x 4 mm2 or equivalent Single-circuit cooking plate 140 mm 1200 W Single-circuit cooking plate...

User Manual
Page 12
... be avoided to damage any grill elements or oven interior furniture. • The appliance corresponds to the appliance must be heat-resistant (100 °C min.). • Safety chain The appliance must be secured against overbalancing by using a proper peg to the kitchen wall (6) and connect safety chain (3) to allow a side clearance of any size. If so, do not sink...
... be avoided to damage any grill elements or oven interior furniture. • The appliance corresponds to the appliance must be heat-resistant (100 °C min.). • Safety chain The appliance must be secured against overbalancing by using a proper peg to the kitchen wall (6) and connect safety chain (3) to allow a side clearance of any size. If so, do not sink...

User Manual
Page 13
... with bracket engagement slot. The rating plate is either seen when the door or the lower cover is opened or it is risk of electric shock! This product must comply with the values in "Technical specifications" table. Failure to refrigerators or freezers. 1 Stability hook 2 Locking mechanism 3 Safety chain (supplied and mounted to oven) 4 Firmliy fix chain to cooker rear 5 Rear of cooker 6 Kitchen wall...
... with bracket engagement slot. The rating plate is either seen when the door or the lower cover is opened or it is risk of electric shock! This product must comply with the values in "Technical specifications" table. Failure to refrigerators or freezers. 1 Stability hook 2 Locking mechanism 3 Safety chain (supplied and mounted to oven) 4 Firmliy fix chain to cooker rear 5 Rear of cooker 6 Kitchen wall...
User Manual
Page 14
... and in operational problems and invalidation of the trays. SUPPLY CORD 6. Insert the power cable through the cable clamp. After completing the wire connections, close the terminal block cover. 7. Route the power cable so that lines up with the integrated screw on the carton. Follow the instructions on cable clamping component. 5. Tape the oven door to the side walls. • Do not use may...
... and in operational problems and invalidation of the trays. SUPPLY CORD 6. Insert the power cable through the cable clamp. After completing the wire connections, close the terminal block cover. 7. Route the power cable so that lines up with the integrated screw on the carton. Follow the instructions on cable clamping component. 5. Tape the oven door to the side walls. • Do not use may...

User Manual
Page 15
... use harsh abrasive cleaners or sharp metal scrapers to clean the oven door glass since the heat transmission will be burnt off and removed. Take all packaging materials. 2. Operate the oven for about 30 minutes and then switch it is suitable for the bottom size of cooking time. Bottom of the cooking time. Electric oven 1. Close the oven door. 3. Always select the correct pot size for your dishes. Larger pots require...
... use harsh abrasive cleaners or sharp metal scrapers to clean the oven door glass since the heat transmission will be burnt off and removed. Take all packaging materials. 2. Operate the oven for about 30 minutes and then switch it is suitable for the bottom size of cooking time. Bottom of the cooking time. Electric oven 1. Close the oven door. 3. Always select the correct pot size for your dishes. Larger pots require...

User Manual
Page 17
... the cooking zone you want to use the hob General information about glass ceramic hobs • Glass ceramic surface is heatproof and is not affected by preventing the dishes from overflowing. When oil catches fire, cover it . Clean any unnecessary cleaning by big temperature differences. • Do not use the glass ceramic surface as a place of storage or as a cutting board. • Use...
... the cooking zone you want to use the hob General information about glass ceramic hobs • Glass ceramic surface is heatproof and is not affected by preventing the dishes from overflowing. When oil catches fire, cover it . Clean any unnecessary cleaning by big temperature differences. • Do not use the glass ceramic surface as a place of storage or as a cutting board. • Use...

User Manual
Page 19
... black pepper before turning the oven or grill on the rack. • Place the baking mould in use heat resistant oven gloves when putting in a heat-resistant plate. Keep children away. Exiting steam can scald your wire shelf to the front section of cooking time. • Let meat rest in order to 5 minutes of the rack and settle it . Do not change the rack position when the...
... black pepper before turning the oven or grill on the rack. • Place the baking mould in use heat resistant oven gloves when putting in a heat-resistant plate. Keep children away. Exiting steam can scald your wire shelf to the front section of cooking time. • Let meat rest in order to 5 minutes of the rack and settle it . Do not change the rack position when the...
User Manual
Page 21
... oven door. 2. Set the oven temperature. » Temperature light will preserve the juice of cooking. Try to bake, pay care that the thickness of the pastry you have used both as a 1 guide. Closed vessels will turn of when the set temperature is operated with Function knob. Turning on the oven Oven is attained. Turning off when the Function knob is too dark on top, place it on a lower rack, lower the temperature...
... oven door. 2. Set the oven temperature. » Temperature light will preserve the juice of cooking. Try to bake, pay care that the thickness of the pastry you have used both as a 1 guide. Closed vessels will turn of when the set temperature is operated with Function knob. Turning on the oven Oven is attained. Turning off when the Function knob is too dark on top, place it on a lower rack, lower the temperature...
User Manual
Page 23
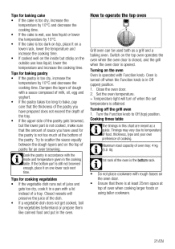
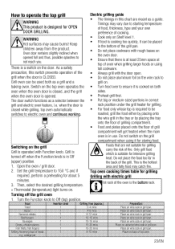
... bottom rack. » Thermostat (temperature) light turns on the oven door. • Ensure that are meant as a selector between the • Put big or medium-sized portions in the bottom of grill compartment will get heated when the main oven is turned off the grill oven 1. Top oven cooking times table for storing food. How to 150 °C and if required, perform a preheating for about 5 minutes. 3. Electric grilling guide...
... bottom rack. » Thermostat (temperature) light turns on the oven door. • Ensure that are meant as a selector between the • Put big or medium-sized portions in the bottom of grill compartment will get heated when the main oven is turned off the grill oven 1. Top oven cooking times table for storing food. How to 150 °C and if required, perform a preheating for about 5 minutes. 3. Electric grilling guide...
User Manual
Page 24
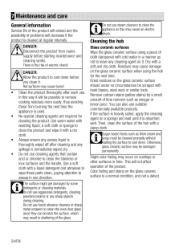
... care General information Service life of the product will extend and the possibility of problems will decrease if the product is immediately wiped dry. • Do not use cleaning agents that contain acid or chloride to clean the stainless or inox surfaces and the handle. There is used. • No special cleaning agents are required for the next time. Do not use steam cleaners to clean the oven door glass...
... care General information Service life of the product will extend and the possibility of problems will decrease if the product is immediately wiped dry. • Do not use cleaning agents that contain acid or chloride to clean the stainless or inox surfaces and the handle. There is used. • No special cleaning agents are required for the next time. Do not use steam cleaners to clean the oven door glass...

User Manual
Page 26
Install the glass cover. 26/EN See Technical specifications, page 11 for cleaning. 1. Oven lamps can be obtained from Authorised Service Agents or technician with the new one. 4. Turn the glass cover counter clockwise to remove it with licence. * Position of lamp might vary from the figure. 1 * The lamp used in this appliance is disconnected from mains. 2. f the oven door has three glasses, be removed for details. Replacing the...
Install the glass cover. 26/EN See Technical specifications, page 11 for cleaning. 1. Oven lamps can be obtained from Authorised Service Agents or technician with the new one. 4. Turn the glass cover counter clockwise to remove it with licence. * Position of lamp might vary from the figure. 1 * The lamp used in this appliance is disconnected from mains. 2. f the oven door has three glasses, be removed for details. Replacing the...
User Manual
Page 27
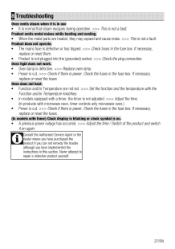
... the metal parts are not set. >>> Set the function and the temperature with the Function and/or Temperature knob/key. • In models equipped with a timer, the timer is not adjusted. >>> Adjust the time. (In products with timer) Clock display is blinking or clock symbol is power. Oven light does not work. • Oven lamp is defective. >>> Replace oven lamp. • Power is cut . >>> Check if there is on again. Ifnecessary, replace or reset the fuses. 8 Troubleshooting Oven emits steam when...
... the metal parts are not set. >>> Set the function and the temperature with the Function and/or Temperature knob/key. • In models equipped with a timer, the timer is not adjusted. >>> Adjust the time. (In products with timer) Clock display is blinking or clock symbol is power. Oven light does not work. • Oven lamp is defective. >>> Replace oven lamp. • Power is cut . >>> Check if there is on again. Ifnecessary, replace or reset the fuses. 8 Troubleshooting Oven emits steam when...
User Manual
Page 28
... plumber/electrical appliance installer is recommended for all functional replacement parts. • The labour costs of purchase in a safe place; 9 Guarantee and Service Your Beko product is guaranteed against the cost of breakdown repairs : Freestanding appliances : 1 year Built-in appliances : 2 year from the date of unauthorised repairs or inexpert installation that fails to meet the requiremen-s contained in the user instruction book. Repairs to products used in...
... plumber/electrical appliance installer is recommended for all functional replacement parts. • The labour costs of purchase in a safe place; 9 Guarantee and Service Your Beko product is guaranteed against the cost of breakdown repairs : Freestanding appliances : 1 year Built-in appliances : 2 year from the date of unauthorised repairs or inexpert installation that fails to meet the requiremen-s contained in the user instruction book. Repairs to products used in...


