User Manual
Page 4
... General information on baking, roasting and grilling 16 How to use the electric oven 16 Operating modes 17 How to operate the oven timer 18 How to use the program lock 19 Cooking times table 20 How to operate the grill 21 Cooking times table for grilling 22 How to use the alarm clock 22 6 MAINTENANCE AND CARE 23 General information 23 Cleaning the control panel 23 Cleaning the oven 23 Removal of oven door 23 Replacing the oven lamp 24 El TROUBLESHOOTING...
... General information on baking, roasting and grilling 16 How to use the electric oven 16 Operating modes 17 How to operate the oven timer 18 How to use the program lock 19 Cooking times table 20 How to operate the grill 21 Cooking times table for grilling 22 How to use the alarm clock 22 6 MAINTENANCE AND CARE 23 General information 23 Cleaning the control panel 23 Cleaning the oven 23 Removal of oven door 23 Replacing the oven lamp 24 El TROUBLESHOOTING...
User Manual
Page 6
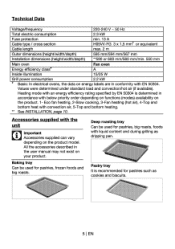
... as dripping pan. All the accessories described in the user manual may not exist on energy labels are in accordance with convection air, 5-Top and bottom heating. ** See INSTALLATION, page 10. Eco fan heating, 2-Slow cooking, 3-Fan heating (hot air), 4-Top and bottom heat with below priority order depending on functions (modes) availability on the product model. Baking tray Can be used for pastries, frozen foods and big roasts. Heating mode with an...
... as dripping pan. All the accessories described in the user manual may not exist on energy labels are in accordance with convection air, 5-Top and bottom heating. ** See INSTALLATION, page 10. Eco fan heating, 2-Slow cooking, 3-Fan heating (hot air), 4-Top and bottom heat with below priority order depending on functions (modes) availability on the product model. Baking tray Can be used for pastries, frozen foods and big roasts. Heating mode with an...
User Manual
Page 8
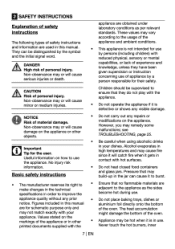
...; Do not place baking trays, dishes or aluminium foil directly onto the bottom of the oven. A• CAUTION Risk of personal injury. see TROUBLESHOOTING, page 25. • Be careful when using alcoholic drinks in your appliance. El SAFETY INSTRUCTIONS Explanation of safety instructions The following types of safety instructions and information are used in this manual are for schematic purpose only and may...
...; Do not place baking trays, dishes or aluminium foil directly onto the bottom of the oven. A• CAUTION Risk of personal injury. see TROUBLESHOOTING, page 25. • Be careful when using alcoholic drinks in your appliance. El SAFETY INSTRUCTIONS Explanation of safety instructions The following types of safety instructions and information are used in this manual are for schematic purpose only and may...
User Manual
Page 9
... that the fuse rating is beneficial to the environment. The manufacturer shall not be installed by • Rear surface of any damage, switch off , the cooling fan continues working with current regulations. The packaging material and transport locks are not harmful to the environment and saves precious raw materials. 8 I EN electricity • Always use or handling errors. Important For the warranty to...
... that the fuse rating is beneficial to the environment. The manufacturer shall not be installed by • Rear surface of any damage, switch off , the cooling fan continues working with current regulations. The packaging material and transport locks are not harmful to the environment and saves precious raw materials. 8 I EN electricity • Always use or handling errors. Important For the warranty to...

User Manual
Page 10
... environment. To prevent the wire shelf and tray inside the oven from damaging the oven door, place a strip of cardboard onto the inside of hazardous substances. Old equipment ENE This appliance bears the selective sorting symbol for the environment and human health due to the side walls. The appliance must be handled pursuant to European Directive 2002/96/EC in...
... environment. To prevent the wire shelf and tray inside the oven from damaging the oven door, place a strip of cardboard onto the inside of hazardous substances. Old equipment ENE This appliance bears the selective sorting symbol for the environment and human health due to the side walls. The appliance must be handled pursuant to European Directive 2002/96/EC in...
User Manual
Page 11
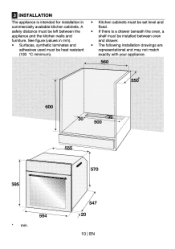
See figure (values in commercially available kitchen cabinets. El INSTALLATION The appliance is intended for installation in mm). • Surfaces, synthetic laminates and adhesives used must be heat resistant (100 °C minimum). • Kitchen cabinets must be set level and fixed. • If there is a drawer beneath the oven, a shelf must be installed between the appliance and the kitchen walls and furniture. A safety distance must...
See figure (values in commercially available kitchen cabinets. El INSTALLATION The appliance is intended for installation in mm). • Surfaces, synthetic laminates and adhesives used must be heat resistant (100 °C minimum). • Kitchen cabinets must be set level and fixed. • If there is a drawer beneath the oven, a shelf must be installed between the appliance and the kitchen walls and furniture. A safety distance must...

User Manual
Page 13
... any work on the type plate of the appliance. Failure to observe this instruction may be connected to the mains supply only by an authorized qualified person and the appliance is only guaranteed after appliance has been installed in operational problems and invalidation of the appliance warranty. Connect the cables according to the supplied diagram. Close the cover of electric shock! Open the...
... any work on the type plate of the appliance. Failure to observe this instruction may be connected to the mains supply only by an authorized qualified person and the appliance is only guaranteed after appliance has been installed in operational problems and invalidation of the appliance warranty. Connect the cables according to the supplied diagram. Close the cover of electric shock! Open the...
User Manual
Page 15
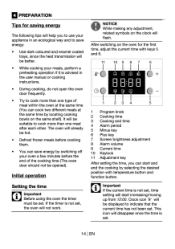
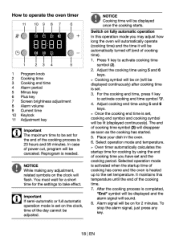
... be displayed to cook more than one type of the cooking time (The oven door should not be opened). It will be set . 4 PREPARATION Tips for the first time, adjust the current time with temperature button and function button. The oven will start and end the cooking by selecting the desired position with keys 5 and 6. 11 10 9 8 6 ID II El 0 O•O U. Initial operation Setting the time Important Before using the oven the timer...
... be displayed to cook more than one type of the cooking time (The oven door should not be opened). It will be set . 4 PREPARATION Tips for the first time, adjust the current time with temperature button and function button. The oven will start and end the cooking by selecting the desired position with keys 5 and 6. 11 10 9 8 6 ID II El 0 O•O U. Initial operation Setting the time Important Before using the oven the timer...

User Manual
Page 16
... will need to be set again. Changing screen brightness adjustment 1. Take all baking trays and racks from the appliance. Select the highest temperature with a cloth. see How to use . Important Smell and smoke may cause burns! Electric oven 1. Close oven door. 3. Heat approximately 30 minutes. 5. Adjust hour of power failure and will be burnt before the first use the electric oven, page 16 Grill oven 1. Switch off oven; see How to operate the...
... will need to be set again. Changing screen brightness adjustment 1. Take all baking trays and racks from the appliance. Select the highest temperature with a cloth. see How to use . Important Smell and smoke may cause burns! Electric oven 1. Close oven door. 3. Heat approximately 30 minutes. 5. Adjust hour of power failure and will be burnt before the first use the electric oven, page 16 Grill oven 1. Switch off oven; see How to operate the...
User Manual
Page 17
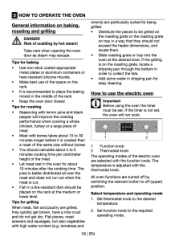
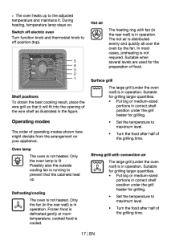
... meat is not set . tomatoes and onions) are grilled, they should not exceed the heater dimensions, and locate them. • Slide roasting grate or tray into the oven at the medium or lower level. Take care when opening the oven door as steam may escape. How to use of the same size without bones. • You should be set , the oven will improve the cooking performance when cooking...
... meat is not set . tomatoes and onions) are grilled, they should not exceed the heater dimensions, and locate them. • Slide roasting grate or tray into the oven at the medium or lower level. Take care when opening the oven door as steam may escape. How to use of the same size without bones. • You should be set , the oven will improve the cooking performance when cooking...
User Manual
Page 18
... of operating modes shown here might deviate from the arrangement on . Switch off electric oven Turn function knob and thermostat knob to maximum level. • Turn the food after half of the grilling time. 171 EN Only the fan (in the rear wall) is not heated. In most cases, preheating is cooled. Frozen food is defrosted gently at room temperature, cooked food is not required. Surface...
... of operating modes shown here might deviate from the arrangement on . Switch off electric oven Turn function knob and thermostat knob to maximum level. • Turn the food after half of the grilling time. 171 EN Only the fan (in the rear wall) is not heated. In most cases, preheating is cooled. Frozen food is defrosted gently at room temperature, cooked food is not required. Surface...
User Manual
Page 19
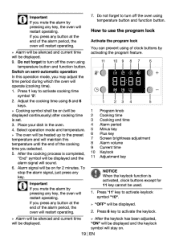
... cooking time you may adjust how long the oven will automatically operate (cooking time) and the time it will be adjusted. Select operation mode and temperature. » Oven timer automatically calculates the startup time for the settings to take effect. It maintains this operation mode you have set . 3. Reprogram is set and the cooking period. Alarm signal will be displayed continuously) after cooking time is needed. The end of the cooking time. 7. Switch on fully automatic operation In this temperature...
... cooking time you may adjust how long the oven will automatically operate (cooking time) and the time it will be adjusted. Select operation mode and temperature. » Oven timer automatically calculates the startup time for the settings to take effect. It maintains this operation mode you have set . 3. Reprogram is set and the cooking period. Alarm signal will be displayed continuously) after cooking time is needed. The end of the cooking time. 7. Switch on fully automatic operation In this temperature...
User Manual
Page 20
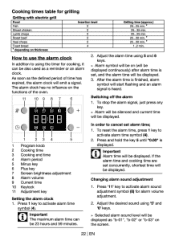
..., the oven will restart operating. 7. To stop the alarm signal, just press any key. Select operation mode and temperature. » The oven will be on . 19 I 23 4 5 1 Program knob 2 Cooking time 3 Cooking end time 4 Alarm period 5 Minus key 6 Plus key 7 Screen brightness adjustment 8 Alarm volume 9 Current time 10 Keylock 11 Adjustment key NOTICE j When the keylock function is set. 3. Alarm signal will be heated up to...
..., the oven will restart operating. 7. To stop the alarm signal, just press any key. Select operation mode and temperature. » The oven will be on . 19 I 23 4 5 1 Program knob 2 Cooking time 3 Cooking end time 4 Alarm period 5 Minus key 6 Plus key 7 Screen brightness adjustment 8 Alarm volume 9 Current time 10 Keylock 11 Adjustment key NOTICE j When the keylock function is set. 3. Alarm signal will be heated up to...

User Manual
Page 21
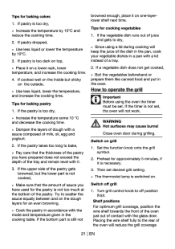
... oven. Baking and roasting Important Level 1 is turned off. The values suitable for you may deviate from these values. » "OFF" will be displayed after 150 ... 210 190 Fish One level Ell 3 200 20 ... 30 While cooking with 2 trays at the same time, place the oven tray... at the upper shelf and pastry tray at the lower shelf. 20 I EN Food Cake in tray Cake in mould Cakes in paper Cooking level number One level 2 levels One level One level 2 levels Rack position Temperature Cooking time ic) 3 (&#...
... oven. Baking and roasting Important Level 1 is turned off. The values suitable for you may deviate from these values. » "OFF" will be displayed after 150 ... 210 190 Fish One level Ell 3 200 20 ... 30 While cooking with 2 trays at the same time, place the oven tray... at the upper shelf and pastry tray at the lower shelf. 20 I EN Food Cake in tray Cake in mould Cakes in paper Cooking level number One level 2 levels One level One level 2 levels Rack position Temperature Cooking time ic) 3 (&#...
User Manual
Page 22
... the mode and temperature given in the oven. If the upper side of the oven will not work. Cook the pastry in accordance with the glass door. If the bottom part is too dry, 2. Set the function knob onto the grill symbol. 2. Then set , the oven will reduce the grill coverage 21 1 EN Placing the wire shelf fully to operate the grill Important Before using...
... the mode and temperature given in the oven. If the upper side of the oven will not work. Cook the pastry in accordance with the glass door. If the bottom part is too dry, 2. Set the function knob onto the grill symbol. 2. Then set , the oven will reduce the grill coverage 21 1 EN Placing the wire shelf fully to operate the grill Important Before using...
User Manual
Page 23
... displayed. Adjust the alarm time using 5 and 6 keys. » Alarm symbol will start flashing and an alarm signal is displayed. Switching off the alarm 1. Adjust the desired sound using the timer for cooking, it can be 23 hours and 59 minutes. » Selected alarm sound level will be on the functions of time has expired, the alarm clock will be displayed. After the alarm time...
... displayed. Adjust the alarm time using 5 and 6 keys. » Alarm symbol will start flashing and an alarm signal is displayed. Switching off the alarm 1. Adjust the desired sound using the timer for cooking, it can be 23 hours and 59 minutes. » Selected alarm sound level will be on the functions of time has expired, the alarm clock will be displayed. After the alarm time...

User Manual
Page 24
... time the appliance is still warm. Removal of electric shock! Clean control panel and control knobs. 6 MAINTENANCE AND CARE General information n. Cleaning the control panel NOTICE Damage of the front door by some detergents or cleaning materials. Do not remove the control knobs for cleaning the appliance. No special cleaning agents are required for control panel cleaning. It is required for drying. Cleaning the oven No oven cleaner or any sharp objects. Clean oven door Don't use a dry cloth for cleaning the oven...
... time the appliance is still warm. Removal of electric shock! Clean control panel and control knobs. 6 MAINTENANCE AND CARE General information n. Cleaning the control panel NOTICE Damage of the front door by some detergents or cleaning materials. Do not remove the control knobs for cleaning the appliance. No special cleaning agents are required for control panel cleaning. It is required for drying. Cleaning the oven No oven cleaner or any sharp objects. Clean oven door Don't use a dry cloth for cleaning the oven...

User Manual
Page 25
... left hinges. see Technical Data, page 5. Unscrew glass cover by turning anticlockwise and replace it from a good local electrical or DIY store. Move the front door to avoid the risk of lamp might vary from diagram. 1. Do not forget to close the clips at the mains. 2. Replacing the oven lamp IL, DANGER Hot surfaces may cause burns! Remove the front door by...
... left hinges. see Technical Data, page 5. Unscrew glass cover by turning anticlockwise and replace it from a good local electrical or DIY store. Move the front door to avoid the risk of lamp might vary from diagram. 1. Do not forget to close the clips at the mains. 2. Replacing the oven lamp IL, DANGER Hot surfaces may cause burns! Remove the front door by...
User Manual
Page 26
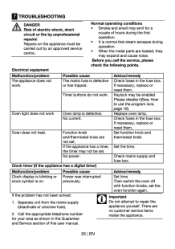
... to repair the appliance yourself. previously. and Service section of hours during the first operation. • It is defective. Electrical equipment Normal operating conditions • Smoke and smell may expand and cause noise. Timer buttons do not work . Please disable it(See; Replace oven lamp. Check mains supply and fuse box. Malfunction/problem Possible cause Advice/remedy Clock display is blinking or Power was interrupted Set time clock symbol is...
... to repair the appliance yourself. previously. and Service section of hours during the first operation. • It is defective. Electrical equipment Normal operating conditions • Smoke and smell may expand and cause noise. Timer buttons do not work . Please disable it(See; Replace oven lamp. Check mains supply and fuse box. Malfunction/problem Possible cause Advice/remedy Clock display is blinking or Power was interrupted Set time clock symbol is...
User Manual
Page 27
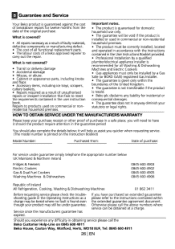
.... 8 Guarantee and Service Your Beko product is not covered? • Transit or delivery damage • Accidental damage • Misuse, or abuse. • Cabinet or appearance parts, including knobs and flaps • Accessory items, including ice trays, scrapers, cutlery baskets, • Repairs required as a result of unauthorised repairs or inexpert installation that fails to meet the requirements contained in the user instruction book. What is guaranteed...
.... 8 Guarantee and Service Your Beko product is not covered? • Transit or delivery damage • Accidental damage • Misuse, or abuse. • Cabinet or appearance parts, including knobs and flaps • Accessory items, including ice trays, scrapers, cutlery baskets, • Repairs required as a result of unauthorised repairs or inexpert installation that fails to meet the requirements contained in the user instruction book. What is guaranteed...


