User Manual
Page 2
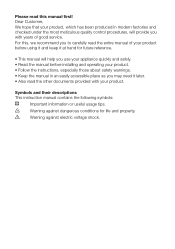
... electric voltage shock. Symbols and their descriptions This instruction manual contains the following symbols: C Important information or useful usage tips. B Warning against dangerous conditions for future reference. • This manual will provide you with years of good service. Dear Customer, We hope that your product, which has been produced in an easily accessible place as you may need...
... electric voltage shock. Symbols and their descriptions This instruction manual contains the following symbols: C Important information or useful usage tips. B Warning against dangerous conditions for future reference. • This manual will provide you with years of good service. Dear Customer, We hope that your product, which has been produced in an easily accessible place as you may need...
User Manual
Page 3
... earthed 6 Energy saving tips 6 Compliance with WEEE Directive and Disposing of the Waste Product: ....... 7 Compliance with rohs directive:......... 7 Package information 7 4 Before operating 12 Final Check 12 5 Using your refrigerator 13 Temperature Control And Adjustment 14 Defrosting 15 6 Maintenance and cleaning 16 7 Do's and Don'ts 17 3 Installation 8 Transportation Instructions 8 Installation Instructions 8 8 Guarantee Details 18 9 How To Obtain Service 19 3 EN CONTENTS 1 Your refrigerator 4 2 Warnings 5 Electrical requirements...
... earthed 6 Energy saving tips 6 Compliance with WEEE Directive and Disposing of the Waste Product: ....... 7 Compliance with rohs directive:......... 7 Package information 7 4 Before operating 12 Final Check 12 5 Using your refrigerator 13 Temperature Control And Adjustment 14 Defrosting 15 6 Maintenance and cleaning 16 7 Do's and Don'ts 17 3 Installation 8 Transportation Instructions 8 Installation Instructions 8 8 Guarantee Details 18 9 How To Obtain Service 19 3 EN CONTENTS 1 Your refrigerator 4 2 Warnings 5 Electrical requirements...
User Manual
Page 4
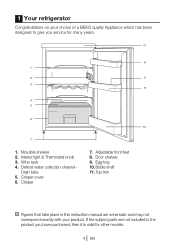
... that take place in the product you service for other models. 4 EN Adjustable front feet 8. Egg tray 10. Defrost water collection channel - Movable shelves 2. Wine rack 4. Bottle shelf 11. Drain tube 5. Crisper 7. Crisper cover 6. 1 Your refrigerator Congratulations on your product. Interior light & Thermostat knob 3. If the subject parts are not included in this instruction manual are schematic and may not correspond exactly with your choice of a BEKO quality Appliance which has been designed...
... that take place in the product you service for other models. 4 EN Adjustable front feet 8. Egg tray 10. Defrost water collection channel - Movable shelves 2. Wine rack 4. Bottle shelf 11. Drain tube 5. Crisper 7. Crisper cover 6. 1 Your refrigerator Congratulations on your product. Interior light & Thermostat knob 3. If the subject parts are not included in this instruction manual are schematic and may not correspond exactly with your choice of a BEKO quality Appliance which has been designed...
User Manual
Page 5
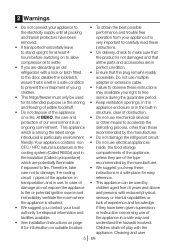
.... At BEKO, the care and • Do not use . This appliance defrosting process, other means to accelerate the ongoing commitment. In case of the appliance in reference. Cleaning and user 5 EN very important to carefully read these instructions children. introduced is not damaged and that it is removed. on suitable location. if exposed to free • This fridge/freezer must only be used service during...
.... At BEKO, the care and • Do not use . This appliance defrosting process, other means to accelerate the ongoing commitment. In case of the appliance in reference. Cleaning and user 5 EN very important to carefully read these instructions children. introduced is not damaged and that it is removed. on suitable location. if exposed to free • This fridge/freezer must only be used service during...
User Manual
Page 6
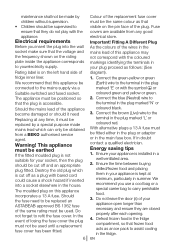
... ventilated area. 2. Fuse covers are closed properly after each opening. 4. Connect the green-yellow or green (Earth) wire to the terminal in the plug marked 'N' or coloured black. 3. Warning! Should the fuse need Replacing at any good electrical store. Fitting A Different Plug As the colours of fridge inner liner. If in the fridge. Defrost frozen food in the fridge compartment, so that frozen...
... ventilated area. 2. Fuse covers are closed properly after each opening. 4. Connect the green-yellow or green (Earth) wire to the terminal in the plug marked 'N' or coloured black. 3. Warning! Should the fuse need Replacing at any good electrical store. Fitting A Different Plug As the colours of fridge inner liner. If in the fridge. Defrost frozen food in the fridge compartment, so that frozen...
User Manual
Page 7
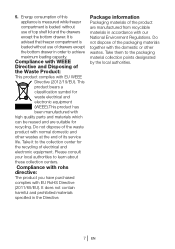
... advised that freezer compartment is loaded without use of electrical and electronic equipment. Do not dispose of its service life. It does not contain harmful and prohibited materials specified in accordance with WEEE Directive and Disposing of the product are suitable for the recycling of top shelf lid and the drawers except the bottom drawer. Take them...
... advised that freezer compartment is loaded without use of electrical and electronic equipment. Do not dispose of its service life. It does not contain harmful and prohibited materials specified in accordance with WEEE Directive and Disposing of the product are suitable for the recycling of top shelf lid and the drawers except the bottom drawer. Take them...
User Manual
Page 8
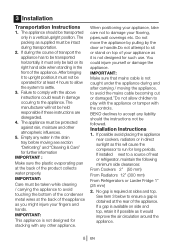
... bottom of the condenser metal wires at the rear of the product collects water properly. Installation Instructions 1. The appliance must only be protected against rain, moisture and other appliance. Failure to the appliance. IMPORTANT: Care must be followed. No gap is not designed for further information IMPORTANT : Make sure the plastic evaporating pan at least 4 hours to allow...
... bottom of the condenser metal wires at the rear of the product collects water properly. Installation Instructions 1. The appliance must only be protected against rain, moisture and other appliance. Failure to the appliance. IMPORTANT: Care must be followed. No gap is not designed for further information IMPORTANT : Make sure the plastic evaporating pan at least 4 hours to allow...
User Manual
Page 9
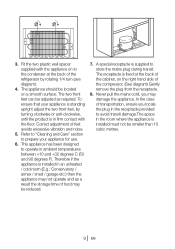
... receptacle is standing upright adjust the two front feet, by rotating 1/4 turn (see diagram). 4. Refer to "Cleaning and Care" section to prepare your appliance is supplied to the condenser at the back of the refrigerator by turning clockwise or anti-clockwise, until the product is fixed at the back of feet avoids excessive vibration and noise. 5. To ensure that your appliance for use. 6.
... receptacle is standing upright adjust the two front feet, by rotating 1/4 turn (see diagram). 4. Refer to "Cleaning and Care" section to prepare your appliance is supplied to the condenser at the back of the refrigerator by turning clockwise or anti-clockwise, until the product is fixed at the back of feet avoids excessive vibration and noise. 5. To ensure that your appliance for use. 6.
User Manual
Page 10
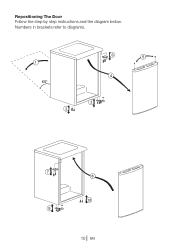
Repositioning The Door Follow the step by step instructions and the diagram below. Numbers in brackets refer to diagrams. 1 60° 6 5 4 3 2 7 8 10 9 10 EN
Repositioning The Door Follow the step by step instructions and the diagram below. Numbers in brackets refer to diagrams. 1 60° 6 5 4 3 2 7 8 10 9 10 EN
User Manual
Page 11
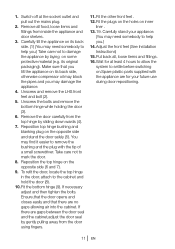
... plastic parts supplied with the tip of a small screwdriver. Remove the door carefully from inside the appliance and door shelves. 3. If there are for at the socket outlet and pull out the mains plug. 2. Carefully stand your future use during door repositioning. 11 EN Fit the other front feet . 12. its back side, otherwise compressor oil may damage the appliance. 4. Adjust the front feet (See Installation Instructions) 15. Switch...
... plastic parts supplied with the tip of a small screwdriver. Remove the door carefully from inside the appliance and door shelves. 3. If there are for at the socket outlet and pull out the mains plug. 2. Carefully stand your future use during door repositioning. 11 EN Fit the other front feet . 12. its back side, otherwise compressor oil may damage the appliance. 4. Adjust the front feet (See Installation Instructions) 15. Switch...
User Manual
Page 12
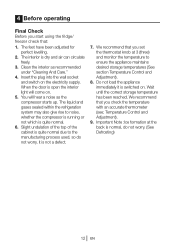
... start using the fridge/ freezer check that you check the temperature with an accurate thermometer (see; Insert the plug into the wall socket and switch on . You will come on. 5. Do not load the appliance immediately it is open the interior light will hear a noise as recommended under "Cleaning And Care." 4. We recommend that : 1. Clean the interior as the compressor starts up. The feet have been adjusted...
... start using the fridge/ freezer check that you check the temperature with an accurate thermometer (see; Insert the plug into the wall socket and switch on . You will come on. 5. Do not load the appliance immediately it is open the interior light will hear a noise as recommended under "Cleaning And Care." 4. We recommend that : 1. Clean the interior as the compressor starts up. The feet have been adjusted...
User Manual
Page 13
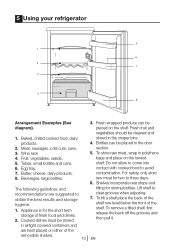
.... Tubes, small bottles and cans. 6. Fresh wrapped produce can be cleaned and stored in airtight covered containers and are suggested to three days. 6. Shelves incorporate rear stops and tilting for two to obtain the best results and storage hygiene. 1. To tilt a shelf place the back of the shelf one level below the front of the shelf. Wine rack 4. To remove...
.... Tubes, small bottles and cans. 6. Fresh wrapped produce can be cleaned and stored in airtight covered containers and are suggested to three days. 6. Shelves incorporate rear stops and tilting for two to obtain the best results and storage hygiene. 1. To tilt a shelf place the back of the shelf one level below the front of the shelf. Wine rack 4. To remove...
User Manual
Page 14
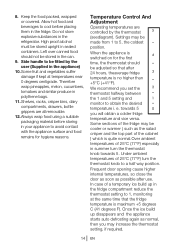
... similar produce in the refrigerator. In case of a temporary ice build up disappears and the appliance starts auto defrosting again as possible after 24 hours, theaverage fridge temperature is switched on for hygiene reasons. Shelves, racks, crisper bins, dairy compartments, drawers, bottle grippers are controlled by the user (Supplied in the fridge. Settings may increase the thermostat setting, if required. 14 EN Side handle to be made from...
... similar produce in the refrigerator. In case of a temporary ice build up disappears and the appliance starts auto defrosting again as possible after 24 hours, theaverage fridge temperature is switched on for hygiene reasons. Shelves, racks, crisper bins, dairy compartments, drawers, bottle grippers are controlled by the user (Supplied in the fridge. Settings may increase the thermostat setting, if required. 14 EN Side handle to be made from...
User Manual
Page 15
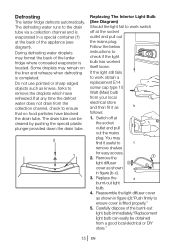
...-out light bulb. 4. The defrosting water runs to remove shelves for easy access. 2. The drain tube can easily be cleared by pushing the special plastic plunger provided down the drain tube. 2 1 Replacing The Interior Light Bulb (See Diagram) Should the light fail to work obtain a replacement E14 screw cap type 15 Watt (Max) bulb from your local electrical store and then fit it useful to the drain tube via a collection channel and is located. Remove the light diffuser cover as...
...-out light bulb. 4. The defrosting water runs to remove shelves for easy access. 2. The drain tube can easily be cleared by pushing the special plastic plunger provided down the drain tube. 2 1 Replacing The Interior Light Bulb (See Diagram) Should the light fail to work obtain a replacement E14 screw cap type 15 Watt (Max) bulb from your local electrical store and then fit it useful to the drain tube via a collection channel and is located. Remove the light diffuser cover as...
User Manual
Page 16
... door seals regularly to clean the cabinet of time switch it off,remove all food, clean it and leave the door ajar. • Any dust that gathers on the condenser, which is located at the socket outlet and pull out the mains plug before cleaning. • Never use any...temperatures in a solution of one teaspoon of bicarbonate of soda to one pint of water to clean the interior and wipe it dry. • Use a damp cloth wrung out in any sharp abrasive instrument, soap, household cleaner, detergent and wax polish for cleaning. • Use luke warm water to ensure they are clean and free...
... door seals regularly to clean the cabinet of time switch it off,remove all food, clean it and leave the door ajar. • Any dust that gathers on the condenser, which is located at the socket outlet and pull out the mains plug before cleaning. • Never use any...temperatures in a solution of one teaspoon of bicarbonate of soda to one pint of water to clean the interior and wipe it dry. • Use a damp cloth wrung out in any sharp abrasive instrument, soap, household cleaner, detergent and wax polish for cleaning. • Use luke warm water to ensure they are clean and free...
User Manual
Page 17
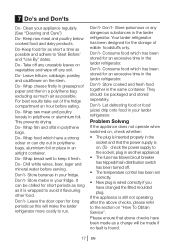
...- Clean your fridge. Problem Solvıng If the appliance does not operate when switched on, check whether: • The plug is inserted properly in a polythene bag excluding as much air as a charge will make the larder refrigerator more costly to run. Leave lettuce, cabbage, parsley and cauliflower on vegetables and wipe off . • The temperature control has been set correctly. • New plug is...
...- Clean your fridge. Problem Solvıng If the appliance does not operate when switched on, check whether: • The plug is inserted properly in a polythene bag excluding as much air as a charge will make the larder refrigerator more costly to run. Leave lettuce, cabbage, parsley and cauliflower on vegetables and wipe off . • The temperature control has been set correctly. • New plug is...
User Manual
Page 18
... appearance parts, including control knobs, flaps, handles or container lids. • Accessories or consumable items including but not limited to, ice trays, scrapers, cutlery baskets, filters and light bulbs. • Repairs required as a result of faulty materials, defective components or manufacturing defect. • The cost of functional replacement parts, but excluding consumable items. • The labour costs of a Beko approved repairer to new products...
... appearance parts, including control knobs, flaps, handles or container lids. • Accessories or consumable items including but not limited to, ice trays, scrapers, cutlery baskets, filters and light bulbs. • Repairs required as a result of faulty materials, defective components or manufacturing defect. • The cost of functional replacement parts, but excluding consumable items. • The labour costs of a Beko approved repairer to new products...
User Manual
Page 19
... Before requesting service please check the trouble-shooting guide in obtaining service please contact the Beko Customer Help-Line. it should also complete the details below UK Mainland & Northern Ireland Fridges & Freezers Electric Cookers Gas & Dual Fuel Cookers Washing Machines & Dishwashers Republic of purchase in a safe place; Should you when requesting service. (The model number is printed on the Rating Label affixed to the instructions contained...
... Before requesting service please check the trouble-shooting guide in obtaining service please contact the Beko Customer Help-Line. it should also complete the details below UK Mainland & Northern Ireland Fridges & Freezers Electric Cookers Gas & Dual Fuel Cookers Washing Machines & Dishwashers Republic of purchase in a safe place; Should you when requesting service. (The model number is printed on the Rating Label affixed to the instructions contained...

User Manual
Page 20
BEKO plc Beko House Caxton Way Watford Hertfordshire WD18 8UF Tel: 0845 6004911 Fax: 0845 6004922 e-mail: service@beko.co.uk website: www.beko.co.uk Printed in Turkey Part no:57 1227 0000 Revision no: AH
BEKO plc Beko House Caxton Way Watford Hertfordshire WD18 8UF Tel: 0845 6004911 Fax: 0845 6004922 e-mail: service@beko.co.uk website: www.beko.co.uk Printed in Turkey Part no:57 1227 0000 Revision no: AH


