
User Manual
Page 2
... 5 Specifications 7 4 Installation 5 Pre-Configuration 8 Step-by-Step Installation Guide 9 6 Single PRO2 PS/2 Installation 10 7 Connecting Multiple PRO2 PS/2s (Daisy-Chaining 12 Powering up the Systems 16 8 Using your PRO2 PS/2 9 Selecting a Computer Using Keyboard Hot Key Commands . . . . 17 AutoScan Mode 18 10 Selecting a Computer Using Direct-Access Port Selectors . . . . . 18 Bank Up and Bank Down Scroll Buttons 18 On-Screen Display Menu Control 20 Belkin KVM Switches and Accessories OmniView KVM Switches 23...
... 5 Specifications 7 4 Installation 5 Pre-Configuration 8 Step-by-Step Installation Guide 9 6 Single PRO2 PS/2 Installation 10 7 Connecting Multiple PRO2 PS/2s (Daisy-Chaining 12 Powering up the Systems 16 8 Using your PRO2 PS/2 9 Selecting a Computer Using Keyboard Hot Key Commands . . . . 17 AutoScan Mode 18 10 Selecting a Computer Using Direct-Access Port Selectors . . . . . 18 Bank Up and Bank Down Scroll Buttons 18 On-Screen Display Menu Control 20 Belkin KVM Switches and Accessories OmniView KVM Switches 23...

User Manual
Page 3
... PRO2 PS/2 also comes with Screws • USB Flash Cable • User Manual • Quick Installation Guide • 12-Volt DC, 1-Amp Power Supply • Registration Card 1 Designed to troubleshooting-in the unlikely event of a 7 problem. section Overview Congratulations on your new PRO2 PS/2, from installation and operation to give 3 you control over multiple computers and servers from one console, Belkin 4 PRO2 PS/2s come in a variety of...
... PRO2 PS/2 also comes with Screws • USB Flash Cable • User Manual • Quick Installation Guide • 12-Volt DC, 1-Amp Power Supply • Registration Card 1 Designed to troubleshooting-in the unlikely event of a 7 problem. section Overview Congratulations on your new PRO2 PS/2, from installation and operation to give 3 you control over multiple computers and servers from one console, Belkin 4 PRO2 PS/2s come in a variety of...

User Manual
Page 4
.... By using designated key commands. To preserve signal integrity at belkin. For complete instructions on your keyboard, selecting one keyboard, monitor, and mouse. On-Screen Display (OSD): The OSD feature simplifies server management by one. For a listing of your PRO2 PS/2 to set your PRO2 PS/2. com for each connected server throughout the system. Firmware upgrades are free for the AutoScan function. 2 Refer to a maximum of switching between...
.... By using designated key commands. To preserve signal integrity at belkin. For complete instructions on your keyboard, selecting one keyboard, monitor, and mouse. On-Screen Display (OSD): The OSD feature simplifies server management by one. For a listing of your PRO2 PS/2 to set your PRO2 PS/2. com for each connected server throughout the system. Firmware upgrades are free for the AutoScan function. 2 Refer to a maximum of switching between...

User Manual
Page 5
... Requirements Cables: To connect to the PRO2 PS/2, each PS/2 computer requires one VGA 8 cable, one PS/2 keyboard cable, and one PS/2 mouse cable. A flashing port LED indicates that there is pushed, the LED next to it will light up to 2048x1536@85Hz requires use OmniView All-In-One PRO Series Plus Cables. These cables offer the highest quality possible to that the console currently controls...
... Requirements Cables: To connect to the PRO2 PS/2, each PS/2 computer requires one VGA 8 cable, one PS/2 keyboard cable, and one PS/2 mouse cable. A flashing port LED indicates that there is pushed, the LED next to it will light up to 2048x1536@85Hz requires use OmniView All-In-One PRO Series Plus Cables. These cables offer the highest quality possible to that the console currently controls...

User Manual
Page 9
... type Port LED Indicators: 9 4 (F1DA104Pea) 8 (F1DA108Pea) 16 (F1DA116Pea) 10 Enclosure: Metal enclosure with center-pin positive polarity Daisy-Chain: Maximum of 16 KVM Switches Computer Connections Supported: 3 4 (F1DA104Pea) 8 (F1DA108Pea) 4 16 (F1DA116Pea) Keyboard Emulation: PS/2 5 Mouse Emulation: PS/2 6 Monitors Supported: VGA, SVGA, MultiSync, and LCD (optional adapter may be required) Max. Overview section Specifications 1 Part No.: F1DA104Pea, F1DA108Pea & F1DA116Pea 2 Power: 12-Volt DC, 1-Amp power adapter...
... type Port LED Indicators: 9 4 (F1DA104Pea) 8 (F1DA108Pea) 16 (F1DA116Pea) 10 Enclosure: Metal enclosure with center-pin positive polarity Daisy-Chain: Maximum of 16 KVM Switches Computer Connections Supported: 3 4 (F1DA104Pea) 8 (F1DA108Pea) 4 16 (F1DA116Pea) Keyboard Emulation: PS/2 5 Mouse Emulation: PS/2 6 Monitors Supported: VGA, SVGA, MultiSync, and LCD (optional adapter may be required) Max. Overview section Specifications 1 Part No.: F1DA104Pea, F1DA108Pea & F1DA116Pea 2 Power: 12-Volt DC, 1-Amp power adapter...

User Manual
Page 10
... Belkin CAT5 Extender (F1D084vea2) with these switches for a study rack installation. 4 An optional rack-mount kit (F1D005) is designed for use the direct-access port selectors; • the lengths of the cables attached to your keyboard, monitor, 7 and mouse; • the location of your CPUs in standard 19-inch server racks. and 16-port PRO2 PS/2s are natively rack-mountable in relation to your console...
... Belkin CAT5 Extender (F1D084vea2) with these switches for a study rack installation. 4 An optional rack-mount kit (F1D005) is designed for use the direct-access port selectors; • the lengths of the cables attached to your keyboard, monitor, 7 and mouse; • the location of your CPUs in standard 19-inch server racks. and 16-port PRO2 PS/2s are natively rack-mountable in relation to your console...

User Manual
Page 11
... brackets allow the faceplate of the rails). 2. Belkin Components is powered off. Determine how far you to set the BANK address prior to installing on may cause 3 irreversible damage to the section in 19-inch racks. or 16-Port PRO2 PS/2s include adjustable mounting brackets ideal for damage caused in this user manual labeled "Connecting Multiple PRO2 PS/2s (Daisy-Chaining)". 9
... brackets allow the faceplate of the rails). 2. Belkin Components is powered off. Determine how far you to set the BANK address prior to installing on may cause 3 irreversible damage to the section in 19-inch racks. or 16-Port PRO2 PS/2s include adjustable mounting brackets ideal for damage caused in this user manual labeled "Connecting Multiple PRO2 PS/2s (Daisy-Chaining)". 9

User Manual
Page 12
Sequentially push the direct-access port selectors for ports 01 through 08 (04 for F1DA104Pea and 16 for connecting your monitor cable to the DC power jack labeled "DC 12V, 1A" located on the rear of a single PRO2 PS/2. (F1DA104Pea, F1DA108Pea, and F1DA116Pea) PS/2 Installation: Keyboard, Video, and Mouse Connections Connect the Console: 1. The corresponding LED should flash as each button is pressed, indicating that...
Sequentially push the direct-access port selectors for ports 01 through 08 (04 for F1DA104Pea and 16 for connecting your monitor cable to the DC power jack labeled "DC 12V, 1A" located on the rear of a single PRO2 PS/2. (F1DA104Pea, F1DA108Pea, and F1DA116Pea) PS/2 Installation: Keyboard, Video, and Mouse Connections Connect the Console: 1. The corresponding LED should flash as each button is pressed, indicating that...

User Manual
Page 14
...-chain cable (F1D108-CBL) is required to daisy-chain each unit is available through 15). section Installation 1 Connecting Multiple PRO2 PS/2s (Daisy-Chaining) 2 You can daisy-chain up to the "Master" (BANK address 00) setting. chained together, each PRO2 PS/2 and is referred to "BANK address 00". The BANK DIP switch is the factory default setting. 8 • For multi-unit configuration, the...
...-chain cable (F1D108-CBL) is required to daisy-chain each unit is available through 15). section Installation 1 Connecting Multiple PRO2 PS/2s (Daisy-Chaining) 2 You can daisy-chain up to the "Master" (BANK address 00) setting. chained together, each PRO2 PS/2 and is referred to "BANK address 00". The BANK DIP switch is the factory default setting. 8 • For multi-unit configuration, the...
User Manual
Page 17
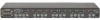
...) Connecting the Computers: 1 2 3 4 5 6 7 8 9. Refer to 9 "Single PRO2 PS/2 Installation" on page 10 for instruction on the Master switch will register and display the attached Slave switch's BANK address. 15 Power up . Each switch should see the Master switch light up and display the digits "00", indicating its corresponding BANK address number as it is powered up the Master switch. Verify that all daisy-chain cables are...
...) Connecting the Computers: 1 2 3 4 5 6 7 8 9. Refer to 9 "Single PRO2 PS/2 Installation" on page 10 for instruction on the Master switch will register and display the attached Slave switch's BANK address. 15 Power up . Each switch should see the Master switch light up and display the digits "00", indicating its corresponding BANK address number as it is powered up the Master switch. Verify that all daisy-chain cables are...

User Manual
Page 18
... the Troubleshooting section in 6 this with all occupied ports to boot normally. If the problem persists, please refer to refresh after switching computers. The computer connected to port "1" will be powered on the front panel of the mouse and keyboard signals also occurs. Using Your PRO2 PS/2: 7 Now that you encounter 5 an error, check your cable connections for use. Select connected computers by using hot key commands through the Console...
... the Troubleshooting section in 6 this with all occupied ports to boot normally. If the problem persists, please refer to refresh after switching computers. The computer connected to port "1" will be powered on the front panel of the mouse and keyboard signals also occurs. Using Your PRO2 PS/2: 7 Now that you encounter 5 an error, check your cable connections for use. Select connected computers by using hot key commands through the Console...

User Manual
Page 19
... in hot key mode. Page Down 17 Using your PRO2 PS/2 section Selecting a Computer Using Keyboard Hot Key Commands: 1 Switch to the next or previous port with simple keyboard key sequences using the "Scroll Lock" key and either the prior port or the next port. 4 �� �� 5 Switch to next active port-Down arrow Switch to next active port-Up arrow 6 With a single-switch configuration (no daisy...
... in hot key mode. Page Down 17 Using your PRO2 PS/2 section Selecting a Computer Using Keyboard Hot Key Commands: 1 Switch to the next or previous port with simple keyboard key sequences using the "Scroll Lock" key and either the prior port or the next port. 4 �� �� 5 Switch to next active port-Down arrow Switch to next active port-Up arrow 6 With a single-switch configuration (no daisy...

User Manual
Page 20
... next BANK. The BANK + button will take you to 10 disable AutoScan. This time interval can be displayed on the Console monitor. Selecting a Computer Using Direct-Access Port Selectors: You can switch directly to the corresponding port. Use the direct-access port selectors to go to prevent data and synchronization errors. The LED will illuminate to the next computer. If the user 8 is using the 9 keyboard. BANK Up...
... next BANK. The BANK + button will take you to 10 disable AutoScan. This time interval can be displayed on the Console monitor. Selecting a Computer Using Direct-Access Port Selectors: You can switch directly to the corresponding port. Use the direct-access port selectors to go to prevent data and synchronization errors. The LED will illuminate to the next computer. If the user 8 is using the 9 keyboard. BANK Up...

User Manual
Page 21
... seconds. Use the direct-access port selectors to go to the desired computer on the Console monitor. For example, 1 when you to BANK 01. To send commands to the PRO2 PS/2, the "Scroll Lock" key must be displayed on BANK 01. 3 Keyboard Hot Key Commands: Conveniently command the PRO2 PS/2 to switch ports through simple 4 keyboard key sequences. Below is a complete list of hot key 5 commands: 6 Note...
... seconds. Use the direct-access port selectors to go to the desired computer on the Console monitor. For example, 1 when you to BANK 01. To send commands to the PRO2 PS/2, the "Scroll Lock" key must be displayed on BANK 01. 3 Keyboard Hot Key Commands: Conveniently command the PRO2 PS/2 to switch ports through simple 4 keyboard key sequences. Below is a complete list of hot key 5 commands: 6 Note...

User Manual
Page 23
... connected to save the entry. A flash cable that port. 8 Note: If there are Slave units connected, and the AutoScan time and OSD display time settings are currently experiencing mouse and keyboard problems with your firmware, download the appropriate firmware file and 10 utility from belkin.com. section Using your PRO2 PS/2. Also specifies 4 the amount of time the OSD menu is displayed. You may use the arrow keys to that connects...
... connected to save the entry. A flash cable that port. 8 Note: If there are Slave units connected, and the AutoScan time and OSD display time settings are currently experiencing mouse and keyboard problems with your firmware, download the appropriate firmware file and 10 utility from belkin.com. section Using your PRO2 PS/2. Also specifies 4 the amount of time the OSD menu is displayed. You may use the arrow keys to that connects...

User Manual
Page 24
... have been completed, run Windows 95, 98, or Me. 3 2. Make sure that all DIP switches to the PRO2 PS/2. After the Flash update has been completed unplug the power supply from the PRO2 PS/2. 3. For example, set to flash update the main firmware of the switch. Connect the flash cable. 4 5 Setting the PRO2 PS/2 into Flash Mode: The PRO2 PS/2 has four Flash DIP switches: 6 DIP Switch 1 2 3 4 7 ON OFF OFF OFF...
... have been completed, run Windows 95, 98, or Me. 3 2. Make sure that all DIP switches to the PRO2 PS/2. After the Flash update has been completed unplug the power supply from the PRO2 PS/2. 3. For example, set to flash update the main firmware of the switch. Connect the flash cable. 4 5 Setting the PRO2 PS/2 into Flash Mode: The PRO2 PS/2 has four Flash DIP switches: 6 DIP Switch 1 2 3 4 7 ON OFF OFF OFF...

User Manual
Page 25
... Switch requires no external power supply and work with the additional convenience of manual push-button port selection on this unit include: hot key functionality; You'll enjoy the greatest interface flexibility with Audio. They offer you to control two or four PS/2 computers from one Console and 2 makes switching between speakers and microphones without compromising the quality of the display. Power for error-free boot...
... Switch requires no external power supply and work with the additional convenience of manual push-button port selection on this unit include: hot key functionality; You'll enjoy the greatest interface flexibility with Audio. They offer you to control two or four PS/2 computers from one Console and 2 makes switching between speakers and microphones without compromising the quality of the display. Power for error-free boot...

User Manual
Page 26
... PS/2 Series KVM Switches deliver reliability, performance, and centralized control necessary for easy installation; On-Screen Display allows you to control multiple platform servers from a single Console. The Omniview PRO2 PS/2 Series KVM Switches use standard cables for today's enterprise environment. Switch between ports by a Belkin FiveYear Warranty. 9 F1DA104T PRO2 PS/2 Series 4-Port KVM Switch PS/2 & USB F1DA108T PRO2 PS/2 Series 8-Port KVM Switch PS/2 & USB 10 F1DA116T PRO2 PS/2 Series 16-Port KVM Switch PS/2 & USB 24 and are supported through dedicated...
... PS/2 Series KVM Switches deliver reliability, performance, and centralized control necessary for easy installation; On-Screen Display allows you to control multiple platform servers from a single Console. The Omniview PRO2 PS/2 Series KVM Switches use standard cables for today's enterprise environment. Switch between ports by a Belkin FiveYear Warranty. 9 F1DA104T PRO2 PS/2 Series 4-Port KVM Switch PS/2 & USB F1DA108T PRO2 PS/2 Series 8-Port KVM Switch PS/2 & USB 10 F1DA116T PRO2 PS/2 Series 16-Port KVM Switch PS/2 & USB 24 and are supported through dedicated...

User Manual
Page 28
... select computers using specially designated keyboard hot keys, through a simple parallel connection. A: The PRO2 PS/2 supports three methods of port selection. The 10 user can independently access the desired port by pushing the direct-access port selectors. 26 Internet upgrade capability ensures that your PRO2 PS/2 firmware at any operating system that runs on a PS/2 platform. 3 Q: What does flash upgradeable mean? 4 A: With flash upgrade capability, you...
... select computers using specially designated keyboard hot keys, through a simple parallel connection. A: The PRO2 PS/2 supports three methods of port selection. The 10 user can independently access the desired port by pushing the direct-access port selectors. 26 Internet upgrade capability ensures that your PRO2 PS/2 firmware at any operating system that runs on a PS/2 platform. 3 Q: What does flash upgradeable mean? 4 A: With flash upgrade capability, you...
User Manual
Page 32
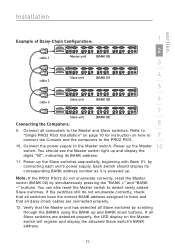
... completely connected. section Troubleshooting 1 Keyboard 2 The computer does not detect a keyboard and I switch to a different port. 8 • Check that the mouse you are using is connected properly to regain mouse function. • De-activate power-management schemes on the PC with your keyboard, uninstall it and install the standard Microsoft mouse driver. • Disconnect and reconnect the mouse cable attached to the channel 10...
... completely connected. section Troubleshooting 1 Keyboard 2 The computer does not detect a keyboard and I switch to a different port. 8 • Check that the mouse you are using is connected properly to regain mouse function. • De-activate power-management schemes on the PC with your keyboard, uninstall it and install the standard Microsoft mouse driver. • Disconnect and reconnect the mouse cable attached to the channel 10...


