
User Manual
Page 3
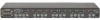
...Flash Cable • User Manual • Quick Installation Guide • 12-Volt DC, 1-Amp Power Supply • Registration Card 1 Our diverse line of KVM solutions exemplifies the Belkin commitment to the Quick Installation 8 Guide included in the unlikely event of this Belkin OmniView PRO2 PS/2 ...PS/2 Series KVM Switch 10 • Adjustable Rack-mount Brackets with an unparalleled Belkin Three-Year Warranty. 6 This manual will provide details about your new PRO2 PS/2, from one console, Belkin 4 PRO2 PS/2s come in a variety of capacities suitable for all configurations...
...Flash Cable • User Manual • Quick Installation Guide • 12-Volt DC, 1-Amp Power Supply • Registration Card 1 Our diverse line of KVM solutions exemplifies the Belkin commitment to the Quick Installation 8 Guide included in the unlikely event of this Belkin OmniView PRO2 PS/2 ...PS/2 Series KVM Switch 10 • Adjustable Rack-mount Brackets with an unparalleled Belkin Three-Year Warranty. 6 This manual will provide details about your new PRO2 PS/2, from one console, Belkin 4 PRO2 PS/2s come in a variety of capacities suitable for all configurations...

User Manual
Page 11
... using the Phillips screws provided. (Refer to the rack. section Installation Step-by-Step Installation Guide 1 Cautions and Warnings: 2 Before attempting to connect anything to the section in this user manual labeled "Connecting Multiple PRO2 PS/2s (Daisy-Chaining)". 9 Determine how far you to ...PRO2 PS/2 requires an optional mounting kit (F1D005). 8 9 10 1. Remove the adjustable brackets from the rack.Select a bracket-hole scheme. 3. Belkin Components is powered off. Mount the PRO2 PS/2 to extend the PRO2 PS/2 past the front of the PRO2 PS/2 to mount 7 flush to...
... using the Phillips screws provided. (Refer to the rack. section Installation Step-by-Step Installation Guide 1 Cautions and Warnings: 2 Before attempting to connect anything to the section in this user manual labeled "Connecting Multiple PRO2 PS/2s (Daisy-Chaining)". 9 Determine how far you to ...PRO2 PS/2 requires an optional mounting kit (F1D005). 8 9 10 1. Remove the adjustable brackets from the rack.Select a bracket-hole scheme. 3. Belkin Components is powered off. Mount the PRO2 PS/2 to extend the PRO2 PS/2 past the front of the PRO2 PS/2 to mount 7 flush to...
