

User Manual
Page 7
section Overview Equipment Requirements 1 Cables: 2 Connecting the PRO3 KVM Switch to a server requires a Belkin Dual-Port Micro-Cable Kit. Belkin Dual-Port Micro-Cable Kits: 3 F1D9400-XX (PS/2-style) 4 5 6 7 8 Belkin PRO3 Daisy-Chain Cable: F1D108-CBL (Available in a 2 feet version) Note: Product codes and availability may vary. 5
section Overview Equipment Requirements 1 Cables: 2 Connecting the PRO3 KVM Switch to a server requires a Belkin Dual-Port Micro-Cable Kit. Belkin Dual-Port Micro-Cable Kits: 3 F1D9400-XX (PS/2-style) 4 5 6 7 8 Belkin PRO3 Daisy-Chain Cable: F1D108-CBL (Available in a 2 feet version) Note: Product codes and availability may vary. 5

User Manual
Page 12
...in this reason, Belkin recommends that everything is designed for stand-alone or rack-mount configuration. Avoid placing cables near fluorescent lights, air-conditioning equipment, or machines that length, the probability of video degradation increases. The 8- Plugging and unplugging cables while servers are...F1D005) is not responsible for the hardware setup of a single PRO3 KVM Switch (F1DA104Qea, F1DA108Qea, F1DA116Qea). 10 Note: The Belkin OmniView CAT5 Extender (F1D084vea2) may cause irreversible damage of the servers and/or the PRO3 KVM Switches. You are natively rack-...
...in this reason, Belkin recommends that everything is designed for stand-alone or rack-mount configuration. Avoid placing cables near fluorescent lights, air-conditioning equipment, or machines that length, the probability of video degradation increases. The 8- Plugging and unplugging cables while servers are...F1D005) is not responsible for the hardware setup of a single PRO3 KVM Switch (F1DA104Qea, F1DA108Qea, F1DA116Qea). 10 Note: The Belkin OmniView CAT5 Extender (F1D084vea2) may cause irreversible damage of the servers and/or the PRO3 KVM Switches. You are natively rack-...

User Manual
Page 16
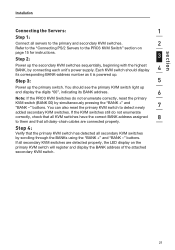
Installation Connecting the Console to the PRO3 KVM Switch Step 1 Connect the VGA monitor cable to the HDDB15 female port on the back of the PRO3 KVM Switch in the "Console" section. (Refer to diagram below .) 14 Only use the ... the PRO3 KVM Switch in the "Console" section. (Refer to diagram below.) Step 4 Attach the power adapter to diagram below .) Step 3 Connect the PS/2 mouse cable to the mouse port on the rear panel of the PRO3 KVM Switch in the "Console" section. (Refer to diagram below.) Step 2 Connect the PS...
Installation Connecting the Console to the PRO3 KVM Switch Step 1 Connect the VGA monitor cable to the HDDB15 female port on the back of the PRO3 KVM Switch in the "Console" section. (Refer to diagram below .) 14 Only use the ... the PRO3 KVM Switch in the "Console" section. (Refer to diagram below.) Step 4 Attach the power adapter to diagram below .) Step 3 Connect the PS/2 mouse cable to the mouse port on the rear panel of the PRO3 KVM Switch in the "Console" section. (Refer to diagram below.) Step 2 Connect the PS...

User Manual
Page 17
section Installation 1 2 3 Your PRO3 KVM Switch is now installed and you are ready to connect 4 your servers. 5 Connecting PS/2 Servers to the PRO3 KVM Switch 6 Step 1 Make sure your server is powered off. 7 Step 2 Using the Belkin Dual-Port Micro-Cable Kit for PS/2 (F1D9400-XX), connect the 8 VGA connector to the monitor port on your server. (Refer to diagram below.) Step 3 Connect the PS/2 mouse and keyboard connectors to the mouse and keyboard ports on the server. (Refer to diagram below.) 15
section Installation 1 2 3 Your PRO3 KVM Switch is now installed and you are ready to connect 4 your servers. 5 Connecting PS/2 Servers to the PRO3 KVM Switch 6 Step 1 Make sure your server is powered off. 7 Step 2 Using the Belkin Dual-Port Micro-Cable Kit for PS/2 (F1D9400-XX), connect the 8 VGA connector to the monitor port on your server. (Refer to diagram below.) Step 3 Connect the PS/2 mouse and keyboard connectors to the mouse and keyboard ports on the server. (Refer to diagram below.) 15
User Manual
Page 18
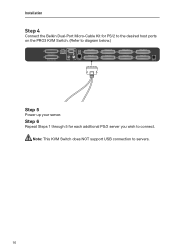
Note: This KVM Switch does NOT support USB connection to connect. Step 6 Repeat Steps 1 through 5 for PS/2 to the desired host ports on the PRO3 KVM Switch. (Refer to diagram below.) Step 5 Power up your server. Installation Step 4 Connect the Belkin Dual-Port Micro-Cable Kit for each additional PS/2 server you wish to servers. 16
Note: This KVM Switch does NOT support USB connection to connect. Step 6 Repeat Steps 1 through 5 for PS/2 to the desired host ports on the PRO3 KVM Switch. (Refer to diagram below.) Step 5 Power up your server. Installation Step 4 Connect the Belkin Dual-Port Micro-Cable Kit for each additional PS/2 server you wish to servers. 16

User Manual
Page 19
... unit (BANK 02) Secondary unit (BANK 03) Note: A Daisy-Chain Cable (F1D108-CBL) is required to as "secondary" KVM switches. 4 Note: Your PRO3 KVM Switch is backward-compatible with Belkin OmniView PRO2 KVM Switches with micro- BANKs 01 through 15 are referred to daisy-chain each PRO3 KVM ...Switch and is available through your Belkin reseller, or online at www.belkin.com. 17 section Installation Connecting Multiple PRO3 KVM Switches 1 (Daisy-Chaining) 2 You can daisy-chain up to 16 PRO3 KVM...
... unit (BANK 02) Secondary unit (BANK 03) Note: A Daisy-Chain Cable (F1D108-CBL) is required to as "secondary" KVM switches. 4 Note: Your PRO3 KVM Switch is backward-compatible with Belkin OmniView PRO2 KVM Switches with micro- BANKs 01 through 15 are referred to daisy-chain each PRO3 KVM ...Switch and is available through your Belkin reseller, or online at www.belkin.com. 17 section Installation Connecting Multiple PRO3 KVM Switches 1 (Daisy-Chaining) 2 You can daisy-chain up to 16 PRO3 KVM...
User Manual
Page 21
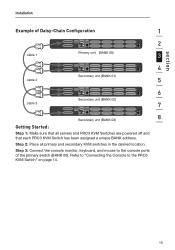
Refer to "Connecting the Console to the console ports of Daisy-Chain Configuration 1 2 cable 1 Primary unit (BANK 00) 3 4 Secondary unit (BANK 01) cable 2 5 6 Secondary unit (BANK 02) cable 3 7 Secondary unit (BANK 03) 8 Getting Started: Step 1: Make sure that each PRO3 KVM Switch has been assigned a unique BANK address. section Installation Example of the ...
Refer to "Connecting the Console to the console ports of Daisy-Chain Configuration 1 2 cable 1 Primary unit (BANK 00) 3 4 Secondary unit (BANK 01) cable 2 5 6 Secondary unit (BANK 02) cable 3 7 Secondary unit (BANK 03) 8 Getting Started: Step 1: Make sure that each PRO3 KVM Switch has been assigned a unique BANK address. section Installation Example of the ...

User Manual
Page 22
Note: Your PRO3 KVM Switch is backward-compatible with Belkin OmniView PRO2 KVM Switches with microcabling (F1DA104Zea, F1DA108Zea, F1DA116Zea) must be designated as the primary KVM switch. 20 In a daisy-chain configuration, the PRO3 KVM Switch with standard cabling (F1DA104Tea, F1DA108Tea, F1DA116Tea). Step 3 To add secondary units, ...PRO3 KVM Switches you wish to the "Daisy-Chain In" port on the first secondary KVM switch and the other end of the Daisy-Chain Cable (F1D108-CBL) to the "Daisy-Chain Out" port of the first secondary KVM switch (BANK 01). Step 4 Repeat Step 3 for ...
Note: Your PRO3 KVM Switch is backward-compatible with Belkin OmniView PRO2 KVM Switches with microcabling (F1DA104Zea, F1DA108Zea, F1DA116Zea) must be designated as the primary KVM switch. 20 In a daisy-chain configuration, the PRO3 KVM Switch with standard cabling (F1DA104Tea, F1DA108Tea, F1DA116Tea). Step 3 To add secondary units, ...PRO3 KVM Switches you wish to the "Daisy-Chain In" port on the first secondary KVM switch and the other end of the Daisy-Chain Cable (F1D108-CBL) to the "Daisy-Chain Out" port of the first secondary KVM switch (BANK 01). Step 4 Repeat Step 3 for ...
User Manual
Page 23
...", indicating its BANK address. 6 Note: If the PRO3 KVM Switches do not enumerate correctly, check that the primary KVM switch has detected all daisy-chain cables are detected properly, the LED display on page 15 for instructions. Step 2: 3 Power up the primary switch.
...", indicating its BANK address. 6 Note: If the PRO3 KVM Switches do not enumerate correctly, check that the primary KVM switch has detected all daisy-chain cables are detected properly, the LED display on page 15 for instructions. Step 2: 3 Power up the primary switch.

User Manual
Page 24
... this time. If any connected servers have not been powered on, it is okay to Port "1" will be displayed on each port and allows your cable connections for that all servers are working normally. If the problem persists, please refer to boot normally. Installation Powering Up the Systems Verify that server...
... this time. If any connected servers have not been powered on, it is okay to Port "1" will be displayed on each port and allows your cable connections for that all servers are working normally. If the problem persists, please refer to boot normally. Installation Powering Up the Systems Verify that server...

User Manual
Page 34
...of your firmware, download the appropriate firmware file and utility from www.belkin.com/support/. The utility will need the following items: 1. A separate computer running Windows 2000, XP, or Vista. Connect the Serial Flash Cable's RJ11 end to the PRO3 KVM Switch and the DB9F end ...to unexpected operational problems. Please contact Belkin Technical Support if you are two flashes that there are experiencing mouse and keyboard problems with...
...of your firmware, download the appropriate firmware file and utility from www.belkin.com/support/. The utility will need the following items: 1. A separate computer running Windows 2000, XP, or Vista. Connect the Serial Flash Cable's RJ11 end to the PRO3 KVM Switch and the DB9F end ...to unexpected operational problems. Please contact Belkin Technical Support if you are two flashes that there are experiencing mouse and keyboard problems with...

User Manual
Page 35
...Click "Write Flash" to the PRO3 KVM Switch. The upgrade process takes about six seconds. Apply power to start the upgrade. Run "BELKIN Firmware Upgrade Utility.exe". The OSD will enter into 8 flash-upgrade mode and wait for the data to upgrade. 6. section Using your ... Switch, set the DIP switch back to select the FW 1 upgrade file. Make sure the Comm-port setting matches the port where the Serial Flash Cable is connected. 2 3 4 5 6 7 5. The KVM Switch should see "WRITE OK" display when the upgrade completes successfully. 7. Click "Browse" to the Normal Run ...
...Click "Write Flash" to the PRO3 KVM Switch. The upgrade process takes about six seconds. Apply power to start the upgrade. Run "BELKIN Firmware Upgrade Utility.exe". The OSD will enter into 8 flash-upgrade mode and wait for the data to upgrade. 6. section Using your ... Switch, set the DIP switch back to select the FW 1 upgrade file. Make sure the Comm-port setting matches the port where the Serial Flash Cable is connected. 2 3 4 5 6 7 5. The KVM Switch should see "WRITE OK" display when the upgrade completes successfully. 7. Click "Browse" to the Normal Run ...

User Manual
Page 37
... all your servers. The PRO3 KVM Switch detects the 5 power from the PS/2 ports on your servers to the Belkin KVM Cable Kits, and then attach one keyboard, monitor, and mouse to use Belkin models: F1DA104Zea, F1DA108Zea, 7 F1DA116Zea. A: No, the PRO3 KVM Switch must be installed in order to function properly. 4 Q: Can I have...
... all your servers. The PRO3 KVM Switch detects the 5 power from the PS/2 ports on your servers to the Belkin KVM Cable Kits, and then attach one keyboard, monitor, and mouse to use Belkin models: F1DA104Zea, F1DA108Zea, 7 F1DA116Zea. A: No, the PRO3 KVM Switch must be installed in order to function properly. 4 Q: Can I have...

User Manual
Page 38
... Switch is completely connected to your server. I am getting ghosting, shadowing, or fuzzy images on my monitor. • Check that all video cables are having trouble with your keyboard, uninstall it is necessary to log in as a user. • Connect your monitor is connected and inserted ... and refresh-rate setting on your server. • Connect the monitor directly into the server you are not crossed. • Check the cable connections. Tighten any loose connections. • Try booting the problem computer while the port is selected and wait until the operating system loads ...
... Switch is completely connected to your server. I am getting ghosting, shadowing, or fuzzy images on my monitor. • Check that all video cables are having trouble with your keyboard, uninstall it is necessary to log in as a user. • Connect your monitor is connected and inserted ... and refresh-rate setting on your server. • Connect the monitor directly into the server you are not crossed. • Check the cable connections. Tighten any loose connections. • Try booting the problem computer while the port is selected and wait until the operating system loads ...

User Manual
Page 39
...• Avoid moving the mouse or pressing the mouse button when switching ports on page 14 of standby mode, allow up . • Check the cables and make sure you power all attached computers off. Make sure that the driver is either for a standard PS/2 mouse, or a Microsoft server-compatible... PS/2 mouse. • Make sure you do not have any loose cable connections. 2 • If you are using a mouse driver that was included with which you are inserted correctly. • Try booting the problem computer ...
...• Avoid moving the mouse or pressing the mouse button when switching ports on page 14 of standby mode, allow up . • Check the cables and make sure you power all attached computers off. Make sure that the driver is either for a standard PS/2 mouse, or a Microsoft server-compatible... PS/2 mouse. • Make sure you do not have any loose cable connections. 2 • If you are using a mouse driver that was included with which you are inserted correctly. • Try booting the problem computer ...
User Manual
Page 40
... port to another in a series. Secondary KVM Switch: Any KVM switch that the user is set to BANK address 00. Console: The all-in a device cable. BANK: The address of other peripherals such as maximum resolution and colour depth, to ensure that is daisy-chained to the primary KVM switch and...
... port to another in a series. Secondary KVM Switch: Any KVM switch that the user is set to BANK address 00. Console: The all-in a device cable. BANK: The address of other peripherals such as maximum resolution and colour depth, to ensure that is daisy-chained to the primary KVM switch and...
