
User Manual
Page 3
... the Quick Installation Guide included in the unlikely event of up to enable management of a problem. quality, durable products at an 3 affordable price. 4 Belkin has designed and developed this Belkin OmniView PRO3 1 KVM Switch (the KVM Switch). We appreciate your PRO3 KVM Switch packaging. 8 Thank you will provide details about your new PRO3 KVM Switch, from a single console. The result is a KVM Switch that you for yourself why Belkin is engineered to work with the server...
... the Quick Installation Guide included in the unlikely event of up to enable management of a problem. quality, durable products at an 3 affordable price. 4 Belkin has designed and developed this Belkin OmniView PRO3 1 KVM Switch (the KVM Switch). We appreciate your PRO3 KVM Switch packaging. 8 Thank you will provide details about your new PRO3 KVM Switch, from a single console. The result is a KVM Switch that you for yourself why Belkin is engineered to work with the server...
User Manual
Page 4
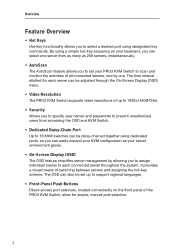
The OSD can be set your server environment grows. • On-Screen Display (OSD) The OSD feature simplifies server management by one. By using designated key commands. It provides a visual means of the PRO3 KVM Switch, allow for each connected server throughout the system. Overview Feature Overview • Hot Keys Hot-key functionality allows you to support regional languages. • Front-Panel Push Buttons Direct-access port selectors, located...
The OSD can be set your server environment grows. • On-Screen Display (OSD) The OSD feature simplifies server management by one. By using designated key commands. It provides a visual means of the PRO3 KVM Switch, allow for each connected server throughout the system. Overview Feature Overview • Hot Keys Hot-key functionality allows you to support regional languages. • Front-Panel Push Buttons Direct-access port selectors, located...

User Manual
Page 5
... enables your PRO3 KVM Switch and can be downloaded from Belkin's 7 support website at www.belkin.com/support. 8 3 section Overview • LED Display 1 An LED display on your PRO3 KVM Switch. A flashing port LED indicates that there is pushed, the LED above each direct-access port selector illuminates to indicate that port. 3 • 7-Segment LED Display When daisy-chaining multiple PRO3 KVM Switches together, the 7-segment 4 LED display serves as a status monitor. Firmware upgrades are free for the life of the PRO3 KVM Switch serves as a quick...
... enables your PRO3 KVM Switch and can be downloaded from Belkin's 7 support website at www.belkin.com/support. 8 3 section Overview • LED Display 1 An LED display on your PRO3 KVM Switch. A flashing port LED indicates that there is pushed, the LED above each direct-access port selector illuminates to indicate that port. 3 • 7-Segment LED Display When daisy-chaining multiple PRO3 KVM Switches together, the 7-segment 4 LED display serves as a status monitor. Firmware upgrades are free for the life of the PRO3 KVM Switch serves as a quick...

User Manual
Page 12
... stand-alone or rack-mount configuration. The 8- For this way. Cautions and Warnings! Belkin is powered off. Note: The Belkin OmniView CAT5 Extender (F1D084) may be transmitted up to 25 feet (7.6m). Beyond that create electrical noise (e.g., vacuum cleaners). and 16-Port PRO3 KVM Switches are natively rack-mountable in relation to your console • the lengths of the cables you use the direct-access port selectors •...
... stand-alone or rack-mount configuration. The 8- For this way. Cautions and Warnings! Belkin is powered off. Note: The Belkin OmniView CAT5 Extender (F1D084) may be transmitted up to 25 feet (7.6m). Beyond that create electrical noise (e.g., vacuum cleaners). and 16-Port PRO3 KVM Switches are natively rack-mountable in relation to your console • the lengths of the cables you use the direct-access port selectors •...
User Manual
Page 17
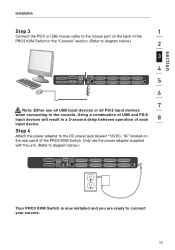
... use the power adapter supplied with the unit. (Refer to diagram below .) 2 3 4 5 6 7 Note: Either use all USB input devices or all PS/2 input devices when connecting to the console. section Installation Step 3 1 Connect the PS/2 or USB mouse cable to the mouse port on the rear panel of the PRO3 KVM Switch. Using a combination of USB and PS/2 input devices will result in the "Console" section. (Refer to diagram below .) Your PRO3 KVM Switch...
... use the power adapter supplied with the unit. (Refer to diagram below .) 2 3 4 5 6 7 Note: Either use all USB input devices or all PS/2 input devices when connecting to the console. section Installation Step 3 1 Connect the PS/2 or USB mouse cable to the mouse port on the rear panel of the PRO3 KVM Switch. Using a combination of USB and PS/2 input devices will result in the "Console" section. (Refer to diagram below .) Your PRO3 KVM Switch...
User Manual
Page 20
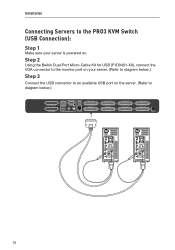
Step 2 Using the Belkin Dual-Port Micro-Cable Kit for USB (F1D9401-XX), connect the VGA connector to the monitor port on your server. (Refer to diagram below .) 18 Installation Connecting Servers to diagram below .) Step 3 Connect the USB connector to an available USB port on the server. (Refer to the PRO3 KVM Switch (USB Connection): Step 1 Make sure your server is powered on.
Step 2 Using the Belkin Dual-Port Micro-Cable Kit for USB (F1D9401-XX), connect the VGA connector to the monitor port on your server. (Refer to diagram below .) 18 Installation Connecting Servers to diagram below .) Step 3 Connect the USB connector to an available USB port on the server. (Refer to the PRO3 KVM Switch (USB Connection): Step 1 Make sure your server is powered on.

User Manual
Page 21
... a USB Cable Kit is connected to the table on page 35 for each additional USB server you attach the Belkin Dual-Port Micro-Cable USB Kit 8 directly to connect. Refer to a Sun server, the Server Interface Module emulates the Sun keys using a set of Sun functions supported by the PRO3 KVM Switch. 19 Note: We recommend that you wish to a free USB port on the PRO3 KVM Switch. (Refer to diagram below.) Your server should 2 recognize the KVM-Switch connection and automatically install the HID USB driver...
... a USB Cable Kit is connected to the table on page 35 for each additional USB server you attach the Belkin Dual-Port Micro-Cable USB Kit 8 directly to connect. Refer to a Sun server, the Server Interface Module emulates the Sun keys using a set of Sun functions supported by the PRO3 KVM Switch. 19 Note: We recommend that you wish to a free USB port on the PRO3 KVM Switch. (Refer to diagram below.) Your server should 2 recognize the KVM-Switch connection and automatically install the HID USB driver...
User Manual
Page 23
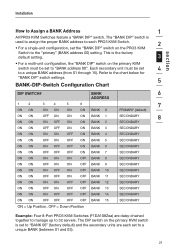
... 14 SECONDARY ON ON OFF OFF OFF OFF BANK 15 SECONDARY ON = Up Position, OFF = Down Position Example: Four 8-Port PRO3 KVM Switches (F1DA108Zea) are each PRO3 KVM Switch. 2 • For a single-unit configuration, set to a unique BANK address (from 01 through 15). Installation section How to the "primary" (BANK address 00) setting. The DIP switch on the PRO3 KVM Switch to Assign a BANK Address 1 All PRO3 KVM Switches feature a "BANK DIP...
... 14 SECONDARY ON ON OFF OFF OFF OFF BANK 15 SECONDARY ON = Up Position, OFF = Down Position Example: Four 8-Port PRO3 KVM Switches (F1DA108Zea) are each PRO3 KVM Switch. 2 • For a single-unit configuration, set to a unique BANK address (from 01 through 15). Installation section How to the "primary" (BANK address 00) setting. The DIP switch on the PRO3 KVM Switch to Assign a BANK Address 1 All PRO3 KVM Switches feature a "BANK DIP...

User Manual
Page 24
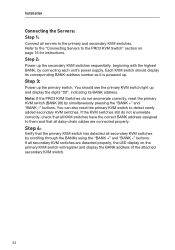
... all servers and PRO3 KVM Switches are powered off and that all primary and secondary KVM switches in the desired location. Installation Example of the primary switch (BANK 00). Refer to "Connecting the Console to the console ports of Daisy-Chain Configuration cable 1 Primary unit (BANK 00) cable 2 Secondary unit (BANK 01) cable 3 Secondary unit (BANK 02) Secondary unit (BANK 03) Getting Started: Step 1: Make sure that each PRO3 KVM Switch has...
... all servers and PRO3 KVM Switches are powered off and that all primary and secondary KVM switches in the desired location. Installation Example of the primary switch (BANK 00). Refer to "Connecting the Console to the console ports of Daisy-Chain Configuration cable 1 Primary unit (BANK 00) cable 2 Secondary unit (BANK 01) cable 3 Secondary unit (BANK 02) Secondary unit (BANK 03) Getting Started: Step 1: Make sure that each PRO3 KVM Switch has...
User Manual
Page 26
... secondary KVM switch. 24 Refer to the "Connecting Servers to the primary and secondary KVM switches. You should display its corresponding BANK-address number as it is powered up and display the digits "00", indicating its BANK address. Note: If the PRO3 KVM Switches do not enumerate correctly, check that all daisy-chain cables are detected properly, the LED display on page 16 for instructions. You can also reset...
... secondary KVM switch. 24 Refer to the "Connecting Servers to the primary and secondary KVM switches. You should display its corresponding BANK-address number as it is powered up and display the digits "00", indicating its BANK address. Note: If the PRO3 KVM Switches do not enumerate correctly, check that all daisy-chain cables are detected properly, the LED display on page 16 for instructions. You can also reset...
User Manual
Page 27
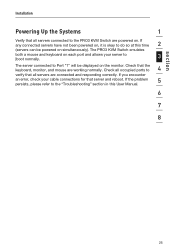
... all servers connected to the PRO3 KVM Switch are connected and responding correctly. Check all servers are powered on the monitor. The PRO3 KVM Switch emulates both a mouse and keyboard on simultaneously). Check that server and reboot. If you encounter an error, check your server to |boot normally. 3 The server connected to do so at this User Manual. 6 7 8 25 If the problem 5 persists, please refer to 4 verify that all occupied ports to the "Troubleshooting" section in this time 2 (servers can...
... all servers connected to the PRO3 KVM Switch are connected and responding correctly. Check all servers are powered on the monitor. The PRO3 KVM Switch emulates both a mouse and keyboard on simultaneously). Check that server and reboot. If you encounter an error, check your server to |boot normally. 3 The server connected to do so at this User Manual. 6 7 8 25 If the problem 5 persists, please refer to 4 verify that all occupied ports to the "Troubleshooting" section in this time 2 (servers can...

User Manual
Page 32
... you to previous screen when navigating through OSD (Esc): Exits the OSD 30 If you have only one PRO3 KVM Switch in the Main Menu page (F2): Session logout (F3): Takes you to switch servers, assign names to your servers, enable and disable the AutoScan feature, set the desired scan-time interval for AutoScan, enable the password security feature, and program hot keys.
... you to previous screen when navigating through OSD (Esc): Exits the OSD 30 If you have only one PRO3 KVM Switch in the Main Menu page (F2): Session logout (F3): Takes you to switch servers, assign names to your servers, enable and disable the AutoScan feature, set the desired scan-time interval for AutoScan, enable the password security feature, and program hot keys.
User Manual
Page 35
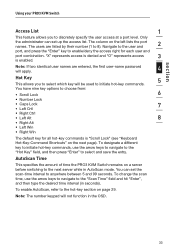
... 5 and 99 seconds. You can set the scan-time interval to enable/deny the access right for all hot-key commands is enabled. Only the administrator can set up the access list. AutoScan Time This specifies the amount of time the PRO3 KVM Switch remains on the left lists the port names. Note: The number keypad will not function in seconds). section Using your PRO3 KVM Switch Access List 1 This feature allows you to...
... 5 and 99 seconds. You can set the scan-time interval to enable/deny the access right for all hot-key commands is enabled. Only the administrator can set up the access list. AutoScan Time This specifies the amount of time the PRO3 KVM Switch remains on the left lists the port names. Note: The number keypad will not function in seconds). section Using your PRO3 KVM Switch Access List 1 This feature allows you to...
User Manual
Page 36
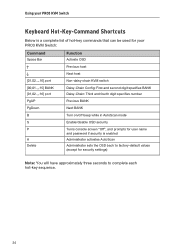
... Non-daisy-chain KVM switch Daisy-Chain Config: First and second digit specifies BANK Daisy-Chain: Third and fourth digit specifies number Previous BANK Next BANK Turn on/off beep while in AutoScan mode Enable/disable OSD security Turns console screen "Off", and prompts for user name and password if security is enabled Administrator activates AutoScan Administrator sets the OSD back to factory-default values (except...
... Non-daisy-chain KVM switch Daisy-Chain Config: First and second digit specifies BANK Daisy-Chain: Third and fourth digit specifies number Previous BANK Next BANK Turn on/off beep while in AutoScan mode Enable/disable OSD security Turns console screen "Off", and prompts for user name and password if security is enabled Administrator activates AutoScan Administrator sets the OSD back to factory-default values (except...

User Manual
Page 38
... update your firmware only if you are free for the life of updating the firmware on your PRO3 KVM Switch. An available serial port on the PRO3 KVM Switch. 2. This server must NOT be connected to -RJ11; The utility will need assistance. A separate server running Windows 2000, XP, or Vista. Using your firmware, download the appropriate firmware file and utility from www.belkin.com/support/. To update your PRO3 KVM Switch Updating Firmware The PRO3 KVM Switch features flash-upgradeable firmware to unexpected operational problems. Please contact Belkin Technical Support...
... update your firmware only if you are free for the life of updating the firmware on your PRO3 KVM Switch. An available serial port on the PRO3 KVM Switch. 2. This server must NOT be connected to -RJ11; The utility will need assistance. A separate server running Windows 2000, XP, or Vista. Using your firmware, download the appropriate firmware file and utility from www.belkin.com/support/. To update your PRO3 KVM Switch Updating Firmware The PRO3 KVM Switch features flash-upgradeable firmware to unexpected operational problems. Please contact Belkin Technical Support...

User Manual
Page 39
... flash-upgrade capability, you may experience. See the "Updating Firmware" section in the PRO3 KVM Switch supports a maximum resolution of up to the console, then you must also use a USB mouse. 4 Q: Can I mix PS/2 and USB devices on the KVM console? 3 A: The PRO3 KVM Switch will support either all PS/2 or all USB devices on a PS/2 and USB platform. The user can select servers using specially designated keyboard hot keys, through a simple serial connection. A: The PRO3 KVM Switch supports USB and...
... flash-upgrade capability, you may experience. See the "Updating Firmware" section in the PRO3 KVM Switch supports a maximum resolution of up to the console, then you must also use a USB mouse. 4 Q: Can I mix PS/2 and USB devices on the KVM console? 3 A: The PRO3 KVM Switch will support either all PS/2 or all USB devices on a PS/2 and USB platform. The user can select servers using specially designated keyboard hot keys, through a simple serial connection. A: The PRO3 KVM Switch supports USB and...

User Manual
Page 40
... Belkin KVM Cable Kits, and then attach one keyboard, monitor, and mouse to the console port, and it is the warranty for PS/2 or USB support. Q: Can I use the PRO3 KVM Switch to switch video signals only? A: No, the PRO3 KVM Switch must be installed in order to function properly. Q: Does the PRO3 KVM Switch support Linux? The PRO3 KVM Switch detects the power from the PS/2 and USB ports on my Sun server that supports USB? Simply connect all your servers...
... Belkin KVM Cable Kits, and then attach one keyboard, monitor, and mouse to the console port, and it is the warranty for PS/2 or USB support. Q: Can I use the PRO3 KVM Switch to switch video signals only? A: No, the PRO3 KVM Switch must be installed in order to function properly. Q: Does the PRO3 KVM Switch support Linux? The PRO3 KVM Switch detects the power from the PS/2 and USB ports on my Sun server that supports USB? Simply connect all your servers...
User Manual
Page 41
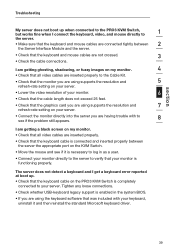
... loose connections. • Check whether USB-keyboard legacy support is enabled in as a user. • Connect your monitor directly to the server to the Cable Kit. • Check that the monitor you are using supports the resolution and 5 refresh-rate setting on the PRO3 KVM Switch is completely connected to your server. • Connect the monitor directly into the server you are having trouble with to 8 see if it is connected and inserted properly between 2 the Server Interface Module...
... loose connections. • Check whether USB-keyboard legacy support is enabled in as a user. • Connect your monitor directly to the server to the Cable Kit. • Check that the monitor you are using supports the resolution and 5 refresh-rate setting on the PRO3 KVM Switch is completely connected to your server. • Connect the monitor directly into the server you are having trouble with to 8 see if it is connected and inserted properly between 2 the Server Interface Module...

User Manual
Page 42
.... Troubleshooting The mouse is lost when I switch from one port to regain mouse function. • De-activate power-management schemes on the PC with your "CONFIG.SYS" or "AUTOEXEC.BAT" files. • Avoid moving the mouse or pressing the mouse button when switching ports on the PRO3 KVM Switch. 40 When I switch to a different port. • Check that the mouse you are using is connected properly to the console port of standby mode...
.... Troubleshooting The mouse is lost when I switch from one port to regain mouse function. • De-activate power-management schemes on the PC with your "CONFIG.SYS" or "AUTOEXEC.BAT" files. • Avoid moving the mouse or pressing the mouse button when switching ports on the PRO3 KVM Switch. 40 When I switch to a different port. • Check that the mouse you are using is connected properly to the console port of standby mode...
User Manual
Page 44
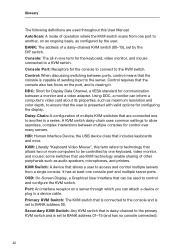
Console Port: Receptors for configuring the display. Control: When discussing switching between a monitor and a video adapter. HID: Human Interface Device, the USB device class that use KVM technology enable sharing of sending input to BANK address 00. KVM: Literally "Keyboard Video Mouse", this User Manual. KVM Switch: A device that the user is set to BANK address 01-15 (and has no console connected). 42 Using DDC, a monitor can inform a computer's video card about its properties, such...
Console Port: Receptors for configuring the display. Control: When discussing switching between a monitor and a video adapter. HID: Human Interface Device, the USB device class that use KVM technology enable sharing of sending input to BANK address 00. KVM: Literally "Keyboard Video Mouse", this User Manual. KVM Switch: A device that the user is set to BANK address 01-15 (and has no console connected). 42 Using DDC, a monitor can inform a computer's video card about its properties, such...


