User Manual
Page 2
... Overview 2 Equipment Requirements 3 Specifications 4 RIPC Diagrams 5 Installation Hardware Installation 6 Initial Network Configuration 12 Using your RIPC Prerequisites 15 Log Into the RIPC 16 Main Screen 17 Log Out from the RIPC 18 Control Host Remote Access 18 Security Ports & Protocols 23 Firewall 24 Certificate Management 25 Network Settings Menu Remote Access Settings 28 Users & Passwords 30 Serial Port 32 Keyboard/Mouse Settings 34 KVM Switches 35 Appendix A Update Firmware 37 RIPC Video Modes 37 Hot Key Table 38 Glossary 39 FAQs...
... Overview 2 Equipment Requirements 3 Specifications 4 RIPC Diagrams 5 Installation Hardware Installation 6 Initial Network Configuration 12 Using your RIPC Prerequisites 15 Log Into the RIPC 16 Main Screen 17 Log Out from the RIPC 18 Control Host Remote Access 18 Security Ports & Protocols 23 Firewall 24 Certificate Management 25 Network Settings Menu Remote Access Settings 28 Users & Passwords 30 Serial Port 32 Keyboard/Mouse Settings 34 KVM Switches 35 Appendix A Update Firmware 37 RIPC Video Modes 37 Hot Key Table 38 Glossary 39 FAQs...

User Manual
Page 3
...; One PS/2 cable kit • One 5V DC, 2000mA power supply • User Manual • Quick Installation Guide • Registration Card • Rack-mount bracket with the server administrator in mind. This manual will soon see for purchasing the OmniView ENTERPRISE Quad-Bus Series Remote IP Console. Thank you 'll need about the RIPC, from anywhere around the world through any web browser, the RIPC can...
...; One PS/2 cable kit • One 5V DC, 2000mA power supply • User Manual • Quick Installation Guide • Registration Card • Rack-mount bracket with the server administrator in mind. This manual will soon see for purchasing the OmniView ENTERPRISE Quad-Bus Series Remote IP Console. Thank you 'll need about the RIPC, from anywhere around the world through any web browser, the RIPC can...
User Manual
Page 4
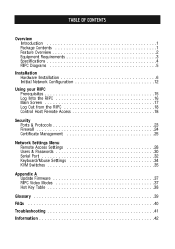
Flash upgrades Flash upgrades allow you to obtain the latest firmware updates for upgrade information and support. There are free for the life of the RIPC. Firmware upgrades are no disks to install or keep track of and you can make changes and perform setup functions from any computer on the network, quickly and easily. 2 To preserve signal integrity and obtain the best results, use Belkin video cables. User-defined hot...
Flash upgrades Flash upgrades allow you to obtain the latest firmware updates for upgrade information and support. There are free for the life of the RIPC. Firmware upgrades are no disks to install or keep track of and you can make changes and perform setup functions from any computer on the network, quickly and easily. 2 To preserve signal integrity and obtain the best results, use Belkin video cables. User-defined hot...

User Manual
Page 7
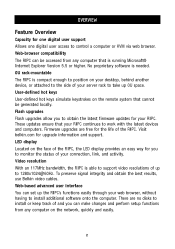
RIPC Diagrams Connection LED OVERVIEW Connection Link / Activity Remote IP Console Link/Activity LED Power Jack Serial 02 Port LAN Port Console VGA Port CPU/KVM VGA Port Serial 02 power console CPU/KVM Serial 01 reset LAN Serial 01 port Reset Button Console CPU/KVM Keyboard Port Keyboard Port Console Mouse Port CPU/KVM Mouse Port 5
RIPC Diagrams Connection LED OVERVIEW Connection Link / Activity Remote IP Console Link/Activity LED Power Jack Serial 02 Port LAN Port Console VGA Port CPU/KVM VGA Port Serial 02 power console CPU/KVM Serial 01 reset LAN Serial 01 port Reset Button Console CPU/KVM Keyboard Port Keyboard Port Console Mouse Port CPU/KVM Mouse Port 5
User Manual
Page 9
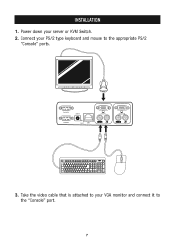
Power down your PS/2 type keyboard and mouse to the "Console" port. 7 INSTALLATION 1. Connect your server or KVM Switch. 2. Serial 02 power Serial 01 reset LAN console CPU/KVM 1 2 34 56 78 9 0 - = delete P [ ] K L ;: '" return shift clt alt F9 F10 F11 num cap lock lock pg up HOME PG UP PG DN HELP CAPS ` ESC OPT PC ^ < + > =/ 7 89 + 45 6 1 23 0 3. Take the video cable that is attached to your VGA monitor and connect it to the appropriate PS/2 "Console" ports.
Power down your PS/2 type keyboard and mouse to the "Console" port. 7 INSTALLATION 1. Connect your server or KVM Switch. 2. Serial 02 power Serial 01 reset LAN console CPU/KVM 1 2 34 56 78 9 0 - = delete P [ ] K L ;: '" return shift clt alt F9 F10 F11 num cap lock lock pg up HOME PG UP PG DN HELP CAPS ` ESC OPT PC ^ < + > =/ 7 89 + 45 6 1 23 0 3. Take the video cable that is attached to your VGA monitor and connect it to the appropriate PS/2 "Console" ports.
User Manual
Page 13
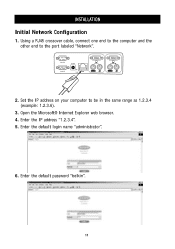
Serial 02 power Serial 01 reset LAN console CPU/KVM 2. Set the IP address on your computer to the port labeled "Network". Enter the IP address "1.2.3.4". 5. Using a RJ45 crossover cable, connect one end to the computer and the other end to be in the same range as 1.2.3.4 (example: 1.2.3.6). 3. Enter the default password "belkin". 11 Open the Microsoft® Internet Explorer web browser. 4. INSTALLATION Initial Network Configuration 1. Enter the default login name "administrator". 6.
Serial 02 power Serial 01 reset LAN console CPU/KVM 2. Set the IP address on your computer to the port labeled "Network". Enter the IP address "1.2.3.4". 5. Using a RJ45 crossover cable, connect one end to the computer and the other end to be in the same range as 1.2.3.4 (example: 1.2.3.6). 3. Enter the default password "belkin". 11 Open the Microsoft® Internet Explorer web browser. 4. INSTALLATION Initial Network Configuration 1. Enter the default login name "administrator". 6.

User Manual
Page 14
Connecting the RIPC to the Network Connect the RIPC to save new network settings. 9. Enter the desired network settings and click on the computer used for configuration of the RIPC. Reset the local IP address settings on "Apply Changes" to the network using a straight-through RJ45 Category 5 network cable. 12 Under Setting & Configurations, click on "Network". (Note: Uncheck "DHCP" check box.) 8. INSTALLATION Initial Network Configuration 7.
Connecting the RIPC to the Network Connect the RIPC to save new network settings. 9. Enter the desired network settings and click on the computer used for configuration of the RIPC. Reset the local IP address settings on "Apply Changes" to the network using a straight-through RJ45 Category 5 network cable. 12 Under Setting & Configurations, click on "Network". (Note: Uncheck "DHCP" check box.) 8. INSTALLATION Initial Network Configuration 7.
User Manual
Page 15
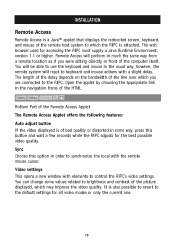
... contrast of the HTML. Bottom Part of the Remote Access Applet The Remote Access Applet offers the following features: Auto adjust button If the video displayed is of bad quality or distorted in some values related to the default settings for accessing the RIPC must supply a Java Runtime Environment, version 1.1 or higher. Video settings This opens a new window with the remote mouse cursor. It is...
... contrast of the HTML. Bottom Part of the Remote Access Applet The Remote Access Applet offers the following features: Auto adjust button If the video displayed is of bad quality or distorted in some values related to the default settings for accessing the RIPC must supply a Java Runtime Environment, version 1.1 or higher. Video settings This opens a new window with the remote mouse cursor. It is...
User Manual
Page 16
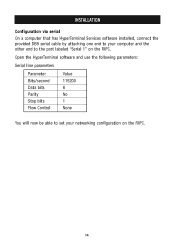
Open the HyperTerminal software and use the following parameters: Serial line parameters Parameter Bits/second Data bits Parity Stop bits Flow Control Value 115200 8 No 1 None You will now be able to the port labeled "Serial 1" on the RIPC. 14 INSTALLATION Configuration via serial On a computer that has HyperTerminal Services software installed, connect the provided DB9 serial cable by attaching one end to your computer and the other end to set your networking configuration on the RIPC.
Open the HyperTerminal software and use the following parameters: Serial line parameters Parameter Bits/second Data bits Parity Stop bits Flow Control Value 115200 8 No 1 None You will now be able to the port labeled "Serial 1" on the RIPC. 14 INSTALLATION Configuration via serial On a computer that has HyperTerminal Services software installed, connect the provided DB9 serial cable by attaching one end to your computer and the other end to set your networking configuration on the RIPC.

User Manual
Page 17
... if you can access the RIPC's card using the administration forms displayed by a standard web browser. Internet Explorer 5.0, which is the case on upgrading your managed host system, the browser must include a Java Runtime Environment, version 1.1 or higher. You can be controlled by the browser itself. Telnet: A standard telnet client can read about the key length of the RIPC's serial ports via a terminal mode.
... if you can access the RIPC's card using the administration forms displayed by a standard web browser. Internet Explorer 5.0, which is the case on upgrading your managed host system, the browser must include a Java Runtime Environment, version 1.1 or higher. You can be controlled by the browser itself. Telnet: A standard telnet client can read about the key length of the RIPC's serial ports via a terminal mode.

User Manual
Page 19
... administration activity for the first time. USING YOUR RIPC Note: Be sure to change the administrator-user password immediately after you have installed and accessed your user name and password to log in again later. The logout button logs you instantly to the home page from one of the RIPC; The RIPC's Home Menu Window 17 The home button brings you out of the...
... administration activity for the first time. USING YOUR RIPC Note: Be sure to change the administrator-user password immediately after you have installed and accessed your user name and password to log in again later. The logout button logs you instantly to the home page from one of the RIPC; The RIPC's Home Menu Window 17 The home button brings you out of the...
User Manual
Page 21
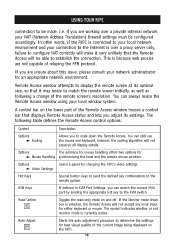
... details. If the Monitor mode check box is connected to your local network environment and your NAT (Network Address Translation) firewall settings must be configured accordingly. Remote Access window attempts to display the remote screen at its optimal size, so that displays Remote Access status and lets you adjust its settings. Video Settings Hot Keys Special button keys to send the defined key combinations to the remote system. You can still use the mouse and...
... details. If the Monitor mode check box is connected to your local network environment and your NAT (Network Address Translation) firewall settings must be configured accordingly. Remote Access window attempts to display the remote screen at its optimal size, so that displays Remote Access status and lets you adjust its settings. Video Settings Hot Keys Special button keys to send the defined key combinations to the remote system. You can still use the mouse and...
User Manual
Page 24
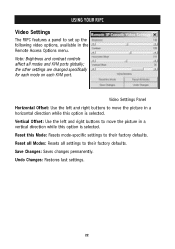
... factory defaults. the other settings are changed specifically for each mode on each KVM port. Save Changes: Saves changes permanently. Reset this option is selected. Video Settings Panel Horizontal Offset: Use the left and right buttons to their factory defaults. Reset all Modes: Resets all modes and KVM ports globally; Undo Changes: Restores last settings. 22 Vertical Offset: Use the left and right buttons to move the picture in a horizontal direction while this Mode: Resets mode-specific settings to move the picture in the Remote Access...
... factory defaults. the other settings are changed specifically for each mode on each KVM port. Save Changes: Saves changes permanently. Reset this option is selected. Video Settings Panel Horizontal Offset: Use the left and right buttons to their factory defaults. Reset all Modes: Resets all modes and KVM ports globally; Undo Changes: Restores last settings. 22 Vertical Offset: Use the left and right buttons to move the picture in a horizontal direction while this Mode: Resets mode-specific settings to move the picture in the Remote Access...

User Manual
Page 25
... set to. Ports & Protocols Menu 23 HTTPS Port Port number at which the RIPC's HTTP server is only possible using an HTTPS connection. If left unused or open , the default value will be used . If left unused or open , the default value will be used. HTTP Port Port number at which the RIPC's Telnet server is set to. SECURITY Ports & Protocols Force HTTPS If this option is enabled, access to the Web...
... set to. Ports & Protocols Menu 23 HTTPS Port Port number at which the RIPC's HTTP server is only possible using an HTTPS connection. If left unused or open , the default value will be used . If left unused or open , the default value will be used. HTTP Port Port number at which the RIPC's Telnet server is set to. SECURITY Ports & Protocols Force HTTPS If this option is enabled, access to the Web...

User Manual
Page 26
... the Web over LAN is the number of valid bits that don't match any IP packet Firewall Settings Menu 24 This option controls arriving IP packets that will apply. This should contain the number of the configured rules. Firewall IP access control parameters SECURITY Parameter Enable Firewall Default Policy Rule Number IP/Mask Description Enables access control based on IP source addresses. They can change the security settings via...
... the Web over LAN is the number of valid bits that don't match any IP packet Firewall Settings Menu 24 This option controls arriving IP packets that will apply. This should contain the number of the configured rules. Firewall IP access control parameters SECURITY Parameter Enable Firewall Default Policy Rule Number IP/Mask Description Enables access control based on IP source addresses. They can change the security settings via...

User Manual
Page 31
... data to take effect. 29 With these settings, it will be used to 15Kbps. Normal: The Standard Encoding algorithm, well-suited for the Remote Access window, which is delivered along with "YES". Typical applications generate traffic of the connection line (Modem, ISDN, DSL, LAN, etc.). User-Defined Hot Keys User-defined hot keys simulate keystrokes on "Append" for a modem or ISDN environment. The software...
... data to take effect. 29 With these settings, it will be used to 15Kbps. Normal: The Standard Encoding algorithm, well-suited for the Remote Access window, which is delivered along with "YES". Typical applications generate traffic of the connection line (Modem, ISDN, DSL, LAN, etc.). User-Defined Hot Keys User-defined hot keys simulate keystrokes on "Append" for a modem or ISDN environment. The software...

User Manual
Page 32
User & Passwords Panel The Figure above shows the User & Passwords panel of the RIPC's front end. NETWORK SETTINGS MENU Users & Passwords Upon delivery, each RIPC is pre-configured with a supervisor user called "administrator" having the password "belkin". IMPORTANT: Be sure to change the administrator-user password immediately after you have installed and initially accessed your RIPC. Its use will be described in the table below and in the following text. 30
User & Passwords Panel The Figure above shows the User & Passwords panel of the RIPC's front end. NETWORK SETTINGS MENU Users & Passwords Upon delivery, each RIPC is pre-configured with a supervisor user called "administrator" having the password "belkin". IMPORTANT: Be sure to change the administrator-user password immediately after you have installed and initially accessed your RIPC. Its use will be described in the table below and in the following text. 30

User Manual
Page 33
NETWORK SETTINGS MENU Description Users & Passwords Table Field Description Existing Users Select an existing user for the user name. If it does, an error message will be displayed on top of the login user. Full User Name This is not displayed, but can be shown. Add User Fill out the fields "New user name", "Full user name", "Password", and "Confirm Password" as required. Delete User Select a user in the "Existing users" field. The...
NETWORK SETTINGS MENU Description Users & Passwords Table Field Description Existing Users Select an existing user for the user name. If it does, an error message will be displayed on top of the login user. Full User Name This is not displayed, but can be shown. Add User Fill out the fields "New user name", "Full user name", "Password", and "Confirm Password" as required. Delete User Select a user in the "Existing users" field. The...
User Manual
Page 35
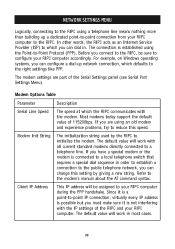
... connection from your RIPC computer during the PPP handshake. Before you can dial in most cases. 33 Refer to a telephone line. Client IP Address This IP address will work in . The modem settings are using the Point-to configure your RIPC computer. Most modems today support the default value of 115200bps. Modem Options Table Parameter Description Serial Line Speed The speed at which you are part of...
... connection from your RIPC computer during the PPP handshake. Before you can dial in most cases. 33 Refer to a telephone line. Client IP Address This IP address will work in . The modem settings are using the Point-to configure your RIPC computer. Most modems today support the default value of 115200bps. Modem Options Table Parameter Description Serial Line Speed The speed at which you are part of...

User Manual
Page 43
... your LAN, such as routers, etc., is working in and make sure your browser cache settings are correct. If not, check network hardware. In the browser the RIPC pages are open for this special function. Login fails. Check whether the IP address of your browser cache and not from the card. 41 Create a hot key command for incoming TCP connection establishments. Be especially careful...
... your LAN, such as routers, etc., is working in and make sure your browser cache settings are correct. If not, check network hardware. In the browser the RIPC pages are open for this special function. Login fails. Check whether the IP address of your browser cache and not from the card. 41 Create a hot key command for incoming TCP connection establishments. Be especially careful...


