
User Manual
Page 1
...Windows, Windows Vista, Microsoft, and IntelliMouse are registered trademarks of Apple Inc., registered in the United States and/or other countries. Mac OS and Mac are trademarks of respective manufacturers listed. P75209-C Boeing Avenue 333 1119 PH Schiphol-Rijk, The Netherlands +31 (0) 20 654 7300 +31 (0) 20 654 7349 fax Belkin Ltd. Belkin...NN10 6GL, United Kingdom +44 (0) 1933 35 2000 +44 (0) 1933 31 2000 fax © 2008 Belkin International, Inc. OmniView® Secure KVM Switch Belkin Tech Support US: 800-282-2355 310-898-1100, ext. 2263 UK: 0845 607 77 87 Australia: 1800 235 ...
...Windows, Windows Vista, Microsoft, and IntelliMouse are registered trademarks of Apple Inc., registered in the United States and/or other countries. Mac OS and Mac are trademarks of respective manufacturers listed. P75209-C Boeing Avenue 333 1119 PH Schiphol-Rijk, The Netherlands +31 (0) 20 654 7300 +31 (0) 20 654 7349 fax Belkin Ltd. Belkin...NN10 6GL, United Kingdom +44 (0) 1933 35 2000 +44 (0) 1933 31 2000 fax © 2008 Belkin International, Inc. OmniView® Secure KVM Switch Belkin Tech Support US: 800-282-2355 310-898-1100, ext. 2263 UK: 0845 607 77 87 Australia: 1800 235 ...
User Manual
Page 4
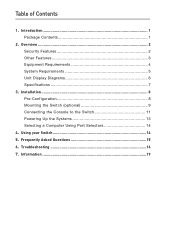
Using your Switch 14 5. Troubleshooting 16 7. Overview 2 Security Features 2 Other Features 3 Equipment Requirements 4 System Requirements 5 Unit Display Diagrams 6 Specifications 7 3. Frequently Asked Questions 15 6. Installation 8 Pre-Configuration 8 Mounting the Switch (optional 9 Connecting the Console to the Switch 11 Powering Up the Systems 13 Selecting a Computer Using Port Selectors 14 4. Introduction 1 Package Contents 1 2. Information 19 Table of Contents 1.
Using your Switch 14 5. Troubleshooting 16 7. Overview 2 Security Features 2 Other Features 3 Equipment Requirements 4 System Requirements 5 Unit Display Diagrams 6 Specifications 7 3. Frequently Asked Questions 15 6. Installation 8 Pre-Configuration 8 Mounting the Switch (optional 9 Connecting the Console to the Switch 11 Powering Up the Systems 13 Selecting a Computer Using Port Selectors 14 4. Introduction 1 Package Contents 1 2. Information 19 Table of Contents 1.

User Manual
Page 6
... of a problem. For quick and easy installation, please refer to the Quick Installation Guide included in your packaging. 5 We appreciate your new Switch, in addition to expert troubleshooting advice-in use worldwide. 6 Package Contents 7 OmniView Secure KVM Switch 5V DC, 3A Global Power Adapter 4 Interchangeable AC Plugs1 User Manual Quick Installation Guide 1 Includes AC plugs for the U.S., U.K., Europe, and Australia. If one of the Switch, to manage multiple computers from a single USB console, while...
... of a problem. For quick and easy installation, please refer to the Quick Installation Guide included in your packaging. 5 We appreciate your new Switch, in addition to expert troubleshooting advice-in use worldwide. 6 Package Contents 7 OmniView Secure KVM Switch 5V DC, 3A Global Power Adapter 4 Interchangeable AC Plugs1 User Manual Quick Installation Guide 1 Includes AC plugs for the U.S., U.K., Europe, and Australia. If one of the Switch, to manage multiple computers from a single USB console, while...

User Manual
Page 7
... listed by the National Information Assurance Partnership (NIAP). Overview Security Features • Dedicated Processors Designed specifically for secure environments, the Switch features a dedicated processor per computer port. This keeps each computer running on both sides of your data. The Switch does not include any features that is not reprogrammable, preventing the ability to tamper with the KVM...
... listed by the National Information Assurance Partnership (NIAP). Overview Security Features • Dedicated Processors Designed specifically for secure environments, the Switch features a dedicated processor per computer port. This keeps each computer running on both sides of your data. The Switch does not include any features that is not reprogrammable, preventing the ability to tamper with the KVM...

User Manual
Page 8
... for rack installation (Belkin part number F1D005). 3Includes AC plugs for both domestic and international installations.3 2The 2- section Overview Other Features 1 • USB Support The Switch is pushed, the LED above each port selector illuminates to indicate that provides stability and allows the Switch to be placed beneath your desktop or mounted to a standard 19-inch server rack for 1U installation.2 • Global Power Adapter The Switch includes a global power adapter...
... for rack installation (Belkin part number F1D005). 3Includes AC plugs for both domestic and international installations.3 2The 2- section Overview Other Features 1 • USB Support The Switch is pushed, the LED above each port selector illuminates to indicate that provides stability and allows the Switch to be placed beneath your desktop or mounted to a standard 19-inch server rack for 1U installation.2 • Global Power Adapter The Switch includes a global power adapter...

User Manual
Page 9
One Cable Kit is required per connected computer. Overview Equipment Requirements Cables Belkin highly recommends you use Belkin All-In-One USB KVM Cable Kits for your Switch to USB limitations, the USB-cable length cannot exceed 15 feet (4.6m). 4 F3X1962bXX All-In-One USB KVM Cable Kits: F3X1962b06 - 6 ft. (1.8m) F3X1962b10 - 10 ft. (3m) F3X1962b15 - 15 ft. (4.6m) Note: Due to help ensure superior performance. These cables offer the highest quality possible to ensure optimal data and video transmission.
One Cable Kit is required per connected computer. Overview Equipment Requirements Cables Belkin highly recommends you use Belkin All-In-One USB KVM Cable Kits for your Switch to USB limitations, the USB-cable length cannot exceed 15 feet (4.6m). 4 F3X1962bXX All-In-One USB KVM Cable Kits: F3X1962b06 - 6 ft. (1.8m) F3X1962b10 - 10 ft. (3m) F3X1962b15 - 15 ft. (4.6m) Note: Due to help ensure superior performance. These cables offer the highest quality possible to ensure optimal data and video transmission.

User Manual
Page 11
... appears disrupted, please call Belkin Technical Support at (800) 282-2355. 6 Overview Unit Display Diagrams Front View LED Indicators �� �� �� �� Port Selectors Back View Console USB Keyboard Port Console USB Mouse Port Console VGA Monitor Port Side View Computer VGA & USB Ports DC Power Jack Tamper-Evident Tape (F1DN104U model shown) IMPORTANT NOTICE: There should be disrupted, your Switch has not been opened or...
... appears disrupted, please call Belkin Technical Support at (800) 282-2355. 6 Overview Unit Display Diagrams Front View LED Indicators �� �� �� �� Port Selectors Back View Console USB Keyboard Port Console USB Mouse Port Console VGA Monitor Port Side View Computer VGA & USB Ports DC Power Jack Tamper-Evident Tape (F1DN104U model shown) IMPORTANT NOTICE: There should be disrupted, your Switch has not been opened or...

User Manual
Page 12
... imported parts 4The Switch includes a 5-volt, 3-Amp power adapter, but only requires a minimum of Users Supported: 1 5 No. of 2.5 Amps. 7 Overview section Specifications 1 Part No.: Enclosure: F1DN102U, F1DN104U, F1DN108U Metal enclosure with high-impact plastic faceplate 2 Power Requirements: 5V DC, 2.5A (minimum) power adapter with VGA support) 6 Resolution Support: Up to 1920x1440@75Hz Console Keyboard Input: USB Type A 7 Console Mouse Input: USB Type A Console Monitor Port: HDDB15 female (VGA) CPU Keyboard/Mouse Ports: USB Type B CPU Monitor Ports: HDDB15...
... imported parts 4The Switch includes a 5-volt, 3-Amp power adapter, but only requires a minimum of Users Supported: 1 5 No. of 2.5 Amps. 7 Overview section Specifications 1 Part No.: Enclosure: F1DN102U, F1DN104U, F1DN108U Metal enclosure with high-impact plastic faceplate 2 Power Requirements: 5V DC, 2.5A (minimum) power adapter with VGA support) 6 Resolution Support: Up to 1920x1440@75Hz Console Keyboard Input: USB Type A 7 Console Mouse Input: USB Type A Console Monitor Port: HDDB15 female (VGA) CPU Keyboard/Mouse Ports: USB Type B CPU Monitor Ports: HDDB15...

User Manual
Page 13
... location of your computers in relation to your console • the lengths of the Switch is available for desktop or rack-mount configuration. and 4-Port Switches. Installation Pre-Configuration Where to place the Switch: The enclosure of the cables you use with the 2- An optional Rack-Mount Kit (Belkin part number F1D005) is designed for use to connect your computers to a standard 19-inch server rack using the included rack-mount brackets and screws.
... location of your computers in relation to your console • the lengths of the Switch is available for desktop or rack-mount configuration. and 4-Port Switches. Installation Pre-Configuration Where to place the Switch: The enclosure of the cables you use with the 2- An optional Rack-Mount Kit (Belkin part number F1D005) is designed for use to connect your computers to a standard 19-inch server rack using the included rack-mount brackets and screws.
User Manual
Page 14
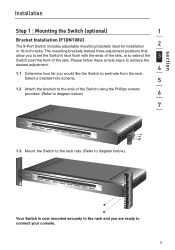
... set the Switch's face flush with the ends of the rails, or to extend the Switch past the front of the Switch using the Phillips screws provided. (Refer to diagram below .) Your Switch is now mounted securely to the rack and you would like the Switch to connect your console. 9 section Installation Step 1 Mounting the Switch (optional) 1 Bracket Installation (F1DN108U) The 8-Port Switch includes adjustable mounting brackets ideal for installation...
... set the Switch's face flush with the ends of the rails, or to extend the Switch past the front of the Switch using the Phillips screws provided. (Refer to diagram below .) Your Switch is now mounted securely to the rack and you would like the Switch to connect your console. 9 section Installation Step 1 Mounting the Switch (optional) 1 Bracket Installation (F1DN108U) The 8-Port Switch includes adjustable mounting brackets ideal for installation...

User Manual
Page 15
Installation Bracket Installation (F1DN102U and F1DN104U) The 2- and 4-Port Switches can be installed into a 19-inch rack using an optional Rack-Mount Kit, sold separately (Belkin part number F1D005). 1.1 Attach the Rack-Mount Bracket to the Switch using the Phillips screws provided. (Refer to diagram below.) 1.2 Mount the Switch to the rack rails. (Refer to diagram below.) Your Switch is now mounted securely to the rack and you are ready to connect your console. 10
Installation Bracket Installation (F1DN102U and F1DN104U) The 2- and 4-Port Switches can be installed into a 19-inch rack using an optional Rack-Mount Kit, sold separately (Belkin part number F1D005). 1.1 Attach the Rack-Mount Bracket to the Switch using the Phillips screws provided. (Refer to diagram below.) 1.2 Mount the Switch to the rack rails. (Refer to diagram below.) Your Switch is now mounted securely to the rack and you are ready to connect your console. 10

User Manual
Page 16
... "User Console" section. (Refer to the Switch or your 3 failure to the computers and/or the Switch. Before you connect your console to the Switch, make sure that your USB 4 keyboard and mouse work properly with all your computers (the Human Interface Device (HID) USB drivers are installed on all computers). 5 2.1 Connect your monitor VGA cable to the VGA port on the back of the Switch in the "User Console" section. (Refer...
... "User Console" section. (Refer to the Switch or your 3 failure to the computers and/or the Switch. Before you connect your console to the Switch, make sure that your USB 4 keyboard and mouse work properly with all your computers (the Human Interface Device (HID) USB drivers are installed on all computers). 5 2.1 Connect your monitor VGA cable to the VGA port on the back of the Switch in the "User Console" section. (Refer...

User Manual
Page 17
... a free USB port on your computer. Note: The Cable Kit must be connected directly to connect. Installation Step 3 Connecting Computers to the Switch (required) 3.1 Make sure all computers and the Switch are powered off. 3.2 Using the Belkin All-In-One USB KVM Cable Kit (F3X1962bXX), connect the male VGA connector to an available USB port on your computer, with no USB hubs or other devices in between. 12 Then connect the USB Type B connector...
... a free USB port on your computer. Note: The Cable Kit must be connected directly to connect. Installation Step 3 Connecting Computers to the Switch (required) 3.1 Make sure all computers and the Switch are powered off. 3.2 Using the Belkin All-In-One USB KVM Cable Kit (F3X1962bXX), connect the male VGA connector to an available USB port on your computer, with no USB hubs or other devices in between. 12 Then connect the USB Type B connector...

User Manual
Page 18
... Switch and automatically install the HID USB driver if necessary. Proceed to do this User Manual. 13 When you encounter an error, check your cable connections for that computer and reboot. All computers can be displayed on the monitor. If the problem persists, please refer to the Troubleshooting section in this with the Switch. 2 (Refer to diagram below.) 3 4 5 6 7 4.2 Power on simultaneously. Only use the power adapter supplied with all computers are working normally. Check...
... Switch and automatically install the HID USB driver if necessary. Proceed to do this User Manual. 13 When you encounter an error, check your cable connections for that computer and reboot. All computers can be displayed on the monitor. If the problem persists, please refer to the Troubleshooting section in this with the Switch. 2 (Refer to diagram below.) 3 4 5 6 7 4.2 Power on simultaneously. Only use the power adapter supplied with all computers are working normally. Check...

User Manual
Page 19
... that the default port at power-up is ready for your console and the new computer selected. Re-synchronization of a power failure or if the power is cycled, the Switch will illuminate to refresh after switching computers. Using your Switch Selecting a Computer Using Port Selectors Now that you have connected your computers. The Switch also prevents any data transfer between the console and the connected computers.5 Once...
... that the default port at power-up is ready for your console and the new computer selected. Re-synchronization of a power failure or if the power is cycled, the Switch will illuminate to refresh after switching computers. Using your Switch Selecting a Computer Using Port Selectors Now that you have connected your computers. The Switch also prevents any data transfer between the console and the connected computers.5 Once...

User Manual
Page 20
... configured for compatibility issues you may have to install software to use the Switch with a computer that the tamper-evident tape on the Switch has been removed or disrupted? 3 Please call Belkin Technical Support at (800) 282-2355 for USB support. Yes, the Switch requires a 5-volt DC, 2.5-Amp (minimum) power adapter in your computer due to USB-cable limitation. The Switch supports mice from your computers. The user can access...
... configured for compatibility issues you may have to install software to use the Switch with a computer that the tamper-evident tape on the Switch has been removed or disrupted? 3 Please call Belkin Technical Support at (800) 282-2355 for USB support. Yes, the Switch requires a 5-volt DC, 2.5-Amp (minimum) power adapter in your computer due to USB-cable limitation. The Switch supports mice from your computers. The user can access...

User Manual
Page 21
... you are using supports the resolution and refresh-rate setting on your computer. • Connect the monitor directly into the computer you are inserted properly. • Check that there is proper voltage available to the power adapter and that it is connected tightly between the Switch and the computer. Troubleshooting General Problem: My computer does not boot when connected to the Switch but works fine when I connect my...
... you are using supports the resolution and refresh-rate setting on your computer. • Connect the monitor directly into the computer you are inserted properly. • Check that there is proper voltage available to the power adapter and that it is connected tightly between the Switch and the computer. Troubleshooting General Problem: My computer does not boot when connected to the Switch but works fine when I connect my...

User Manual
Page 22
... the keyboard works when directly plugged into the computer (the HID USB driver is installed on the computer). 6 Rebooting may be necessary when trying this. • If you are using a PC keyboard on a Mac system, a few of the option keys on my keyboard are using keyboard software that the USB cable between the Switch and the computer is completely connected. 5 • Try connecting to regain...
... the keyboard works when directly plugged into the computer (the HID USB driver is installed on the computer). 6 Rebooting may be necessary when trying this. • If you are using a PC keyboard on a Mac system, a few of the option keys on my keyboard are using keyboard software that the USB cable between the Switch and the computer is completely connected. 5 • Try connecting to regain...

User Manual
Page 23
... USB port on the computer. • Make sure the mouse works when directly plugged into the computer (the HID USB driver is completely connected. • Try connecting to regain mouse function. • Try a different mouse. 18 Solution: • Check that the mouse you are using a mouse driver that the USB cable between the Switch and the computer is installed on the computer). Troubleshooting Mouse Problem: The...
... USB port on the computer. • Make sure the mouse works when directly plugged into the computer (the HID USB driver is completely connected. • Try connecting to regain mouse function. • Try a different mouse. 18 Solution: • Check that the mouse you are using a mouse driver that the USB cable between the Switch and the computer is installed on the computer). Troubleshooting Mouse Problem: The...

User Manual
Page 25
...repair facility and of such estimate shall be subrogated under any , of shipping the Belkin product to provide the following steps: 1. Contact Belkin International, Inc., at 501 W. The part number of original receipt. 2. THIS WARRANTY CONTAINS THE SOLE WARRANTY OF BELKIN. c. Some states do not allow limitations on how to forward...OR MULTIPLE DAMAGES SUCH AS, BUT NOT LIMITED TO, LOST BUSINESS OR PROFITS ARISING OUT OF THE SALE OR USE OF ANY BELKIN PRODUCT, EVEN IF ADVISED OF THE POSSIBILITY OF SUCH DAMAGES. To get service. This warranty gives you specific legal ...
...repair facility and of such estimate shall be subrogated under any , of shipping the Belkin product to provide the following steps: 1. Contact Belkin International, Inc., at 501 W. The part number of original receipt. 2. THIS WARRANTY CONTAINS THE SOLE WARRANTY OF BELKIN. c. Some states do not allow limitations on how to forward...OR MULTIPLE DAMAGES SUCH AS, BUT NOT LIMITED TO, LOST BUSINESS OR PROFITS ARISING OUT OF THE SALE OR USE OF ANY BELKIN PRODUCT, EVEN IF ADVISED OF THE POSSIBILITY OF SUCH DAMAGES. To get service. This warranty gives you specific legal ...


