User Manual
Page 3
... Requirements 4 System Requirements 6 Unit Display Diagrams 7 Specifications 8 3. Local Installation 11 Pre-Configuration 11 Mounting the Switch 13 Connecting the Console to the Switch 14 Connecting Servers to the Switch 16 Powering Up the Systems 22 Daisy-Chaining Multiple KVM Switches (Optional 23 4. Table of Contents 1. Introduction 1 Package Contents 1 2. Remote Installation 28 Identifying the IP Address 28 Logging into the Web Interface 29 Network Configuration 31 User Settings 33 Switch Configuration 36 Serial Settings 38 Security Settings 39 Maintenance 41
... Requirements 4 System Requirements 6 Unit Display Diagrams 7 Specifications 8 3. Local Installation 11 Pre-Configuration 11 Mounting the Switch 13 Connecting the Console to the Switch 14 Connecting Servers to the Switch 16 Powering Up the Systems 22 Daisy-Chaining Multiple KVM Switches (Optional 23 4. Table of Contents 1. Introduction 1 Package Contents 1 2. Remote Installation 28 Identifying the IP Address 28 Logging into the Web Interface 29 Network Configuration 31 User Settings 33 Switch Configuration 36 Serial Settings 38 Security Settings 39 Maintenance 41
User Manual
Page 5
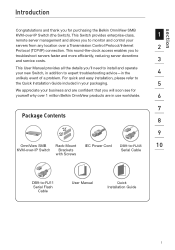
... purchasing the Belkin OmniView SMB KVM-over -IP Switch Brackets Serial Cable with Screws DB9-to-RJ11 Serial Flash Cable User Manual Quick Installation Guide 1 This round-the-clock access enables you to troubleshoot servers faster and more efficiently, reducing server downtime and service costs. 3 This User Manual provides all the details you to monitor and control your new Switch, in addition to expert troubleshooting advice-in use worldwide. 6 7 Package Contents 8 9 OmniView SMB Rack-Mount IEC Power Cord DB9...
... purchasing the Belkin OmniView SMB KVM-over -IP Switch Brackets Serial Cable with Screws DB9-to-RJ11 Serial Flash Cable User Manual Quick Installation Guide 1 This round-the-clock access enables you to troubleshoot servers faster and more efficiently, reducing server downtime and service costs. 3 This User Manual provides all the details you to monitor and control your new Switch, in addition to expert troubleshooting advice-in use worldwide. 6 7 Package Contents 8 9 OmniView SMB Rack-Mount IEC Power Cord DB9...
User Manual
Page 6
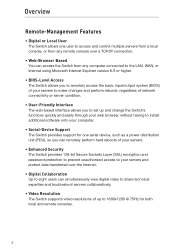
... version 6.0 or higher. • BIOS-Level Access The Switch allows you to remotely access the basic input/output system (BIOS) of your servers to make changes and perform reboots, regardless of network connectivity or server condition. • User-Friendly Interface The web-based interface allows you to set up and change the Switch's functions quickly and easily through your web browser, without having to install additional software onto your computer. • Serial-Device Support...
... version 6.0 or higher. • BIOS-Level Access The Switch allows you to remotely access the basic input/output system (BIOS) of your servers to make changes and perform reboots, regardless of network connectivity or server condition. • User-Friendly Interface The web-based interface allows you to set up and change the Switch's functions quickly and easily through your web browser, without having to install additional software onto your computer. • Serial-Device Support...
User Manual
Page 7
... Switch or when replacing cabling. 6 • KVM Expansion The Switch can be daisy-chained with the latest devices and hardware and are free for local users. section Overview Other Features 1 • CAT5 Technology Integrated CAT5 technology enables you to obtain the latest firmware updates for upgrade information and support. 3 Visit www.belkin.com for your servers to 100 feet (30m) away using standard CAT5 cabling and compact Server Interface Modules. These firmware updates...
... Switch or when replacing cabling. 6 • KVM Expansion The Switch can be daisy-chained with the latest devices and hardware and are free for local users. section Overview Other Features 1 • CAT5 Technology Integrated CAT5 technology enables you to obtain the latest firmware updates for upgrade information and support. 3 Visit www.belkin.com for your servers to 100 feet (30m) away using standard CAT5 cabling and compact Server Interface Modules. These firmware updates...
User Manual
Page 30
...-chain configuration. 26 Local Installation Getting Started: 1. Place the SMB KVM-over -IP Switch. 2. Using the Daisy-Chain Cable (F1D108-CBL-XX), connect one end of the next secondary KVM Switch (for additional KVM Switches you wish to add to the "Daisy-Chain" port on the SMB KVM-over -IP Switch and all servers and Switches are powered off and that each KVM Switch has been assigned a unique BANK address. 2. Make...
...-chain configuration. 26 Local Installation Getting Started: 1. Place the SMB KVM-over -IP Switch. 2. Using the Daisy-Chain Cable (F1D108-CBL-XX), connect one end of the next secondary KVM Switch (for additional KVM Switches you wish to add to the "Daisy-Chain" port on the SMB KVM-over -IP Switch and all servers and Switches are powered off and that each KVM Switch has been assigned a unique BANK address. 2. Make...
User Manual
Page 31
... "BANK +" and "BANK -" buttons. If all secondary 8 KVM Switches by connecting each unit's power supply. Power up the secondary KVM Switches sequentially, beginning with BANK 01, by scrolling through the BANKs using the "BANK +" and "BANK -" buttons. You should 4 display its BANK address. 3. Each KVM Switch should see the Switch 3 light up . 5 Note: If the secondary KVM Switches do not enumerate correctly, check that all KVM Switches have the 7 correct BANK...
... "BANK +" and "BANK -" buttons. If all secondary 8 KVM Switches by connecting each unit's power supply. Power up the secondary KVM Switches sequentially, beginning with BANK 01, by scrolling through the BANKs using the "BANK +" and "BANK -" buttons. You should 4 display its BANK address. 3. Each KVM Switch should see the Switch 3 light up . 5 Note: If the secondary KVM Switches do not enumerate correctly, check that all KVM Switches have the 7 correct BANK...
User Manual
Page 33
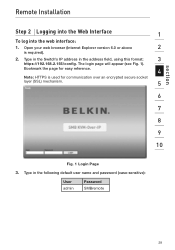
... (see Fig. 1). Open your web browser (Internet Explorer version 6.0 or above 2 is used for communication over an encrypted secure socket layer (SSL) mechanism. 5 6 7 8 9 10 Fig. 1 Login Page 3. Type in the Switch's IP address in the following default user name and password (case-sensitive): User admin Password SMBremote 29 section Remote Installation Step 2 Logging into the Web Interface 1 To log into the web interface: 1. Type in the address field, using this format: 3 https://192.168.2.155/config.
... (see Fig. 1). Open your web browser (Internet Explorer version 6.0 or above 2 is used for communication over an encrypted secure socket layer (SSL) mechanism. 5 6 7 8 9 10 Fig. 1 Login Page 3. Type in the Switch's IP address in the following default user name and password (case-sensitive): User admin Password SMBremote 29 section Remote Installation Step 2 Logging into the Web Interface 1 To log into the web interface: 1. Type in the address field, using this format: 3 https://192.168.2.155/config.
User Manual
Page 35
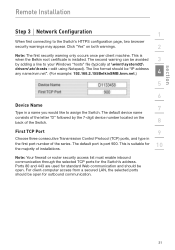
... address any name.kvm.net". (For example: 192.168.2.155BelkinSMB.kvm.net.) 4 5 6 Device Name 7 Type in 10 the first port number of the letter "D" followed by adding a line to your Windows "hosts" file (typically at \winnt\system32\ drivers\etc\hosts-edit using Notepad). For client-computer access from a secured LAN, the selected ports should be open . The default device name consists of the series. section Remote Installation Step 3 Network Configuration...
... address any name.kvm.net". (For example: 192.168.2.155BelkinSMB.kvm.net.) 4 5 6 Device Name 7 Type in 10 the first port number of the letter "D" followed by adding a line to your Windows "hosts" file (typically at \winnt\system32\ drivers\etc\hosts-edit using Notepad). For client-computer access from a secured LAN, the selected ports should be open . The default device name consists of the series. section Remote Installation Step 3 Network Configuration...
User Manual
Page 41
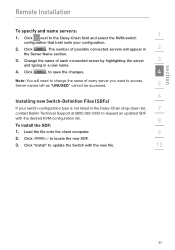
... and select the KVM-switch 1 configuration that best suits your switch-configuration type is not listed in a new name. 4. The number of every server you want to change the name of possible connected servers will need to access. Load the file onto the client computer. 9 2. Change the name of each connected server by highlighting the server 3 and typing in the Daisy-Chain drop-down list, 7 contact Belkin Technical Support at (800) 282...
... and select the KVM-switch 1 configuration that best suits your switch-configuration type is not listed in a new name. 4. The number of every server you want to change the name of possible connected servers will need to access. Load the file onto the client computer. 9 2. Change the name of each connected server by highlighting the server 3 and typing in the Daisy-Chain drop-down list, 7 contact Belkin Technical Support at (800) 282...
User Manual
Page 45
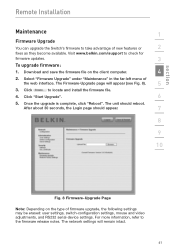
... Maintenance 1 Firmware Upgrade You can upgrade the Switch's firmware to locate and install the firmware file. 4. For more information, refer to check for firmware updates. 3 To upgrade firmware: 1. Select "Firmware Upgrade" under "Maintenance" in the far-left menu of firmware upgrade, the following settings may be erased: user settings, switch-configuration settings, mouse and video adjustments, and RS232 serial-device settings. Visit www.belkin.com/support to the firmware release notes. Download and save the firmware file on the type of the web interface.
... Maintenance 1 Firmware Upgrade You can upgrade the Switch's firmware to locate and install the firmware file. 4. For more information, refer to check for firmware updates. 3 To upgrade firmware: 1. Select "Firmware Upgrade" under "Maintenance" in the far-left menu of firmware upgrade, the following settings may be erased: user settings, switch-configuration settings, mouse and video adjustments, and RS232 serial-device settings. Visit www.belkin.com/support to the firmware release notes. Download and save the firmware file on the type of the web interface.
User Manual
Page 61
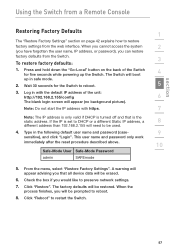
... the Switch to reboot. 5 3. Type in safe mode. 2. A warning will appear advising you would like to restart the Switch. 57 Wait 30 seconds for five seconds while powering up in the following default user name and password (case- 9 sensitive), and click "Login". The factory defaults will boot up the Switch. Click "Reboot" to preserve network settings. 7. Check the box if you that is the static address. section Using the Switch from a Remote Console Restoring Factory Defaults 1 The "Restore Factory Settings...
... the Switch to reboot. 5 3. Type in safe mode. 2. A warning will appear advising you would like to restart the Switch. 57 Wait 30 seconds for five seconds while powering up in the following default user name and password (case- 9 sensitive), and click "Login". The factory defaults will boot up the Switch. Click "Reboot" to preserve network settings. 7. Check the box if you that is the static address. section Using the Switch from a Remote Console Restoring Factory Defaults 1 The "Restore Factory Settings...
User Manual
Page 66
... "BANK -" buttons on the local console. The superimposed menu screen is powered up , you will need to reset the Switch to re-detect the server. This is connected and powered up . If you have only one Switch in your server, operating system, or software function. If the OSD menu does not display a "✹" symbol for remote access operation. Using the Switch from a Local Console On-Screen...
... "BANK -" buttons on the local console. The superimposed menu screen is powered up , you will need to reset the Switch to re-detect the server. This is connected and powered up . If you have only one Switch in your server, operating system, or software function. If the OSD menu does not display a "✹" symbol for remote access operation. Using the Switch from a Local Console On-Screen...
User Manual
Page 68
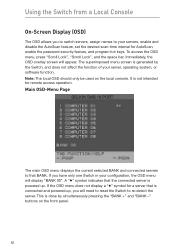
... save the password. Admin Password This allows you to specify the administrator password needed to all Server Interface Modules Change options for selected field Scan This specifies whether the AutoScan feature is enabled or not. Security This feature allows you will be accessing the remote session often. Scan Time This specifies the amount of time the Switch remains on a server before switching to prevent unauthorized users from a Local Console...
... save the password. Admin Password This allows you to specify the administrator password needed to all Server Interface Modules Change options for selected field Scan This specifies whether the AutoScan feature is enabled or not. Security This feature allows you will be accessing the remote session often. Scan Time This specifies the amount of time the Switch remains on a server before switching to prevent unauthorized users from a Local Console...
User Manual
Page 70
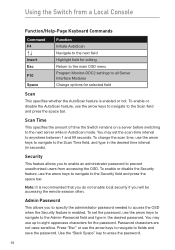
Using the Switch from a Local Console Hot-Key-Command Shortcuts Below is a complete list of hot-key commands that can be used for your Switch: Command Scroll Lock, ...port Switch to PREVIOUS BANK (By default, selects first active port on the BANK) Switch to NEXT BANK (By default, selects first active port on the BANK) Directly switches to PORT Y on BANK 00 (single-switch configuration) (Y=01 to 16) Directly switches to PORT Y on BANK X (daisy-chain configuration) (X=00 to 15), (Y=01 to 16) Monitor DDC2 (identifies monitor settings) Activate OSD Enable AutoScan mode (refer to AutoScan button...
Using the Switch from a Local Console Hot-Key-Command Shortcuts Below is a complete list of hot-key commands that can be used for your Switch: Command Scroll Lock, ...port Switch to PREVIOUS BANK (By default, selects first active port on the BANK) Switch to NEXT BANK (By default, selects first active port on the BANK) Directly switches to PORT Y on BANK 00 (single-switch configuration) (Y=01 to 16) Directly switches to PORT Y on BANK X (daisy-chain configuration) (X=00 to 15), (Y=01 to 16) Monitor DDC2 (identifies monitor settings) Activate OSD Enable AutoScan mode (refer to AutoScan button...
User Manual
Page 72
... firmware, download the appropriate firmware file and utility from a Local Console Updating Firmware The Switch features flash-upgradeable firmware to ensure compatibility with your Switch, as reconfiguring software may lead to unexpected operational problems. Please contact Belkin Technical Support if you need assistance. 68 The utility will guide you through the process of your Switch. Firmware upgrades are experiencing mouse and keyboard problems with the latest devices and servers. Using the Switch from www.belkin.com/support...
... firmware, download the appropriate firmware file and utility from a Local Console Updating Firmware The Switch features flash-upgradeable firmware to ensure compatibility with your Switch, as reconfiguring software may lead to unexpected operational problems. Please contact Belkin Technical Support if you need assistance. 68 The utility will guide you through the process of your Switch. Firmware upgrades are experiencing mouse and keyboard problems with the latest devices and servers. Using the Switch from www.belkin.com/support...
User Manual
Page 73
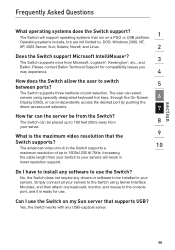
... direct-access port selectors. 7 How far can be from your server. Novell; The user can select servers using Server Interface Modules, and then attach one keyboard, monitor, and mouse to the console port, and it is the maximum video resolution that run on my Sun server that supports USB? Windows 2000, NT, XP, 2003 Server; Solaris; and Linux. 2 Does the Switch support Microsoft IntelliMouse®? 3 The Switch supports mice from 8 your Switch...
... direct-access port selectors. 7 How far can be from your server. Novell; The user can select servers using Server Interface Modules, and then attach one keyboard, monitor, and mouse to the console port, and it is the maximum video resolution that run on my Sun server that supports USB? Windows 2000, NT, XP, 2003 Server; Solaris; and Linux. 2 Does the Switch support Microsoft IntelliMouse®? 3 The Switch supports mice from 8 your Switch...
User Manual
Page 76
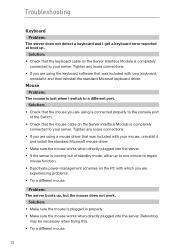
... connected properly to the console port of standby mode, allow up to one minute to regain mouse function. • Deactivate power-management schemes on the Server Interface Module is plugged in properly. • Make sure the mouse works when directly plugged into the server. • If the server is lost when I get a keyboard error reported at boot up , but the mouse does not work. Troubleshooting Keyboard Problem: The server...
... connected properly to the console port of standby mode, allow up to one minute to regain mouse function. • Deactivate power-management schemes on the Server Interface Module is plugged in properly. • Make sure the mouse works when directly plugged into the server. • If the server is lost when I get a keyboard error reported at boot up , but the mouse does not work. Troubleshooting Keyboard Problem: The server...
User Manual
Page 78
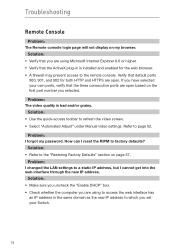
... web interface through the new IP address. Troubleshooting Remote Console Problem: The Remote console login page will not display on the first port number you selected. Refer to factory defaults? Problem: The video quality is installed and enabled for both HTTP and HTTPS are using Microsoft Internet Explorer 6.0 or higher. • Verify that the ActiveX plug-in the same domain as the new IP address to a static IP address, but I changed the LAN settings...
... web interface through the new IP address. Troubleshooting Remote Console Problem: The Remote console login page will not display on the first port number you selected. Refer to factory defaults? Problem: The video quality is installed and enabled for both HTTP and HTTPS are using Microsoft Internet Explorer 6.0 or higher. • Verify that the ActiveX plug-in the same domain as the new IP address to a static IP address, but I changed the LAN settings...
User Manual
Page 79
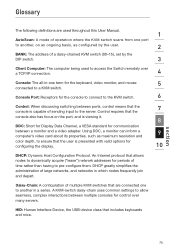
... ensure that the user is viewing it. 8 DDC: Short for Display Data Channel, a VESA standard for configuring the display. 10 DHCP: Dynamic Host Configuration Protocol. DHCP greatly simplifies the administration of time rather than having to pre-configure them. An Internet protocol that allows nodes to dynamically acquire ("lease") network addresses for the console to connect to the KVM switch. 6 Control: When discussing switching between ports, control means that the...
... ensure that the user is viewing it. 8 DDC: Short for Display Data Channel, a VESA standard for configuring the display. 10 DHCP: Dynamic Host Configuration Protocol. DHCP greatly simplifies the administration of time rather than having to pre-configure them. An Internet protocol that allows nodes to dynamically acquire ("lease") network addresses for the console to connect to the KVM switch. 6 Control: When discussing switching between ports, control means that the...
User Manual
Page 80
... be used to control and configure the KVM switch. SSL: Secure Sockets Layer. Shorthand for such things as audio speakers, microphones, and printers. some switches that allows a user to access and control multiple servers from a local or remote console. 76 MAC: Media Access Control. In computer networking, a MAC address is set to communicate over the Internet. Target Server: The server currently being accessed and controlled by one console port and multiple server ports. It has at least one keyboard, video monitor...
... be used to control and configure the KVM switch. SSL: Secure Sockets Layer. Shorthand for such things as audio speakers, microphones, and printers. some switches that allows a user to access and control multiple servers from a local or remote console. 76 MAC: Media Access Control. In computer networking, a MAC address is set to communicate over the Internet. Target Server: The server currently being accessed and controlled by one console port and multiple server ports. It has at least one keyboard, video monitor...


