User Manual
Page 2
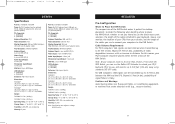
...; Attachable Base • DB25 to delivering high-quality, durable products at a competitive price. This compact, affordable Belkin OmniView KVM Switch is backed by a Belkin Five-Year Warranty and free technical support. For easy installation, please refer to troubleshooting-in a variety of capacities ... Your KVM Switch Powering Up the Systems 21 Selecting a Computer Using Direct-Access Port Selectors 21 Selecting a Computer Using Keyboard Hot Key Commands 21 AutoScan Mode 22 Belkin KVM Switches and Accessories OmniView KVM Switches 23 OmniView KVM Cables 25 OmniView Accessories ...
...; Attachable Base • DB25 to delivering high-quality, durable products at a competitive price. This compact, affordable Belkin OmniView KVM Switch is backed by a Belkin Five-Year Warranty and free technical support. For easy installation, please refer to troubleshooting-in a variety of capacities ... Your KVM Switch Powering Up the Systems 21 Selecting a Computer Using Direct-Access Port Selectors 21 Selecting a Computer Using Keyboard Hot Key Commands 21 AutoScan Mode 22 Belkin KVM Switches and Accessories OmniView KVM Switches 23 OmniView KVM Cables 25 OmniView Accessories ...
User Manual
Page 3
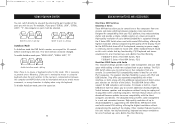
... status monitoring. Firmware upgrades are conveniently maintained through the back opening. Call Belkin Tech Support at high resolutions, 75-Ohm coaxial VGA cabling is added to the direct-access port selector selected. 2 3 When pushed, the LED should light next to ...the face of multimedia use in cable management to your KVM Switch, when necessary. AutoScan The AutoScan feature allows you have been connected and the shroud slid into place, the cables are free for both USB and PS/2 computers (F1DS102T...
... status monitoring. Firmware upgrades are conveniently maintained through the back opening. Call Belkin Tech Support at high resolutions, 75-Ohm coaxial VGA cabling is added to the direct-access port selector selected. 2 3 When pushed, the LED should light next to ...the face of multimedia use in cable management to your KVM Switch, when necessary. AutoScan The AutoScan feature allows you have been connected and the shroud slid into place, the cables are free for both USB and PS/2 computers (F1DS102T...
User Manual
Page 5
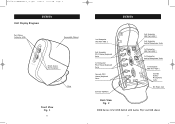
... 5:17 PM Page 6 OVERVIEW Unit Display Diagrams Port Status Indicator LEDs Removable Shroud Direct-Access Port Selectors Base Front View Fig. 1 6 OVERVIEW 2nd Computer VGA Port-VGA 2 2nd Computer PS/2 Mouse/Keyboard Ports 1st Computer PS/2 Mouse/Keyboard Ports Console PS/2 Mouse/Keyboard Ports Console VGA Port 2nd Computer USB Port-USB 2 2nd Computer Audio/Microphone Jacks 1st...
... 5:17 PM Page 6 OVERVIEW Unit Display Diagrams Port Status Indicator LEDs Removable Shroud Direct-Access Port Selectors Base Front View Fig. 1 6 OVERVIEW 2nd Computer VGA Port-VGA 2 2nd Computer PS/2 Mouse/Keyboard Ports 1st Computer PS/2 Mouse/Keyboard Ports Console PS/2 Mouse/Keyboard Ports Console VGA Port 2nd Computer USB Port-USB 2 2nd Computer Audio/Microphone Jacks 1st...
User Manual
Page 6
...F1DS102T) 4 (F1DS104T) Keyboard Emulation: USB and PS/2 Mouse Emulation: USB and PS/2 Monitor Supported: VGA and SVGA MultiSync, LCD (with an increase in distance. Consider the following when deciding where to place the KVM Switch: whether or not you use the Belkin... miniDIN (PS/2) Mouse Input: 6-pin miniDIN (PS/2) Audio Input/Output: 3.5mm jack Microphone Input/Output: 3.5mm jack VGA Port: 15-pin HDDB type LED Indicators: 2 (F1DS102T) 4 (F1DS104T) Enclosure: High-impact plastic Dimensions: F1DS102T (H) 6.75 x (W) 4.25 x (D) 7.75 inches (H) 17.2 x (W) 10.8 x (D) 19.7 centimeters F1DS104T (H) ...
...F1DS102T) 4 (F1DS104T) Keyboard Emulation: USB and PS/2 Mouse Emulation: USB and PS/2 Monitor Supported: VGA and SVGA MultiSync, LCD (with an increase in distance. Consider the following when deciding where to place the KVM Switch: whether or not you use the Belkin... miniDIN (PS/2) Mouse Input: 6-pin miniDIN (PS/2) Audio Input/Output: 3.5mm jack Microphone Input/Output: 3.5mm jack VGA Port: 15-pin HDDB type LED Indicators: 2 (F1DS102T) 4 (F1DS104T) Enclosure: High-impact plastic Dimensions: F1DS102T (H) 6.75 x (W) 4.25 x (D) 7.75 inches (H) 17.2 x (W) 10.8 x (D) 19.7 centimeters F1DS104T (H) ...

User Manual
Page 7
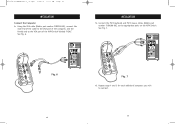
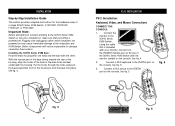
Belkin Corporation will not be responsible for the hardware setup of a single KVM Switch. (F1DS102P, F1DS104P, F1DS102T, or F1DS104T) Important Note: Before attempting to connect anything to the KVM Switch or into place. Put the hooks through the holes and ... Keyboard, Video, and Mouse Connections Connect the Console 1. See Fig. 5. Using the cable that everything is powered off. Connect a PS/2 keyboard to the green port in the "Console" section of the base to the computers and KVM Switch. Fig. 4 Fig. 3 10 Fig. 5 11 Plugging and unplugging cables while computers...
Belkin Corporation will not be responsible for the hardware setup of a single KVM Switch. (F1DS102P, F1DS104P, F1DS102T, or F1DS104T) Important Note: Before attempting to connect anything to the KVM Switch or into place. Put the hooks through the holes and ... Keyboard, Video, and Mouse Connections Connect the Console 1. See Fig. 5. Using the cable that everything is powered off. Connect a PS/2 keyboard to the green port in the "Console" section of the base to the computers and KVM Switch. Fig. 4 Fig. 3 10 Fig. 5 11 Plugging and unplugging cables while computers...
User Manual
Page 8
See Fig. 6. See Fig. 7. P73778-C-SOHO-man-9_02.qxd 9/18/02 5:17 PM Page 12 INSTALLATION Connect the Computer 4. Fig. 6 12 Fig. 7 6. Repeat steps 4 and 5 for each additional computer you wish to the VGA port of the computer, and the female end to connect. 13 Using the VGA cable (Belkin part number F1D9100-XX), connect the male end of the cable to the VGA port of the KVM Switch labeled "VGA1". INSTALLATION 5. Connect the PS/2 keyboard and PS/2 mouse cables (Belkin part number F1D9100-XX), to the appropriate ports on the KVM Switch.
See Fig. 6. See Fig. 7. P73778-C-SOHO-man-9_02.qxd 9/18/02 5:17 PM Page 12 INSTALLATION Connect the Computer 4. Fig. 6 12 Fig. 7 6. Repeat steps 4 and 5 for each additional computer you wish to the VGA port of the computer, and the female end to connect. 13 Using the VGA cable (Belkin part number F1D9100-XX), connect the male end of the cable to the VGA port of the KVM Switch labeled "VGA1". INSTALLATION 5. Connect the PS/2 keyboard and PS/2 mouse cables (Belkin part number F1D9100-XX), to the appropriate ports on the KVM Switch.

User Manual
Page 10
... Mouse Connections Available on your monitor, connect it to verify that is enabled. Please reference your computer manufacturer's manual or motherboard manual to the VGA port in the "Console" section of the KVM Switch. Fig. 10 16 Fig. 11 3. See Fig. 11. 4. Using the cable that USB... support is included with your system BIOS. Connect the Console 1. Power on your computer as you must enable USB support on F1DS102T and F1DS104T models only Note: On some computers, you would normally and wait until your operating system completes loading. Connect a PS/2 mouse to...
... Mouse Connections Available on your monitor, connect it to verify that is enabled. Please reference your computer manufacturer's manual or motherboard manual to the VGA port in the "Console" section of the KVM Switch. Fig. 10 16 Fig. 11 3. See Fig. 11. 4. Using the cable that USB... support is included with your system BIOS. Connect the Console 1. Power on your computer as you must enable USB support on F1DS102T and F1DS104T models only Note: On some computers, you would normally and wait until your operating system completes loading. Connect a PS/2 mouse to...

User Manual
Page 11
...SOHO Series with Audio are included with Belkin part number F1D9101-XX. Fig. 12 18 Fig. 13 8. Using a standard USB A to B cable (we recommend Belkin part number F1D9101-XX), insert the end with the A-type connector to an available port on your computer. INSTALLATION Audio and ...Microphone Connections Recommended Belkin OmniView KVM Cables for use of your microphone, connect the male 3.5mm plug...
...SOHO Series with Audio are included with Belkin part number F1D9101-XX. Fig. 12 18 Fig. 13 8. Using a standard USB A to B cable (we recommend Belkin part number F1D9101-XX), insert the end with the A-type connector to an available port on your computer. INSTALLATION Audio and ...Microphone Connections Recommended Belkin OmniView KVM Cables for use of your microphone, connect the male 3.5mm plug...
User Manual
Page 12
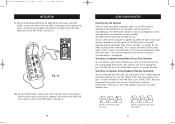
...-man-9_02.qxd 9/18/02 5:17 PM Page 20 INSTALLATION 9. All computers can directly select which computer to operate by pressing the corresponding direct-access port selector next to the pink mic jack of the KVM Switch. Your KVM Switch should now be pressed twice within two seconds. This is normal... operation and ensures that takes place. Selecting a Computer Using Keyboard Hot Key Commands You can press the up/down arrow keys to switch ports with Audio (the KVM Cable), connect one end of the pink male 3.5mm plug to the mic jack of the KVM Switch or through keyboard...
...-man-9_02.qxd 9/18/02 5:17 PM Page 20 INSTALLATION 9. All computers can directly select which computer to operate by pressing the corresponding direct-access port selector next to the pink mic jack of the KVM Switch. Your KVM Switch should now be pressed twice within two seconds. This is normal... operation and ensures that takes place. Selecting a Computer Using Keyboard Hot Key Commands You can press the up/down arrow keys to switch ports with Audio (the KVM Cable), connect one end of the pink male 3.5mm plug to the mic jack of the KVM Switch or through keyboard...
User Manual
Page 13
... error-free boot up to 2048x1536@85Hz is necessary and less cables to hassle with. The designed enclosure offers cable management in , 2-port USB device hub that allows you to control two or four computers from one console. keyboard and mouse emulations for use . PS/2... VGA cabling, offering the highest resolution without compromising the quality of the display. High-quality resolution of up ; and a Belkin Two-Year Warranty. F1DB102P E Series 2-Port KVM Switch, PS/2 F1DB104P E Series 4-Port KVM Switch, PS/2 OmniView SOHO Series with the latest computers and devices.
... error-free boot up to 2048x1536@85Hz is necessary and less cables to hassle with. The designed enclosure offers cable management in , 2-port USB device hub that allows you to control two or four computers from one console. keyboard and mouse emulations for use . PS/2... VGA cabling, offering the highest resolution without compromising the quality of the display. High-quality resolution of up ; and a Belkin Two-Year Warranty. F1DB102P E Series 2-Port KVM Switch, PS/2 F1DB104P E Series 4-Port KVM Switch, PS/2 OmniView SOHO Series with the latest computers and devices.
User Manual
Page 14
... installation of up to set up to name and select attached servers using hot key commands or direct-access port selectors. Video resolutions of a Belkin OmniView KVM Switch. The PRO2 Series uses standard cables for easy installation; On-Screen Display allows you with ... PM Page 24 BELKIN KVM SWITCHES AND ACCESSORIES F1DS102P SOHO Series 2-Port KVM Switch with Audio, PS/2 F1DS104P SOHO Series 4-Port KVM Switch with Audio, PS/2 F1DS102U SOHO Series 2-Port KVM Switch with Audio, USB F1DS104U SOHO Series 4-Port KVM Switch with Audio, USB F1DS102T SOHO Series 2-Port KVM Switch with...
... installation of up to set up to name and select attached servers using hot key commands or direct-access port selectors. Video resolutions of a Belkin OmniView KVM Switch. The PRO2 Series uses standard cables for easy installation; On-Screen Display allows you with ... PM Page 24 BELKIN KVM SWITCHES AND ACCESSORIES F1DS102P SOHO Series 2-Port KVM Switch with Audio, PS/2 F1DS104P SOHO Series 4-Port KVM Switch with Audio, PS/2 F1DS102U SOHO Series 2-Port KVM Switch with Audio, USB F1DS104U SOHO Series 4-Port KVM Switch with Audio, USB F1DS102T SOHO Series 2-Port KVM Switch with...
User Manual
Page 16
... standard CAT5 UTP cable. F1D084 - The OmniView 2-Port Reverse KVM Switch gives two users central control of distance between ports? Internet-upgrade capability ensures that runs on a PS/2 and USB platform. A: When using the appropriate adapters (Belkin OmniView PS/2 Sun Adapter-F1D082 and OmniView PS/2 ... F5U119 - Q: Does the KVM Switch support Microsoft IntelliMouse®? Q: How far can update your KVM solution. F1D087 - F1DR200 - The Belkin PS/2-to-USB Adapter converts PS/2 keyboard and mouse signals to switch between your PS/2 keyboard, PS/2 mouse, and monitor up to 250 ...
... standard CAT5 UTP cable. F1D084 - The OmniView 2-Port Reverse KVM Switch gives two users central control of distance between ports? Internet-upgrade capability ensures that runs on a PS/2 and USB platform. A: When using the appropriate adapters (Belkin OmniView PS/2 Sun Adapter-F1D082 and OmniView PS/2 ... F5U119 - Q: Does the KVM Switch support Microsoft IntelliMouse®? Q: How far can update your KVM solution. F1D087 - F1DR200 - The Belkin PS/2-to-USB Adapter converts PS/2 keyboard and mouse signals to switch between your PS/2 keyboard, PS/2 mouse, and monitor up to 250 ...
User Manual
Page 17
...Series KVM Switch? a space-saving desktop design; Q: What are the benefits of 2048x1536@85Hz. and small-office user who depend on the same port? A: The advanced video circuit in your computer. A: The KVM Switch supports 400MHz of the optional AC power adapter since power cannot be used ...Natural® Keyboard PRO, and Logitech keyboards with a five-year limited warranty. 31 Q: Can I use the USB SOHO Series KVM Switch on the F1DS102T and F1DS104T only). Q: How long is the warranty for the home- A: The SOHO Series KVM Switch is perfect for the KVM Switch? Q: What ...
...Series KVM Switch? a space-saving desktop design; Q: What are the benefits of 2048x1536@85Hz. and small-office user who depend on the same port? A: The advanced video circuit in your computer. A: The KVM Switch supports 400MHz of the optional AC power adapter since power cannot be used ...Natural® Keyboard PRO, and Logitech keyboards with a five-year limited warranty. 31 Q: Can I use the USB SOHO Series KVM Switch on the F1DS102T and F1DS104T only). Q: How long is the warranty for the home- A: The SOHO Series KVM Switch is perfect for the KVM Switch? Q: What ...
User Manual
Page 18
... mouse connection between the KVM Switch and PC, you will need to purchase the optional 9V DC, 600mA power adapter (F1D065-PWR for the appropriate port. • If you are having trouble with to see if the problem still appears. MOUSE Mouse is lost when I switch to a different channel. ...the PC that you are experiencing problems with. • Try swapping the mouse with a different one . • Try connecting the computer to a different port. • If you are using the keyboard software that was included with your keyboard, uninstall it and install the standard Microsoft keyboard driver.
... mouse connection between the KVM Switch and PC, you will need to purchase the optional 9V DC, 600mA power adapter (F1D065-PWR for the appropriate port. • If you are having trouble with to see if the problem still appears. MOUSE Mouse is lost when I switch to a different channel. ...the PC that you are experiencing problems with. • Try swapping the mouse with a different one . • Try connecting the computer to a different port. • If you are using the keyboard software that was included with your keyboard, uninstall it and install the standard Microsoft keyboard driver.
User Manual
Page 19
...appropriate connector. • Check that they are using are not crossed. Rebooting may be necessary when trying this. • Try a different mouse. USB - (F1DS102T, F1DS104T) only I use a Mac computer. • Because you do not have any sound from the front of the KVM Switch for a standard PS/2 ...35 All major keys will function as labeled. AUDIO AND MICROPHONE I have connected the speakers to the KVM Switch and I switch from one port to it is plugged in again. 34 TROUBLESHOOTING GENERAL My computer does not boot when connected to the KVM Switch and works fine when I...
...appropriate connector. • Check that they are using are not crossed. Rebooting may be necessary when trying this. • Try a different mouse. USB - (F1DS102T, F1DS104T) only I use a Mac computer. • Because you do not have any sound from the front of the KVM Switch for a standard PS/2 ...35 All major keys will function as labeled. AUDIO AND MICROPHONE I have connected the speakers to the KVM Switch and I switch from one port to it is plugged in again. 34 TROUBLESHOOTING GENERAL My computer does not boot when connected to the KVM Switch and works fine when I...
KVM SOHO Series (P/T versions) Manual
Page 3
...and 22. Once the cables have purchased supports either PS/2 output for computers (F1DS102P or F1DS104P), or both USB and PS/2 computers (F1DS102T or F1DS104T). A lit LED indicates which KVM you have purchased, and consult your KVM Switch one by one keyboard, monitor, and ... with the latest devices and computers. When pushed, the LED should light next to contain connected cables. Visit belkin.com for easy status monitoring. The corresponding port selection button is required. 2 OVERVIEW Flash Upgrade: Flash upgradeability allows you to obtain the latest firmware upgrades for...
...and 22. Once the cables have purchased supports either PS/2 output for computers (F1DS102P or F1DS104P), or both USB and PS/2 computers (F1DS102T or F1DS104T). A lit LED indicates which KVM you have purchased, and consult your KVM Switch one by one keyboard, monitor, and ... with the latest devices and computers. When pushed, the LED should light next to contain connected cables. Visit belkin.com for easy status monitoring. The corresponding port selection button is required. 2 OVERVIEW Flash Upgrade: Flash upgradeability allows you to obtain the latest firmware upgrades for...
KVM SOHO Series (P/T versions) Manual
Page 5
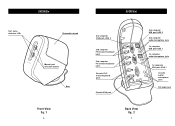
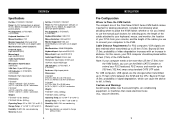
OVERVIEW Port status indicator LEDs Removable shroud Manual port selection buttons Base Front View fig. 1 6 OVERVIEW 2nd computer VGA port-VGA 2 2nd computer PS/2 mouse/keyboard ports 2nd computer PS/2 mouse/keyboard ports Console PS/2 mouse/keyboard ports Console VGA port 2nd computer USB port-USB 2 2nd computer audio/microphone jacks 1st computer USB port-USB 1 1st computer audio/microphone jacks 1st computer VGA port-VGA 1 Console audio/ microphone jacks DC power jack Back View fig. 2 7
OVERVIEW Port status indicator LEDs Removable shroud Manual port selection buttons Base Front View fig. 1 6 OVERVIEW 2nd computer VGA port-VGA 2 2nd computer PS/2 mouse/keyboard ports 2nd computer PS/2 mouse/keyboard ports Console PS/2 mouse/keyboard ports Console VGA port 2nd computer USB port-USB 2 2nd computer audio/microphone jacks 1st computer USB port-USB 1 1st computer audio/microphone jacks 1st computer VGA port-VGA 1 Console audio/ microphone jacks DC power jack Back View fig. 2 7
KVM SOHO Series (P/T versions) Manual
Page 6
... Keyboard Input: 6-pin miniDIN (PS/2) Mouse Input: 6-pin miniDIN (PS/2) Audio Input/Output: 3.5mm jack Microphone Input/Output: 3.5mm jack VGA Port: 15-pin HDDB type LED Indicators: 2 (F1DS102T), 4 (F1DS104T) Enclosure: High-impact plastic Dimensions: F1DS102T (H)6.75 x (W)4.25 x (D)7.75 inches (H)17.2 x (W)10.8 x (D)19.7 centimeters F1DS104T (H)7.75 x (W)4.75 x (D)9.5 inches (H)19.7 x ... 8 INSTALLATION Pre-Configuration Where to Place the KVM Switch: The compact size of video degradation increases with use the Belkin CAT5 Extender to 500 feet (152.4m) away using standard CAT5 UTP cable.
... Keyboard Input: 6-pin miniDIN (PS/2) Mouse Input: 6-pin miniDIN (PS/2) Audio Input/Output: 3.5mm jack Microphone Input/Output: 3.5mm jack VGA Port: 15-pin HDDB type LED Indicators: 2 (F1DS102T), 4 (F1DS104T) Enclosure: High-impact plastic Dimensions: F1DS102T (H)6.75 x (W)4.25 x (D)7.75 inches (H)17.2 x (W)10.8 x (D)19.7 centimeters F1DS104T (H)7.75 x (W)4.75 x (D)9.5 inches (H)19.7 x ... 8 INSTALLATION Pre-Configuration Where to Place the KVM Switch: The compact size of video degradation increases with use the Belkin CAT5 Extender to 500 feet (152.4m) away using standard CAT5 UTP cable.
KVM SOHO Series (P/T versions) Manual
Page 7
.... 5 fig. 4 fig. 3 10 fig. 5 11 Connect the monitor to the HDDB15 female port on the top of the SOHO Series KVM Switch with the other. Installing the SOHO Series KVM Base...to the SOHO Series KVM Switch. See fig. 3. See fig. 4. 2. See fig. 5. 3. Belkin Components will not be responsible for damage caused by -Step Installation Guide This section provides complete instructions for the... hardware setup of a single SOHO Series KVM Switch. (F1DS102P, F1DS104P, F1DS102T, or F1DS104T) Important Note: Before attempting to connect anything to the SOHO Series KVM Switch or into...
.... 5 fig. 4 fig. 3 10 fig. 5 11 Connect the monitor to the HDDB15 female port on the top of the SOHO Series KVM Switch with the other. Installing the SOHO Series KVM Base...to the SOHO Series KVM Switch. See fig. 3. See fig. 4. 2. See fig. 5. 3. Belkin Components will not be responsible for damage caused by -Step Installation Guide This section provides complete instructions for the... hardware setup of a single SOHO Series KVM Switch. (F1DS102P, F1DS104P, F1DS102T, or F1DS104T) Important Note: Before attempting to connect anything to the SOHO Series KVM Switch or into...

KVM SOHO Series (P/T versions) Manual
Page 8
... additional computer you wish to the top of the cable to the VGA port to the computer, and the female end on the section labeled CPU1. (Belkin Part# F3X1105-XX, F3X1835-XX, or F2N036-XX). Using the VGA cable (Belkin Part# F3X1105-XX, F3X1835-XX or F2N209-XX), connect the male end of...: 4. Connect the PS/2 keyboard and PS/2 mouse cables to the SOHO Series KVM Switch. See fig. 7. Connect the first computer's VGA cable to the appropriate ports on the VGA port to connect. 13 12
... additional computer you wish to the top of the cable to the VGA port to the computer, and the female end on the section labeled CPU1. (Belkin Part# F3X1105-XX, F3X1835-XX, or F2N036-XX). Using the VGA cable (Belkin Part# F3X1105-XX, F3X1835-XX or F2N209-XX), connect the male end of...: 4. Connect the PS/2 keyboard and PS/2 mouse cables to the SOHO Series KVM Switch. See fig. 7. Connect the first computer's VGA cable to the appropriate ports on the VGA port to connect. 13 12

